DROPS Delight
DROPS Delight
75% Wool, 25% Polyamide
Discontinued
find alternatives
DROPS SS24

Spectre

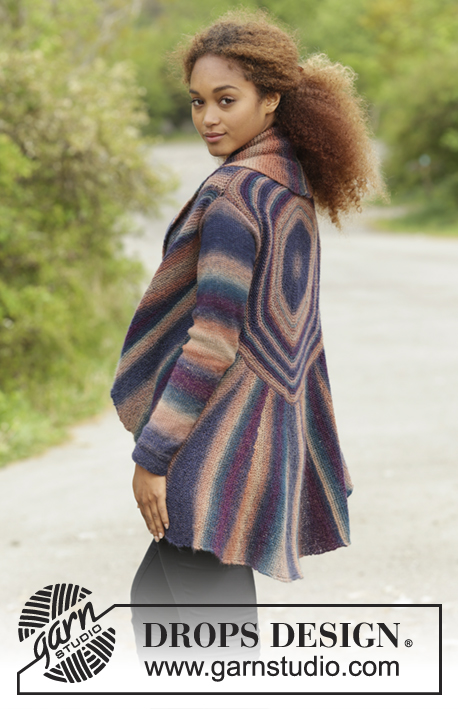
Knitted DROPS jacket worked in a circle in garter st with short rows in ”Delight”. Size: S - XXXL.

DROPS 171-25
DROPS design: Pattern no de-157
Yarn group A
----------------------------------------------------------
Size: S - M - L - XL - XXL - XXXL
Materials:
DROPS DELIGHT from Garnstudio
500-550-600-650-750-800 g colour no 18, autumn forest

DROPS DOUBLE POINTED NEEDLES AND CIRCULAR NEEDLE (40 and 80 cm) SIZE 4 mm - or size needed to get 21 sts x 41 rows in garter st = 10 x 10 cm.
DROPS DOUBLE POINTED NEEDLES SIZE 3.5 mm for sleeve - or size needed to get 23 sts x 30 rows in stocking st = 10 x 10 cm.

-------------------------------------------------------

Alternative Yarn – See how to change yarns here
Yarn Groups A to F – Use the same pattern and change the yarn here
Yarn usage using an alternative yarn – Use our yarn converter here

-------------------------------------------------------

DROPS Delight
DROPS Delight
75% Wool, 25% Polyamide
Discontinued
find alternatives

Pattern instructions

NOTE: This pattern is written in British English. All measurements in charts are in cm. For conversion from cm to inches - click here. There are different terms for crocheting in British and American English. If this pattern includes crochet, click for "crochet terms" here. For this pattern in American English, please click here.
GARTER ST (back and forth):
K all rows. 1 ridge = 2 rows K.

GARTER ST (worked in the round):
1 ridge = 2 rounds. * K 1 round and P 1 round *, repeat from *-*.

SHORT ROWS IN GARTER ST - WITH YOS:
When turning and making a YO avoid holes in piece.
Short rows in garter st: Work no of sts described in pattern, slip 1 st as if to P, place strand on the front of piece, move the slipped st back on left needle. Turn piece. On next row when getting to the slipped st, work st and strand around it (YO) tog as one st and work the rest of row.

INCREASE TIP:
When picking up more sts than there are ridges (e.g. when picking up 140 sts evenly over the next 132 ridges), pick up 1 st in every ridge and make the remaining sts with 1 YO distributed evenly between sts. I.e. in this example pick up 132 sts in the 132 ridges and make YOs 8 times evenly = 140 sts. Work YO twisted on next row.
----------------------------------------------------------

CIRCLE:
Work first the outer circle, then pick up sts on the shortest curve on this and work circles in the centre.

OUTER CIRCLE:
Work piece back and forth in GARTER ST - see explanation above, until finished measurements. Cast on 70-72-74-76-78-80 sts on circular needle size 4 mm with Delight.

PART 1:
Work 7-7-7-7-8-8 ridges (= 14-14-14-14-16-16 rows). REMEMBER THE KNITTING TENSION On next row from RS work short rows as follows:
Row 1 (= RS): K the first 60-66-66-66-66-66 – READ SHORT ROWS IN GARTER ST – WITH YOS, turn piece.
Row 2 (= WS): K all sts, turn piece.
Row 3: K the first 54-60-60-60-60-60, turn.
Row 4: K all sts, turn piece.
Row 5: K the first 48-54-54-54-54-54, turn.
Row 6: Turn and K all sts, turn piece.

Continue to work short rows in garter st like this. I.e. work 6 sts less on every row from RS until 1 ridge has been worked (= 2 rows) over the last 6 sts (= 10-11-11-11-11-11 ridges, 17-18-18-18-19-19 ridges have been worked in total on the widest). Last row is from WS. Then work short rows as follows:
Row 1 (= RS): K the first 8 sts, turn piece.
Row 2 (= WS): K all sts, turn piece.
Row 3: K the first 14 sts, turn piece.
Row 4: K all sts, turn piece.
Row 5: K the first 20 sts, turn piece.
Row 6: Turn and K all sts, turn piece.
Continue to work short rows in garter st like this. I.e. work 6 sts more on every row from RS until 2-4-6-8-10-6 sts remain on row (= 11-11-11-11-11-12 ridges). Last row is from WS. Work 7-7-8-8-8-8 ridges over all sts.

14-14-15-15-16-16 ridges have been worked on the shortest and 35-36-37-37-38-39 ridges have been worked on the widest. Piece measures approx. 7-7-7-7-8-8 cm on the shortest and approx. 17-18-18-18-19-19 cm on the widest.

Work 20-20-20-21-21-21 parts in total. Piece measures approx. 137-137-146-154-164-164 cm on the shortest and approx. 341-351-361-379-389-400 cm on the widest. Cast off.

ASSEMBLY:
Sew cast-off edge tog with cast-on edge, in outer loop of edge sts.

CIRCLE IN THE CENTRE:
Work piece in the round on circular needle (switch to double pointed needles when needed) from the shortest side on the outer circle and in towards centre. Pick up from RS on circular needle size 4 mm as follows: Adjust so that seam is mid back.

Pick up 1 st in each of the first 35-37-40-41-43-45 ridges (i.e. over the next 70-74-80-82-86-90 rows), cast on 36-38-40-42-44-46 sts (for armhole), skip the next 35-37-39-41-43-45 ridges (= 70-74-78-82-86-90 rows in total), pick up 134-140-144-150-154-158 sts evenly over the next 140-132-142-151-164-156 ridges (= 280-264-284-302-328-312 rows in total) – READ INCREASE TIP, cast on 36-38-40-42-44-46 sts (for armhole), skip the next 35-37-39-41-43-45 ridges (= 70-74-78-82-86-90 rows in total), pick up 1 st in each of the first 35-37-40-41-43-45 ridges (i.e. over the next 70-74-80-82-86-90 rows) = 276-290-304-316-328-340 sts.

Now work in the round in GARTER ST - see explanation above, until finished measurements. P 1 round, insert 5 markers and dec evenly as follows: Dec 0-2-4-4-4-4 sts evenly on entire round and work as follows: * P 46-48-50-52-54-56, insert 1 marker *, repeat from *-* 5 times in total, P the last 46-48-50-52-54-56 sts = 276-288-300-312-324-336 sts.

On next round, dec as follows: K 1, K the next 2 tog (= 1 st dec), * work until 3 sts remain before next marker, K 2 tog (= 1 st dec), K 2 (marker is in the middle of these 2 sts), K 2 tog (= 1 st dec) *, repeat from *-* 5 times in total, work until 3 sts remain, K 2 tog (= 1 st dec), K 1 (= 12 sts dec in total).

Dec like this every 4th round until 24 sts remain. Work all sts tog 2 by 2 = 12 sts. Cut the yarn and pull it through the remaining sts, tighten tog and fasten. Circle in the centre measures approx. 42-44-46-48-50-52 cm in diameter.

SLEEVE:
Worked in the round from bottom up.
Cast on 46-48-50-52-56-58 sts on double pointed needles size 3.5 mm with Delight. Work in garter st for 3 cm. Then work in stocking st but assemble sleeves with WS outwards. Insert 1 marker at beg of round (= mid under sleeve). When piece measures 6-10-6-10-10-8 cm, inc 1 st on each side of marker. Inc like this every 3-2½-2½-2-2-2 cm 16-17-19-20-20-22 times in total = 78-82-88-92-96-102 sts. Cast off when sleeve measures 53 cm in total. Knit another sleeve the same way.

ASSEMBLY:
Turn the sleeves and fasten them with WS outwards.

Diagram

symbols = outer circle


symbols = circle in the centre
symbols = knitting direction
diagram

Each of our patterns has specific tutorial videos to help you.

Do you have a question? See a list of frequently asked questions (FAQ)

Knitting tension is what determines the final measurements of your work, and is usually measured per 10 x 10 cm. It is provided like so: number of stitches in width x number of rows in height - eg: 19 stitches x 26 rows = 10 x 10 cm.

The knitting tension is very individual; some people knit/crochet loosely while others work tightly. You adjust the knitting tension with the needle size, which is why the suggested needle size is only meant as a guide! You need to adjust this (up or down) to ensure that YOUR knitting tension matches the knitting tension provided in the pattern. If you work with a different knitting tension than provided you will have a different yarn consumption, and your work will have different measurements than what the pattern suggests.

The knitting tension also determines which yarns can replace each other. As long as you achieve the same knitting tension you can replace one yarn with another.

See DROPS lesson: How to measure your tension/gauge

See DROPS video: How to make a gauge tension swatch

The required amount of yarn is provided in grams, eg: 450 g. To calculate how many balls you’ll need you first need to know how many grams are in 1 ball (25g, 50g or 100g). This information is available if you click on the individual yarn quality on our pages. Divide the amount required with the amount of each ball. For example, if each ball is 50g (the most common amount), the calculation will be as follows: 450 / 50 = 9 balls.

The important thing when changing from one yarn to another is that the knitting/crochet tension remains the same. This is so that the measurements of the finished piece will be the same as on the sketch provided. It is easier to achieve the same knitting tension using yarns from the same yarn group. It is also possible to work with multiple strands of a thinner yarn to achieve the knitting tension of a thicker one. Please try our yarn converter. We recommend you to always work a test swatch.

Please NOTE: when changing yarn the garment might have a different look and feel to the garment in the photo, due to individual properties and qualities of each yarn.

See DROPS lesson: Can I use a different yarn than the one mentioned in the pattern?

All our yarns are categorised into yarn groups (from A to F) according to thickness and knitting tension – group A contains the thinnest yarns and group F the thickest. This makes it easier for you to find alternative yarns to our patterns, should you wish to switch yarn. All yarns within the same group have a similar knitting tension and can easily replace each other. However, different yarn qualities have different structures and properties which will give the finished work a unique look and feel.

Click here for an overview of the yarns in each yarn group

At the top of all our patterns you’ll find a link to our yarn calculator, which is a helpful tool should you wish to use a different yarn than suggested. By filling in the yarn quality you wish to replace, the amount (in your size) and number of strands, the calculator will present good alternative yarns with the same knitting tension. Additionally it will tell you how much you’ll require in the new qualities and whether you’ll need to work with multiple strands. Most skeins are 50g (some are 25g or 100g).

If the pattern is worked with multiple colours, every colour will have to be calculated separately. Similarly, if the pattern is worked with several strands of different yarns (for example 1 strand Alpaca and 1 strand Kid-Silk) you will have to find alternatives for each, individually.

Click here to see our yarn calculator

Since different yarns have different qualities and textures we have chosen to keep the original yarn in our patterns. However, you can easily find options among our available qualities by using our yarn calculator, or simply pick a yarn from the same yarn group.

It is possible that some retailers still have discontinued yarns in stock, or that someone has a few skeins at home that they would like to find patterns for.

The yarn calculator will provide both alternative yarn as well as required amount in the new quality.

If you think it's hard to decide what size to make, it can be a good idea to measure a garment you own already and like the size of. Then you can pick the size by comparing those measures with the ones available in the pattern's size chart.

You'll find the size chart at the bottom of the pattern.

See DROPS lesson: How to read size chart

The needle size provided in the pattern serves only as a guide, the important thing is to follow the knitting tension. And since knitting tension is very individual, you will have to adjust the needle size to ensure that YOUR tension is the same as in the pattern – maybe you’ll have to adjust 1, or even 2 needle sizes, up or down to achieve the correct tension. For this, we recommend that you work test swatches.

Should you work with a different knitting tension than the one provided, the measurements of the finished garment might deviate from the measurement sketch.

See DROPS lesson: How to measure your tension/gauge

See DROPS video: How to make a tension/gauge swatch

Working a garment top-down provides more flexibility and room for personal adjustment. For example it is easier to try the garment on while working, as well as making adjustments to length of yoke and shoulder caps.

The instructions are carefully explaining every step, in the correct order. Diagrams are adjusted to the knitting direction and are worked as usual.

The diagram depicts all rows/rounds, and every stitch seen from the right side. It is read from bottom to top, from right to left. 1 square = 1 stitch.

When working back and forth, every other row is worked from the right side and every other row is worked from the wrong side. When working from the wrong side, the diagram will have to be worked reversed: from left to right, knit stitches are purled, purl stitches are knit etc.

When working in the round every round is worked from the right side and the diagram are worked from right to left on all rounds.

See DROPS lesson: How to read knitting diagrams

The diagram depicts all rows/rounds, and every stitch seen from the right side. It is worked from bottom to top, from right to left.

When working back and forth every other row is worked from the right side: from right to left and every other row is worked from the wrong side: from left to right.

When working in the round, every row in the diagram are worked from the right side, from right to left.

When working a circular diagram you start in the middle and work your way outwards, counter clockwise, row by row.

The rows usually start with a given number of chain stitches (equivalent to the height of the following stitch), this will either be depicted in the diagram or explained in the pattern.

See DROPS lesson: How to read crochet diagrams

Instructions for working several diagrams after each other on the same row/round, will often be written like so: “work A.1, A.2, A.3 a total of 0-0-2-3-4 times". This means you work A.1 once, then A.2 is worked once, and A.3 is repeated (in width) the number of times provided for your size – in this case like so: S = 0 times, M = 0 times, L=2 times, XL= 3 times and XXL = 4 times.

The diagrams are worked as usual: begin with the first row in A.1, then work the first row in A.2 etc.

See DROPS lesson: How to read knitting diagrams

See DROPS lesson: How to read crochet diagrams

The total width of the garment (from wrist-to-wrist) will be larger in the larger sizes, despite the actual sleeves being shorter. The larger sizes have longer sleeve caps and wider shoulders, so there will be a good fit in all sizes.

The measurement sketch/schematic drawing provides information regarding the full length of the garment. If it’s a jumper or a jacket the length is measured from the highest point on the shoulder closest to the neckline, and straight down to the bottom of the garment. It is NOT measured from the tip of shoulder. Similarly, the length of yoke is measured from the highest point on the shoulder and down to where yoke is split into body and sleeves.

On a jacket measures are never taken along bands, unless specifically stated. Always measure inside band stitches when measuring the length.

See DROPS lesson: How to read a schematic drawing

Diagrams are often repeated on the round or in height. 1 repeat is the diagram the way it appears in the pattern. If it says to work 5 repeats of A.1 in the round, then you work A.1 a total of 5 times after/next to each other in the round. If it says to work 2 repeats of A.1 vertically/in height you work the entire diagram once, then begin again at the start and work the entire diagram one more time.

Chain stitches are slightly narrower than other stitches and to avoid working the cast-on edge too tight, we simply chain more stitches to begin with. The stitch count will be adjusted on the following row to fit the pattern and measurement sketch.

The rib edge is more elastic and will contract slightly compared to, for example, stocking stitch. By increasing before the rib edge, you avoid a visible difference in width between the rib edge and the rest of the body.

It’s very easy to cast off too tightly, and by making yarn overs while casting off (and simultaneously casting these off) you avoid a too tight cast off edge.

See DROPS video: How to bind off with yarn overs (yo)

To achieve an even increase (or decrease) you can increase on, for example: every 3rd and 4th row alternately, like so: work 2 rows and increase on the 3rd row, work 3 rows and increase on the 4th. Repeat this until the increase is complete.

See DROPS lesson: Increase or decrease 1 st on every 3rd and 4th row alternately

Should you prefer to work in the round instead of back and forth, you may of course adjust the pattern. You’ll need to add steeks mid-front (usually 5 stitches), and follow the instructions. When you would normally turn and work from the wrong side, simply work across the steek and continue in the round. At the end you’ll cut the piece open, pick up stitches to work bands, and cover the cut edges.

See DROPS video: How to knit steeks and cut open

Should you prefer to work back and forth instead of in the round, you may of course adjust the pattern so you work the pieces separately and then assemble them at the end. Divide the stitches for the body in 2, add 1 edge stitch in each side (for sewing) and work the front and back pieces separately.

See DROPS lesson: Can I adapt a pattern for circular needles into straight needles?

Pattern repeats can vary slightly in the different sizes, in order to get the correct proportions. If you’re not working the exact same size as the garment in the photo, yours might deviate slightly. This has been carefully developed and adjusted so that the complete impression of the garment is the same in all sizes.

Make sure to follow instructions and diagrams for your size!

If you have found a pattern you like which is available in women’s size it’s not very difficult to convert it to men’s size. The biggest difference will be the length of sleeves and body. Start working on the women size that you think would fit across the chest. The additional length will be worked right before you cast off for the armhole/sleeve cap. If the pattern is worked top-down you can add the length right after the armhole or before the first decrease on sleeve.

Regarding additional yarn amount, this will depend on how much length you add, but it is better with a skein too many than too few.

All yarns will have excess fibres (from production) that might come off as lint or shedding. Brushed yarns (ie hairier yarns) have more of these loose, excess fibres, causing more shedding.

Shedding also depends on what is worn under or over the garment, and whether this pulls at the yarn fibres. It’s therefore not possible to guarantee that there will be no shedding

Below are some tips on how to get the best result when working with hairier yarns:

1. When the garment is finished (before you wash it) shake it vigorously so the looser hairs come off. NOTE: do NOT use a lint roller, brush or any method that pulls at the yarn.

2. Place the garment in a plastic bag and put it in your freezer - the temperature will cause the fibres to become less attached to each other, and excess fibres will come off easier.

3. Leave in the freezer for a few hours before taking it out and shaking it again.

4. Wash the garment according to the instructions on the yarn label.

Pilling is a natural process that happens to even the most exclusive of fibers. It's a natural sign of wear and tear that is hard to avoid, and that is most visible in high friction areas of your garment like a sweater's arms and cuffs.

You can make your garment look as new by removing the pilling, using a fabric comb or a pill/lint remover.

Still can't find the answer you need? Then scroll down and leave your question so one of our experts can try to help you. This will be done normally within 5 to 10 working days.
In the meantime, you can read the questions and answers that others have left to this pattern or join the DROPS Workshop on Facebook to get help from fellow knitters/crocheters!

Post a comment to pattern DROPS 171-25

We would love to hear what you have to say about this pattern!

If you want to leave a question, please make sure you select the correct category in the form below, to speed up the answering process. Required fields are marked *.

Comments / Questions (60)

country flag Jenny Strick wrote:

Ich verstehe das Prinzip der verkürzten Reihen mit Umschlag nicht. Wenn ich eine Masche abhebe und dann den Faden nach vorne nehme (links an der abgehobenen Masche vorbei) entsteht kein Umschlag, welchen ich mit der abgehobenen Masche zusammenstricken könnte. Wenn ich den Arbeitsfaden über die Arbeit nach vorne hebe entsteht eine "doppelte Masche", wie man sie von der Boomerangferse bei Socken kennt. Ist das vielleicht gemeint?

05.04.2018 - 11:32

DROPS Design answered:

Liebe Frau Strick, in diesem Video zeigen wir, wie man diese verkürzten Reihen mit Umschlag strickt. Viel Spaß beim stricken!

05.04.2018 - 11:54

Smita Satish Salunke wrote:

Do you have any video of this pattern? I am a bigginer. I don't understand the written pattern.

17.03.2018 - 10:15

DROPS Design answered:

Dear Smita, there is no video to show how to knit this piece from the beginning to end. However, you can find tutorial videos that will help you with certain parts. You can find the links to these videos on the left side of the page, belove the pictures. Also, don't forget, that you can always get help in the store you bought your DROPS yarn from. Happy Knitting!

17.03.2018 - 12:44

Su Mitchell wrote:

Hi. When finishing the centre circle - do I do the work two together as soon as I have 24 stitches on my needles - i.e on the round immediately after the previous decrease round? Brilliant pattern by the way. Thanks

16.03.2018 - 09:26

DROPS Design answered:

Dear Mrs Mitchell, you can work one last P round (= last ridge) after last dec and then K2 tog across to finish the circle. Happy knitting!

16.03.2018 - 09:50

country flag Mette Rose wrote:

Der er noget jeg ikke forstår i opskriften og desværre først har opdaget nu. Som jeg læser opskriften skal være 9 riller pr. rapport. I alt 180 riller (L)/360 pinde= 88 cm.?? Hvordan får I det til 164 cm? Det ville svare til 17 riller pr. rapport hvilket ikke fremgår af opskriften og som I også afviser i et svar til Mary-Ann ovenfor. Jeg har strikket 18 rapporter og har ca. 350 cm. Yderst og 88 inderst med bredde 37. Noget er rivende galt.

11.01.2018 - 11:47

DROPS Design answered:

Hej, 1 rapport måler 7 cm på det korteste og 18 cm på det bredeste og du strikker 20 rapporter i din størrelse. Hvis du ikke har nøjagtig samme strikkefasthed, så følg målene. God fornøjelse!

30.01.2018 - 10:08

country flag Gabriele wrote:

In der Anleitung steht: In dieser Weise insgesamt 20 Teilstücke stricken.... Ich weiß nicht. an welcher Stelle ich mit dem Wiederholen beginnen muss. ;-(

25.10.2017 - 13:48

DROPS Design answered:

Liebe Gabriele, also ja genau, jetzt müssen Sie von Anfang an wiederholen, dh die 7 Krausrippen, dann die verkürzten Reihen bis die 7 Krausrippen, bis dieses Teil insgesamt 20 mal gestrickt wird. Viel Spaß beim stricken!

25.10.2017 - 14:48

country flag Gabriele wrote:

Beginne ich das zweite Teilstück mit 7 Krausrippen oder sofort mit den verkürzten Reihen?

25.10.2017 - 11:18

DROPS Design answered:

Liebe Gabriele, ich bin nicht so sicher, was Sie "2.Teilstück" nennen - das 1. Teilstück ist der äußere Kreis (mit verkürzten Reihen gestrickt), dann wird der innere Kreis gestrickt (sihe Pfeil im Diagram im inneren Kreis). Viel Spaß beim stricken!

25.10.2017 - 12:27

country flag Line Sørensen wrote:

Hej Jeg har lidt svært ved at finde fx brystmål på denne jakke - har I en lidt bedre tegning så man kan vurdere hvilken størrelse man skal strikke? Mvh Line Sørensen

21.04.2017 - 16:15

DROPS Design answered:

Hei Line. Målskissen til denne modellen finner du under oppskriften/nederst på siden. Ut i fra målskissen kan du se målene fra ermet og ut. Noen mer nøyaktig målskisse har vi ikke. God Fornøyelse!

24.04.2017 - 13:10

country flag Stéphanie wrote:

Bonjour, quand on a tricoté la partie 1 avec les 7 côtes mousses à la fin, doit on re tricoter les 7 côtes mousses du début de la partie 1 ? Merci

13.03.2017 - 18:45

DROPS Design answered:

Bonjour Stéphanie, vous devez répéter la partie 1 en entier untotal de 20-21 fois, donc à partir des 7-8 côtes mousse sur toutes les mailles jusqu'au 7-8 côtes mousse sur toutes les mailles avec les rangs raccourcis entre elles. Bon tricot!

14.03.2017 - 09:35

country flag Magali wrote:

Bonjour, je tricote très serré donc j'ai déjà l'habitude de réaliser les modèles avec les informations de taille M alors que je fais du S (1,53m, 46kg). Est-il possible de réaliser ce modèle avec la laine Big Delight plutôt que Delight ?

08.03.2017 - 12:27

DROPS Design answered:

Bonjour Magali, ce modèle a été écrit pour un fil du groupe A (Delight), alors que Big Delight appartient au groupe C, la tension sera donc totalement différente et il vous faudra ajuster le modèle en fonction de votre échantillon. Bon tricot!

08.03.2017 - 13:37

country flag ABADIE Dominique wrote:

Bonjour Je suis entrain de tricoter une veste (modèle n0 157). Pour moi les explications ne sont pas assez claires. Pouvez vous me faire parvenir des explications plus détaillées avec dessins à l'appui si possible Merci

01.02.2017 - 11:53

DROPS Design answered:

Bonjour Mme Abadie, pour toute assistance personnelle pour réaliser ce modèle, nous vous invitons à contacter votre magasin DROPS ou le Forum DROPS. Bon tricot!

01.02.2017 - 12:02