DROPS Alpaca
DROPS Alpaca
100% Alpaca
from 4.85 $ /50g
DROPS Brushed Alpaca Silk
77% Alpaca, 23% Silk
from 3.95 $ /25g
Get the yarn to make this pattern from 57.65$.

The yarn cost is calculated from the pattern’s smallest size and the yarn’s cheapest product type. Looking for an even better price? You might find it on the DROPS Deals!

DROPS SS24

Winter Drizzle

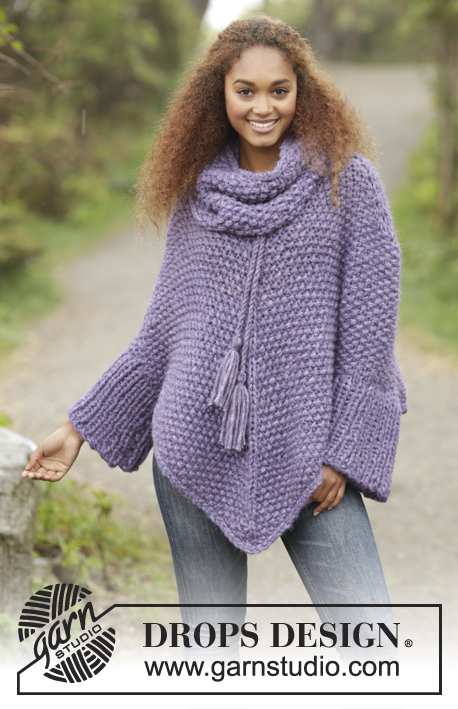
Knitted DROPS poncho with stripes turtle neck in rib and twined string with tassels, worked top down in ”Alpaca” and ”Brushed Alpaca Silk”. Size: S - XXXL.

DROPS 171-33
DROPS design: Pattern no z-762
Yarn group C + A or D
----------------------------------------------------------
Size: S/M – L/XL – XXL/XXXL
Materials:
DROPS ALPACA from Garnstudio
100 g for all sizes in color no 9020, light pearl gray
100-100-150 g color no 501, light gray
150-150-200 g, color no 517, medium gray
And use:
DROPS BRUSHED ALPACA SILK from Garnstudio
75 g for all sizes in color no 02, light gray.
75 g for all sizes in color no 03, gray.

DROPS CIRCULAR NEEDLE (40 and 80 cm / 16" and 32") SIZE 6 mm/US 10 – or size needed to get 15 sts x 20 rows in stockinette st with 1 strand of each yarn (= 2 strands) = 4" x 4" (10 x 10 cm).
DROPS DOUBLE POINTED NEEDLES and CIRCULAR NEEDLE (40 cm / 16") SIZE 4 mm/US 6 for rib - or size needed to get 19 sts x 25 rows in stockinette st with 2 strands Alpaca = 4" x 4" (10 x 10 cm).

-------------------------------------------------------

Alternative Yarn – See how to change yarns here
Yarn Groups A to F – Use the same pattern and change the yarn here
Yarn usage using an alternative yarn – Use our yarn converter here

-------------------------------------------------------

DROPS Alpaca
DROPS Alpaca
100% Alpaca
from 4.85 $ /50g
DROPS Brushed Alpaca Silk
77% Alpaca, 23% Silk
from 3.95 $ /25g
Get the yarn to make this pattern from 57.65$.

The yarn cost is calculated from the pattern’s smallest size and the yarn’s cheapest product type. Looking for an even better price? You might find it on the DROPS Deals!

Pattern instructions

NOTE: This pattern is written in American English. All measurements in charts are in cm. For conversion from inches to cm - click here. There are different terms for crocheting in American and British English. If this pattern includes crochet, click for "crochet terms" here. For this pattern in British English, please click here.
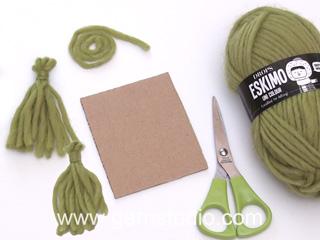
GARTER ST (worked in the round):
1 ridge = 2 rounds. * K 1 round and P 1 round *, repeat from *-*.

GARTER ST (back and forth):
K all rows. 1 ridge = K2 rows.

STRIPES:
Work all stripes with 2 strands in stockinette as follows:
STRIPE 1: Work 11-12-13 cm / 4½"-4¾"-5" with Alpaca light pearl gray + Brushed Alpaca Silk light gray.
STRIPE 2: Work 11-13-14 cm / 4½"-5"-5½" with Alpaca light gray + Brushed Alpaca Silk light gray.
STRIPE 3: Work 12-13-14 cm / 4¾"-5"-5½" with Alpaca medium gray + Brushed Alpaca Silk light gray.
STRIPE 4: Work 12-13-14 cm / 4¾"-5"-5½" with Alpaca light gray + Brushed Alpaca Silk gray.
STRIPE 5: Work 12-13-14 cm / 4¾"-5"-5½" (i.e. until finished measurements) with Alpaca medium gray + Brushed Alpaca Silk gray.

INCREASE TIP-1 (evenly spaced):
To calculate how often inc should be done, use the total no of sts on row (e.g. 104 sts) and divide remaining sts by no of inc to be done (e.g. 8) = 13. I.e. in this example make 1 YO for every 13th st.

INCREASE TIP-2:
Work until marker, 1 YO, K 1 (= mid st), 1 YO. Repeat at each of the remaining markers. On next round K the YOs mid front and mid back to make holes and K the YO's on the sides twisted to avoid holes.
----------------------------------------------------------

PONCHO:
The poncho is worked top down. Work in the round down to sleeve edge. Then finish front and back piece back and forth separately. Work neck and sleeve edge with 2 strands Alpaca.

Cast on 104-116-120 sts with 2 strand Alpaca light pearl gray on circular needle size 4 mm / US 6. K 1 round. * K 2, P 2 *, repeat from *-* the entire round. When piece measures 13 cm / 5", work 1 round as follows: * K 2, P 2 tog, 1 YO *, repeat from *-* the entire round. Now work 1 ridge in GARTER ST - see explanation above, while inc 8-12-16 sts evenly on 1st row in ridge - READ INCREASE TIP-1 (evenly) = 112-128-136 sts.
On next round P YOs to create eyelet holes.
Switch to circular needle size 6 mm / US 10. Now work STRIPES - see explanation above! On first round insert 4 markers as follows: Insert 1st marker at beg of round (= the side), then insert the remaining 3 markers with 28-32-34 sts between each marker: 2nd marker = mid front, 3rd marker = the side and 4th marker = mid back. After 4th marker there are 28-32-34 sts on round. On next round inc 1 st in each side of each marker - Read INCREASE TIP-2! Inc like this at marker mid front and mid back every other round 46-50-54 times in total and at markers in the side every 4th round 20-23-27 times in total = 376-420-460 sts. REMEMBER THE KNITTING GAUGE Now divide into front and back piece and finish each part separately. Slip all sts between 3rd and 1st marker on a stitch holder for back piece = 188-210-230 sts for back piece.

FRONT PIECE:
There are now 188-210-230 sts for front piece.
NOTE: Continue inc mid front on every other row as before until finished measurements. Work as follows from beg of round: bind off the first 3 sts (= sts between inc in the side and the next 2 sts), continue in stockinette st until mid st in the inc in the next side, turn piece and bind off the first 2 sts. Then bind off 2 sts for sleeve edge at beg of every row until bind off has been done 12-14-15 times in each side = 163-181-199 sts. Then work 2 ridges in garter st over all sts on needle. Bind off.

BACK PIECE:
Slip sts back on needle = 188-210-230 sts for back piece. NOTE: Continue inc on each side of marker mid back on every other row as before.
Work and bind off in each side as on front piece = 163-181-199 sts. Work 2 ridges and bind off.

SLEEVE EDGE:
Sew with 2 strands Alpaca medium gray the 2 ridges at the bottom on back and front piece tog with a couple of sts in each side (sleeve edge has a circumference of approx. 24-28-30 cm / 9½"-11"-11¾"). Worked in the round on double pointed needles. Pick up 44-48-52 sts around sleeve edge on double pointed needles size 4 mm / US 6 with 2 strands Alpaca medium gray. P 1 round. Then work rib * K 2, P 2 *, repeat from *-* the entire round. When rib measures 14 cm / 5½" in all sizes, bind off with K over K and P over P.
Work the other sleeve edge the same way.

TWINED STRING WITH TASSELS:
Cut 5 lengths Alpaca light pearl gray of 3.5 metres/3.75yds each. Twine the strands tog until they resist, fold the string double so that it twines again. Make a knot at each end. Thread the tie up and down through the eyelet holes on neck. Cut 14 strands Alpaca light pearl gray + 14 strands Brushed Alpaca Silk light gray (= 28 strands in total) of 20 cm / 8". Thread them through end on the twined string and distribute so that they are even. Place a strand around the tassel, tighten and make a knot. Repeat in the other end of string.

This pattern has been corrected.

Updated online: 21.10.2016
Correction: Added info about stripes in stocking st.
Updated online: 25.10.2016
INCREASE TIP-2: Work until marker, 1 YO, K 1 (= mid st), 1 YO. Repeat at each of the remaining markers. On next round K the YOs mid front and mid back to make holes and K the YO\'s on the sides twisted to avoid holes.
Updated online: 13.12.2016
PONCHO: ...Now work 1 ridge in GARTER ST - see explanation above, while inc 8-12-16 sts evenly on 1st row in ridge - READ INCREASE TIP-1 (evenly) = 112-128-136 sts. On next round P YOs to create eyelet holes...

Diagram

All measurements in charts are in cm.

diagram measurements
Do you have a question? See a list of frequently asked questions (FAQ)

Knitting tension is what determines the final measurements of your work, and is usually measured per 10 x 10 cm. It is provided like so: number of stitches in width x number of rows in height - eg: 19 stitches x 26 rows = 10 x 10 cm.

The knitting tension is very individual; some people knit/crochet loosely while others work tightly. You adjust the knitting tension with the needle size, which is why the suggested needle size only serve as a guide! You need to adjust this (up or down) to ensure that YOUR knitting tension matches the knitting tension provided in the pattern. If you work with a different knitting tension than provided you will have a different yarn consumption, and your work will have different measurements than what the pattern suggests.

The knitting tension also determines which yarns can replace each other. As long as you achieve the same knitting tension you can replace one yarn with another.

See DROPS lesson: How to measure your tension/gauge

See DROPS video: How to make a gauge tension swatch

The required amount of yarn is provided in grams, eg: 450 g. To calculate how many balls you’ll need you first need to know how many grams are in 1 ball (25g, 50g or 100g). This information is available if you click on the individual yarn quality on our pages. Divide the amount required with the amount of each ball. For example, if each ball is 50g (the most common amount), the calculation will be as follows: 450 / 50 = 9 balls.

The important thing when changing from one yarn to another is that the knitting/crochet tension remains the same. This is so that the measurements of the finished piece will be the same as on the sketch provided. It is easier to achieve the same knitting tension using yarns from the same yarn group. It is also possible to work with multiple strands of a thinner yarn to achieve the knitting tension of a thicker one. Please try our yarn converter. We recommend you to always work a test swatch.

Please NOTE: when changing yarn the garment might have a different look and feel to the garment in the photo, due to individual properties and qualities of each yarn.

See DROPS lesson: Can I use a different yarn than the one mentioned in the pattern?

All our yarns are categorised into yarn groups (from A to F) according to thickness and knitting tension – group A contains the thinnest yarns and group F the thickest. This makes it easier for you to find alternative yarns to our patterns, should you wish to switch yarn. All yarns within the same group have a similar knitting tension and can easily replace each other. However, different yarn qualities have different structures and properties which will give the finished work a unique look and feel.

Click here for an overview of the yarns in each yarn group

At the top of all our patterns you’ll find a link to our yarn converter, which is a helpful tool should you wish to use a different yarn than suggested. By filling in the yarn quality you wish to replace, the amount (in your size) and number of strands, the converter will present good alternative yarns with the same knitting tension. Additionally it will tell you how much you’ll require in the new qualities and whether you’ll need to work with multiple strands. Most skeins are 50g (some are 25g or 100g).

If the pattern is worked with multiple colours, every colour will have to be converted separately. Similarly, if the pattern is worked with several strands of different yarns (for example 1 strand Alpaca and 1 strand Kid-Silk) you will have to find alternatives for each, individually.

Click here to see our yarn converter

Since different yarns have different qualities and textures we have chosen to keep the original yarn in our patterns. However, you can easily find options among our available qualities by using our yarn converter, or simply pick a yarn from the same yarn group.

It is possible that some retailers still have discontinued yarns in stock, or that someone has a few skeins at home that they would like to find patterns for.

The yarn converter will provide both alternative yarn as well as required amount in the new quality.

If you think it's hard to decide what size to make, it can be a good idea to measure a garment you own already and like the size of. Then you can pick the size by comparing those measures with the ones available in the pattern's size chart.

You'll find the size chart at the bottom of the pattern.

See DROPS lesson: How to read size chart

The needle size provided in the pattern serves only as a guide, the important thing is to follow the knitting tension. And since knitting tension is very individual, you will have to adjust the needle size to ensure that YOUR tension is the same as in the pattern – maybe you’ll have to adjust 1, or even 2 needle sizes, up or down to achieve the correct tension. For this, we recommend that you work test swatches.

Should you work with a different knitting tension than the one provided, the measurements of the finished garment might deviate from the measurement sketch.

See DROPS lesson: How to measure your tension/gauge

See DROPS video: How to make a gauge tension swatch

Working a garment top-down provides more flexibility and room for personal adjustment. For example it is easier to try the garment on while working, as well as making adjustments to length of yoke and shoulder caps.

The instructions are carefully explaining every step, in the correct order. Diagrams are adjusted to the knitting direction and are worked as usual.

The diagram depicts all rows/rounds, and every stitch seen from the right side. It is read from bottom to top, from right to left. 1 square = 1 stitch.

When working back and forth, every other row is worked from the right side and every other row is worked from the wrong side. When working from the wrong side, the diagram will have to be worked reversed: from left to right, knit stitches are purled, purl stitches are knit etc.

When working in the round every round is worked from the right side and the diagram are worked from right to left on all rounds.

See DROPS lesson: How to read knitting diagrams

The diagram depicts all rows/rounds, and every stitch seen from the right side. It is worked from bottom to top, from right to left.

When working back and forth every other row is worked from the right side: from right to left and every other row is worked from the wrong side: from left to right.

When working in the round, every row in the diagram are worked from the right side, from right to left.

When working a circular diagram you start in the middle and work your way outwards, counter clockwise, row by row.

The rows usually start with a given number of chain stitches (equivalent to the height of the following stitch), this will either be depicted in the diagram or explained in the pattern.

See DROPS lesson: How to read crochet diagrams

Instructions for working several diagrams after each other on the same row/round, will often be written like so: “work A.1, A.2, A.3 a total of 0-0-2-3-4 times". This means you work A.1 once, then A.2 is worked once, and A.3 is repeated (in width) the number of times provided for your size – in this case like so: S = 0 times, M = 0 times, L=2 times, XL= 3 times and XXL = 4 times.

The diagrams are worked as usual: begin with the first row in A.1, then work the first row in A.2 etc.

See DROPS lesson: How to read knitting diagrams

See DROPS lesson: How to read crochet diagrams

The total width of the garment (from wrist-to-wrist) will be larger in the larger sizes, despite the actual sleeves being shorter. The larger sizes have longer sleeve caps and wider shoulders, so there will be a good fit in all sizes.

The measurement sketch/schematic drawing provides information regarding the full length of the garment. If it’s a jumper or a jacket the length is measured from the highest point on the shoulder (usually closest to the neckline), and straight down to the bottom of the garment. It is NOT measured from the tip of shoulder. Similarly, the length of yoke is measured from the highest point on the shoulder and down to where yoke is split into body and sleeves.

See DROPS lesson: How to read a schematic drawing

Diagrams are often repeated on the round or in height. 1 repeat is the diagram the way it appears in the pattern. If it says to work 5 repeats of A.1 in the round, then you work A.1 a total of 5 times after/next to each other in the round. If it says to work 2 repeats of A.1 vertically/in height you work the entire diagram once, then begin again at the start and work the entire diagram one more time.

Chain stitches are slightly narrower than other stitches and to avoid working the cast-on edge too tight, we simply chain more stitches to begin with. The stitch count will be adjusted on the following row to fit the pattern and measurement sketch.

The rib edge is more elastic and will contract slightly compared to, for example, stocking stitch. By increasing before the rib edge, you avoid a visible difference in width between the rib edge and the rest of the body.

It’s very easy to cast off too tightly, and by making yarn overs while casting off (and simultaneously casting these off) you avoid a too tight cast off edge.

See DROPS video: How to bind off with yarn overs (yo)

To achieve an even increase (or decrease) you can increase on, for example: every 3rd and 4th row alternately, like so: work 2 rows and increase on the 3rd row, work 3 rows and increase on the 4th. Repeat this until the increase is complete.

See DROPS lesson: Increase or decrease 1 st on every 3rd and 4th row alternately

Should you prefer to work in the round instead of back and forth, you may of course adjust the pattern. You’ll need to add steeks mid-front (usually 5 stitches), and follow the instructions. When you would normally turn and work from the wrong side, simply work across the steek and continue in the round. At the end you’ll cut the piece open, pick up stitches to work bands, and cover the cut edges.

See DROPS video: How to knit steeks and cut open

Should you prefer to work back and forth instead of in the round, you may of course adjust the pattern so you work the pieces separately and then assemble them at the end. Divide the stitches for the body in 2, add 1 edge stitch in each side (for sewing) and work the front and back pieces separately.

See DROPS lesson: Can I adapt a pattern for circular needles into straight needles?

Pattern repeats can vary slightly in the different sizes, in order to get the correct proportions. If you’re not working the exact same size as the garment in the photo, yours might deviate slightly. This has been carefully developed and adjusted so that the complete impression of the garment is the same in all sizes.

Make sure to follow instructions and diagrams for your size!

If you have found a pattern you like which is available in women’s size it’s not very difficult to convert it to men’s size. The biggest difference will be the length of sleeves and body. Start working on the women size that you think would fit across the chest. The additional length will be worked right before you cast off for the armhole/sleeve cap. If the pattern is worked top-down you can add the length right after the armhole or before the first decrease on sleeve.

Regarding additional yarn amount, this will depend on how much length you add, but it is better with a skein too many than too few.

All yarns will have excess fibres (from production) that might come off as lint or shedding. Brushed yarns (ie hairier yarns) have more of these loose, excess fibres, causing more shedding.

Shedding also depends on what is worn under or over the garment, and whether this pulls at the yarn fibres. It’s therefore not possible to guarantee that there will be no shedding

Below are some tips on how to get the best result when working with hairier yarns:

1. When the garment is finished (before you wash it) shake it vigorously so the looser hairs come off. NOTE: do NOT use a lint roller, brush or any method that pulls at the yarn.

2. Place the garment in a plastic bag and put it in your freezer - the temperature will cause the fibres to become less attached to each other, and excess fibres will come off easier.

3. Leave in the freezer for a few hours before taking it out and shaking it again.

4. Wash the garment according to the instructions on the yarn label.

Pilling is a natural process that happens to even the most exclusive of fibers. It's a natural sign of wear and tear that is hard to avoid, and that is most visible in high friction areas of your garment like a sweater's arms and cuffs.

You can make your garment look as new by removing the pilling, using a fabric comb or a pill/lint remover.

Still can't find the answer you need? Then scroll down and leave your question so one of our experts can try to help you. This will be done normally within 5 to 10 working days.
In the meantime, you can read the questions and answers that others have left to this pattern or join the DROPS Workshop on Facebook to get help from fellow knitters/crocheters!

You might also like...

Post a comment to pattern DROPS 171-33

We would love to hear what you have to say about this pattern!

If you want to leave a question, please make sure you select the correct category in the form below, to speed up the answering process. Required fields are marked *.

Comments / Questions (49)

country flag Marie wrote:

Bonjour, pourquoi le bas de mon poncho roule dans le bas, j'ai rabattu lâchement pourtant. Y a t'il un truc. merci

04.08.2017 - 23:13

DROPS Design answered:

Bonjour Marie, vous pouvez le bloquer: humidifiez le et faites le sécher bien à plat, avec des épingles inoxydables si besoin pour bien maintenir la bordure plate. Votre magasin DROPS aura probablement d'autres astuces pour vous, n'hésitez pas à le contacter, même par mail ou téléphone. Bon tricot!

07.08.2017 - 11:38

country flag Jenny wrote:

Hallo, ich komme mit den Abnahmen am Ende der Vorder- bzw. Rückseite nicht klar. Ich habe beidseitig 12x angenommen, nun hätte das Ärmelbündchen aber knapp 50 cm Umfang, also ca doppelt so viel wie nötig. Wenn ich nur 12 mal insgesamt abnehme, habe ich zwar die nötigen 24 cm Bündchen, aber zu viele Maschen.

05.02.2017 - 21:50

DROPS Design answered:

Liebe Jenny, die Abnahmen auf beiden Seiten werden 24 cm sein = 12 cm, so daß Sie für die Ärmel 24 cm Umfang haben. Viel Spaß beim stricken!

06.02.2017 - 11:15

country flag Isabelle wrote:

Bonjour, je vous remercie pour ces précisions, j'ai maintenant bien compris que les diminutions de 2m se font 12 fois ET de chaque côté (à chaque rang) et donc 49 m diminuées. Du coups après le rapprochement du devant et derrière au niveau des 2 côtes j'ai une circonférence d'environ 48 cm de bordure de manche. Or je devrai avoir 24 cm selon l'explication. Merci de votre aide

01.02.2017 - 00:00

DROPS Design answered:

Bonjour Isabelle, vous rabattez d'un côté 24 m (12 x 2) et de l'autre 25 m (1x3 m + 11 x 2 m) soit 24 rangs = 12 cm. Vous faites quelques points de chaque côté pour les manches pour que la circonférence de la manche soit de 24 cm environ et vous relevez 44 m pour la manche. Bon tricot!

01.02.2017 - 09:35

country flag Isabelle wrote:

Bonjour Après division On a 188 m, pour les manches, il y a les (3+2m) 5 m à diminuer selon explications + les 2m à diminuer 12 fois (soit 24m) ce qui fait - 29 m au total, et en même temps les augmentations des jetés pour les jours devant (soit 6 augmentations de chaque côté du marqueur) +12m. Donc j'arrive à 188-29+12= 171 m or on doit arriver à 163 m. Il y a quelque chose que je n'ai pas du bien comprendre. Pouvez vous m'aider ? Merci

28.01.2017 - 15:15

DROPS Design answered:

Bonjour Isabelle, on doit rabattre 12 fois de chaque côté, soit 1 x 3 m et 11 x 2 m d'un côté et 12 x 2 m de l'autre (= 49 m rabattues au total) + 12 x 2 m augmentées tous les 2 rangs = +24 m. On avait 188 m - 49 + 24 = 163 m. Bon tricot!

30.01.2017 - 11:12

EVANGELIA VISVIKI wrote:

I' like a clarification, on the number of using strands. For the rib we use 2 strands of Alpaca light grey and then when we start with stripes we use as third strand the Brushed Alpaca Silk, or we use 1 strand of Alpaca an 1 strand of Brushed Alpaca. As I have already used 3 strands of yarn, knitting the first stripe, do you think the garment is going to be too heavy or too wide?

19.01.2017 - 16:01

DROPS Design answered:

Dear Mrs Visviki, at the beg you work rib with 2 strands Alpaca, then work 1 ridge, then continue with stripes, ie 1 strand Alpaca + 1 strand Brushed Alpaca Silk. 1 strand Brushed Alpaca Silk can be replaced by 2 strands Alpaca, read more here. Happy kniting!

19.01.2017 - 16:40

country flag Marijke wrote:

Na het breien van de col volgt een toer *2r, 2av samen, 1 omsl*. Bij de volgende toer staat dan: 'brei de omslag gedraaid av om gaatjes te voorkomen.' Maar het is toch juist de bedoeling dat er gaatjes gebreid worden, om straks het koord door te halen??

09.12.2016 - 18:05

DROPS Design answered:

Hoi Marijke. Ik ben het met je eens. De omsl onder de col moeten niet gedraaid gebreid worden. Ik zal een correctie regelen. Bedankt voor het melden.

13.12.2016 - 12:11

country flag Chrystelle wrote:

Bonjour, j'ai divisé les 2 parties (dos/devant). Je ne comprends pas pour les 3 mailles à rabattre et doit-on continuer avec les aiguilles circulaires ou des aiguilles droites en jersey (endroit et envers) ? Merci

08.11.2016 - 22:12

DROPS Design answered:

Bonjour Chrystelle, on continue maintenant chaque pièce séparément, comme avant, c'est-à-dire en allers et retours (sur aiguilles droites ou circulaires), en jersey avec les augmentations au milieu devant tous les 2 rangs (= tous les rangs sur l'endroit). En même temps, rabattez les 3 premières m au début du 1er rang sur l'endroit et rabattez les 2 premières m au début du 1er rang sur l'envers. Continuez ainsi en rabattant 2 m au début de chaque rang jusqu'à ce que 12-14-15 m aient été rabattues. Bon tricot!

09.11.2016 - 10:00

country flag Chrystelle wrote:

Bonjour, Ma question précédente concerne le 1er rang des rayures en jersey pour les augmentation 2, juste savoir si les jetés des côtés servent juste à faire une augmentation ou un jour comme le devant/dos ?

24.10.2016 - 10:35

DROPS Design answered:

Bonjour Chrystelle, une précision va être apporter aux augmentations, on tricote les jetés à l'end au tour suivant au milieu devant et au milieu dos, mais on les tricote torse à l'end sur les côtés. Bon tricot!

25.10.2016 - 12:29

country flag Chrystelle wrote:

Bonjour, Je voudrais savoir pour les jetés faits sur les cotés doivent ils faire au rang suivant des jours pour faire le même motif au mileu dos et devant ou bien doit on éviter de faire des trous et ne faire qu'une augmentation ?

22.10.2016 - 10:58

DROPS Design answered:

Bonjour Chrystelle, au tour ajouré après les côtes, on n'augmente pas, mais on diminue 1 m dans les 2 m env (= 2 m ens à l'env), et on fait un jeté, c'est-à-dire on tricote ainsi: *2 m end, 2 m ens à l'env (= 1 diminution), 1 jeté (= compense la diminution)* et on répète de *-* tout le tour, le nbe de mailles sera le même à la fin de ce tour. Au tour suivant, on tricote le tour end de la côte mousse, tricotez toutes les mailles et les jetés à l'end = vous avez toujours le même nombre de mailles. Bon tricot!

24.10.2016 - 09:27

country flag Chrystelle wrote:

Rebonjour, 1 jeté rajoute 1 maille et je ne comprends pas que le jeté compense la diminution qui se trouve où ?

21.10.2016 - 12:36

DROPS Design answered:

Bonjour Chrystelle, on tricote 2 m ens à l'env et on fait 1 jeté = on diminue 1 m env et on compense cette diminution par un jeté, on n'augmente pas de mailles, on conserve bien le même nombre, je cite: " À 13 cm de hauteur totale, tricoter 1 tour ainsi: *2 m end, 2 m ens à l'env, 1 jeté *, répéter de *-* tout le tour. ". Bon tricot!

21.10.2016 - 15:00