
Popular categories
Looking for a yarn?


|
|||||||
Aredhel |
|||||||
 |
 |
||||||
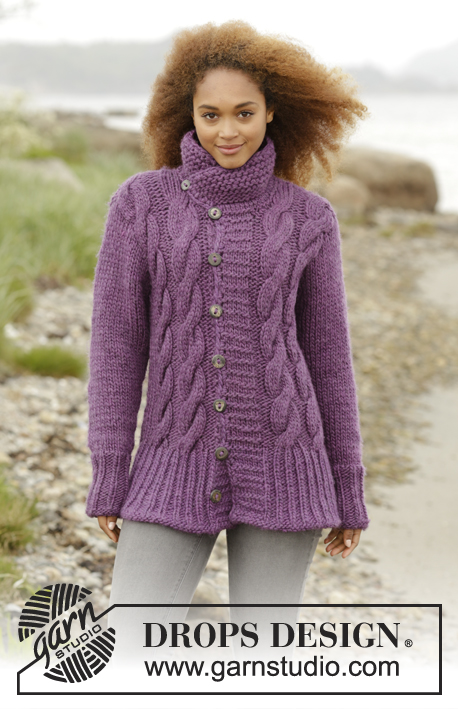
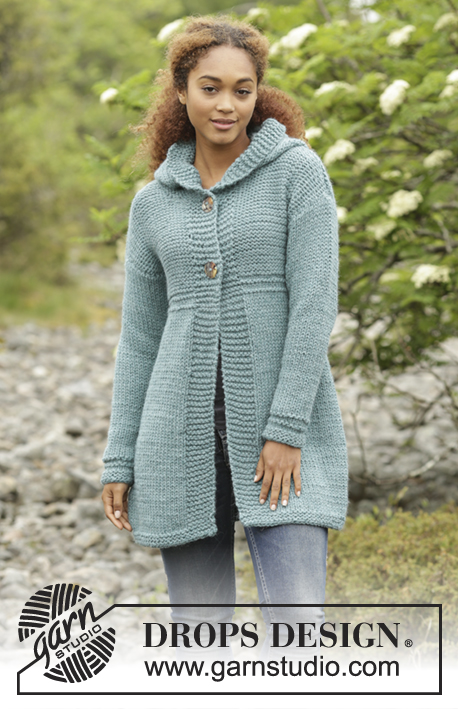
Knitted DROPS jacket with hood and A-shape in "Andes". Size: S - XXXL.
DROPS 172-46 |
|||||||
|
GARTER ST (back and forth): K all rows. 1 ridge = K2 rows. PATTERN: See diagram A.1. The diagram shows all rows in pattern seen from RS. DECREASE TIP: All dec are done from RS! Dec inside 1 st K and 1 edge st in garter st. Dec as follows when 2 sts remain before 1 K st and 1 edge st in garter st: K 2 tog. Dec as follows after 1 st in garter st and K 1: Slip 1 st as if to K, K 1, psso. INCREASE TIP: All inc are done from RS. Inc inside 1 edge st in garter st and 1 K by making 1 YO. On next row P YO twisted to avoid holes. MEASURING TIP-1 (applies to front and back piece): To get the right proportions on jacket length measurements are done when piece is flat. Because of the weight of the yarn the piece will be approx. 10 cm / 4'' longer than measurements in chart. MEASURING TIP-2 (applies to sleeve): Because of the weight of the yarn length measurements are done when piece is held up. BUTTONHOLES: bind off for buttonholes on right front piece (from RS): Work 3 sts, bind off 2 sts for buttonhole, work the rest of row. On next row cast on 2 new sts over the bind off sts. bind off for buttonholes when piece measures: SIZE S: 56 and 70 cm / 22" and 27½'' SIZE M: 57 and 72 cm / 22½" and 28½" Size L: 58 and 74 cm / 22 3/4" and 29" SIZE XL: 59 and 76 cm / 23 1/4" and 30" Size XXL: 60 and 78 cm / 23½" and 30 3/4" SIZE XXXL: 61 and 80 cm / 24" and 31½" ---------------------------------------------------------- BACK PIECE: The piece is worked back and forth on circular needle because of no of sts. Cast on 60-64-70-76-82-88 sts on circular needle size 7 mm / US 10.75 with Andes. Work 3 ridges in GARTER ST - see explanation above. Switch to circular needle size 8 mm / US 11 and work in stockinette st with 5 sts in garter st in each side. REMEMBER THE KNITTING GAUGE When piece measures 18 cm / 7'', cast on 1 edge st in each side = 62-66-72-78-84-90 sts. Continue in stockinette st with 1 edge sts in garter st in each side. When piece measures 19 cm / 7½'', dec 1 st in each side (= 2 sts dec) - READ DECREASE TIP and MEASURING TIP-1! Dec in each side every 7-7-8-8-8-8 cm / 2 3/4"-2 3/4"-3"-3"-3"-3" a total of 6 times = 50-54-60-66-72-78 sts. AT THE SAME TIME when piece measures 48-49-50-51-52-53 cm / 19''-19¼''-19¾''-20''-20½''-21'', work as follows: Work A.1 over all sts with 1 edge st in garter st in each side (edge st continues in garter st). When A.1 has been worked 1 time vertically, work piece until finished measurements in reversed stockinette st (edge st in garter st). When piece measures 60-61-62-63-64-65 cm / 23½"-24"-24½"-24 3/4"-25 1/4"-25½", bind off 1 edge st in each side = 48-52-58-64-70-76 sts. When piece measures 76-78-80-82-84-86 cm / 30''-30¾''-31½''-32¼''-33''-33 7/8'', bind off the middle 14-14-14-16-16-16 sts for neck and finish each shoulder separately. Continue to bind off 1 st on next row from neck = 16-18-21-23-26-29 sts remain on the shoulder. Loosely bind off all sts when piece measures 78-80-82-84-86-88 cm / 30¾''-31½''-32¼''-33''-33 7/8''-34 5/8''. Repeat on the other shoulder. RIGHT FRONT PIECE: Worked back and forth on circular needle. Cast on 35-37-40-43-46-49 sts (includes 8 band sts towards mid front) on circular needle size 7 mm / US 10.75 with Andes. Work 3 ridges. Switch to circular needle size 8 mm / US 11 and work next row from RS as follows: 8 sts in garter st (= band), stockinette st until 5 sts remain, work 5 sts in garter st. Continue like this in stockinette st and garter st. When piece measures 18 cm / 7'', work as follows from RS: 8 sts in garter st, stockinette st over the remaining sts, cast on 1 edge st at the end of row (edge st in garter st) = 36-38-41-44-47-50 sts. When piece measures 19 cm / 7½'', dec in the side as on back piece, dec 6 times in total = 30-32-35-38-41-44 sts. AT THE SAME TIME when piece measures 48-49-50-51-52-53 cm / 19''-19¼''-19¾''-20''-20½''-21'', work as follows: Work 8 sts in garter st, work A.1 over the remaining sts (edge st in garter st). When A.1 has been worked 1 time vertically, work piece until finished measurements in reversed stockinette st (continue band and edge st in garter st). AT THE SAME TIME when piece measures 56-57-58-59-60-61 cm / 22"-22½"-22 3/4"-23 1/4"-23½"-24", bind off for BUTTONHOLES - see explanation above. When piece measures 60-61-62-63-64-65 cm / 23½"-24"-24½"-24 3/4"-25 1/4"-25½", bind off 1 edge st in the side = 29-31-34-37-40-43 sts. When piece measures 72-74-76-78-80-82 cm / 28 3/8''-29 1/8''-30''-30 3/4''-31½''-32¼'', slip the outermost 9-9-9-10-10-10 sts towards mid front on 1 stitch holder for neck (work them before slipping them on stitch holder to avoid cutting the yarn). Continue to bind off for neck at beg of every row from neck as follows: bind off 2 sts 1 time and then 1 st 2 times = 16-18-21-23-26-29 sts remain on shoulder. Loosely bind off all sts when piece measures 78-80-82-84-86-88 cm / 30¾''-31½''-32¼''-33''-33 7/8''-34 5/8''. LEFT FRONT PIECE: Cast on and work as right front piece but reversed. Do not dec for buttonholes on left front piece. ASSEMBLY: Sew the shoulder seams. HOOD: Pick up approx. 46 to 58 sts around the neck (includes sts on stitch holders at the front) on circular needle size 7 mm / US 10.75 with Andes. K 1 row from WS while inc evenly to 66-68-70-72-74-76 sts - do not inc over bands. Work 2 ridges. Switch to circular needle size 8 mm / US 11. Then work in stockinette st with 8 sts in garter st in each side, back and forth over all sts until hood measures approx. 30-31-32-33-34-35 cm / 11¾''-12¼''-12½''-13''-13 3/8''-13¾''. Switch to circular needle size 7 mm / US 10.75. Work 2 ridges over all sts. Bind off. Fold the hood double and sew tog at the top with grafting/kitchener sts. SLEEVE: Worked back and forth on circular needle. Cast on 22-22-24-24-26-26 sts (includes 1 edge st in each side) on circular needle size 7 mm / US 10.75 with Andes. Work 3 ridges - then work A.1 over all sts. Work A.1 1 time vertically. Switch to circular needle size 8 mm / US 11 and work in stockinette st with 1 edge st in garter st in each side. When piece measures 8-8-8-8-10-8 cm / 3"-3"-3"-3"-4"-3", inc 1 st in each side - READ INCREASE TIP (= 2 sts inc) and MEASURING TIP-2. Inc every 5-4-4-3½-3-3 cm / 2"-1½"-1½"-1 1/4"-1"-1" 9-10-10-11-11-12 times in total = 40-42-44-46-48-50 sts. Bind off when piece measures 51-50-49-48-45-44 cm / 20"-19 3/4"-19 1/4"-19"-17 3/4"-17 1/4" (NOTE: Shorter measurements in the larger sizes because of wider shoulders). Make another sleeve. ASSEMBLY: Sew in sleeves. Sew under arm and side seams inside 1 edge st, finish when 18 cm / 7'' remain at the bottom of body for vent. Sew the buttons on to left front piece. |
|||||||
Diagram explanations |
|||||||
|
|||||||

|
|||||||
|
Have you made this or any other of our designs? Tag your pictures in social media with #dropsdesign so we can see them! Do you need help with this pattern?You'll find tutorial videos, a Comments/Questions area and more by visiting the pattern on garnstudio.com. © 1982-2024 DROPS Design A/S. We reserve all rights. This document, including all its sub-sections, has copyrights. Read more about what you can do with our patterns at the bottom of each pattern on our site. |
|||||||


With over 40 years in knitting and crochet design, DROPS Design offers one of the most extensive collections of free patterns on the internet - translated to 17 languages. As of today we count 304 catalogs and 11422 patterns - 11417 of which are translated into English (US/in).
We work hard to bring you the best knitting and crochet have to offer, inspiration and advice as well as great quality yarns at incredible prices! Would you like to use our patterns for other than personal use? You can read what you are allowed to do in the Copyright text at the bottom of all our patterns. Happy crafting!
Comments / Questions (35)
Vil gerne vide om den kan strikkes på pinde nr 5 og selvfølgelig i tyndere garn og hvordan jeg omregner
22.10.2020 - 13:10DROPS Design answered:
Hej Lilian. Vi har dessvärre inte möjlighet att räkna om denna till tunnare pinnar, men vi har flera liknande opskrifter gjorda för pinne 5, du hittar dem här. Lycka till!
22.10.2020 - 13:22Hey. Thanks for this beautiful pattern. I am in need of clarification. In the explanation of the back piece you mention some measurements but Im confused as to how to measure. For example you say “when piece measures 18cm cast on one edge stitch on each side...then in the next statement you say “when the piece measures 19cm.. so am i to measure 19cm from the 18cm you mentioned? Or 19cm from the bottom of the piece to where Im at? Thanks in advance. And again, lovely pattern
15.05.2020 - 20:41DROPS Design answered:
Dear Samya, in your case the measurements are from the same pont, from the cast on edge. Happy Knitting!
17.05.2020 - 09:12Hey. Thank you for this pattern. One question I have is on the measurements. In the pattern you state, do this after ‘such and such no of inches’ and Im a bit confused. Is this the no of inches from the bottom of the piece, or from when a measurement was last mentioned? Would really appreciate guidance on this. Thanks 😊
15.05.2020 - 20:36DROPS Design answered:
Dear Samya, these measurements are for whole piece, so from the beginning/bottom. Happy knitting!
17.05.2020 - 18:45Bonjour Je viens de découvrir le site qui me plait; J'ai un souci au niveau de la lecture (santé) des explications. Quand je souhaite tricoter un modèle je cherche une vidéo que je suis du début à la fin du modèle. Avez-vous sur le site un moyen d'obtenir les modèle de votre catalogue en vidéo. Merci Bien cordialement
27.10.2019 - 12:03DROPS Design answered:
Bonjour Alex, nous avons effectivement quelques vidéos qui montrent en vidéo comment réaliser un ouvrage du début à la fin, mais il s'agit de petits ouvrages. Pour vous aider, vous trouverez sous chaque modèle les vidéos montrant les techniques utilisées dans le modèle. Pour toute assistance complémentaire, merci de bien vouloir contacter votre magasin DROPS, même par mail ou téléphone. Bon tricot!
04.11.2019 - 12:27I would take that beautiful sweater all the way to my ankles am 6 feet tall
06.09.2019 - 05:34Hej, det står på höger fram i slutet att man ska maska av 2m 1 gång och sedan 1m 2ggr hur menas det är jag ska göra ? Maskar jag av 2m tillsammans 1 gång och 1 m för sig 2ggr?
09.03.2019 - 16:16DROPS Design answered:
Hej! Du ska maska av till hals på varje varv mot halsen (totalt 3 gånger). Den första gången maskar du av 2 maskor, den andra gången 1 maska och den tredje gången 1 maska. Lycka till!
14.03.2019 - 11:06Hi, A couple of questions: My measurements are CHEST--100 cm, WAIST--91 cm. HIPS--102 cm. Which size would be best for me? Also...I already have ESKIMO MIX 100% NEW WOOL---THICKNESS GROUP E (50 gm). How much yarn do I need and which pins should I use? Signed, 'A Newcomer'
28.10.2018 - 19:47DROPS Design answered:
Dear Holly, as it depends on teh stíle and your preference on how much ase you like your swetaers with please use the schematica at the bottom of the pattern to decide which size to knit. Knitting a swatch can also help you decide which size of needles would be the best. For calculating how much of a different yarn would you need, please use the yarn converter here. Happy Knitting!
29.10.2018 - 00:26Posso usare ferri diritti?Grazie
16.10.2018 - 13:52DROPS Design answered:
Buongiorno Maria. Il capo è lavorato avanti e indietro. Può quindi usare ferri dritti. Buon lavoro!
16.10.2018 - 14:12Wieviel Garn würde ich circa für dieses Model in Größe S/M ohne Kapuze brauchen? Vielen Dank und Liebe Grüße
24.09.2018 - 09:57DROPS Design answered:
Liebe Annette, wir haben die Garnmenge für diese Jacke nur mit Kapuze und können leider nicht jeder unsere Anleitung nach jeder Anfrage anpassen. Gerne bekommen Sie weiter Hilfe von Ihrem DROPS Laden, auch telefonisch oder per E-Mail. Viel Spaß beim stricken!
24.09.2018 - 11:21Lucia Reyes wrote:
Hola, desde Chile muy triste porque sus lanas no son comercializadas acá... y tampoco encontré tiendas que las vendan y que hagan envíos hacia este rincón del mundo. Puede ser que sí hay una tienda que distribuya a Chile y que yo no haya encontrado? Espero sus comentarios! Saludos
26.06.2018 - 18:58DROPS Design answered:
Hola Lucia. Aquí tienes la lista de las tiendas con envío internacional: https://www.garnstudio.com/findastore.php?s=w&cid=23
30.06.2018 - 19:04