
Popular categories
Looking for a yarn?


|
|||||||||||||||||||
Blizzard |
|||||||||||||||||||
|
|
|||||||||||||||||||
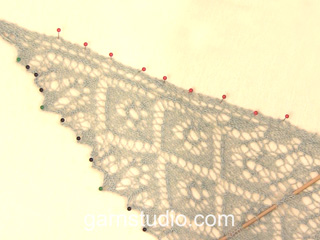
Knitted DROPS shawl with wave pattern and stripes, worked top down in ”Puna”.
DROPS 173-23 |
|||||||||||||||||||
|
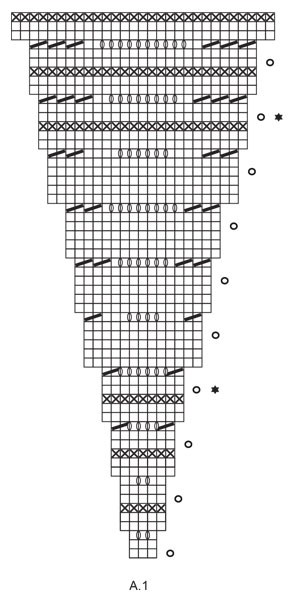
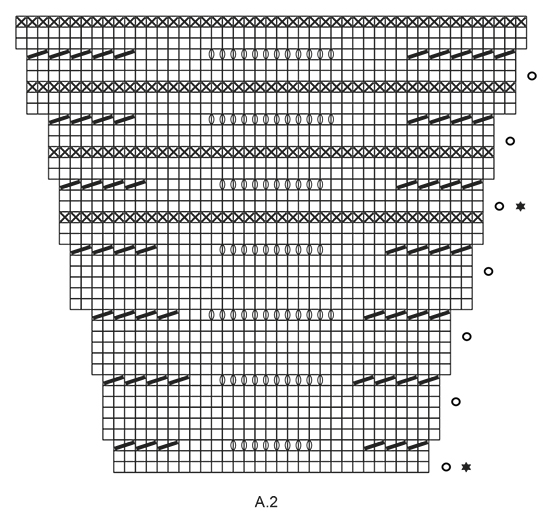
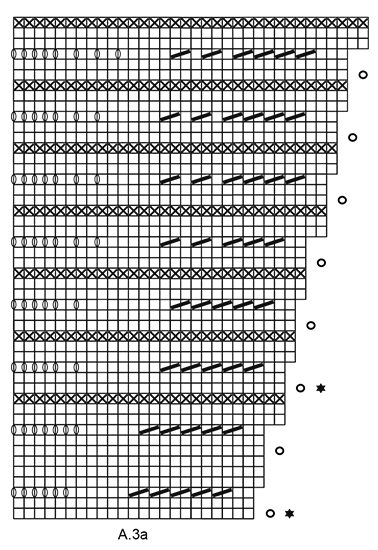
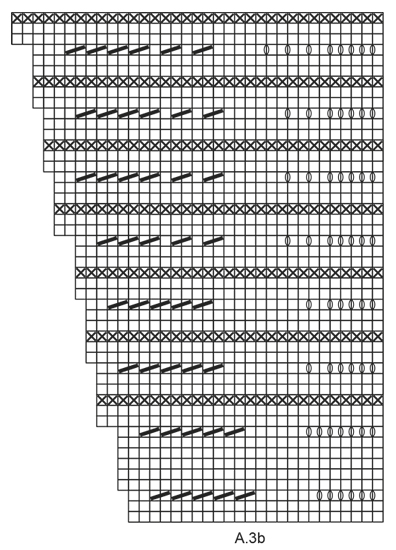
GARTER ST (back and forth): K all rows. 1 ridge = 2 rows K. PATTERN: See diagrams A.1 to A.3. The diagrams show all rows in pattern seen from RS. STRIPES: Stripe 1: off white Stripe 2: taupe Stripe 3: light grey Stripe 4: grey Stripe 5: off white Stripe 6: taupe Stripe 7: light grey SHORT ROWS: Work short rows over the outermost repetition + the 2 edge sts in garter st in each side of shawl. Work as follows from RS: Work 2 edge sts in garter st, work stocking st over all sts in 1st repetition A.1 (= 3 sts on 1st row in diagram), turn, tighten yarn to avoid holes and work in stocking st over sts in A.1, 2 edge sts in garter st. Turn and work pattern over all sts on needle, turn, work 2 sts in garter st, stocking st over all sts in the 1st repetition of A.1, turn, tighten yarn and work back. Repeat the short rows as shown in diagram = on every 6th row. NOTE: Because of inc in the pattern work more and more sts when working short rows. When diagram A.3a and A.3b are worked, work short rows over both diagrams + the 2 edge sts in each side of piece. INCREASE TIP: Inc 1 st by making a YO. On next row K YO twisted to avoid hole. CAST-OFF TIP: To avoid a tight cast-off edge, you may use a needle ½ size larger. ---------------------------------------------------------- SHAWL: Worked back and forth on circular needle, top down. First work one section in garter st until there are enough sts to work a pattern. Cast on 7 sts with off white on circular needle size 4 mm. K 1 row. Now work as follows: ROW 1: K 2, 1 YO, K 1, 1 YO, K 1, 1 YO, K 1, 1 YO, K 2 = 11 sts. ROW 2: K all sts. NOTE: K YOs twisted to avoid holes. ROW 3: K 2, insert 1st marker, 1 YO, K 2, insert 2nd marker, 1 YO, K 3, 1 YO, insert 3rd marker, K 2, 1 YO, insert 4th marker, K 2 = 15 sts. ROW 4: K back. Now continue in GARTER ST - see explanation above, and inc as follows: Inc after 1st and 2nd marker and before 3rd and 4th marker – READ INCREASE TIP! Inc like this on every row from RS (i.e. every other row) 3 times in total = 27 sts. REMEMBER THE KNITTING TENSION On next row from RS, inc 1 st = 28 sts. Work 1 row. Now continue with STRIPES – see explanation above (i.e. continue with off white = 1st stripe) and PATTERN as follows: Work 2 edge sts in garter st, A.1 (= 3 sts on 1st row in diagram) 8 times in width, 2 edge sts in garter st, AT THE SAME TIME work SHORT ROWS – see explanation above, in each side. NOTE: Repeat the short rows as shown in diagram, i.e. on every 6th row. When A.1 has been worked vertically, there are 236 sts on needle. Continue with A.2 over each repetition with A.1. When A.2 has been worked vertically, there are 380 sts on needle. Now work as follows: 2 edge sts in garter st, * A.3a (= 23 sts), A.3b (= 24 sts) *, repeat from *-* until 2 sts remain (= 8 times), 2 edge sts in garter st. When A.3a and A.3b have been worked vertically, there are 556 sts on needle. Work 1 ridge in garter st and cast off - READ CAST-OFF TIP. SHAPING: Place the piece in lukewarm water until it is soaking wet. Carefully squeeze out the water - do not twist. Then roll the piece in a towel and squeeze to remove more water - the piece will now only be moist. Place the piece on a carpet or mattress - carefully stretch it out to measurements found at the top of pattern. Leave to dry. Repeat the process when the garment has been washed. |
|||||||||||||||||||
Diagram explanations |
|||||||||||||||||||
|
|||||||||||||||||||
|
|||||||||||||||||||
|
|||||||||||||||||||
|
|||||||||||||||||||
|
|||||||||||||||||||
|
Have you made this or any other of our designs? Tag your pictures in social media with #dropsdesign so we can see them! Do you need help with this pattern?You'll find tutorial videos, a Comments/Questions area and more by visiting the pattern on garnstudio.com. © 1982-2024 DROPS Design A/S. We reserve all rights. This document, including all its sub-sections, has copyrights. Read more about what you can do with our patterns at the bottom of each pattern on our site. |
|||||||||||||||||||


With over 40 years in knitting and crochet design, DROPS Design offers one of the most extensive collections of free patterns on the internet - translated to 17 languages. As of today we count 304 catalogues and 11422 patterns - 11422 of which are translated into English (UK/cm).
We work hard to bring you the best knitting and crochet have to offer, inspiration and advice as well as great quality yarns at incredible prices! Would you like to use our patterns for other than personal use? You can read what you are allowed to do in the Copyright text at the bottom of all our patterns. Happy crafting!
Comments / Questions (14)
Is there any chance these could be posted with row by row instruction at some point? I love your designs, but the charts are super hard for a lot of folks to understand to the point that it seems like they're sort of notorious for it. Is there any chance you might consider coming back around and translating them to text? I'm still new to knitting and thought a shawl would be great practice but I'm so lost at the first stripe!
28.12.2022 - 18:57DROPS Design answered:
Dear Ferabird, there are only diagrams to this pattern, but this lesson explains how to read diagram and should help you understanding how to work them. Happy knitting!
02.01.2023 - 11:29Det er ikke merke for Forkortede pinner i diagram: . A.3b .
04.08.2022 - 23:21DROPS Design answered:
Hej Anita, vi skal høre med design om vi kan få dem med i diagrammet - tak for info :)
05.08.2022 - 12:11Står ikke merke for Forkortede pinner i diagram A.3b .
04.08.2022 - 23:18Ik heb een vraag over de verkorte toeren. Als ik het goed begrijp brei je bij de eerste verkorte toer van de 27 steken die je dan hebt de twee kantsteken en daarna drie steken waarnaar je het werk keert en terug breit. Klopt het dan dat je bij de volgende verkorte toer er vijf breit, daarna 7 etc?
27.10.2019 - 21:01DROPS Design answered:
Dag Emma,
Dat klopt inderdaad. Je breit verkorte toeren over de buitenste herhaling van het telpatroon en over de 2 kantsteken. Als het telpatroon op dat moment 3 steken heeft, brei je dus verkorte toeren over 5 steken in totaal. Omdat het telpatroon meerdert in aantal steken, zitten er dus steeds meer steken in de verkorte toeren. Op de eerstvolgende verkorte toer heb je inderdaad 7 steken in totaal.
29.10.2019 - 10:04Negli schemi A la gettava va ancora fatta ritorta? Continuando a farla ritorta sparisce il motivo è non viene come la foto
14.08.2019 - 00:30DROPS Design answered:
Buongiorno Matteo. Le maglie gettate negli schemi non vengono lavorate ritorte. Deve rimanere un buco. Buon lavoro!
14.08.2019 - 07:38Hiba a leírásban: "Most folyt LUSTAKÖTÉSSEL, lásd a fenti magyarázatot és szap következő módon: Szap a 3. és a 6. jelölő után, valamint az 1. és a 4. jelölő előtt". Helyesen: "Most folyt LUSTAKÖTÉSSEL, lásd a fenti magyarázatot és szap következő módon: Szap az 1. és a 2. jelölő után, valamint az 3. és a 4. jelölő előtt"
28.04.2019 - 19:19Bonjour, j’ai du mal à comprendre les rangs raccourcis. Vous parlez de 6 rangs mais dans les explications, il y en a 5. Pourrez-vous m’aider ? (1 et : 2 enfin puis les 24 m end ? Tourne Puis 2 rg : 24 m env , 2 end. 3 rg : 2 end, 24 m avec les jetés du diag A1 puis 2 end. 4 rg : 2 end, 24 m env puis je suis bloquée ??? Il est mis rang retour c’est à dire ? Merci d’avance.
07.10.2018 - 23:34DROPS Design answered:
Bonjour Maud, on tricote 5 rangs au total pour les rangs raccourcis et on répète ces 5 rangs tous les 6 rangs (cf diagrammes). Les rangs raccourcis se tricotent ainsi: Rg1: 2 m point mousse, en jersey sur les mailles du 1er motif de A.1 (ce nombre de m va augmenter au fur et à mesure, mais on en a 3 la 1ère fois), tournez. Rg2: tricotez le rang retour (= sur l'envers). Rg3: tricotez toutes les mailles en suivant les diagrammes (le rang avec le rond). Rg4: (sur l'envers): 2 m point mousse, le 1er A.1 en jersey. tournez. Rg5: tricotez les m du rang 3 sur l'endroit. Au rang suivant, tricotez le rang suivant du diagramme (celui après le rond = sur l'envers). Bon tricot!
08.10.2018 - 09:46Czy w schemacie nie ma błędu? Chodzi mi o rzędy, które na prawej stronie mają być oczkami lewymi (xxxxxxx). Wydaje mi się, że powinny się powtarzać co każde 6 rzędów i tak to wygląda na zdjęciu gotowego szalu. Sama robiąc szal najpierw robiłam dokładnie wg wzoru, ale potem zdecydowałam się spruć i robić tak, że lewe rzędy powtarzałam regularnie - wyglądało to zdecydowanie lepiej. Powtarzalność rzędów czyni ten szal pięknym.
19.06.2018 - 11:15DROPS Design answered:
Witamy! Na schemacie są od czasu do czasu rzędy tylko oczek lewych. Jest to widoczne na zdjęciu szala. Jeżeli jednak bardziej podoba Ci się w wersji bez oczek lewych, to cieszymy się. Koniecznie zamieść zdjęcie swojego szala w grupie DROPS Workshop na facebooku. Pozdrawiamy!
19.06.2018 - 21:17Habe schon gleich bei den ersten Reihen eine Frage... Sie betrifft die verkürzten Reihen. Werden diese jeweils pro Rapport gestrickt oder nur jeweils an der Seite ( " beidseitig")? Und laut Muster wird in der dritten Reihe mit Umschlägen zugenommen. Diese werden also dann in der letzten Reihe der verkürzten Reihe eingearbeitet? Oder sind "hin/wenden/zurück/wenden" zusätzliche Reihen?
31.08.2017 - 17:11DROPS Design answered:
Liebe Steffi, die verkürzten Reihen werden glatt re gestrickt (die kommen zusätzlich zum Muster) wie unter VERKÜRZTE REIHEN erklärt: 2 Reihen glatt re über 1 Rapport A.1 mit 2 M Kraus re (= auf die rechte Seite von der Vorderseite gesehen), 1 Hin-Reihe im Muster über alle Maschen, und 2 Reihen glatt re über 1 Rapport A.1 mit 2 M Kraus re (= auf der andere Seite = linke Seite von der VorderSeite gesehen), dann die Rückreihe im Muster über alle M stricken. Viel Spaß beim stricken!
01.09.2017 - 08:34Dell Chan wrote:
Question # 1 Short Rows. "Repeat the short rows as shown in diagram = on every 6th row". " o=on this row work SHORT ROWS". On the diagrams A.1, A,2 and A3a, the " o " is on Row 7. When (which row) is the repeat to be done? Question # 2 : " ....working stocking st over all sts in 1st repetition A.1 (=3sts on 1st row in diagram) ..... " Does this means 3 sts or 3 sts x 8 repeats = 24 sts ( ie all the stitches) ? Thank you. DC
24.11.2016 - 18:09DROPS Design answered:
Dear Dell Chan, you repeat the short rows every 6th row, ie work 5 rows as in diagrams and on next row, repeat short row. Short rows are worked over sts in 1st repetition of A.1 only, ie there are 3 sts in A.1 on first row, but then when working A.1 and repeating the short rows there will be more sts (see diagram), work only the sts in first repetition in A.1 for the short rows. Happy knitting!
25.11.2016 - 08:41