DROPS Alpaca
DROPS Alpaca
100% Alpaca
from 3.40 £ /50g
Get the yarn to make this pattern from 27.20£.

The yarn cost is calculated from the pattern’s smallest size and the yarn’s cheapest product type. Looking for an even better price? You might find it on the DROPS Deals!

DROPS SS24

Aurora Borealis

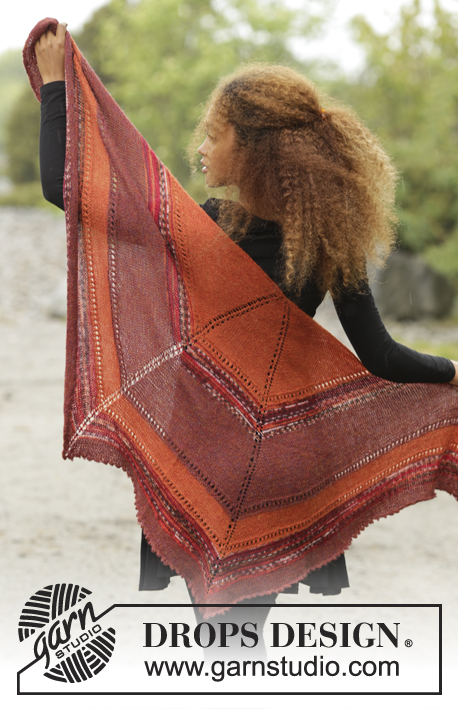
Knitted DROPS shawl with zig-zag pattern, lace pattern and stripes in ”Alpaca”.

DROPS 171-13
DROPS design: Pattern no z-754
Yarn group A
----------------------------------------------------------
Measurements: Width at the top: 148 cm Length in the middle: 74 cm
Materials:
DROPS ALPACA from Garnstudio
150 g colour no 7240, petrol
100 g colour no 6360, blue
100 g colour no 4400, dark purple
50 g colour no 7815 green/turquoise

NOTE: If the shawl is worked with one colour 350 g are used of Alpaca.

DROPS CIRCULAR NEEDLE (80 cm) SIZE 3.5 mm - or size needed to get 23 sts x 30 rows in stocking st = 10 x 10 cm.

-------------------------------------------------------

Alternative Yarn – See how to change yarns here
Yarn Groups A to F – Use the same pattern and change the yarn here
Yarn usage using an alternative yarn – Use our yarn converter here

-------------------------------------------------------

DROPS Alpaca
DROPS Alpaca
100% Alpaca
from 3.40 £ /50g
Get the yarn to make this pattern from 27.20£.

The yarn cost is calculated from the pattern’s smallest size and the yarn’s cheapest product type. Looking for an even better price? You might find it on the DROPS Deals!

Pattern instructions

NOTE: This pattern is written in British English. All measurements in charts are in cm. For conversion from cm to inches - click here. There are different terms for crocheting in British and American English. If this pattern includes crochet, click for "crochet terms" here. For this pattern in American English, please click here.
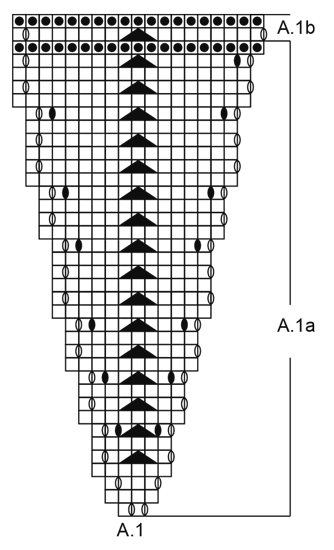
GARTER ST (back and forth):
K all rows. 1 ridge = 2 rows K.

MEASUREMENTS
All measurements given in pattern are measured at the longest.

PATTERN:
See diagrams A.1 to A.6. The diagrams show all rows in pattern seen from RS.
When diagram A.6 and A.1b are repeated, there are more and more sts between YO and dec (dec = slip 2 sts as if to K, K 1, pass the 2 slipped sts over) than shown in diagram, note that the dec will repeat vertically over themselves until finished measurements.
----------------------------------------------------------

SHAWL:
Worked top down, back and forth on circular needle to make room for all the sts. Cast on 5 sts on circular needle size 3.5 mm with blue.

STRIPE 1 (stocking st):
ROW 1 (= WS): * K 1, 1 YO *, repeat from *-* until 1 st remains, K 1 = 9 sts.
ROW 2 (= RS): K all sts.
ROW 3 (= WS): K 2, * 1 YO, K 1 *, repeat from *-* 6 times in total, finish with K 1 = 15 sts.

Then work pattern as follows, beg from RS: Work 2 edge sts in GARTER ST – see explanation above, repeat A.1a 6 times in total but on last repetition do not work last st in diagram (i.e. last repetition = 1 st), finish with 2 edge sts in garter st. Continue pattern like this. Work edge sts in garter st until finished measurements. REMEMBER THE KNITTING TENSION When A.1a has been worked 1 time vertically, there are 117 sts on needle (= 19 sts in each of the first 5 repetitions of A.1a and 18 sts in the last repetition). Piece measures approx. 12 cm - READ MEASUREMENTS.

STRIPE 2 (lace pattern):
Switch colour to petrol. Work A.1b over A.1a. Then work lace pattern as follows: Work 2 edge sts in garter st, * A.2 over the next 2 sts, repeat A.3 (= 7 sts) over the next 14 sts (= 2 times in total in width), A.4 over the next 3 sts *, repeat from *-* 5 times in total, then work A.2 over the next 2 sts, repeat A.3 (= 7 m) over the next 14 sts (= 2 times in total in width), A.4 over the next 2 sts (i.e. do not work last st in A.4), finish with 2 edge sts in garter st. Continue pattern like this. When A.2 to A.4 have been worked 1 time vertically, there are 201 sts on needle (= 33 sts in each of the first 5 repetitions of A.2 to A.4 and 32 sts in the last repetition of A.2 to A.4). Work next row as follows from RS: Work 2 edge sts in garter st, repeat A.5a (= 33 sts) 6 times in total in width but on last repetition in width do not work last st in diagram, finish with 2 edge sts in garter st. When A.5a has been worked 1 time vertically, there are 207 sts on needle (= 34 sts in each of the first 5 repetitions and 33 sts in the last repetition).

STRIPE 3 (stocking st):
Switch colour to green/turquoise. Work A.5b over A.5a. When A.5b has been worked 1 time vertically, there are 255 sts on needle (= 42 sts in each of the first 5 repetitions and 41 sts in the last repetition). Piece measures approx. 26 cm.

Work 2 edge sts in garter st, work and inc as A.6a 6 times in total but on last repetition in width do not work last st in diagram, finish with 2 edge sts in garter st. When A.6a has been worked 3 times vertically - READ PATTERN, there are 327 sts on needle (= 54 sts in each of the first 5 repetitions of A.6a and 53 sts in the last repetition).

Then work A.6b over A.6a (note that dec will continue over itself vertically until finished measurements) AT THE SAME TIME on first row in A.6b dec 4 sts evenly on each side of dec in every A.6b (= 8 sts dec in every A.6b = 48 sts dec in total on entire shawl) = 285 sts on needle (= 47 sts in each of the first 5 repetitions of A.6b and 46 sts in the last repetition). Piece measures approx. 37 cm.

STRIPE 4 (lace pattern):
Switch colour to dark purple. Work A.1b over A.6b.

Then work lace pattern as follows: Work 2 edge sts in garter st, * A.2 over the next 2 sts, repeat A.3 (= 7 sts) over the next 42 sts (= 6 times in total in width), A.4 over the next 3 sts *, repeat from *-* 5 times in total, then work A.2 over the next 2 sts, repeat A.3 (= 7 m) over the next 42 sts (= 6 times in total in width), A.4 over the next 2 sts (i.e. do not work last st in A.4), finish with 2 edge sts in garter st. Continue pattern like this.

When A.2 to A.4 have been worked 1 time vertically, there are 369 sts on needle (= 61 sts in each of the first 5 repetitions of A.2 to A.4 and 60 sts in the last repetition of A.2 to A.4). Work next row as follows from RS: Work 2 edge sts in garter st, repeat A.6b 6 times in total in width but on last repetition do not work last st in diagram, finish with 2 edge sts in garter st = 375 sts (= 62 sts in each of the first 5 repetitions of A.6b and 61 sts in the last repetition). Piece measures approx. 50 cm.

STRIPE 5 (stocking st):
Switch to blue. Work A.1b AT THE SAME TIME on first row inc 4 sts evenly on each side of dec in every A.1b (= 8 sts inc in every A.1b = 48 sts inc in total on entire shawl) = 423 sts (= 70 sts in each of the first 5 repetitions of A.1b and 69 sts in the last repetition).

Work 2 edge sts in garter st, work and inc as A.6a 6 times in total but on last repetition do not work last st in diagram, finish with 2 edge sts in garter st. When A.6a has been worked 3 times vertically, there are 495 sts on needle (= 82 sts in each of the first 5 repetitions of A.6a and 81 sts in the last repetition).

then work A.6b over A.6a AT THE SAME TIME on first row in A.6b dec 4 sts evenly on each side of dec in every A.6b (= 8 sts dec in every A.6b = 48 sts dec in total on entire shawl) = 453 sts on needle (= 75 sts in each of the first 5 repetitions of A.6b and 74 sts in the last repetition). Piece measures approx. 61 cm.

STRIPE 6 (lace pattern):
Switch colour to petrol. Work A.1b over A.6b.
Then work lace pattern as follows: Work 2 edge sts in garter st, * A.2 over the next 2 sts, repeat A.3 (= 7 sts) over the next 70 sts (= 10 times in total in width), A.4 over the next 3 sts *, repeat from *-* 5 times in total, then work A.2 over the next 2 sts, repeat A.3 (= 7 sts) over the next 70 sts (= 10 times in total in width), A.4 over the next 2 sts (i.e. do not work last st in A.4), finish with 2 edge sts in garter st. Continue pattern like this. When A.2 to A.4 have been worked 1 time vertically, there are 537 sts on needle (= 89 sts in each of the first 5 repetitions of A.2 to A.4 and 88 sts in the last repetition of A.2 to A.4).

Work next row as follows from RS: Work 2 edge sts in garter st, repeat A.6b 6 times in total but on last repetition do not work last st in diagram, finish with 2 edge sts in garter st = 543 sts (= 90 sts in each of the first 5 repetitions of A.6a and 89 sts in the last repetition). Loosely cast off. Piece measures approx. 74 cm.

Diagram

symbols = K from RS, P from WS
symbols = K from WS
symbols = 1 YO between 2 sts, DO NOT work YO twisted on next row, it should make hole

symbols = 1 YO between 2 sts, work YO twisted on next row, it should NOT make hole
symbols = K 2 tog
symbols = slip 1 st as if to K, K 1, psso
symbols = slip 2 sts tog as if to K, K 1, pass the 2 slipped sts over
diagram
diagram
diagram
Do you have a question? See a list of frequently asked questions (FAQ)

Knitting tension is what determines the final measurements of your work, and is usually measured per 10 x 10 cm. It is provided like so: number of stitches in width x number of rows in height - eg: 19 stitches x 26 rows = 10 x 10 cm.

The knitting tension is very individual; some people knit/crochet loosely while others work tightly. You adjust the knitting tension with the needle size, which is why the suggested needle size is only meant as a guide! You need to adjust this (up or down) to ensure that YOUR knitting tension matches the knitting tension provided in the pattern. If you work with a different knitting tension than provided you will have a different yarn consumption, and your work will have different measurements than what the pattern suggests.

The knitting tension also determines which yarns can replace each other. As long as you achieve the same knitting tension you can replace one yarn with another.

See DROPS lesson: How to measure your tension/gauge

See DROPS video: How to make a gauge tension swatch

The required amount of yarn is provided in grams, eg: 450 g. To calculate how many balls you’ll need you first need to know how many grams are in 1 ball (25g, 50g or 100g). This information is available if you click on the individual yarn quality on our pages. Divide the amount required with the amount of each ball. For example, if each ball is 50g (the most common amount), the calculation will be as follows: 450 / 50 = 9 balls.

The important thing when changing from one yarn to another is that the knitting/crochet tension remains the same. This is so that the measurements of the finished piece will be the same as on the sketch provided. It is easier to achieve the same knitting tension using yarns from the same yarn group. It is also possible to work with multiple strands of a thinner yarn to achieve the knitting tension of a thicker one. Please try our yarn converter. We recommend you to always work a test swatch.

Please NOTE: when changing yarn the garment might have a different look and feel to the garment in the photo, due to individual properties and qualities of each yarn.

See DROPS lesson: Can I use a different yarn than the one mentioned in the pattern?

All our yarns are categorised into yarn groups (from A to F) according to thickness and knitting tension – group A contains the thinnest yarns and group F the thickest. This makes it easier for you to find alternative yarns to our patterns, should you wish to switch yarn. All yarns within the same group have a similar knitting tension and can easily replace each other. However, different yarn qualities have different structures and properties which will give the finished work a unique look and feel.

Click here for an overview of the yarns in each yarn group

At the top of all our patterns you’ll find a link to our yarn calculator, which is a helpful tool should you wish to use a different yarn than suggested. By filling in the yarn quality you wish to replace, the amount (in your size) and number of strands, the calculator will present good alternative yarns with the same knitting tension. Additionally it will tell you how much you’ll require in the new qualities and whether you’ll need to work with multiple strands. Most skeins are 50g (some are 25g or 100g).

If the pattern is worked with multiple colours, every colour will have to be calculated separately. Similarly, if the pattern is worked with several strands of different yarns (for example 1 strand Alpaca and 1 strand Kid-Silk) you will have to find alternatives for each, individually.

Click here to see our yarn calculator

Since different yarns have different qualities and textures we have chosen to keep the original yarn in our patterns. However, you can easily find options among our available qualities by using our yarn calculator, or simply pick a yarn from the same yarn group.

It is possible that some retailers still have discontinued yarns in stock, or that someone has a few skeins at home that they would like to find patterns for.

The yarn calculator will provide both alternative yarn as well as required amount in the new quality.

If you think it's hard to decide what size to make, it can be a good idea to measure a garment you own already and like the size of. Then you can pick the size by comparing those measures with the ones available in the pattern's size chart.

You'll find the size chart at the bottom of the pattern.

See DROPS lesson: How to read size chart

The needle size provided in the pattern serves only as a guide, the important thing is to follow the knitting tension. And since knitting tension is very individual, you will have to adjust the needle size to ensure that YOUR tension is the same as in the pattern – maybe you’ll have to adjust 1, or even 2 needle sizes, up or down to achieve the correct tension. For this, we recommend that you work test swatches.

Should you work with a different knitting tension than the one provided, the measurements of the finished garment might deviate from the measurement sketch.

See DROPS lesson: How to measure your tension/gauge

See DROPS video: How to make a tension/gauge swatch

Working a garment top-down provides more flexibility and room for personal adjustment. For example it is easier to try the garment on while working, as well as making adjustments to length of yoke and shoulder caps.

The instructions are carefully explaining every step, in the correct order. Diagrams are adjusted to the knitting direction and are worked as usual.

The diagram depicts all rows/rounds, and every stitch seen from the right side. It is read from bottom to top, from right to left. 1 square = 1 stitch.

When working back and forth, every other row is worked from the right side and every other row is worked from the wrong side. When working from the wrong side, the diagram will have to be worked reversed: from left to right, knit stitches are purled, purl stitches are knit etc.

When working in the round every round is worked from the right side and the diagram are worked from right to left on all rounds.

See DROPS lesson: How to read knitting diagrams

The diagram depicts all rows/rounds, and every stitch seen from the right side. It is worked from bottom to top, from right to left.

When working back and forth every other row is worked from the right side: from right to left and every other row is worked from the wrong side: from left to right.

When working in the round, every row in the diagram are worked from the right side, from right to left.

When working a circular diagram you start in the middle and work your way outwards, counter clockwise, row by row.

The rows usually start with a given number of chain stitches (equivalent to the height of the following stitch), this will either be depicted in the diagram or explained in the pattern.

See DROPS lesson: How to read crochet diagrams

Instructions for working several diagrams after each other on the same row/round, will often be written like so: “work A.1, A.2, A.3 a total of 0-0-2-3-4 times". This means you work A.1 once, then A.2 is worked once, and A.3 is repeated (in width) the number of times provided for your size – in this case like so: S = 0 times, M = 0 times, L=2 times, XL= 3 times and XXL = 4 times.

The diagrams are worked as usual: begin with the first row in A.1, then work the first row in A.2 etc.

See DROPS lesson: How to read knitting diagrams

See DROPS lesson: How to read crochet diagrams

The total width of the garment (from wrist-to-wrist) will be larger in the larger sizes, despite the actual sleeves being shorter. The larger sizes have longer sleeve caps and wider shoulders, so there will be a good fit in all sizes.

The measurement sketch/schematic drawing provides information regarding the full length of the garment. If it’s a jumper or a jacket the length is measured from the highest point on the shoulder closest to the neckline, and straight down to the bottom of the garment. It is NOT measured from the tip of shoulder. Similarly, the length of yoke is measured from the highest point on the shoulder and down to where yoke is split into body and sleeves.

On a jacket measures are never taken along bands, unless specifically stated. Always measure inside band stitches when measuring the length.

See DROPS lesson: How to read a schematic drawing

Diagrams are often repeated on the round or in height. 1 repeat is the diagram the way it appears in the pattern. If it says to work 5 repeats of A.1 in the round, then you work A.1 a total of 5 times after/next to each other in the round. If it says to work 2 repeats of A.1 vertically/in height you work the entire diagram once, then begin again at the start and work the entire diagram one more time.

Chain stitches are slightly narrower than other stitches and to avoid working the cast-on edge too tight, we simply chain more stitches to begin with. The stitch count will be adjusted on the following row to fit the pattern and measurement sketch.

The rib edge is more elastic and will contract slightly compared to, for example, stocking stitch. By increasing before the rib edge, you avoid a visible difference in width between the rib edge and the rest of the body.

It’s very easy to cast off too tightly, and by making yarn overs while casting off (and simultaneously casting these off) you avoid a too tight cast off edge.

See DROPS video: How to bind off with yarn overs (yo)

To achieve an even increase (or decrease) you can increase on, for example: every 3rd and 4th row alternately, like so: work 2 rows and increase on the 3rd row, work 3 rows and increase on the 4th. Repeat this until the increase is complete.

See DROPS lesson: Increase or decrease 1 st on every 3rd and 4th row alternately

Should you prefer to work in the round instead of back and forth, you may of course adjust the pattern. You’ll need to add steeks mid-front (usually 5 stitches), and follow the instructions. When you would normally turn and work from the wrong side, simply work across the steek and continue in the round. At the end you’ll cut the piece open, pick up stitches to work bands, and cover the cut edges.

See DROPS video: How to knit steeks and cut open

Should you prefer to work back and forth instead of in the round, you may of course adjust the pattern so you work the pieces separately and then assemble them at the end. Divide the stitches for the body in 2, add 1 edge stitch in each side (for sewing) and work the front and back pieces separately.

See DROPS lesson: Can I adapt a pattern for circular needles into straight needles?

Pattern repeats can vary slightly in the different sizes, in order to get the correct proportions. If you’re not working the exact same size as the garment in the photo, yours might deviate slightly. This has been carefully developed and adjusted so that the complete impression of the garment is the same in all sizes.

Make sure to follow instructions and diagrams for your size!

If you have found a pattern you like which is available in women’s size it’s not very difficult to convert it to men’s size. The biggest difference will be the length of sleeves and body. Start working on the women size that you think would fit across the chest. The additional length will be worked right before you cast off for the armhole/sleeve cap. If the pattern is worked top-down you can add the length right after the armhole or before the first decrease on sleeve.

Regarding additional yarn amount, this will depend on how much length you add, but it is better with a skein too many than too few.

All yarns will have excess fibres (from production) that might come off as lint or shedding. Brushed yarns (ie hairier yarns) have more of these loose, excess fibres, causing more shedding.

Shedding also depends on what is worn under or over the garment, and whether this pulls at the yarn fibres. It’s therefore not possible to guarantee that there will be no shedding

Below are some tips on how to get the best result when working with hairier yarns:

1. When the garment is finished (before you wash it) shake it vigorously so the looser hairs come off. NOTE: do NOT use a lint roller, brush or any method that pulls at the yarn.

2. Place the garment in a plastic bag and put it in your freezer - the temperature will cause the fibres to become less attached to each other, and excess fibres will come off easier.

3. Leave in the freezer for a few hours before taking it out and shaking it again.

4. Wash the garment according to the instructions on the yarn label.

Pilling is a natural process that happens to even the most exclusive of fibers. It's a natural sign of wear and tear that is hard to avoid, and that is most visible in high friction areas of your garment like a sweater's arms and cuffs.

You can make your garment look as new by removing the pilling, using a fabric comb or a pill/lint remover.

Still can't find the answer you need? Then scroll down and leave your question so one of our experts can try to help you. This will be done normally within 5 to 10 working days.
In the meantime, you can read the questions and answers that others have left to this pattern or join the DROPS Workshop on Facebook to get help from fellow knitters/crocheters!

You might also like...

Post a comment to pattern DROPS 171-13

We would love to hear what you have to say about this pattern!

If you want to leave a question, please make sure you select the correct category in the form below, to speed up the answering process. Required fields are marked *.

Comments / Questions (43)

country flag Augusta Jensen wrote:

Hej. Forstår ikke at den sidste 1 m før 2 kantmasker skal med, så der er 2 kantmasker når man starter men 3 kantmasker til sidst. :-(

08.02.2024 - 05:23

DROPS Design answered:

Hei Augusta. Når du har 15 masker på pinnen starter du med 2 kant-m (retstrik), så strikker du A.1a over 10 masker og for at det skal bli likt i begge sider, strikker du ikke siste maske av A.1a når du skal strikke A.1a siste gang. Du strikker kun 1 kast, 1 rett, 1 kast. Du har nå 2 masker igjen = 2 kant-m (i retstrik). Nå starter og slutter man med kast (før og etter de 2 kant maskene. mvh DROPS Design

16.02.2024 - 10:17

country flag Maria Gloria Zanardi wrote:

I started the first 3 step of Aurora Borealis. 3 doubts: when you say "all stitches in K" do you intend all, or just row 2?and when I start diagram 1a,4th row is to be knitted K or P? I should have 15 stitches, 2 garter, 6 yo and 6 k-2garter=27 st. But I end with 25...

26.11.2023 - 11:29

DROPS Design answered:

Dear Maria, in the STRIPE 1, it indicates how to work each row. In ROW 2, it says K all sts, so you knit all of the stitches in that specific row. Since we work back and forth and the first row is from the right side, then the 4th row is from the wrong side and is purled. In the first row of A.1a you should have: 2 garter sts, then you work 5 repeats of A.1a, where you increase 2 stitches in each repeat (= 10 increases) and work A.1a again (with 2 increases, but worked over only one stitch) and 2 garter stitch stitches. So you have 2 + 5*4 (=20) (2 knit and 2 yarn overs in each repeat) +3 (1 knit and 2 yarn overs) + 2 sts in garter stitch = 27 in total. Happy knitting!

26.11.2023 - 22:38

country flag Maria Gloria Zanardi wrote:

Ma se partiamo dal rovescio del lavoro facendo 3 ferri, come posso partire dallo schema sul diritto? Nello schema ci sono gettati che vanno sopra, altri gettati?

25.11.2023 - 14:46

DROPS Design answered:

Buonasera Maria Gloria, il 3° ferro dell'inizio è sul rovescio del lavoro, quindi quello successivo in cui parte il motivo è sul diritto. Buon lavoro!

26.11.2023 - 23:15

country flag MO Diederiks wrote:

Welke driehoekjes?

19.03.2023 - 18:32

DROPS Design answered:

Dag MO Diederiks,

De zwarte driehoekjes in het midden (1 steek afhalen, 2 samenbreien, de afgehaalde steek overhalen.

21.03.2023 - 21:18

country flag MO Diederiks wrote:

"Brei dan A.6b en A.6a (let op dat U de minderingen recht boven elkaar maakt in de hoogte tot het werk klaar is) en minder tegelijkertijd in A.6b 4 steken gelijkmatig aan elke kant van de mindering in elke A.6b" Ik zie in het schema van A.6a en A.6b geen minderingen staan. Wat wordt er bedoeld?

18.03.2023 - 12:47

DROPS Design answered:

Dag MO Diederiks,

Volgens mij wordt er bedoeld dat je de driehoekjes in het midden van het telpatroon boven elkaar hebt.

19.03.2023 - 16:35

country flag Perkele wrote:

On todella sekavasti selvitetty ohje, harmi kun alotin, hermot menee ......

27.06.2021 - 18:08

country flag GAUTHEROT wrote:

Bonjour , je crois que je viens de comprendre enfin !!! il était temps !! en faites 4 augm . oui il y a 2 augm a la 1ere ligne et 2 augm a la 7 eme ligne , donc il faut que je diminue a ces deux lignes-ci ? donc 2 mailles ensembles avant le trapèze ? Ai -je bien compris ?merci pour votre patience !!bonne journée

10.05.2021 - 14:11

DROPS Design answered:

Bonjour Mme Gautherot, effectivement, dans A.6a vous devez bien augmenter 2 m au 1er rang et 4 m au 7ème rang, les autres rangs doivent conserver le nombre de mailles = autant de jetés que de diminutions aux rangs 3 et 5. Au milieu de chaque A.6a vous diminuez 2 mailles: glissez 2 m comme pour les tricoter ens à l'end, 1 m end, passez les 2 m glissées par-dessus la m tricotée. Bon tricot!

10.05.2021 - 14:43

country flag GAUTHEROT wrote:

Bonjour , je suis comme Mme Dekepper , je ne comprends pas ce que je dois faire après avoir fait 1 fois A6a , je me retrouve comme cette dame avec 4 mailles de trop , mais quand je lis votre réponse je ne comprends pas encore , désolé ! quand vous dites 4 augm , c'est sur la totalité du A6a ?

10.05.2021 - 13:44

DROPS Design answered:

Bonjour Mme Gautherot, ce n'est pas facile de trouver l'erreur à distance, vérifiez bien le nombre de mailles que vous avez au dernier rang du dernier A.6a autrement dit: 2 m point mousse, 5 fois A.6a de 82 mailles chacun, 1 fois A.6a de 81 m, 2 m point mousse = 2 + 5x82 + 81 + 2= 495 mailles. Puis vous tricotez A.6b au-dessus de A.6a = 2 m point mousse + 5 x A.6b de 75 m chacun (= 82 + 1 augm - 8 dim= 75 m dans chaque A.6b) + 1 x A.6B de 74 m (= 81+1-8) + 2 m point mousse = 453 mailles après A.6b. Bon tricot!

10.05.2021 - 14:39

country flag GAUTHEROT wrote:

Bonjour , je tricote le châle Aurora Boréalis et je bloque encore au niveau de : Rayure 3(jersey) quand il est dit tricoter ensuite A.6b (noter que les diminutions vont continuer d'elles mêmes .....) il y a des diminutions a faire ? une fois que j'ai tricoté A6a 3fois en hauteur je dois me retrouver avec 327 mailles , je dois faire des diminutions en plus du A6b ? pour me retrouver avec 285 mailles ?merci pour votre réponse ! bonne journée à vous !

06.05.2021 - 10:53

DROPS Design answered:

Bonjour Mme Gautherot, A.6b se compose des 2 derniers rangs juste après A.6a, autrement dit, vous commencez par 1 jeté, 1 m end, 1 jeté, tricotez à l'endroit jusqu'au milieu du diagramme en diminuant 2 m et tricotez la diminution (triangle noir) au-dessus de celles de A.6a), tricotez à l'endroit jusqu'à ce qu'il reste 1 m en diminuant 2 m et terminez le diagramme par 1 m end, 1 jeté = vous diminuez 6 mailles dans chaque A.6b, autrement dit vous aurez 47 mailles dans chacun des 5 premiers A.6b et 46 m dans le dernier. Bon tricot!

06.05.2021 - 11:13

country flag GAUTHEROT wrote:

Bonjour j'essaie de faire le châle Aurora Boréalis , mais je ne comprends pas la 5e rangée glisser de mailles...., je ne trouve pas 51 mailles a la fin de mon rang?pourriez vous m'expliquer s'il vous plaît ? merci beaucoup !

26.04.2021 - 10:24

DROPS Design answered:

Bonjour Mme Gautherot, parlez-vous du rang 5 de A.1a? à la fin de ce rang-là, vous devez avoir 39m : 2 m point mousse, 5 x 6 mailles de A.1, 1 x 5 mailles de A.1, 2 m point mousse = 39 m. Pensez-vous à un autre diagramme? Pouvez-vous nous indiquer auquel vous pensez? Il sera plus facile de pouvoir vérifier ensemble. Merci pour votre compréhension!

26.04.2021 - 12:51