DROPS Snow
DROPS Snow
100% Wool
from 2.65 $ /50g
Get the yarn to make this pattern from 34.45$.

The yarn cost is calculated from the pattern’s smallest size and the yarn’s cheapest product type. Looking for an even better price? You might find it on the DROPS Deals!

DROPS SS24

Winter Hues

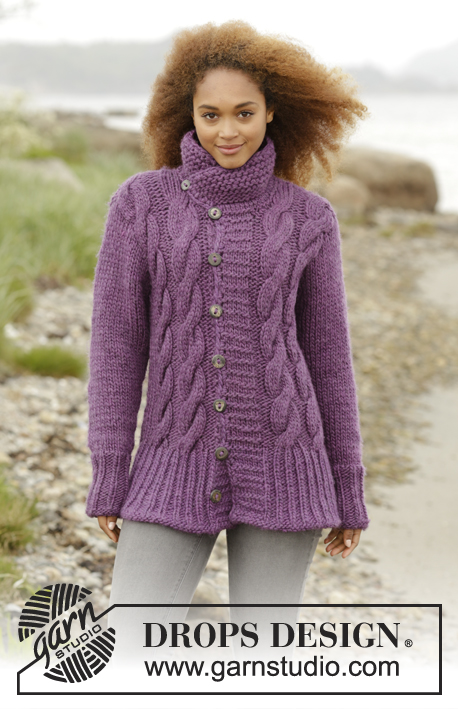
Knitted DROPS jacket with double seed st in band and shawl collar in ”Snow” or DROPS Wish. Size: S - XXXL.

DROPS 171-2
DROPS design: Pattern no ee-565
Yarn group E or C + C
----------------------------------------------------------
Size: S - M - L - XL - XXL - XXXL
Materials:
DROPS SNOW from Garnstudio
650-750-800-900-1000-1050 g color no 21, blue/violet

Or use:
DROPS WISH from Garnstudio
450-550-600-650-750-750 g color no 09, denim blue

DROPS CIRCULAR NEEDLE (60 or 80 cm / 24" or 32") size 8 mm / US 11 - or size needed to get 11 sts x 15 rows in stockinette st = 4" x 4" (10 x 10 cm).
DROPS CIRCULAR NEEDLE (60 or 80 cm / 24" or 32") size 7 mm / US 10.75 for garter st - or size needed to get 12 sts x 16 rows in stockinette st = 4" x 4" (10 x 10 cm).
DROPS MOTHER-OF-PEARL BUTTON ARCHED (white), NO 540: 2 pieces for all sizes

-------------------------------------------------------

Alternative Yarn – See how to change yarns here
Yarn Groups A to F – Use the same pattern and change the yarn here
Yarn usage using an alternative yarn – Use our yarn converter here

-------------------------------------------------------

DROPS Snow
DROPS Snow
100% Wool
from 2.65 $ /50g
Get the yarn to make this pattern from 34.45$.

The yarn cost is calculated from the pattern’s smallest size and the yarn’s cheapest product type. Looking for an even better price? You might find it on the DROPS Deals!

Pattern instructions

NOTE: This pattern is written in American English. All measurements in charts are in cm. For conversion from inches to cm - click here. There are different terms for crocheting in American and British English. If this pattern includes crochet, click for "crochet terms" here. For this pattern in British English, please click here.
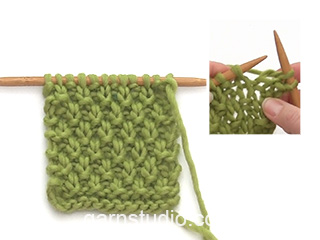
GARTER ST (back and forth):
K all rows. 1 ridge = K2 rows.

PATTERN:
See diagram A.1. Diagram shows all rows in pattern, seen from RS.

DECREASE TIP:
Dec inside 1 edge st in garter st. All dec are done from RS!
Dec as follows before 1 edge st: K 2 tog.
Dec as follows after 1 edge sts: Slip 1 st as if to K, K 1, psso.

INCREASE TIP
Increase 1 stitch with a yarn over inside 1 edge stitch on each side. Work the yarn overs twisted on next row to avoid holes.


BUTTONHOLES:
Dec for buttonholes on right band. 1 buttonhole = K tog fourth and fifth st from edge and make 1 YO.
Dec for buttonholes when piece measures:
SIZE S: 17 and 26 cm / 6¾" and 10¼"
SIZE M: 18 and 27 cm / 7" and 10½".
SIZE L: 19 and 28 cm / 7½" and 11".
SIZE XL: 20 and 29 cm / 8" and 11½".
SIZE XXL: 21 and 30 cm / 8¼" and 11¾".
SIZE XXXL: 22 and 31 cm / 8¾" and 12¼".
----------------------------------------------------------

BACK PIECE:
Worked back and forth on circular needle.
Cast on 62-66-70-78-82-86 sts on circular needle size 7 mm / US 10.75 with Snow or Wish. Work 2 ridges in GARTER ST - see explanation above. Switch to circular needle size 8 mm / US 11. Work in stockinette st with 3 sts in garter st in each side. When piece measures 8 cm / 3⅛", cast on 1 new st at the end of the next 2 rows = 64-68-72-80-84-88 sts. Work in stockinette st with 1 edge st in garter st in each side. REMEMBER THE KNITTING GAUGE When piece measures 11 cm / 4½", dec 1 st in each side of piece - READ DECREASE TIP! Dec like this every 3-3-4-3-4-4 cm / 1"-1"-1½"-1"-1½"-1½" 8-8-7-8-7-7 times in total = 48-52-58-64-70-74 sts. When piece measures 35-36-37-38-39-40 cm / 13¾"-14¼"-14½"-15"-15¼"-15¾", bind off for armhole in each side of piece on every other row: 3 sts 0-1-1-1-1-1 time, 2 sts 1-0-1-2-3-3 times and 1 st 1-1-2-2-2-3 times = 42-44-44-46-48-50 sts. When piece measures 52-54-56-58-60-62 cm / 20½"-21¼"-22"-22¾"-23⅝"-24⅜", bind off the middle 10-10-12-12-14-14 sts for neck = 16-17-16-17-17-18 sts remain on each shoulder. Bind off when piece measures 54-56-58-60-62-64 cm / 21¼"-22"-22¾"-23⅝"-24⅜"-25¼".

RIGHT FRONT PIECE:
Cast on 45-47-49-55-57-59 sts (includes 14-14-14-16-16-16 band sts) on circular needle size 7 with Snow or Wish. Work 2 ridges. Switch to circular needle size 8 mm / US 11. Work as follows from RS: 14-14-14-16-16-16 band sts in A.1, stockinette st until 3 sts remain, finish with 3 sts in garter st. Continue like this until piece measures 8 cm / 3⅛". Cast on 1 new st at the end of next row from RS = 46-48-50-56-58-60 sts. Work as follows from WS: 1 edge st in garter st, stockinette st until 14-14-14-16-16-16 sts remain, A.1 over band sts as before. Continue like this. When piece measures 11 cm / 4½", dec in the side (i.e. at the end of row from RS) as on back piece = 38-40-43-48-51-53 sts. REMEMBER BUTTONHOLES! When piece measures 35-36-37-38-39-40 cm / 13¾"-14¼"-14½"-15"-15¼"-15¾", bind off for armhole in the side as on back piece = 35-36-36-39-40-41 sts. When bind off for armhole is done work band sts (= 14-14-14-16-16-16 sts towards mid front) in garter st until finished measurements. When piece measures 54-56-58-60-62-64 cm / 21¼"-22"-22¾"-23⅝"-24⅜"-25¼", bind off the first 16-17-16-17-17-18 sts for shoulder on next row from WS = 19-19-20-22-23-23 sts remain for shawl collar. Continue in garter st over these sts - AT THE SAME TIME work short rows, beg from the neck (RS) as follows: * Work 1 ridge over all sts (= 2 rows K). On next row from RS K 14-14-14-16-16-16, turn and K back *, repeat from *-* until piece measures 7-7-8-8-9-9 cm / 2¾"-2¾"-3⅛"-3⅛"-3½"-3½" from bind off for shoulder (short side). Loosely bind off all sts.

LEFT FRONT PIECE:
Work as right front piece but reversed. Do not dec for buttonholes on left band.

SLEEVE:
Worked back and forth on circular needle. Cast on 34-34-36-36-38-38 sts (includes 1 edge st in each side) on circular needle size 7 mm / US 10.75 with Snow or Wish. Work 6 ridges. Switch to circular needle size 8 mm / US 11. Work in stockinette st with 1 edge st in garter st in each side. When piece measures 12-13-13-12-10-11 cm / 4¾"-5"-5"-4¾"-4"-4½", inc 1 st in each side of piece - READ INCREASE TIP! Inc like this every 8-6-6-5-5-4 cm / 3"-2¼"-2¼"-2"-2"-1½" 5-6-6-7-7-8 times in total = 44-46-48-50-52-54 sts. When piece measures 48-47-47-46-44-43 cm / 19"-18½"-18½"-18"-17¼"-17", bind off for sleeve cap in each side on every other row: 3 sts 1 time, 2 sts 1 time, 1 st 2-3-4-4-6-7 times, then bind off 2 sts in each side until piece measures 54-54-55-55-55-55 cm / 21¼"-21¼"-21½"-21½"-21½"-21½" , then bind off 3 sts 1 time in each side before binding off the remaining sts. Piece measures approx. 56-56-57-57-57-57 cm / 22"-22"-22½"-22½"-22½"-22½". Make another sleeve the same way.

ASSEMBLY:
Sew the shoulder seams tog. Sew in the sleeves inside 1 edge st. Sew side and sleeve seams in one inside 1 edge st down to where edge st were cast on (i.e. approx. 8 cm / 3" vent). Sew collar tog mid back - NOTE: Seam should be at the back so that it is not visible when collar is folded down. Sew collar along neckline in the back of neck. Sew buttons on left band.

Diagram

All measurements in charts are in cm.

symbols = K from RS, P from WS
symbols = P from RS, K from WS
diagram
Do you have a question? See a list of frequently asked questions (FAQ)

Knitting tension is what determines the final measurements of your work, and is usually measured per 10 x 10 cm. It is provided like so: number of stitches in width x number of rows in height - eg: 19 stitches x 26 rows = 10 x 10 cm.

The knitting tension is very individual; some people knit/crochet loosely while others work tightly. You adjust the knitting tension with the needle size, which is why the suggested needle size only serve as a guide! You need to adjust this (up or down) to ensure that YOUR knitting tension matches the knitting tension provided in the pattern. If you work with a different knitting tension than provided you will have a different yarn consumption, and your work will have different measurements than what the pattern suggests.

The knitting tension also determines which yarns can replace each other. As long as you achieve the same knitting tension you can replace one yarn with another.

See DROPS lesson: How to measure your tension/gauge

See DROPS video: How to make a gauge tension swatch

The required amount of yarn is provided in grams, eg: 450 g. To calculate how many balls you’ll need you first need to know how many grams are in 1 ball (25g, 50g or 100g). This information is available if you click on the individual yarn quality on our pages. Divide the amount required with the amount of each ball. For example, if each ball is 50g (the most common amount), the calculation will be as follows: 450 / 50 = 9 balls.

The important thing when changing from one yarn to another is that the knitting/crochet tension remains the same. This is so that the measurements of the finished piece will be the same as on the sketch provided. It is easier to achieve the same knitting tension using yarns from the same yarn group. It is also possible to work with multiple strands of a thinner yarn to achieve the knitting tension of a thicker one. Please try our yarn converter. We recommend you to always work a test swatch.

Please NOTE: when changing yarn the garment might have a different look and feel to the garment in the photo, due to individual properties and qualities of each yarn.

See DROPS lesson: Can I use a different yarn than the one mentioned in the pattern?

All our yarns are categorised into yarn groups (from A to F) according to thickness and knitting tension – group A contains the thinnest yarns and group F the thickest. This makes it easier for you to find alternative yarns to our patterns, should you wish to switch yarn. All yarns within the same group have a similar knitting tension and can easily replace each other. However, different yarn qualities have different structures and properties which will give the finished work a unique look and feel.

Click here for an overview of the yarns in each yarn group

At the top of all our patterns you’ll find a link to our yarn converter, which is a helpful tool should you wish to use a different yarn than suggested. By filling in the yarn quality you wish to replace, the amount (in your size) and number of strands, the converter will present good alternative yarns with the same knitting tension. Additionally it will tell you how much you’ll require in the new qualities and whether you’ll need to work with multiple strands. Most skeins are 50g (some are 25g or 100g).

If the pattern is worked with multiple colours, every colour will have to be converted separately. Similarly, if the pattern is worked with several strands of different yarns (for example 1 strand Alpaca and 1 strand Kid-Silk) you will have to find alternatives for each, individually.

Click here to see our yarn converter

Since different yarns have different qualities and textures we have chosen to keep the original yarn in our patterns. However, you can easily find options among our available qualities by using our yarn converter, or simply pick a yarn from the same yarn group.

It is possible that some retailers still have discontinued yarns in stock, or that someone has a few skeins at home that they would like to find patterns for.

The yarn converter will provide both alternative yarn as well as required amount in the new quality.

If you think it's hard to decide what size to make, it can be a good idea to measure a garment you own already and like the size of. Then you can pick the size by comparing those measures with the ones available in the pattern's size chart.

You'll find the size chart at the bottom of the pattern.

See DROPS lesson: How to read size chart

The needle size provided in the pattern serves only as a guide, the important thing is to follow the knitting tension. And since knitting tension is very individual, you will have to adjust the needle size to ensure that YOUR tension is the same as in the pattern – maybe you’ll have to adjust 1, or even 2 needle sizes, up or down to achieve the correct tension. For this, we recommend that you work test swatches.

Should you work with a different knitting tension than the one provided, the measurements of the finished garment might deviate from the measurement sketch.

See DROPS lesson: How to measure your tension/gauge

See DROPS video: How to make a gauge tension swatch

Working a garment top-down provides more flexibility and room for personal adjustment. For example it is easier to try the garment on while working, as well as making adjustments to length of yoke and shoulder caps.

The instructions are carefully explaining every step, in the correct order. Diagrams are adjusted to the knitting direction and are worked as usual.

The diagram depicts all rows/rounds, and every stitch seen from the right side. It is read from bottom to top, from right to left. 1 square = 1 stitch.

When working back and forth, every other row is worked from the right side and every other row is worked from the wrong side. When working from the wrong side, the diagram will have to be worked reversed: from left to right, knit stitches are purled, purl stitches are knit etc.

When working in the round every round is worked from the right side and the diagram are worked from right to left on all rounds.

See DROPS lesson: How to read knitting diagrams

The diagram depicts all rows/rounds, and every stitch seen from the right side. It is worked from bottom to top, from right to left.

When working back and forth every other row is worked from the right side: from right to left and every other row is worked from the wrong side: from left to right.

When working in the round, every row in the diagram are worked from the right side, from right to left.

When working a circular diagram you start in the middle and work your way outwards, counter clockwise, row by row.

The rows usually start with a given number of chain stitches (equivalent to the height of the following stitch), this will either be depicted in the diagram or explained in the pattern.

See DROPS lesson: How to read crochet diagrams

Instructions for working several diagrams after each other on the same row/round, will often be written like so: “work A.1, A.2, A.3 a total of 0-0-2-3-4 times". This means you work A.1 once, then A.2 is worked once, and A.3 is repeated (in width) the number of times provided for your size – in this case like so: S = 0 times, M = 0 times, L=2 times, XL= 3 times and XXL = 4 times.

The diagrams are worked as usual: begin with the first row in A.1, then work the first row in A.2 etc.

See DROPS lesson: How to read knitting diagrams

See DROPS lesson: How to read crochet diagrams

The total width of the garment (from wrist-to-wrist) will be larger in the larger sizes, despite the actual sleeves being shorter. The larger sizes have longer sleeve caps and wider shoulders, so there will be a good fit in all sizes.

The measurement sketch/schematic drawing provides information regarding the full length of the garment. If it’s a jumper or a jacket the length is measured from the highest point on the shoulder (usually closest to the neckline), and straight down to the bottom of the garment. It is NOT measured from the tip of shoulder. Similarly, the length of yoke is measured from the highest point on the shoulder and down to where yoke is split into body and sleeves.

See DROPS lesson: How to read a schematic drawing

Diagrams are often repeated on the round or in height. 1 repeat is the diagram the way it appears in the pattern. If it says to work 5 repeats of A.1 in the round, then you work A.1 a total of 5 times after/next to each other in the round. If it says to work 2 repeats of A.1 vertically/in height you work the entire diagram once, then begin again at the start and work the entire diagram one more time.

Chain stitches are slightly narrower than other stitches and to avoid working the cast-on edge too tight, we simply chain more stitches to begin with. The stitch count will be adjusted on the following row to fit the pattern and measurement sketch.

The rib edge is more elastic and will contract slightly compared to, for example, stocking stitch. By increasing before the rib edge, you avoid a visible difference in width between the rib edge and the rest of the body.

It’s very easy to cast off too tightly, and by making yarn overs while casting off (and simultaneously casting these off) you avoid a too tight cast off edge.

See DROPS video: How to bind off with yarn overs (yo)

To achieve an even increase (or decrease) you can increase on, for example: every 3rd and 4th row alternately, like so: work 2 rows and increase on the 3rd row, work 3 rows and increase on the 4th. Repeat this until the increase is complete.

See DROPS lesson: Increase or decrease 1 st on every 3rd and 4th row alternately

Should you prefer to work in the round instead of back and forth, you may of course adjust the pattern. You’ll need to add steeks mid-front (usually 5 stitches), and follow the instructions. When you would normally turn and work from the wrong side, simply work across the steek and continue in the round. At the end you’ll cut the piece open, pick up stitches to work bands, and cover the cut edges.

See DROPS video: How to knit steeks and cut open

Should you prefer to work back and forth instead of in the round, you may of course adjust the pattern so you work the pieces separately and then assemble them at the end. Divide the stitches for the body in 2, add 1 edge stitch in each side (for sewing) and work the front and back pieces separately.

See DROPS lesson: Can I adapt a pattern for circular needles into straight needles?

Pattern repeats can vary slightly in the different sizes, in order to get the correct proportions. If you’re not working the exact same size as the garment in the photo, yours might deviate slightly. This has been carefully developed and adjusted so that the complete impression of the garment is the same in all sizes.

Make sure to follow instructions and diagrams for your size!

If you have found a pattern you like which is available in women’s size it’s not very difficult to convert it to men’s size. The biggest difference will be the length of sleeves and body. Start working on the women size that you think would fit across the chest. The additional length will be worked right before you cast off for the armhole/sleeve cap. If the pattern is worked top-down you can add the length right after the armhole or before the first decrease on sleeve.

Regarding additional yarn amount, this will depend on how much length you add, but it is better with a skein too many than too few.

All yarns will have excess fibres (from production) that might come off as lint or shedding. Brushed yarns (ie hairier yarns) have more of these loose, excess fibres, causing more shedding.

Shedding also depends on what is worn under or over the garment, and whether this pulls at the yarn fibres. It’s therefore not possible to guarantee that there will be no shedding

Below are some tips on how to get the best result when working with hairier yarns:

1. When the garment is finished (before you wash it) shake it vigorously so the looser hairs come off. NOTE: do NOT use a lint roller, brush or any method that pulls at the yarn.

2. Place the garment in a plastic bag and put it in your freezer - the temperature will cause the fibres to become less attached to each other, and excess fibres will come off easier.

3. Leave in the freezer for a few hours before taking it out and shaking it again.

4. Wash the garment according to the instructions on the yarn label.

Pilling is a natural process that happens to even the most exclusive of fibers. It's a natural sign of wear and tear that is hard to avoid, and that is most visible in high friction areas of your garment like a sweater's arms and cuffs.

You can make your garment look as new by removing the pilling, using a fabric comb or a pill/lint remover.

Still can't find the answer you need? Then scroll down and leave your question so one of our experts can try to help you. This will be done normally within 5 to 10 working days.
In the meantime, you can read the questions and answers that others have left to this pattern or join the DROPS Workshop on Facebook to get help from fellow knitters/crocheters!

You might also like...

Post a comment to pattern DROPS 171-2

We would love to hear what you have to say about this pattern!

If you want to leave a question, please make sure you select the correct category in the form below, to speed up the answering process. Required fields are marked *.

Comments / Questions (65)

country flag Marieke wrote:

Bij het afkanten van de armsgaten (rugpand) en van de mouwkop staat: afkanten "om de naald". Hoe moet ik dat opvatten? Moet er dan niet aan het begin van elke naald worden afgekant? Maar moet er, na een naald met afkanting, steeds een naald zonder afkanting volgen? Het lijkt me zo onlogisch. Alvast dank voor uw antwoord!

15.10.2016 - 09:59

DROPS Design answered:

Hoi Marieke. Om de nld = elke 2e nld aan elke zijkant, dus dat is inderdaad aan het begin van elke nld (afkanten, brei de nld uit, keer, kant af een brei de nld uit, keer enzovoort)

18.10.2016 - 15:00

country flag Marieke wrote:

Ik heb dezelfde vraag als de vorige, maar het antwoord is mij nog steeds niet duidelijk. Moet je na 8 cm TEGELIJKERTIJD 2 steken meerderen + overstappen op 1 ribbelsteek aan weerskanten? Of EERST die 2 naalden breien met de meerderingen, en VERVOLGENS pas overstappen op de 1 ribbelsteek aan weerskanten?

07.10.2016 - 12:43

DROPS Design answered:

Hoi Marieke. Je zet bij 8 cm 1 nieuwe st op aan beide zijkanten (Brei tot een hoogte van 8 cm, zet 1 nieuwe st op aan het einde van de volgende 2 nld = 64-68-72-80-84-88 st.) Daarna breit u door met 1 ribbelst aan beide zijkanten en mindert zoals beschreven.

07.10.2016 - 13:11

country flag Gerda wrote:

Klopt het dat je bij het achterpand bij een hoogte van 8 cm overstapt van 3 steken in ribbelsteek aan beide kanten naar 1 kantsteek in ribbelsteek aan beide kanten? Of moet die kantsteek bij die 3 steken opgeteld worden?

04.10.2016 - 18:42

DROPS Design answered:

Hej Gerda. Je zet 1 nieuwe st op aan beide zijkanten = kantsteken en breit de overige st in tricotst. Je breit niet meer de 3 st in ribbelst. Dat is puur voor de split in de zijkant.

05.10.2016 - 12:32

Rosanna wrote:

Non mi sono chiare alcune cose. Dietro: si devono lavorare 8 cm a maglia rasata con tre maglie di vivagno, poi si fa un aumento a questo punto la mahlia di vivagno diventa una? l ' aumento va fatto ad inizio e fine del ferro?Se è così prima o dopo le tre maglie a legaccio? e Quindi le maglie a legaccio diventano una sola? grazie ma davvero non capisco. grazie dell'aiuto

15.09.2016 - 06:38

DROPS Design answered:

Buongiorno Rosanna! Deve aumentare 1 m alla fine di un ferro sul diritto del lavoro (dopo le 3 m vivagno) e 1 m alla fine del ferro successivo sul rovescio del lavoro. Prosegue con una sola m vivagno. Gli 8 cm già lavorati non verranno cuciti al davanti, ma formeranno uno spacco laterale con le 3 m a punto legaccio come bordo. Buon lavoro!

15.09.2016 - 07:00

country flag Sokhnamaggi wrote:

Fast fertig...in knallpink. Sieht klasse aus. Anleitung ist auch allerbest - bis auf eins: Zunahmetipp beachten- ich sehe nur einen Abnahmetipp...oder spinne ich😜?

24.08.2016 - 16:47

country flag Christina Mellberg wrote:

Diagram A1 och måttangivelserna syns här på internetsidan men kommer inte med på utskriften

15.08.2016 - 09:28

DROPS Design answered:

Hej. Om du trycker på knappen "Skriv ut mönster" så kommer de med på den fjärde sidan. Mvh DROPS Design

17.08.2016 - 10:19

country flag Christina Mellberg wrote:

Saknar diagram A1 som texten hänvisar till. Ser bara teckenflrklaringen.

15.08.2016 - 09:23

DROPS Design answered:

Hej. Diagram A1 finns längst ner på mönstret, till höger om måttskissen. Lycka till!

16.08.2016 - 11:27

country flag Jutta wrote:

Eine sehr schöne Jacke, ich freue mich schon auf die Anleitung.

06.07.2016 - 17:19

country flag Shannon Furnish wrote:

Love the design. Practical fit. Beautiful model.

20.06.2016 - 06:57

country flag CorinneF wrote:

I like the shawl collar and set-in sleeves. Looks cosy.

14.06.2016 - 19:16