DROPS Alpaca Bouclé
DROPS Alpaca Bouclé
80% Alpaca, 15% Wool, 5% Polyamide
from 3.60 £ /50g
DROPS Brushed Alpaca Silk
77% Alpaca, 23% Silk
from 2.90 £ /25g
Get the yarn to make this pattern from 30.30£.

The yarn cost is calculated from the pattern’s smallest size and the yarn’s cheapest product type. Looking for an even better price? You might find it on the DROPS Deals!

DROPS SS24

Clarice

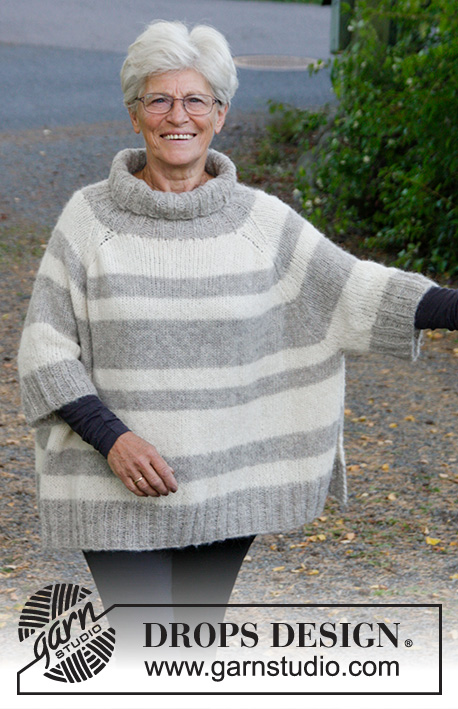
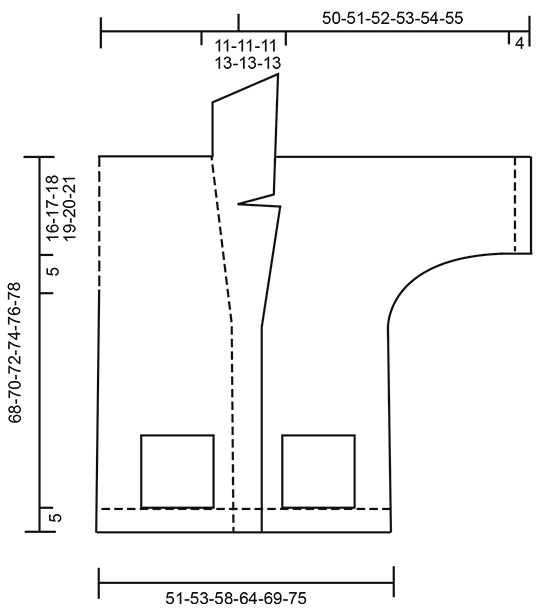
Knitted DROPS jacket with pockets and collar in "Alpaca Bouclé" and "Brushed Alpaca Silk". Size S-XXXL.

DROPS 173-30
DROPS design: Pattern no ab-064
Yarn group C + C or E
----------------------------------------------------------
Size: S - M - L - XL - XXL - XXXL
Materials:
DROPS ALPACA BOUCLÉ from Garnstudio
300-350-400-400-450-500 g colour no 5110, light grey
And use:
DROPS BRUSHED ALPACA SILK from Garnstudio
150-175-200-200-225-250 g colour no 02, light grey

DROPS CIRCULAR NEEDLE (80 cm) SIZE 8 mm – or size needed to get 11 sts x 15 rows in stocking st with 1 strand of each yarn (= 2 strands) = 10 x 10 cm.
DROPS MOTHER-OF-PEARL BUTTON Arched (white) NO 540 – 2 pieces in all sizes.

-------------------------------------------------------

Alternative Yarn – See how to change yarns here
Yarn Groups A to F – Use the same pattern and change the yarn here
Yarn usage using an alternative yarn – Use our yarn converter here

-------------------------------------------------------

DROPS Alpaca Bouclé
DROPS Alpaca Bouclé
80% Alpaca, 15% Wool, 5% Polyamide
from 3.60 £ /50g
DROPS Brushed Alpaca Silk
77% Alpaca, 23% Silk
from 2.90 £ /25g
Get the yarn to make this pattern from 30.30£.

The yarn cost is calculated from the pattern’s smallest size and the yarn’s cheapest product type. Looking for an even better price? You might find it on the DROPS Deals!

Pattern instructions

NOTE: This pattern is written in British English. All measurements in charts are in cm. For conversion from cm to inches - click here. There are different terms for crocheting in British and American English. If this pattern includes crochet, click for "crochet terms" here. For this pattern in American English, please click here.
GARTER ST (back and forth):
K all rows. 1 ridge = 2 rows K.

SHORT ROWS:
Work short rows over sts in band to avoid it contracting vertically. Work as follows from RS on every 10th row: K over all sts in band, turn, tighten yarn and K back, turn and work over all sts as before. NOTE! When working short ros on left band start from WS.

DECREASE TIP:
All dec are done from RS!
Dec as follows on right front piece (i.e. after band sts): Slip 1 st as if to K, K 1, psso
Dec as follows on left front piece (i.e. before band sts): Work until 2 sts remain before band, K 2 tog.

INCREASE TIP:
All inc are done from RS.
Inc 1 st on right band as follows: Work until 1 st remains in band, 1 YO, work last sts in band.
Inc 1 st on left band as follows: Work 1 st, 1 YO, work the remaining sts in band.
On next row K YO twisted to avoid holes.

BUTTONHOLES:
Dec for buttonholes on right band. 1 buttonhole = K tog third and fourth st from edge and make 1 YO.
Dec for buttonholes when piece measures:
SIZE S: 28 and 36 cm.
SIZE M: 30 and 38 cm.
SIZE L: 32 and 40 cm.
SIZE XL: 34 and 42 cm.
SIZE XXL: 36 and 44 cm.
SIZE XXXL: 38 and 46 cm.
----------------------------------------------------------

JACKET:
Piece is worked back and forth in parts and sewn tog when finished.

BACK PIECE:
Cast on 58-60-66-72-78-84 sts (incl 1 edge st in each side) on circular needle size 8 mm with 1 strand Alpaca Bouclé and 1 strand Brushed Alpaca Silk (= 2 strands). Work in GARTER ST - see explanation above - for 5 cm. On next row from RS work in stocking st with 1 edge st in garter st in each side. REMEMBER THE KNITTING TENSION When piece measures 47-48-49-50-51-52 cm, cast on new sts at the end of every row for sleeves as follows: 3 sts 2 times, 4 sts 1 time and 16-16-14-12-10-9 st 1 time (= 26-26-24-22-20-19 sts inc for sleeve in each side) = 110-112-114-116-118-122 sts. Now continue in stocking st with 4 sts in garter st in each side (= sleeve edge). When piece measures 66-68-70-72-74-76 cm, cast off the middle 10-10-10-12-12-12 sts for neck and finish each shoulder separately. Continue to cast off 1 st on next row from neck = 49-50-51-51-52-54 sts. When piece measures 68-70-72-74-76-78 cm, work on next row from RS 1 ridge over all sts. Cast off with K. Work the other shoulder the same way.

RIGHT FRONT PIECE:
Cast on 37-38-41-44-47-50 sts (incl 1 edge st in the side) on circular needle size 8 mm with 1 strand Alpaca Bouclé and 1 strand Brushed Alpaca Silk (= 2 strands). Work in garter st - see explanation above - for 5 cm. On next row from RS work as follows: Work 8 band sts in garter st, stocking st until 1 sts remain, 1 edge sts in garter st. Work SHORT ROWS - see explanation above - over all sts in band. REMEMBER BUTTONHOLES! When piece measures 36-38-40-42-44-46 cm, inc 1 st in band – see INCREASE TIP. Inc like this every other row (i.e. every row from RS) 8 times in total (= 16 sts in band), AT THE SAME TIME dec sts in stocking st inside band st, cast on new sts for sleeve and cast off sts for vent in collar as follows: READ ALL OF THE FOLLOWING SECTION BEFORE CONTINUING!

SLEEVE: When piece measures 47-48-49-50-51-52 cm, cast on new sts for sleeve at the end of every row from RS as follows: 3 sts 2 times, 4 sts 1 time and 16-16-14-12-10-9 sts 1 time (= 26-26-24-22-20-19 sts inc for sleeve). Work the new sts in stocking st with 4 sts in garter st at the edge (= sleeve edge).
DECREASE TIP INSIDE BAND:
When piece measures 47-48-49-50-51-52 cm, dec 1 st in stocking st inside band sts – see DECREASE TIP. Dec like this every 4th row (i.e. every other row from RS) 6-6-6-7-7-7 times in total.
COLLAR: When piece measures 57-59-61-63-65-67 cm, work as follows from RS: Cast off the first 8 sts (= lapel), work the remaining sts. Turn and work back, at the end of row cast on 6 new sts (= 14 sts for collar).

When all inc and dec are done, there are 63-64-65-65-66-68 sts on needle. Continue to work until piece measures 68-70-72-74-76-78 cm. Then work 1 ridge in garter st over all sts. On next row from RS work as follows: Work the first 14 sts, cast off the remaining 49-50-51-51-52-54 sts for shoulder/sleeve. Cut the yarn. Now work collar as follows: Beg from WS and work over all 14 sts, * turn and work 8 sts back, turn and work back, turn, work over all sts, turn and work over all sts *, repeat from *-* until collar measures 8-8-8-9-9-9 cm on the shortest side. Cast off.

LEFT FRONT PIECE:
Cast on and work as right front piece. NOTE: Do not dec for buttonholes on left band. Cast on new sts for sleeve at the end of row from WS. When casting off sts for vent in collar, work as follows from WS: Cast off the first 8 sts (= lapel), work the remaining sts. Turn and work back, at the end of row cast on 6 new sts (= 14 sts for collar).
When piece measures 68-70-72-74-76-78 cm, work 1 ridge over all sts. Then work as follows from RS: Cast off the first
49-50-51-51-52-54 sts, then work the remaining 14 sts in band. Turn and work short rows over band as follows:
Beg from WS and work back over all 14 sts, turn and work over all sts, * turn and work 8 sts back, turn and work back, turn, work over all sts, turn and work over all sts *, repeat from *-* until collar measures 8-8-8-9-9-9 cm on the shortest side. Cast off.

ASSEMBLY:
Sew the shoulder seams tog. Sew the collar tog mid back and sew it to neck edge. Sew underarm and side seams in one inside 1 edge st in garter st. Fasten off.

POCKETS:
Worked back and forth on needle. LOOSELY cast on 20 sts on circular needle size 8 mm with 1 strand of each yarn (= 2 strands). Then work in garter st. When piece measures 20 cm, cast off.
Place pocket on front piece so that there are 3 sts in stocking st between pocket and band, and bottom of pocket goes all the way down to edge in garter st at the bottom of body. Sew pocket with 1 strand of each quality in one and one st so that pocket is flat on front piece. Repeat on the other front piece. Fasten off.

Diagram

diagram measurements

Each of our patterns has specific tutorial videos to help you.

Do you have a question? See a list of frequently asked questions (FAQ)

Knitting tension is what determines the final measurements of your work, and is usually measured per 10 x 10 cm. It is provided like so: number of stitches in width x number of rows in height - eg: 19 stitches x 26 rows = 10 x 10 cm.

The knitting tension is very individual; some people knit/crochet loosely while others work tightly. You adjust the knitting tension with the needle size, which is why the suggested needle size is only meant as a guide! You need to adjust this (up or down) to ensure that YOUR knitting tension matches the knitting tension provided in the pattern. If you work with a different knitting tension than provided you will have a different yarn consumption, and your work will have different measurements than what the pattern suggests.

The knitting tension also determines which yarns can replace each other. As long as you achieve the same knitting tension you can replace one yarn with another.

See DROPS lesson: How to measure your tension/gauge

See DROPS video: How to make a gauge tension swatch

The required amount of yarn is provided in grams, eg: 450 g. To calculate how many balls you’ll need you first need to know how many grams are in 1 ball (25g, 50g or 100g). This information is available if you click on the individual yarn quality on our pages. Divide the amount required with the amount of each ball. For example, if each ball is 50g (the most common amount), the calculation will be as follows: 450 / 50 = 9 balls.

The important thing when changing from one yarn to another is that the knitting/crochet tension remains the same. This is so that the measurements of the finished piece will be the same as on the sketch provided. It is easier to achieve the same knitting tension using yarns from the same yarn group. It is also possible to work with multiple strands of a thinner yarn to achieve the knitting tension of a thicker one. Please try our yarn converter. We recommend you to always work a test swatch.

Please NOTE: when changing yarn the garment might have a different look and feel to the garment in the photo, due to individual properties and qualities of each yarn.

See DROPS lesson: Can I use a different yarn than the one mentioned in the pattern?

All our yarns are categorised into yarn groups (from A to F) according to thickness and knitting tension – group A contains the thinnest yarns and group F the thickest. This makes it easier for you to find alternative yarns to our patterns, should you wish to switch yarn. All yarns within the same group have a similar knitting tension and can easily replace each other. However, different yarn qualities have different structures and properties which will give the finished work a unique look and feel.

Click here for an overview of the yarns in each yarn group

At the top of all our patterns you’ll find a link to our yarn calculator, which is a helpful tool should you wish to use a different yarn than suggested. By filling in the yarn quality you wish to replace, the amount (in your size) and number of strands, the calculator will present good alternative yarns with the same knitting tension. Additionally it will tell you how much you’ll require in the new qualities and whether you’ll need to work with multiple strands. Most skeins are 50g (some are 25g or 100g).

If the pattern is worked with multiple colours, every colour will have to be calculated separately. Similarly, if the pattern is worked with several strands of different yarns (for example 1 strand Alpaca and 1 strand Kid-Silk) you will have to find alternatives for each, individually.

Click here to see our yarn calculator

Since different yarns have different qualities and textures we have chosen to keep the original yarn in our patterns. However, you can easily find options among our available qualities by using our yarn calculator, or simply pick a yarn from the same yarn group.

It is possible that some retailers still have discontinued yarns in stock, or that someone has a few skeins at home that they would like to find patterns for.

The yarn calculator will provide both alternative yarn as well as required amount in the new quality.

If you think it's hard to decide what size to make, it can be a good idea to measure a garment you own already and like the size of. Then you can pick the size by comparing those measures with the ones available in the pattern's size chart.

You'll find the size chart at the bottom of the pattern.

See DROPS lesson: How to read size chart

The needle size provided in the pattern serves only as a guide, the important thing is to follow the knitting tension. And since knitting tension is very individual, you will have to adjust the needle size to ensure that YOUR tension is the same as in the pattern – maybe you’ll have to adjust 1, or even 2 needle sizes, up or down to achieve the correct tension. For this, we recommend that you work test swatches.

Should you work with a different knitting tension than the one provided, the measurements of the finished garment might deviate from the measurement sketch.

See DROPS lesson: How to measure your tension/gauge

See DROPS video: How to make a tension/gauge swatch

Working a garment top-down provides more flexibility and room for personal adjustment. For example it is easier to try the garment on while working, as well as making adjustments to length of yoke and shoulder caps.

The instructions are carefully explaining every step, in the correct order. Diagrams are adjusted to the knitting direction and are worked as usual.

The diagram depicts all rows/rounds, and every stitch seen from the right side. It is read from bottom to top, from right to left. 1 square = 1 stitch.

When working back and forth, every other row is worked from the right side and every other row is worked from the wrong side. When working from the wrong side, the diagram will have to be worked reversed: from left to right, knit stitches are purled, purl stitches are knit etc.

When working in the round every round is worked from the right side and the diagram are worked from right to left on all rounds.

See DROPS lesson: How to read knitting diagrams

The diagram depicts all rows/rounds, and every stitch seen from the right side. It is worked from bottom to top, from right to left.

When working back and forth every other row is worked from the right side: from right to left and every other row is worked from the wrong side: from left to right.

When working in the round, every row in the diagram are worked from the right side, from right to left.

When working a circular diagram you start in the middle and work your way outwards, counter clockwise, row by row.

The rows usually start with a given number of chain stitches (equivalent to the height of the following stitch), this will either be depicted in the diagram or explained in the pattern.

See DROPS lesson: How to read crochet diagrams

Instructions for working several diagrams after each other on the same row/round, will often be written like so: “work A.1, A.2, A.3 a total of 0-0-2-3-4 times". This means you work A.1 once, then A.2 is worked once, and A.3 is repeated (in width) the number of times provided for your size – in this case like so: S = 0 times, M = 0 times, L=2 times, XL= 3 times and XXL = 4 times.

The diagrams are worked as usual: begin with the first row in A.1, then work the first row in A.2 etc.

See DROPS lesson: How to read knitting diagrams

See DROPS lesson: How to read crochet diagrams

The total width of the garment (from wrist-to-wrist) will be larger in the larger sizes, despite the actual sleeves being shorter. The larger sizes have longer sleeve caps and wider shoulders, so there will be a good fit in all sizes.

The measurement sketch/schematic drawing provides information regarding the full length of the garment. If it’s a jumper or a jacket the length is measured from the highest point on the shoulder closest to the neckline, and straight down to the bottom of the garment. It is NOT measured from the tip of shoulder. Similarly, the length of yoke is measured from the highest point on the shoulder and down to where yoke is split into body and sleeves.

On a jacket measures are never taken along bands, unless specifically stated. Always measure inside band stitches when measuring the length.

See DROPS lesson: How to read a schematic drawing

Diagrams are often repeated on the round or in height. 1 repeat is the diagram the way it appears in the pattern. If it says to work 5 repeats of A.1 in the round, then you work A.1 a total of 5 times after/next to each other in the round. If it says to work 2 repeats of A.1 vertically/in height you work the entire diagram once, then begin again at the start and work the entire diagram one more time.

Chain stitches are slightly narrower than other stitches and to avoid working the cast-on edge too tight, we simply chain more stitches to begin with. The stitch count will be adjusted on the following row to fit the pattern and measurement sketch.

The rib edge is more elastic and will contract slightly compared to, for example, stocking stitch. By increasing before the rib edge, you avoid a visible difference in width between the rib edge and the rest of the body.

It’s very easy to cast off too tightly, and by making yarn overs while casting off (and simultaneously casting these off) you avoid a too tight cast off edge.

See DROPS video: How to bind off with yarn overs (yo)

To achieve an even increase (or decrease) you can increase on, for example: every 3rd and 4th row alternately, like so: work 2 rows and increase on the 3rd row, work 3 rows and increase on the 4th. Repeat this until the increase is complete.

See DROPS lesson: Increase or decrease 1 st on every 3rd and 4th row alternately

Should you prefer to work in the round instead of back and forth, you may of course adjust the pattern. You’ll need to add steeks mid-front (usually 5 stitches), and follow the instructions. When you would normally turn and work from the wrong side, simply work across the steek and continue in the round. At the end you’ll cut the piece open, pick up stitches to work bands, and cover the cut edges.

See DROPS video: How to knit steeks and cut open

Should you prefer to work back and forth instead of in the round, you may of course adjust the pattern so you work the pieces separately and then assemble them at the end. Divide the stitches for the body in 2, add 1 edge stitch in each side (for sewing) and work the front and back pieces separately.

See DROPS lesson: Can I adapt a pattern for circular needles into straight needles?

Pattern repeats can vary slightly in the different sizes, in order to get the correct proportions. If you’re not working the exact same size as the garment in the photo, yours might deviate slightly. This has been carefully developed and adjusted so that the complete impression of the garment is the same in all sizes.

Make sure to follow instructions and diagrams for your size!

If you have found a pattern you like which is available in women’s size it’s not very difficult to convert it to men’s size. The biggest difference will be the length of sleeves and body. Start working on the women size that you think would fit across the chest. The additional length will be worked right before you cast off for the armhole/sleeve cap. If the pattern is worked top-down you can add the length right after the armhole or before the first decrease on sleeve.

Regarding additional yarn amount, this will depend on how much length you add, but it is better with a skein too many than too few.

All yarns will have excess fibres (from production) that might come off as lint or shedding. Brushed yarns (ie hairier yarns) have more of these loose, excess fibres, causing more shedding.

Shedding also depends on what is worn under or over the garment, and whether this pulls at the yarn fibres. It’s therefore not possible to guarantee that there will be no shedding

Below are some tips on how to get the best result when working with hairier yarns:

1. When the garment is finished (before you wash it) shake it vigorously so the looser hairs come off. NOTE: do NOT use a lint roller, brush or any method that pulls at the yarn.

2. Place the garment in a plastic bag and put it in your freezer - the temperature will cause the fibres to become less attached to each other, and excess fibres will come off easier.

3. Leave in the freezer for a few hours before taking it out and shaking it again.

4. Wash the garment according to the instructions on the yarn label.

Pilling is a natural process that happens to even the most exclusive of fibers. It's a natural sign of wear and tear that is hard to avoid, and that is most visible in high friction areas of your garment like a sweater's arms and cuffs.

You can make your garment look as new by removing the pilling, using a fabric comb or a pill/lint remover.

Still can't find the answer you need? Then scroll down and leave your question so one of our experts can try to help you. This will be done normally within 5 to 10 working days.
In the meantime, you can read the questions and answers that others have left to this pattern or join the DROPS Workshop on Facebook to get help from fellow knitters/crocheters!

You might also like...

Post a comment to pattern DROPS 173-30

We would love to hear what you have to say about this pattern!

If you want to leave a question, please make sure you select the correct category in the form below, to speed up the answering process. Required fields are marked *.

Comments / Questions (38)

country flag Alejandra Vera wrote:

Hola! Por favor, qué es una hilera corta? Qué significa "apretar el hilo"? Gracias 😘

20.01.2020 - 21:44

DROPS Design answered:

Hola Alexandra. Este vídeo te explica cómo trabajar las filas acortadas:

26.01.2020 - 23:07

country flag Alejandra Vera wrote:

Hola! Por favor, qué es una hilera corta? Qué significa "estirar el hilo"? Gracias 😘

20.01.2020 - 21:42

DROPS Design answered:

Ver la respuesta arriba

26.01.2020 - 23:07

country flag Maj-Britt Vollesen wrote:

Er igang med hø forstykke. Kan slet ikke få ind og udtagninger ifm forkanten til at passe . Det drejer sig kun om midten - ikke ærmesiden vel ???

12.07.2019 - 00:00

DROPS Design answered:

Hej Maj-Britt, du laver et omslag inden sidste maske mod midt foran og tager en maske ind indenfor kantmaskerne i retstrik. Ja det er kun forkantmaskerne du tager ind og ud. God fornøjelse!

30.09.2019 - 08:33

country flag Rita Harder wrote:

1e deel van reactie. Ging even mis met posten. Hoe gaat het dan met het aantal te minderen steken aan de binnenkant van de voorbies? Ik citeer:” Brei tot een hoogte van 36-46 cm, meerder 1 st in de voorbies,,,. Meerder zo om de nld ... 8 keer in totaal..., minder TEGELIJKERTIJD st in tricost naast de voorbies st...” ik vat dit op als tegelijkertijd 8 st meerderen en 8 st minderen. Dus het blijven 44 st. Dan 22 voor de mouw erbij = 66. En dan zie 2e deel van mijn reactie

04.04.2019 - 13:39

DROPS Design answered:

Dag Rita,

Bij MOUW staat beschreven hoe je mindert naast de voorbies en bij het rechter voorpand staat hier een verwijzing voor, er staat dus (bij rechtervoorpand): '... minder tegelijkertijd tricotsteken naast de voorbies en zet nieuwe steken op voor de mouw en kant af voor de split als volgt...' Dat zijn 3 dingen die je tegelijkertijd moet doen zoals beschreven in de paragraaf eronder) en daarnaast dus nog het meerderen voor de voorbies.

06.04.2019 - 21:19

country flag Rita Harder wrote:

Verderop: “brei tot een hoogte van 47-52 cm, minder 1 st in tricotst naast de voorbies. Minder zo elke 4e nld 6-7 keer in totaal.” En dat brengt mij op 66-7 steken. Je ziet ook op de tekening dat de voorbies schuin afloopt en er dus aan de binnenkant steken geminderd worden. Ik begrijp het dus nog niet helemaal

04.04.2019 - 13:32

DROPS Design answered:

Dag Rita,

Op een gegeven moment kant je steken af voor de revers bij de kraag en in de volgend naald zet je weer steken op, zodat je een revers krijgt (soort van splitje bij de kraag). Vermoedelijk zijn dit de steken die je nog mist in je bereking (...?): ...Brei tot een hoogte van 57-59-61-63-65-67 cm, brei dan als volgt aan de goede kant: kant de eerste 8 st af (= revers), brei de overgebleven st. Keer en brei de teruggaande nld, zet aan het einde van de nld 6 nieuwe st op (= 14 st voor de kraag).

06.04.2019 - 21:28

country flag Rita Harder wrote:

Het gaat om het rechtervoorpand. Ik brei maat xl. Zoals ik het lees: Opzetten 44 steken, meerderen voor de bies 8 steken, zelfde aantal minderen naast de voorbies. Dus bij begin mouw nog steeds 44 steken. Dan voor mouw 22 opzetten. Samen 66 steken. 7 keer minderen naast de voorbies = 59 steken. Dan voor de kraag 8 eraf en daarna 6 erbij. Totaal 57 steken. In de beschrijving staat echter dat er aan het eind 66 steken over zijn. Waar zie ik iets over het hoofd?

03.04.2019 - 11:33

DROPS Design answered:

Dag Rita,

Je zet 44 steken op en meerdert 8 steken bij de bies en deze kant je later ook weer af bij de kraag = 44 st. Voor de mouw zet je 2 keer 3 st (=6), 1 keer 4 st en 1 keer 12 st op: 44+6+4+12=66 st, daarna minder je nog 1 st. bij de voorbies = 65 st.

04.04.2019 - 08:36

country flag Tekla wrote:

Hi.. At the back piece in size L, we cast on 66 sts then increase for the sleeves by 24 sts. So i have 90 sts i total. but you say at this point i should have 114 sts. Could you please explain where the difference comes from? Thanks in advance.

21.01.2019 - 02:20

DROPS Design answered:

Dear Tekla, you have to cast on 24 sts on EACH side for the sleeves and you'll end up with 114 sts. Happy knitting!

21.01.2019 - 06:44

country flag Guillemette wrote:

Bonjour, Combien faut-il acheter de pelotes de chaque pour une taille M ? Merci de votre réponse.

14.11.2018 - 16:35

DROPS Design answered:

Bonjour Guillemette, il vous faut 7 pelotes de DROPS ALPACA BOUCLÉ et 7 pelotes de DROPS BRUSHED ALPACA SILK dans la taille M. Bon tricot!

14.11.2018 - 16:41

country flag Sylvia A. wrote:

Est-ce possible de modifier ce patron pour en faire une veste à manches longues? Car ce modèle est exactement ce que je cherchais sauf pour les manches!

10.11.2018 - 12:27

DROPS Design answered:

Bonjour Sylvie, probablement, toutefois, le résultat serait différent. Nous ne sommes pas en mesure de pouvoir ajuster chaque modèle à chaque demande. Pour toute assistance complémentaire, merci de contacter le magasin où vous avez acheté votre laine - par mail ou téléphone - ou de consulter les autres modèles analogues avec manches longues. Bon tricot!

12.11.2018 - 09:15

country flag Mieke wrote:

Die steken opzetten lukt wel maar hoe moet ik dan minderen ?? want anders is de mouw onderaan veel te wijd

12.08.2018 - 18:45

DROPS Design answered:

Dag Mieke, In het patroon zitten verder geen minderingen in de mouw naar de manchet (/pols) toe, het blijft een wijde mouw, dus je kunt gewoon extra steken opzetten en verder het patroon volgen. Als je toch meer aanpassingen in het patroon wilt doen, dan zou je eventueel hulp kunnen vragen bij de winkel waar je het garen hebt gekocht. Het is voor ons helaas niet mogelijk om persoonlijke aanpassingen op het patroon te doen.

14.08.2018 - 10:26