
Popular categories
Looking for a yarn?


|
|||||||||||||||||||||||||||||||
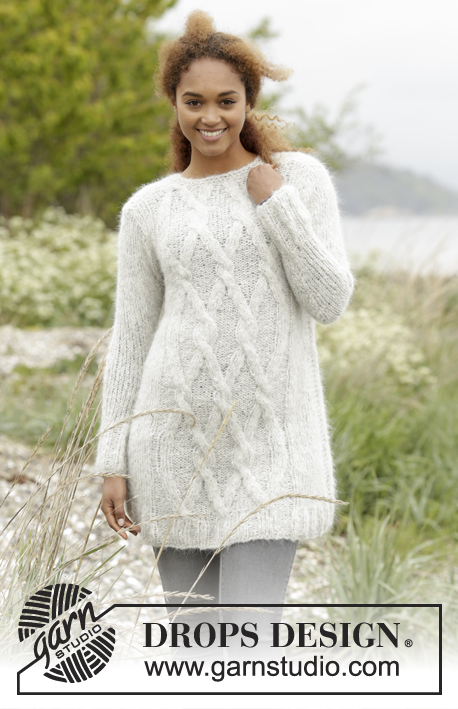
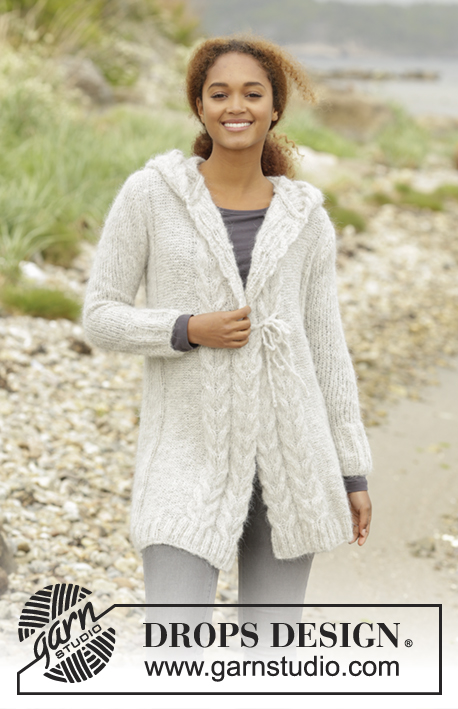
Melody of Snow |
|||||||||||||||||||||||||||||||
 |
 |
||||||||||||||||||||||||||||||
Knitted DROPS jacket with cables and hood in ”Melody”. Size XS/S - XXXL.
DROPS 172-4 |
|||||||||||||||||||||||||||||||
|
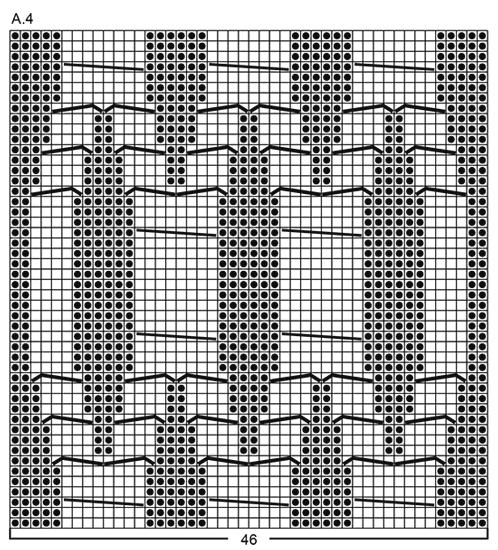
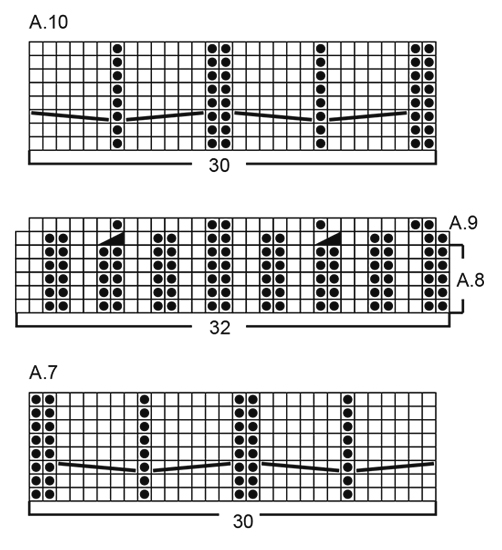
GARTER ST (back and forth): K all rows. 1 ridge = 2 rows K. PATTERN: See diagrams A.1 to A.10. The diagrams show all rows in pattern seen from RS. DECREASE TIP (applies to in the sides on front and back piece): Dec 1 st inside 3 edge sts in garter st. All dec are done from RS! Dec as follows after 3 edge sts: Slip 1 st as if to K, K 1, psso. Dec as follows before 3 edge st: Beg 2 sts before the 3 edge sts and K 2 tog. INCREASE TIP (applies to sleeves): Beg 1 st before marker, make 1 YO, K 2 and make 1 YO. On next round K YOs twisted to avoid holes. ---------------------------------------------------------- JACKET: Work front and back piece back and forth on circular needle in sections. Work sleeves in the round on double pointed needles/short circular needle. BACK PIECE: Cast on 86-96-96-106-116-126 sts on circular needle size 7 mm with Melody. P 1 row from WS. Work next row as follows from RS: 3 edge sts in GARTER ST – see explanation above, * K 2, P 3 *, repeat from *-* 3-4-4-5-6-7 times in total, K 2, work rib according to diagram A.1 (= 46 sts), * K 2, P 3 *, repeat from *-* 3-4-4-5-6-7 times in total and finish with K 2 and 3 edge sts in garter st. Continue rib like this. When piece measures 6-6-6-8-8-8 cm, work next row as follows from RS: 3 edge sts in garter st, K over the next 17-22-22-27-32-37 sts AT THE SAME TIME dec 5-7-5-6-7-9 sts evenly over these sts, work and dec according to diagram A.2 (= 46 sts dec to 38 sts), K the next 17-22-22-27-32-37 sts AT THE SAME TIME dec 5-7-5-6-7-9 sts evenly over these sts and finish with 3 edge sts in garter st = 68-74-78-86-94-100 sts. Switch to circular needle size 8 mm and work back from WS with K over K, P over P and garter st over garter st but sts in A.2 are worked as shown in diagram A.2. Work next row as follows from RS: 3 edge sts in garter st, 12-15-17-21-25-28 sts in stocking st, work and inc according to diagram A.3 (= 38 sts inc to 46 sts), 12-15-17-21-25-28 sts in stocking st and 3 edge sts in garter st = 76-82-86-94-102-108 sts. Work back from WS with K over K, P over P and garter st over garter st but sts in A.3 are worked as shown in diagram A.3. Work next row as follows from RS: 3 edge sts in garter st, 12-15-17-21-25-28 sts in stocking st, A.4 (= 46 sts), 12-15-17-21-25-28 sts in stocking st, 3 edge sts in garter st. Continue pattern like this. REMEMBER THE KNITTING TENSION When piece measures 10-10-10-11-11-11 cm, dec 1 st in each side - READ DECREASE TIP. Dec like this every 6-6-6-5-5-5 cm a total of 7-7-7-8-8-8 times in each side = 62-68-72-78-86-92 sts. When piece measures 60-61-62-63-64-65 cm, cast off for armholes at the beg of every row in each side as follows: Cast off 3 sts 0-0-1-1-2-2 times, 2 sts 1-1-1-1-2-2 times and 1 st 1-3-1-4-2-4 times = 56-58-60-60-62-64 sts remain on needle. Continue with pattern, stocking st with 1 edge st in garter st in each side until 1 row remains before piece measures 78-80-82-84-86-88 cm. On next row work sts in each cable K tog 2 by 2 (from RS = 12 sts dec) = 44-46-48-48-50-52 sts remain on needle. Then cast off the middle 12-12-14-14-16-16 sts for neck and finish each shoulder separately. Continue pattern and cast off 1 st on next row from neck = 15-16-16-16-16-17 sts remain on the shoulder. Continue with K over K, P over P and garter st over garter st until piece measures 80-82-84-86-88-90 cm and cast off (make sure to avoid a tight cast-off edge). Repeat on the other shoulder. RIGHT FRONT PIECE: Cast on 72-77-77-82-87-92 sts on circular needle size 7 mm and P 1 row from WS. Work next row as follows from RS: Work rib according to diagram A.5 (= 32 sts), * K 2, P 3 *, repeat from *-* until 5 sts remain on needle, finish with K 2 and 3 edge sts in garter st. Continue rib like this. When piece measures 6-6-6-8-8-8 cm, work next row as follows from RS: Work and dec according to diagram A.6 (= 32 sts dec to 30 sts), P the next 20 sts and dec AT THE SAME TIME 3 sts evenly over these sts, K the next 17-22-22-27-32-37 sts and dec AT THE SAME TIME 5-7-5-6-7-9 sts evenly over these sts and finish with 3 edge sts in garter st = 62-65-67-71-75-78 sts. Switch to circular needle size 8 mm and work back from WS with K over K, P over P and garter st over garter st, but sts in A.6 are worked as shown in diagram A.6. Work next row as follows from RS: Work A.7 (= 30 sts), P 17, K 12-15-17-21-25-28 and 3 edge sts in garter st. Continue pattern like this. When piece measures 10-10-10-11-11-11 cm, beg dec in the side and dec as on back piece = 55-58-60-63-67-70 sts. When piece measures 60-61-62-63-64-65 cm, beg cast off for armhole and cast off in the side as on back piece = 52-53-54-54-55-56 sts remain on needle. Continue pattern with 1 edge sts in garter st towards armhole until piece measures 74-76-77-79-80-82 cm. Now cast off the outermost 32-32-33-33-34-34 sts at beg of row from mid front for neck. Continue to cast off for neck at the beg of every row from mid front as follows: Cast off 2 sts 1 time and 1 st 3 times = 15-16-16-16-16-17 sts remain on needle. Continue with K over K, P over P and garter st over garter st until piece measures 80-82-84-86-88-90 cm and cast off (make sure to avoid a tight cast-off edge). LEFT FRONT PIECE: Cast on as on right front piece and work as right front piece but reversed. I.e. at beg of piece P 1 row from WS. Work next row as follows from RS: 3 edge sts in garter st, * K 2, P 3 *, repeat from *-* 7-8-8-9-10-11 times in total, K 2 and finish with rib according to diagram A.8 (= 32 sts). When piece measures 6-6-6-8-8-8 cm, work next row as follows from RS: 3 edge sts in garter st, K the next 17-22-22-27-32-37 and dec AT THE SAME TIME 5-7-5-6-7-9 sts evenly over these sts, P the next 20 sts and dec AT THE SAME TIME 3 sts evenly over these sts and work and dec according to diagram A.9 (= 32 sts dec to 30 sts) = 62-65-67-71-75-78 sts. Switch to circular needle size 8 mm and work back from WS with K over K, P over P and garter st over garter st but sts in A.9 are worked as shown in diagram A.9. Work next row as follows from RS: 3 edge sts in garter st, K 12-15-17-21-25-28, P 17 and A.10 over the last 30 sts. Then work as right front piece. SLEEVE: Work in the round on double pointed needles, switch to a short circular needle when needed. Cast on 35-35-35-35-40-40 sts on double pointed needles size 7 mm with Melody. K 1 round, then work rib in the round = K 2/P 3. When rib measures 10-10-10-12-12-12 cm, K 1 round while dec 11-9-7-7-10-8 sts evenly = 24-26-28-28-30-32 sts. Switch to double pointed needles size 8 mm and work in stocking st in the round. When piece measures 13 cm, inc 2 sts mid under sleeve - READ INCREASE TIP. Inc like this every 4-3½-3½-3-2½-2½ cm 9-10-10-12-13-13 times in total = 42-46-48-52-56-58 sts. When piece measures 49-48-47-47-45-44 cm, cast off the middle 6 sts mid under sleeve and work sleeve cap back and forth until finished measurements on circular needle. Continue with stocking st and cast off at beg of every row in each side as follows: Cast off 2 sts 1-2-2-2-3-3 times and 1 st 1 time, then cast off 2 sts in each side until piece measures 55-55-55-56-56-56 cm before casting off 3 sts 1 time in each side. Cast off the remaining sts, piece measures approx. 56-56-56-57-57-57 cm. Knit another sleeve. ASSEMBLY: Sew the shoulder seams. Sew in the sleeves inside 1 edge st. HOOD: Pick up from RS approx. 90 to 100 sts around the neck on circular needle size 8 mm. P 1 row from WS while inc evenly to 120-122-124-126-128-130 sts – NOTE: K the 2 outermost sts in each side and do not inc over these sts. Work next row as follows from RS: Work pattern according to diagram A.7 (= 30 sts - continue repetition where it ended after neck dec), work in stocking st until 30 sts remain and finish with pattern according to diagram A.10 (= 30 sts – continue where it ended after neck dec). Continue back and forth like this until hood measures 34-35-36-37-38-39 cm. On next row from RS work sts in cables K tog two by two (= 12 sts dec in each side = 96-98-100-102-104-106 sts remain on needle). On next row cast off all sts (make sure to avoid a tight cast-off edge). Fold the hood double and sew tog at the top with grafting/kitchener sts. TIES: Cut 1 strand Melody of 1 meter, twine strand until it resist, fold strand double and it will twine again. Make a knot at each end. Thread tie through cable at the edge on right front piece approx. 34-36-38-40-42-44 cm from shoulder and down (or desired length). Make another tie and fasten it the same way on left front piece. Close the jacket by tying the two ties tog. |
|||||||||||||||||||||||||||||||
Diagram explanations |
|||||||||||||||||||||||||||||||
|
|||||||||||||||||||||||||||||||

|
|||||||||||||||||||||||||||||||
|
|||||||||||||||||||||||||||||||
|
|||||||||||||||||||||||||||||||

|
|||||||||||||||||||||||||||||||
|
Have you made this or any other of our designs? Tag your pictures in social media with #dropsdesign so we can see them! Do you need help with this pattern?You'll find tutorial videos, a Comments/Questions area and more by visiting the pattern on garnstudio.com. © 1982-2024 DROPS Design A/S. We reserve all rights. This document, including all its sub-sections, has copyrights. Read more about what you can do with our patterns at the bottom of each pattern on our site. |
|||||||||||||||||||||||||||||||


With over 40 years in knitting and crochet design, DROPS Design offers one of the most extensive collections of free patterns on the internet - translated to 17 languages. As of today we count 304 catalogues and 11422 patterns - 11422 of which are translated into English (UK/cm).
We work hard to bring you the best knitting and crochet have to offer, inspiration and advice as well as great quality yarns at incredible prices! Would you like to use our patterns for other than personal use? You can read what you are allowed to do in the Copyright text at the bottom of all our patterns. Happy crafting!
Comments / Questions (44)
Hei,hvorfor lages mange modeller slik at delene strikkes hver for seg (forstykker og rygg)? Det er jo enklere å strikke alle i ett stykke og sette av masker til ermehull? Det gjør jo også montering enklere :-)
18.08.2018 - 18:21DROPS Design answered:
Hej Gry, vi udgår altid fra hvordan modellen bliver pænest. Ud over det forsøger vi at lave modellerne så alle kan finde sin favoritmodel. Nogle vil helst strikke oppefra og ned andre modsat. Nogle vil strikke frem og tilbage andre vil strikke rundt osv. Vi håber at du også finder dine favoritter. God fornøjelse :)
30.08.2018 - 15:06Jadran wrote:
Liebes Drops Design Team, es wäre sehr nett, wenn Sie mir etwas ausführlicher die Anleitung für die Kapuze schreiben könnten. Leider verstehe ich nicht, wo ich damit genau anfange? Vielen Dank im Voraus und herzliche Grüße
13.06.2018 - 21:12DROPS Design answered:
Liebe Julie, für die Kapuze fassen Sie die Maschen um den Halsausschnitt so aus: (bei einer Hinreihe) 1 M in jeder den abgeketteten Maschen am rechten Vorderteil, dann Maschen aus dem Halsausschnitt weiter auffassen (Vorderteil dann am Rückenteil und endlich am linken Vorderteil) bis die abgeketteten Maschen am linken Vorderteil auffassen = ca 90-100 M. 1 Rück-R li mit 2 M re auf beiden Seiten stricken und dabei die Maschenanzahl anpassen, und dann A.7 über die ersten 30 Maschen und A.10 über die letzten 30 Maschen wie zuvor am beiden Vorderteilen weiterstricken, die restlichen Maschen zwischen A.7 und A.10 werden dann glatt gestrickt. Viel Spaß beim stricken!
14.06.2018 - 08:29Thanks for the excellent help in answering my queries!
28.02.2017 - 14:21Hi and thanks for the reply regarding the sleeves. Just one more query - the pattern says "When piece measures 49-48-47- 47-45-44 cm, cast off the middle 6 sts mid under sleeve and work sleeve cap back and forth until finished measurements on circular needle." Should I knit any rows before commencing the decreasing? Or should the decreasing start immediately after the cast off of the 6sts? Thanks
27.02.2017 - 17:15DROPS Design answered:
Dear Mrs Ibes, sleeve cap is worked back and forth in stocking st, so that you will K from RS and P from WS. Cast off first the 6 sts mid under sleeve then cast off sts for sleeve cap at the beg of every row on each side, it both from RS and WS. Happy knitting!
28.02.2017 - 08:35Liebes dropsteam,, ich scheitere beim stricken von Diagramm A.1 bei 2 x 46 maschen bleiben 14 maschen übrig. Wäre sehr nett wenn ihr es mir nochmal versucht zu erklären. mfg marina
26.02.2017 - 21:41DROPS Design answered:
Liebe Frau Römer, so sollen Sie stricken: 3 M Kraus re, *2 M re, 3 M li*, von *-* insgesamt 3-4-4-5-6-7 x arb (= über die nächsten 15-20-20-25-30-35 M), 2 M re, im Rippenmuster nach Diagramm A.1 (= 46 M), *2 M re, 3 M li*, von *-* insgesamt 3-4-4-5-6-7 x arb (= über die nächsten 15-20-20-25-30-35 M) und enden mit 2 M re (glatt re) und 3 M kraus re = 3+ (15-20-20-25-30-35)+ 2+46+ (15-20-20-25-30-35) +5 = 86-96-96-106-116-126 M. Viel Spaß beim stricken!
27.02.2017 - 11:23Kris Ibes wrote:
Hi I am knitting the first sleeve and unsure how many stitches should remain after decreasing on sleeve cap, on last cast off. Can you help? I'm knitting size L. Thanks
21.02.2017 - 19:20DROPS Design answered:
Dear Mrs Ibes, number of remaining sts will depend on your tension in height, you have to cast off every row in each side (= at the beg of every row both from RS and WS): 2 sts 2 times, 1 st 1 time, then cast off 2 sts in each side until piece measures 55 cm then casting off 3 sts 1 time in each side. Happy knitting!
22.02.2017 - 09:53Hessa wrote:
I want to buy the needles to start this project, can you send me the link of the exact needles size for this pattern please? thank you.
07.11.2016 - 09:57DROPS Design answered:
Dear Mrs Hessa, you need double pointed needles in size 7 mm and 8 mm, see here and circular needles in size 7 mm and 8 mm, both in 40 cm and 80 cm, read more here. See also our sets. Happy knitting!
07.11.2016 - 11:09Liebes Garnstudio-Team, meine Frage zu Muster A.4: ist es richtig, dass zwischen den beiden "großen" Verzopfungen (4 M vor die Arb legen, 4 M re, 4 M re von Zopfnadel) in der Mitte des Musters 9 R "wie sie erscheinen" gestrickt werden, während es bei der Wiederholung des Rapports nur 5 R sind? Persönlich finde ich das etwas knubbelig und werde nun an beiden Stellen in der 10. R das 2. Mal verzopfen... Liebe Grüße, Claudia
06.11.2016 - 14:03DROPS Design answered:
Liebe Frau Weiss, ja genau, so wird man A.4 stricken, dh wie auf dem Bild.
07.11.2016 - 09:44Klopt het, dat de voorpanden veel breder(veel meer steken 77) zijn dan het achterpand met 96steken . Ik kom ook niet uit met mijn garen.
20.10.2016 - 19:59DROPS Design answered:
Hoi Hannie. Het aantal st in het patroon moet kloppen.
21.10.2016 - 15:13Miten kohdan A.2. toinen rivi neulotaan eli miten lisäykset?
11.10.2016 - 17:46DROPS Design answered:
Piirroksen A.2 toisella kerroksella neulotaan oikeaa ja nurjaa piirroksen mukaisesti, kerroksella ei tehdä lisäyksiä.
18.10.2016 - 16:05