DROPS Melody
DROPS Melody
71% Alpaca, 25% Wool, 4% Polyamide
from 6.35 $ /50g
Get the yarn to make this pattern from 44.45$.

The yarn cost is calculated from the pattern’s smallest size and the yarn’s cheapest product type. Looking for an even better price? You might find it on the DROPS Deals!

DROPS SS24

Warm Wine

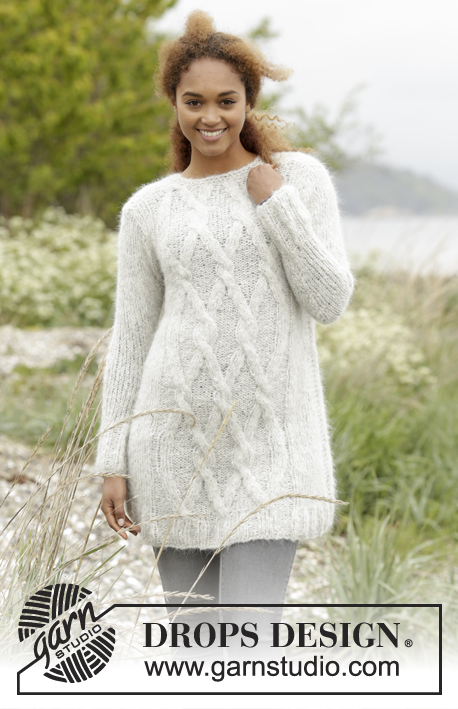
Knitted DROPS oversized jumper with cables and turtle neck in ”Melody”. Size: S - XXXL.

DROPS 172-36
DROPS design: Pattern no ml-018
Yarn group D or A + A + A
----------------------------------------------------------
Size: S - M - L - XL - XXL - XXXL
Materials:
DROPS MELODY from Garnstudio
350-400-450-500-550-600 g color no 10, heather

DROPS DOUBLE POINTED NEEDLES AND CIRCULAR NEEDLE (40 and 80 cm / 16" and 32") size 8 mm / US 11 - or size needed to get 12 sts x 14 rows in stockinette st = 4" x 4" (10 x 10 cm).
DROPS DOUBLE POINTED NEEDLES AND CIRCULAR NEEDLE (40 and 80 cm / 16" and 32") size 7 mm / US 10.75 for rib - or size needed to get 13 sts x 15 rows in stockinette st = 4" x 4" (10 x 10 cm).
DROPS CABLE NEEDLE - for cables.

-------------------------------------------------------

Alternative Yarn – See how to change yarns here
Yarn Groups A to F – Use the same pattern and change the yarn here
Yarn usage using an alternative yarn – Use our yarn converter here

-------------------------------------------------------

DROPS Melody
DROPS Melody
71% Alpaca, 25% Wool, 4% Polyamide
from 6.35 $ /50g
Get the yarn to make this pattern from 44.45$.

The yarn cost is calculated from the pattern’s smallest size and the yarn’s cheapest product type. Looking for an even better price? You might find it on the DROPS Deals!

Pattern instructions

NOTE: This pattern is written in American English. All measurements in charts are in cm. For conversion from inches to cm - click here. There are different terms for crocheting in American and British English. If this pattern includes crochet, click for "crochet terms" here. For this pattern in British English, please click here.
GARTER ST (back and forth):
K all rows. 1 ridge = K2 rows.

PATTERN:
See diagrams A.1 to A.8. The diagrams show all rows in pattern seen from RS.

INCREASE TIP-1 (applies to sleeve):
Beg 1 st before marker, make 1 YO, K 2 and make 1 YO. On next round K YOs twisted to avoid holes.

INCREASE TIP-2 (applies to neck):
Inc 1 st by making 1 YO in transition between K and P. On next round work YO twisted to avoid holes.
----------------------------------------------------------

JUMPER:
Work front and back piece back and forth on circular needle. Work sleeves in the round on double pointed needles.

BACK PIECE:
LOOSELY cast on 90-102-102-114-114-126 sts on circular needle size 7 mm / US 10.75 with Melody. P 1 row from WS. Work next row as follows from RS: 3 edge sts in GARTER ST – see explanation above, * K 3, P 3 *, repeat from *-* 0-1-1-2-2-3 times in total (i.e. in size S do not work K 3/P 3), work rib according to diagram A.1 (= 21 sts), work rib according to diagram A.2 (= 42 sts), work rib according to diagram A.1 (= 21 sts), * P 3, K 3 *, repeat from *-* 0-1-1-2-2-3 times in total (i.e. in size S do not work P 3/K 3) and finish with 3 edge sts in garter st. Continue rib like this until piece measures 12 cm / 4¾".
Work next row as follows from RS: 3 edge sts in garter st, K over the first 0-6-6-12-12-18 sts AT THE SAME TIME dec 0-4-1-4-1-4 sts evenly over these sts, work and dec according to diagram A.3 (one time), work and dec according to diagram A.4 (one time), work and dec according to diagram A.3 (one time), K the next 0-6-6-12-12-18 sts AT THE SAME TIME dec 0-4-1-4-1-4 sts evenly over these sts and finish with 3 edge sts in garter st = 70-74-80-86-92-98 sts. Switch to circular needle size 8 mm / US 11 and work back from WS with K over K, P over P and garter st over garter st, but sts in A.4 are worked as shown in diagram. Work next row as follows from RS: 3 edge sts in garter st, 0-2-5-8-11-14 sts in stockinette st, work and inc according to diagram A.5 (= 15 sts that inc to 21 sts), A.6 (= 34 sts that inc to 46 sts), A.5 (= 15 sts that inc to 21 sts), 0-2-5-8-11-14 sts in stockinette st and 3 edge sts in garter st = 94-98-104-110-116-122 sts on needle. Work back from WS with K over K, P over P and garter st over garter st.
Work next row as follows from RS: 3 edge st in garter st, 0-2-5-8-11-14 sts in stockinette st, A.7 (= 21 sts), A.8 (= 46 sts), A.7 (= 21 sts), 0-2-5-8-11-14 sts in stockinette st, 3 edge st in garter st. Continue pattern like this. REMEMBER THE KNITTING GAUGE When piece measures 49-50-51-52-53-54 cm / 19¼"-19¾"-20"-20½"-21"-21¼", bind off the first 0-2-3-6-8-11 sts at beg of the next 2 rows for armholes = 94-94-98-98-100-100 sts (in size S do not bind off any sts but insert a marker in each side to mark armholes). Work next row as follows from RS: 3 edge sts in garter st, 0-0-2-2-3-3 sts in stockinette st, continue A.7, A.8 and A.7 as before, work 0-0-2-2-3-3 sts in stockinette st and 3 edge sts in garter st. Continue the pattern like this until 1 row remains before piece measures 68-70-72-74-76-78 cm / 26¾"-27½"-28⅜"-29⅛"-30"-30¾". Now work sts in cables in A.8 tog 2 by 2 (= 12 sts dec). On next row, bind off the middle 20-20-22-22-24-24 sts for neck and finish each shoulder separately. Continue to bind off 1 st on next row from neck = 30-30-31-31-31-31 sts remain on the shoulder. Work until 1 row remain before piece measures 70-72-74-76-78-80 cm / 27½"-28⅜"-29⅛"-30"-30¾"-31½. Work sts in the remaining cables tog 2 by 2 (= 6 sts dec). On next row bind off the remaining 25-25-26-26-26-26 sts on shoulder (it is important to avoid a tight bind-off edge on shoulder). Repeat on the other shoulder.

FRONT PIECE:
Cast on and work as on back piece until 1 row remains before piece measures 64-66-67-69-70-72 cm / 25¼"-26"-26½"-27"-27½"-28½". Now work sts in cables in A.8 tog 2 by 2 (= 12 sts dec). On next row slip the middle 14-14-16-16-18-18 sts on 1 stitch holder for neck. Continue to bind off for neck at beg of every row from neck as follows: bind off 2 sts 1 time and 1 st 2 times = 30-30-31-31-31-31 sts remain on shoulder. Work until 1 row remain before piece measures 70-72-74-76-78-80 cm / 27½"-28⅜"-29⅛"-30"-30¾"-31½. Work sts in the remaining cables tog 2 by 2 (= 6 sts dec). On next row bind off the remaining 25-25-26-26-26-26 sts on shoulder (it is important to avoid a tight bind-off edge). Repeat on the other shoulder.

SLEEVE:
Work in the round on double pointed needles, switch to circular needle when needed. Cast on 30-30-36-36-36-36 sts on double pointed needles size 7 mm / US 10.75 with Melody. K 1 round. Then work rib in the round = K 3/P 3 for 10 cm / 4". K 1 round while at the same time dec 2-2-6-6-4-4 sts evenly = 28-28-30-30-32-32 sts. Insert 1 marker at beg of round = mid under sleeve. Switch to double pointed needles size 8 mm / US 11 and work in stockinette st. When piece measures 11-11-11-13-13-11 cm / 4½"-4½"-4½"-5"-5"-4½", inc 2 sts mid under sleeve - READ INCREASE TIP-1. Inc like this every 3½-3-3-2-2-2 cm / 1¼"-1"-1"-¾"-¾"-¾" 10-11-11-13-13-14 times in total = 48-50-52-56-58-60 sts. When piece measures 45-44-42-41-40-39 cm / 17¾"-17¼"-16½"-16"-15¾"-15¼", insert 1 marker at the beg of round. Then work piece back and forth on circular needle until sleeve measures 45-46-45-46-47-48 cm / 17¾"-18"-17¾"-18"-18½"-19" (i.e. approx. 0-2-3-5-7-9 cm / 0-¾"-1"-2"-2¾"-3½" from marker), bind off (make sure to avoid a tight bind-off edge). Make another sleeve.

ASSEMBLY:
Sew shoulder seams inside bind-off edge. Sew side seams sew edge to edge - sew in outer loops of edge sts to get a flat seam (make sure to avoid a tight seam) BUT stop when approx. 20 cm / 8" remain in each side (= vent). Place sleeve in under edge in garter st along armhole (marker on sleeve should fit with side on body at marker). Sew neatly along armhole (edge in garter st along armhole should be on top of sleeve) and in bottom of armhole from marker and in towards garment.

NECK:
Pick up from RS approx. 50 to 64 sts around the neck (includes sts on stitch holder at the front) on short circular needle size 7 mm / US 10.75. K 1 round while inc evenly to 66-66-72-72-78-78 sts. Work rib in the round (= K 3/P 3). When neck measures 10 cm / 4", inc all K 3 to K 4 - READ INCREASE TIP-2 = 77-77-84-84-91-91 sts. When neck measures 20 cm / 8", inc all K 4 to K 5 = 88-88-96-96-104-104 sts. When neck measures 22 cm / 8¾", inc all P 3 to P 4 = 99-99-108-108-117-117 sts. Continue rib K 5/P 4 until neck measures 27-27-28-28-29-29 cm / 10½"-10½"-11"-11"-11½"-11½". LOOSELY bind off sts with K over K and P over P - NOTE: Make 1 YO after approx. every 9th st while binding off (bind off YOs as sts) to make the bind-off edge more elastic (bind off YOs as normal sts).

This pattern has been corrected.

Updated online: 25.08.2017
BACK PIECE:...Switch to circular needle size 8 mm/US 11 and work back from WS with K over K, P over P and garter st over garter st, but sts in A.4 are worked as shown in diagram...

Diagram

All measurements in charts are in cm.

symbols = K from RS, P from WS
symbols = P from RS, K from WS
symbols = work 2 sts in same st (= 1 st inc)
symbols = slip 4 sts on cable needle in front of piece, K 4, K 4 from cable needle
symbols = slip 1 st on cable needle behind piece, K 4, P 1 from cable needle
symbols = slip 4 st on cable needle in front of piece, P 1, K 4 from cable needle
symbols = slip 3 sts on cable needle behind piece, K 3, K 3 from cable needle
symbols = slip 3 sts on cable needle in front of piece, K 3, K 3 from cable needle
symbols = K 2 tog
symbols = P 2 tog
symbols = P 3 tog
diagram
diagram
diagram

Each of our patterns has specific tutorial videos to help you.

Do you have a question? See a list of frequently asked questions (FAQ)

Knitting tension is what determines the final measurements of your work, and is usually measured per 10 x 10 cm. It is provided like so: number of stitches in width x number of rows in height - eg: 19 stitches x 26 rows = 10 x 10 cm.

The knitting tension is very individual; some people knit/crochet loosely while others work tightly. You adjust the knitting tension with the needle size, which is why the suggested needle size only serve as a guide! You need to adjust this (up or down) to ensure that YOUR knitting tension matches the knitting tension provided in the pattern. If you work with a different knitting tension than provided you will have a different yarn consumption, and your work will have different measurements than what the pattern suggests.

The knitting tension also determines which yarns can replace each other. As long as you achieve the same knitting tension you can replace one yarn with another.

See DROPS lesson: How to measure your tension/gauge

See DROPS video: How to make a gauge tension swatch

The required amount of yarn is provided in grams, eg: 450 g. To calculate how many balls you’ll need you first need to know how many grams are in 1 ball (25g, 50g or 100g). This information is available if you click on the individual yarn quality on our pages. Divide the amount required with the amount of each ball. For example, if each ball is 50g (the most common amount), the calculation will be as follows: 450 / 50 = 9 balls.

The important thing when changing from one yarn to another is that the knitting/crochet tension remains the same. This is so that the measurements of the finished piece will be the same as on the sketch provided. It is easier to achieve the same knitting tension using yarns from the same yarn group. It is also possible to work with multiple strands of a thinner yarn to achieve the knitting tension of a thicker one. Please try our yarn converter. We recommend you to always work a test swatch.

Please NOTE: when changing yarn the garment might have a different look and feel to the garment in the photo, due to individual properties and qualities of each yarn.

See DROPS lesson: Can I use a different yarn than the one mentioned in the pattern?

All our yarns are categorised into yarn groups (from A to F) according to thickness and knitting tension – group A contains the thinnest yarns and group F the thickest. This makes it easier for you to find alternative yarns to our patterns, should you wish to switch yarn. All yarns within the same group have a similar knitting tension and can easily replace each other. However, different yarn qualities have different structures and properties which will give the finished work a unique look and feel.

Click here for an overview of the yarns in each yarn group

At the top of all our patterns you’ll find a link to our yarn converter, which is a helpful tool should you wish to use a different yarn than suggested. By filling in the yarn quality you wish to replace, the amount (in your size) and number of strands, the converter will present good alternative yarns with the same knitting tension. Additionally it will tell you how much you’ll require in the new qualities and whether you’ll need to work with multiple strands. Most skeins are 50g (some are 25g or 100g).

If the pattern is worked with multiple colours, every colour will have to be converted separately. Similarly, if the pattern is worked with several strands of different yarns (for example 1 strand Alpaca and 1 strand Kid-Silk) you will have to find alternatives for each, individually.

Click here to see our yarn converter

Since different yarns have different qualities and textures we have chosen to keep the original yarn in our patterns. However, you can easily find options among our available qualities by using our yarn converter, or simply pick a yarn from the same yarn group.

It is possible that some retailers still have discontinued yarns in stock, or that someone has a few skeins at home that they would like to find patterns for.

The yarn converter will provide both alternative yarn as well as required amount in the new quality.

If you think it's hard to decide what size to make, it can be a good idea to measure a garment you own already and like the size of. Then you can pick the size by comparing those measures with the ones available in the pattern's size chart.

You'll find the size chart at the bottom of the pattern.

See DROPS lesson: How to read size chart

The needle size provided in the pattern serves only as a guide, the important thing is to follow the knitting tension. And since knitting tension is very individual, you will have to adjust the needle size to ensure that YOUR tension is the same as in the pattern – maybe you’ll have to adjust 1, or even 2 needle sizes, up or down to achieve the correct tension. For this, we recommend that you work test swatches.

Should you work with a different knitting tension than the one provided, the measurements of the finished garment might deviate from the measurement sketch.

See DROPS lesson: How to measure your tension/gauge

See DROPS video: How to make a gauge tension swatch

Working a garment top-down provides more flexibility and room for personal adjustment. For example it is easier to try the garment on while working, as well as making adjustments to length of yoke and shoulder caps.

The instructions are carefully explaining every step, in the correct order. Diagrams are adjusted to the knitting direction and are worked as usual.

The diagram depicts all rows/rounds, and every stitch seen from the right side. It is read from bottom to top, from right to left. 1 square = 1 stitch.

When working back and forth, every other row is worked from the right side and every other row is worked from the wrong side. When working from the wrong side, the diagram will have to be worked reversed: from left to right, knit stitches are purled, purl stitches are knit etc.

When working in the round every round is worked from the right side and the diagram are worked from right to left on all rounds.

See DROPS lesson: How to read knitting diagrams

The diagram depicts all rows/rounds, and every stitch seen from the right side. It is worked from bottom to top, from right to left.

When working back and forth every other row is worked from the right side: from right to left and every other row is worked from the wrong side: from left to right.

When working in the round, every row in the diagram are worked from the right side, from right to left.

When working a circular diagram you start in the middle and work your way outwards, counter clockwise, row by row.

The rows usually start with a given number of chain stitches (equivalent to the height of the following stitch), this will either be depicted in the diagram or explained in the pattern.

See DROPS lesson: How to read crochet diagrams

Instructions for working several diagrams after each other on the same row/round, will often be written like so: “work A.1, A.2, A.3 a total of 0-0-2-3-4 times". This means you work A.1 once, then A.2 is worked once, and A.3 is repeated (in width) the number of times provided for your size – in this case like so: S = 0 times, M = 0 times, L=2 times, XL= 3 times and XXL = 4 times.

The diagrams are worked as usual: begin with the first row in A.1, then work the first row in A.2 etc.

See DROPS lesson: How to read knitting diagrams

See DROPS lesson: How to read crochet diagrams

The total width of the garment (from wrist-to-wrist) will be larger in the larger sizes, despite the actual sleeves being shorter. The larger sizes have longer sleeve caps and wider shoulders, so there will be a good fit in all sizes.

The measurement sketch/schematic drawing provides information regarding the full length of the garment. If it’s a jumper or a jacket the length is measured from the highest point on the shoulder (usually closest to the neckline), and straight down to the bottom of the garment. It is NOT measured from the tip of shoulder. Similarly, the length of yoke is measured from the highest point on the shoulder and down to where yoke is split into body and sleeves.

See DROPS lesson: How to read a schematic drawing

Diagrams are often repeated on the round or in height. 1 repeat is the diagram the way it appears in the pattern. If it says to work 5 repeats of A.1 in the round, then you work A.1 a total of 5 times after/next to each other in the round. If it says to work 2 repeats of A.1 vertically/in height you work the entire diagram once, then begin again at the start and work the entire diagram one more time.

Chain stitches are slightly narrower than other stitches and to avoid working the cast-on edge too tight, we simply chain more stitches to begin with. The stitch count will be adjusted on the following row to fit the pattern and measurement sketch.

The rib edge is more elastic and will contract slightly compared to, for example, stocking stitch. By increasing before the rib edge, you avoid a visible difference in width between the rib edge and the rest of the body.

It’s very easy to cast off too tightly, and by making yarn overs while casting off (and simultaneously casting these off) you avoid a too tight cast off edge.

See DROPS video: How to bind off with yarn overs (yo)

To achieve an even increase (or decrease) you can increase on, for example: every 3rd and 4th row alternately, like so: work 2 rows and increase on the 3rd row, work 3 rows and increase on the 4th. Repeat this until the increase is complete.

See DROPS lesson: Increase or decrease 1 st on every 3rd and 4th row alternately

Should you prefer to work in the round instead of back and forth, you may of course adjust the pattern. You’ll need to add steeks mid-front (usually 5 stitches), and follow the instructions. When you would normally turn and work from the wrong side, simply work across the steek and continue in the round. At the end you’ll cut the piece open, pick up stitches to work bands, and cover the cut edges.

See DROPS video: How to knit steeks and cut open

Should you prefer to work back and forth instead of in the round, you may of course adjust the pattern so you work the pieces separately and then assemble them at the end. Divide the stitches for the body in 2, add 1 edge stitch in each side (for sewing) and work the front and back pieces separately.

See DROPS lesson: Can I adapt a pattern for circular needles into straight needles?

Pattern repeats can vary slightly in the different sizes, in order to get the correct proportions. If you’re not working the exact same size as the garment in the photo, yours might deviate slightly. This has been carefully developed and adjusted so that the complete impression of the garment is the same in all sizes.

Make sure to follow instructions and diagrams for your size!

If you have found a pattern you like which is available in women’s size it’s not very difficult to convert it to men’s size. The biggest difference will be the length of sleeves and body. Start working on the women size that you think would fit across the chest. The additional length will be worked right before you cast off for the armhole/sleeve cap. If the pattern is worked top-down you can add the length right after the armhole or before the first decrease on sleeve.

Regarding additional yarn amount, this will depend on how much length you add, but it is better with a skein too many than too few.

All yarns will have excess fibres (from production) that might come off as lint or shedding. Brushed yarns (ie hairier yarns) have more of these loose, excess fibres, causing more shedding.

Shedding also depends on what is worn under or over the garment, and whether this pulls at the yarn fibres. It’s therefore not possible to guarantee that there will be no shedding

Below are some tips on how to get the best result when working with hairier yarns:

1. When the garment is finished (before you wash it) shake it vigorously so the looser hairs come off. NOTE: do NOT use a lint roller, brush or any method that pulls at the yarn.

2. Place the garment in a plastic bag and put it in your freezer - the temperature will cause the fibres to become less attached to each other, and excess fibres will come off easier.

3. Leave in the freezer for a few hours before taking it out and shaking it again.

4. Wash the garment according to the instructions on the yarn label.

Pilling is a natural process that happens to even the most exclusive of fibers. It's a natural sign of wear and tear that is hard to avoid, and that is most visible in high friction areas of your garment like a sweater's arms and cuffs.

You can make your garment look as new by removing the pilling, using a fabric comb or a pill/lint remover.

Still can't find the answer you need? Then scroll down and leave your question so one of our experts can try to help you. This will be done normally within 5 to 10 working days.
In the meantime, you can read the questions and answers that others have left to this pattern or join the DROPS Workshop on Facebook to get help from fellow knitters/crocheters!

You might also like...

Post a comment to pattern DROPS 172-36

We would love to hear what you have to say about this pattern!

If you want to leave a question, please make sure you select the correct category in the form below, to speed up the answering process. Required fields are marked *.

Comments / Questions (25)

Ruth wrote:

Please can you tell me what i need to do, i am stuck on the back section of the Drops Design 172-36, I have changed over to the 8mm needles and completed the first section, the pattern instruction is for me to work the stitches in A2 as shown in diagram A2, my confusion is that the previous row was a decrease row, so i dont have that amount of stitches to work the A2 diagram. Please can you clarify this for me. Thanks Ruth

29.03.2017 - 14:32

DROPS Design answered:

Dear Ruth, on first row with needle size 8 mm, you will K over K and P over P and work the sts in A.4 as shown in 2nd row in A.4 (A.4 is worked over A.2, there maybe a typo here). Happy knitting!

29.03.2017 - 15:18

country flag Anita Gavoldi wrote:

Hallo, ich möchte den Pulli in Grösse M machen. Die 12cm Börtchen habe ich gemacht. Jetzt weiss ich nicht wie weiter. 3M kraus und dann noch 6M r ? In diesen 6M 4M abnehmen ? Anschliessend A3 und dann A1 stricken ? Die 6M r sind vor dem A3 Muster ? Danke für viel Hilfe !

05.01.2017 - 16:30

DROPS Design answered:

Liebe Frau Gavoldi, so werden Sie stricken: 3 M kraus re, 6 M re gleichzeitig 4 M gleichmäßig verteilt über diesen 6 M abnehmen (= 2 M), Muster A.3 1 x str (= über 21 M und nach A.3 gibt es nur 15 M), Muster A.4 1 x str (= über die nächsten 42 M und nach A.4 gibt es nur 34 M), Muster A.3 (= 15 M), 6 M re und gleichzeitig 4 M gleichmäßig verteilt abnehmen ( = 2 M) und mit 3 M kraus re = 74 M. Viel Spaß beim stricken!

06.01.2017 - 08:29

country flag Reidun Reknes wrote:

Skjønner ikke helt hvordan ermene skal syes i og hva som er meningen med splitten i ermet på 2 cm (str.M). Hvor langt inn under rillekanten skal ermet ligge, og hvilke type sting skal brukes? Finner ingen video som viser dette. Ang. diagram A.7: Skal det være 3 eller 5 omganger mellom hver flette? Jeg tok sjansen på 3 omg. Når det gjelder resterende masker som skal felles av på skulderen, skal det vel være 24-24-25-25-25-25? Mvh Reidun

08.12.2016 - 15:59

DROPS Design answered:

Hei Reidun. Der er flere muligheder for hvordan du syer sammen, du skal bruge de masker du selv synes er paenest. Som der staar i opskriften: (merket på ermet skal stemme med siden på bolen ved merket), dvs, de 2 cm paa hver side af merket (2 cm ekstra strikket, ligger over de afkantede m paa bolen. Der er 5 omg mellem hver flette i A.7, den förste flette kommer i 3 p og herefter gentager du diagrammet = 5 p mellem hver. Du skal huske at du ogsaa feller 1 m paa halssiden lige efter du har lukket de midterste m til halsen af.

14.12.2016 - 14:28

Ruth Shearar wrote:

Please explain what the patterns means when it asks me to k over k, or P over P, etc.

24.11.2016 - 06:58

DROPS Design answered:

Dear Mrs Shearar, when you work this row, work the sts as they are on needle (= work K over K sts on previous row and P over P sts on previous row = stocking st / reversed stocking st + work sts in diagram as explained and the sts in garter sts as before). Happy knitting!

24.11.2016 - 09:54

country flag CHEVALIER wrote:

J'ai tricoté une veste l'année dernière, elle ne gratte pas du tout, elle est légère et très chaude, ne se détend du coup pas au lavage! Je vais en racheter vous pouvez l'utiliser les yeux fermés !

11.11.2016 - 14:11

country flag STEPHANIE wrote:

Bonjour, je souhaiterai faire ce modèle avec une laine différente, car j'ai un peu peur que Melody cratouille... Aussi je souhaite utiliser Baby alpaca silk 4088 en tricotant 3 fils en même temps. Pouvez vous m'aider pour le nombre de pelotes à commander pour une taille L ( 9 pelotes de melody suivant vos explications) Merci pour votre aide Stéphanie

02.11.2016 - 16:44

DROPS Design answered:

Bonjour Stéphanie, vous trouverez ici toutes les informations vous permettant de calculer la quantité nécessaire. Bon tricot!

03.11.2016 - 09:00

country flag Inghild wrote:

Har problemer med å forstå hvordan vrangbordet skal strikkes. Strikker i str M. Er det slik at det først skal strikkes 3 masker i riller (rett på både vrangsiden og rettsiden) så tre masker vrang (vrang på rettsiden og rett på vrangsiden), A1, deretter A2, så A1 igjen før man avslutter med 3 masker vrang og så 3 masker riller? Og så gjentar dette til vrangbordet måler 12 cm?

11.08.2016 - 00:02

DROPS Design answered:

Hej Inghild. Du strikker: 3 masker i riller (ret paa baade ret og vrangsiden), * 3 rett, 3 vrang * (gentages 1, 2 eller 3 gange afhaengigt af hvilken str du laver = dette er retten, saa paa vranen bliver rett vrang og vrang rett, i str S strikkes der ikke 3r/3vr), saa strikker du A.1, A.2 og A.1, derefter 3r/3vr igen og afslut med 3 riller.

16.09.2016 - 16:53

country flag Sus wrote:

Blir det något garn över i storlek L av de 4,5 hg? I så fall hur mycket? Mvh Sus

09.08.2016 - 21:51

DROPS Design answered:

Hej Sus. Jeg gaar ud fraa der bliver lidt til overs, men hvor meget ved jeg desvaerre ikke.

24.08.2016 - 12:49

Cat wrote:

Thanks Heather - because the pattern says to 'repeat 1 time' I had knitted *3K/3P* two times - ie knitting 6 stitches once and then repeating 1 time = 12 stitches...

08.08.2016 - 01:32

Cat wrote:

Hi - would you please check the cast on number of stitches OR the number of repeats required to set the pattern, as they do not total e.g. size M & L says cast on 102 stitches but instructions require 114 stitches to cast on. Assume all larger sizes also incorrect too? And does rest of pattern need adjusting? Many thanks for looking, as I already have the yarn and am keen to start!

07.08.2016 - 09:29

DROPS Design answered:

Hi Cat, the numbers are correct for size M and L. You have to cast on 102 sts. = 3sts in Garter St + 3K/3P (= 6 sts)+ A.1. (= 21 sts) + A.2(= 42 sts) + A.1. (= 21 sts) + 3K/3P (= 6 sts) + 3sts in Garter St.

07.08.2016 - 11:44