DROPS Kid-Silk
DROPS Kid-Silk
75% Mohair, 25% Silk
from 4.60 £ /25g
Get the yarn to make this pattern from 23.00£.

The yarn cost is calculated from the pattern’s smallest size and the yarn’s cheapest product type. Looking for an even better price? You might find it on the DROPS Deals!

DROPS SS24

Misty Harbor

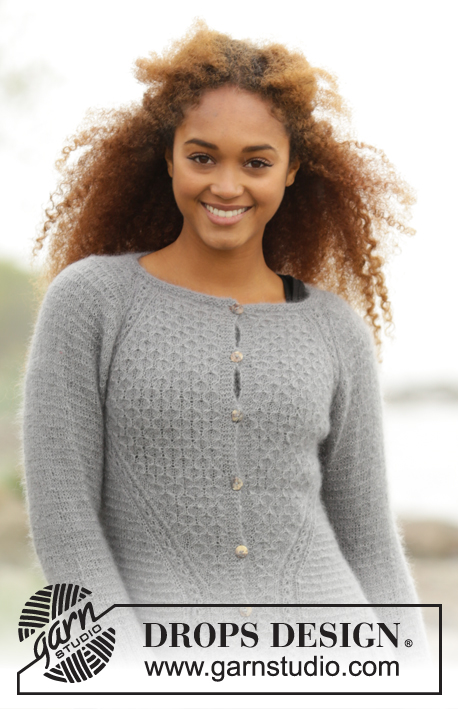
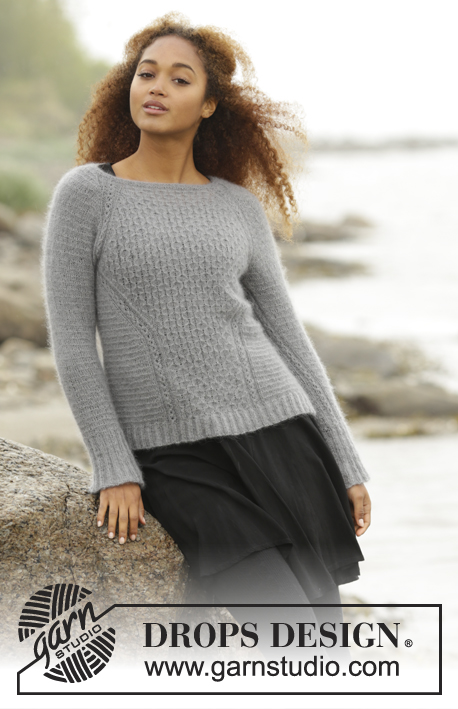
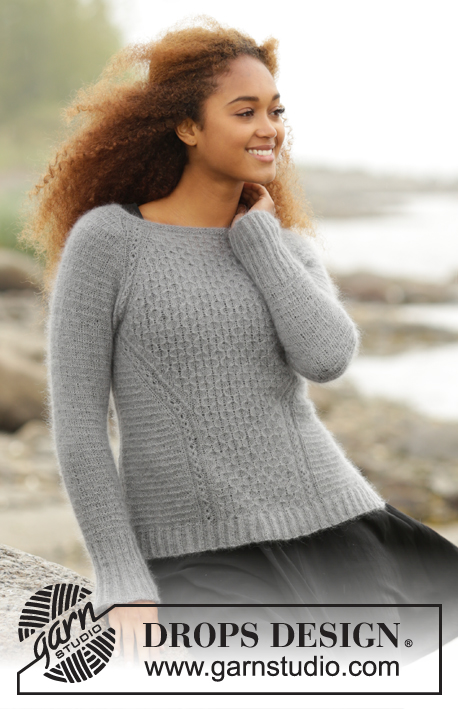
Knitted DROPS jumper, worked top down with raglan and textured pattern in “Kid-Silk”. Size: S - XXXL.

DROPS 171-24
DROPS design: Pattern no ks-116
Yarn group A
----------------------------------------------------------
Size: S - M - L - XL - XXL - XXXL
Materials:
DROPS KID-SILK from Garnstudio
125-150-150-175-200-200 g colour no 10, grey

DROPS DOUBLE POINTED NEEDLES AND CIRCULAR NEEDLE (40 + 60 or 80 cm) SIZE 3.5 mm - or size needed to get 23 sts x 30 rows in stocking st = 10 x 10 cm.
DROPS DOUBLE POINTED NEEDLES and CIRCULAR NEEDLE (40 + 80 cm) SIZE 3 mm - for edges.
DROPS CABLE NEEDLE - for cables

-------------------------------------------------------

Alternative Yarn – See how to change yarns here
Yarn Groups A to F – Use the same pattern and change the yarn here
Yarn usage using an alternative yarn – Use our yarn converter here

-------------------------------------------------------

DROPS Kid-Silk
DROPS Kid-Silk
75% Mohair, 25% Silk
from 4.60 £ /25g
Get the yarn to make this pattern from 23.00£.

The yarn cost is calculated from the pattern’s smallest size and the yarn’s cheapest product type. Looking for an even better price? You might find it on the DROPS Deals!

Pattern instructions

NOTE: This pattern is written in British English. All measurements in charts are in cm. For conversion from cm to inches - click here. There are different terms for crocheting in British and American English. If this pattern includes crochet, click for "crochet terms" here. For this pattern in American English, please click here.
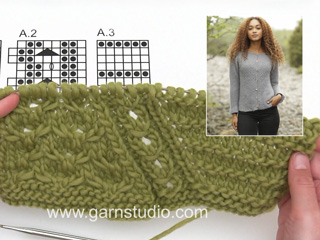
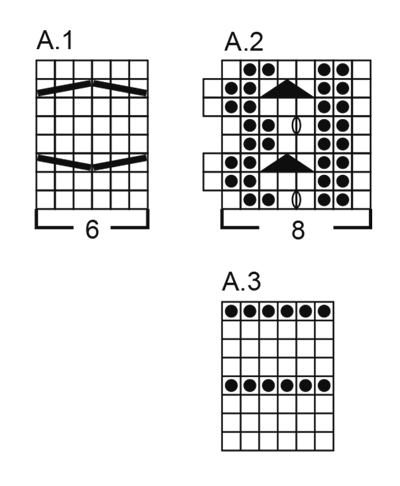
GARTER ST (worked in the round):
1 ridge = 2 rounds. * K 1 round and P 1 round *, repeat from *-*.

GARTER ST (back and forth):
K all rows. 1 ridge = 2 rows K.

PATTERN:
See diagrams A.1 to A.3. The diagrams show all rows in pattern seen from RS.

RAGLAN:
Inc for raglan on each side of A.2 in every transition between sleeve and body. Inc 1 st by making 1 YO, on next row work YO twisted to avoid holes. Work the inc sts in stocking st until the fit A.1 on body and work them in A.3 on sleeves NOTE: Inc differently on body and sleeves as explained in pattern and on some rounds there will only be inc on front and back piece and not on sleeves.


DISPLACEMENT IN A.2 (applies to front and back piece after armhole):
A.2 should be displaced from the side under sleeve to mid front/mid back.

On right front/back piece this is done as follows: Work as before until A.2, make 1 YO, work A.2 as before but when last st in A.2 remains slip this st as if to K, K 1 and psso. Continue pattern as before. On next round work YO twisted to avoid holes - work new sts in A.3.

On left front/back piece this is done as follows: Work as before until 1 st remains before A.2, K next st tog with first st in A.2, work A.2 as before, make 1 YO and work the remaining sts as before. On next round work YO twisted to avoid holes - work new sts in A.3.

INCREASE TIP (applies to sides of body):
Inc 1 st by making 1 YO, on next round work YO twisted to avoid holes. Work the inc sts in A.3.

DECREASE TIP (applies to sleeves):
Dec 2 sts mid under sleeve as follows: Beg 2 sts before A.2, K 2 tog, work A.2 (= 8 sts), slip next st as if to K, K 1, psso (= 2 sts dec).
----------------------------------------------------------

JUMPER:
Worked in the round on circular needle from top down.

YOKE:
Cast on 100-100-100-100-124-124 sts on circular needle size 3 mm with Kid-Silk. Work 2 ridges in GARTER ST - see explanation above. K 1 round while inc 20 sts evenly in all sizes = 120-120-120 -120-144-144 sts. Switch to circular needle size 3,5 mm. Work next round as follows: A.2 (= 8 sts in raglan line), A.3 over the next 8 sts (= right sleeve), A.2 (= 8 sts in raglan line), A.1 over the next 36-36-36-36-48-48 sts (= 6-6-6-6-8-8 repetitions of 6 sts on front piece), A.2 (= 8 sts in raglan line), A.3 over the next 8 sts (= left sleeve), A.2 (= 8 sts in raglan line), A.1 over the last 36-36-36-36-48-48 sts (= 6-6-6-6-8-8 repetitions of 6 sts on back piece). Continue pattern like this. REMEMBER THE KNITTING TENSION
AT THE SAME TIME on next round beg inc for RAGLAN – see explanation above! NOTE: Inc differently on body and sleeves:
BODY: Inc on every round 0-6-5-12-10-16 times in total, then on every other round 18 times in total in all sizes and finally every 4th round 6-6-7-6-8-8 times in total.
SLEEVES: Inc every other round a total of 14-19-27-30-33-32 times, and on every 4th round a total of 8-7-4-3-3-5 time.

After all inc are done there are 304-344-364-396-432-460 sts on needle. Work next round as follows: Work 4 sts (= ½ repetition of A.2), slip the next 60-68-78-82-88-90 sts on 1 stitch holder (= right sleeve), cast on 12-12-14-14-16 sts under sleeve, work the next 92-104-104-116-128-140 sts (= front piece), slip the next 60-68-78-82-88-90 sts on 1 stitch holder (= left sleeve), cast on 12-12-14-14-16 sts under sleeve, work the remaining 88-100-100-112-124-136 sts (= back piece). Cut the yarn.

BODY:
= 208-232-236-260-284-312 sts on needle (beg of round = in the middle of the 12-12-14-14-16 new sts under sleeve in the right side of piece). Insert 1 marker, NOW MEASURE PIECE FROM HERE! Work next round as follows: 2 sts in garter st, 0-0-1-1-1-2 sts pattern according to diagram A.3, continue A.2 over the next 8 sts, continue A.1 over the next 84-96-96-108-120-132 sts at the front of jumper, continue A.2 over the next 8 sts, work 0-0-1-1-1-2 sts pattern according to diagram A.3, 4 sts in garter st (insert 1 marker in the middle of these 4 sts = in the middle of left side), 0-0-1-1-1-2 sts pattern according to diagram A.3, continue A.2 over the next 8 sts, continue A.1 over the next 84-96-96-108-120-132 sts at the back of jumper, continue A.2 over the next 8 sts, work 0-0-1-1-1-2 sts pattern according to diagram A.3 and finish with 2 sts in garter st.
Continue pattern like this. AT THE SAME TIME on next round beg DISPLACEMENT IN A.2 – see explanation above. Repeat displacement every other round 24-24-24-24-30-30 times in total - NOTE: When displacing A.2, the total no of sts will be the same but there will be fewer sts in A.1 towards mid front and mid back and more sts in A.3 towards the sides. Sts in A.1 that do not fit in pattern when displacing, is worked in stocking st until they fit pattern again.
AT THE SAME TIME when piece measures 6 cm from marker, inc 1 st on each side of the 4 sts in garter st in each side - READ INCREASE TIP. Inc like this every 6 cm a total of 3 times = 220-244-248-272-296-324 sts.
After last displacement there will be 6-8-8-10-10-12 repetitions of A.1 mid front/mid back (i.e. 36-48-48-60-60-72 sts with A.1). Now continue pattern without displacements.
When piece measures 22-22-23-24-24-24 cm from marker (jumper measures approx. 44-46-48-50-52-54 cm from shoulder) divide the piece in the middle of the 4 sts in garter st in each side and finish front and back piece separately.

BACK PIECE:
= 110-122-124-136-148-162 sts. Continue pattern as before with 2 edge sts in garter st in each side until piece measures 30-30-31-30-30-30 cm from marker (jumper measures approx. 52-54-56-56-58-60 cm from shoulder). P 1 row from WS while inc 8-8-6-6-6-8 sts evenly = 118-130-130-142-154-170 sts - NOTE: Continue the 2 edge sts in each side in garter st and continue A.2 with K over K and P over P (i.e. do not inc over A.2 or sts in garter st). Switch to circular needle size 3 mm and work next row from RS as follows: 2 edge sts in garter st, * K 2, P 2 *, repeat from *-* until 4 sts remain on needle, finish with K 2 and 2 edge sts in garter st (adjust so that rib fits rib in A.2). Continue rib like this but on next row from RS inc all 2 P sts to 3 P sts (inc 1 st by making 1 YO in transition between K and P, on next row K YO twisted to avoid holes) = 146-161-161-176-191-211 sts. When rib measures 4-4-4-6-6-6 cm, loosely cast of with garter st over garter st, K over K and P over P (to avoid a tight cast-off edge cast off with 2 strands Kid-Silk). Jumper measures approx. 56-58-60-62-64-66 cm from shoulder and down.

FRONT PIECE:
= 110-122-124-136-148-162 sts. Work as on back piece.

SLEEVE:
Worked in the round on a short circular needle, switch to double pointed needles when needed. Slip the 60-68-78-82-88-90 sts from stitch holder in one side of piece back on a short circular needle size 3.5 mm and cast in addition on 12-12-14-14-14-16 new sts mid under sleeve = 72-80-92-96-102-106 sts. NOW MEASURE PIECE FROM HERE! Continue A.3 in the round but now work A.2 only over the middle 8 sts under sleeve.
When sleeve measures 1½ cm, dec 1 st on each side of A.2 - READ DECREASE TIP (= 2 sts dec). Dec a total of 13-16-21-22-23-24 times in Size S: On every 7th round, in size M: Alternately on every 5th and 6th round, in size L + XL: On every 4th round, in size XXL: Alternately on every 3rd and 4th round and in size XXXL. On every 3rd round = 46-48-50-52-56-58 sts. When sleeve measures 32-31-31-31-28-27 cm, K 1 round while inc 14-16-18-16-16-14 sts evenly = 60-64-68-68-72-72 sts. Switch to double pointed needles size 3 mm and work rib in the round over all sts (= K 2/P 2 but adjust to continue rib over A.2 mid under sleeve). When rib measures 8 cm, inc all P 2 to P 3 = 75-80-85-85-90-90 sts. When rib measures 12 cm (or desired length, sleeve measures now approx. 44-43-43-43-40-39 cm), cast off with K over K and P over P - NOTE: To avoid a tight cast-off edge cast off with 2 strands Kid-Silk.

ASSEMBLY:
Sew the opening under the sleeves.

This pattern has been corrected.

Updated online: 09.03.2017
BODY:
= 208-232-236-260-284-312 sts on needle (beg of round = in the middle of the 12-12-14-14-16 new sts under sleeve in the right side of piece)...
Updated online: 24.04.2018
Correction: The 8 sts for the sleeves in the yoke are knitted in A.3

Diagram

symbols = K from RS, P from WS
symbols = P from RS, K from WS
symbols = 1 YO between 2 sts
symbols = K 3, pass first st worked over the other 2 so that this st is around the last 2 sts on right needle (= 1 st dec)
symbols = slip 2 sts on cable needle behind piece, K 1, K 2 from cable needle
symbols = slip 1 st on cable needle in front of piece, K 2, K 1 from cable needle
symbols = knitting direction
diagram
diagram

Each of our patterns has specific tutorial videos to help you.

Do you have a question? See a list of frequently asked questions (FAQ)

Knitting tension is what determines the final measurements of your work, and is usually measured per 10 x 10 cm. It is provided like so: number of stitches in width x number of rows in height - eg: 19 stitches x 26 rows = 10 x 10 cm.

The knitting tension is very individual; some people knit/crochet loosely while others work tightly. You adjust the knitting tension with the needle size, which is why the suggested needle size is only meant as a guide! You need to adjust this (up or down) to ensure that YOUR knitting tension matches the knitting tension provided in the pattern. If you work with a different knitting tension than provided you will have a different yarn consumption, and your work will have different measurements than what the pattern suggests.

The knitting tension also determines which yarns can replace each other. As long as you achieve the same knitting tension you can replace one yarn with another.

See DROPS lesson: How to measure your tension/gauge

See DROPS video: How to make a gauge tension swatch

The required amount of yarn is provided in grams, eg: 450 g. To calculate how many balls you’ll need you first need to know how many grams are in 1 ball (25g, 50g or 100g). This information is available if you click on the individual yarn quality on our pages. Divide the amount required with the amount of each ball. For example, if each ball is 50g (the most common amount), the calculation will be as follows: 450 / 50 = 9 balls.

The important thing when changing from one yarn to another is that the knitting/crochet tension remains the same. This is so that the measurements of the finished piece will be the same as on the sketch provided. It is easier to achieve the same knitting tension using yarns from the same yarn group. It is also possible to work with multiple strands of a thinner yarn to achieve the knitting tension of a thicker one. Please try our yarn converter. We recommend you to always work a test swatch.

Please NOTE: when changing yarn the garment might have a different look and feel to the garment in the photo, due to individual properties and qualities of each yarn.

See DROPS lesson: Can I use a different yarn than the one mentioned in the pattern?

All our yarns are categorised into yarn groups (from A to F) according to thickness and knitting tension – group A contains the thinnest yarns and group F the thickest. This makes it easier for you to find alternative yarns to our patterns, should you wish to switch yarn. All yarns within the same group have a similar knitting tension and can easily replace each other. However, different yarn qualities have different structures and properties which will give the finished work a unique look and feel.

Click here for an overview of the yarns in each yarn group

At the top of all our patterns you’ll find a link to our yarn calculator, which is a helpful tool should you wish to use a different yarn than suggested. By filling in the yarn quality you wish to replace, the amount (in your size) and number of strands, the calculator will present good alternative yarns with the same knitting tension. Additionally it will tell you how much you’ll require in the new qualities and whether you’ll need to work with multiple strands. Most skeins are 50g (some are 25g or 100g).

If the pattern is worked with multiple colours, every colour will have to be calculated separately. Similarly, if the pattern is worked with several strands of different yarns (for example 1 strand Alpaca and 1 strand Kid-Silk) you will have to find alternatives for each, individually.

Click here to see our yarn calculator

Since different yarns have different qualities and textures we have chosen to keep the original yarn in our patterns. However, you can easily find options among our available qualities by using our yarn calculator, or simply pick a yarn from the same yarn group.

It is possible that some retailers still have discontinued yarns in stock, or that someone has a few skeins at home that they would like to find patterns for.

The yarn calculator will provide both alternative yarn as well as required amount in the new quality.

If you think it's hard to decide what size to make, it can be a good idea to measure a garment you own already and like the size of. Then you can pick the size by comparing those measures with the ones available in the pattern's size chart.

You'll find the size chart at the bottom of the pattern.

See DROPS lesson: How to read size chart

The needle size provided in the pattern serves only as a guide, the important thing is to follow the knitting tension. And since knitting tension is very individual, you will have to adjust the needle size to ensure that YOUR tension is the same as in the pattern – maybe you’ll have to adjust 1, or even 2 needle sizes, up or down to achieve the correct tension. For this, we recommend that you work test swatches.

Should you work with a different knitting tension than the one provided, the measurements of the finished garment might deviate from the measurement sketch.

See DROPS lesson: How to measure your tension/gauge

See DROPS video: How to make a tension/gauge swatch

Working a garment top-down provides more flexibility and room for personal adjustment. For example it is easier to try the garment on while working, as well as making adjustments to length of yoke and shoulder caps.

The instructions are carefully explaining every step, in the correct order. Diagrams are adjusted to the knitting direction and are worked as usual.

The diagram depicts all rows/rounds, and every stitch seen from the right side. It is read from bottom to top, from right to left. 1 square = 1 stitch.

When working back and forth, every other row is worked from the right side and every other row is worked from the wrong side. When working from the wrong side, the diagram will have to be worked reversed: from left to right, knit stitches are purled, purl stitches are knit etc.

When working in the round every round is worked from the right side and the diagram are worked from right to left on all rounds.

See DROPS lesson: How to read knitting diagrams

The diagram depicts all rows/rounds, and every stitch seen from the right side. It is worked from bottom to top, from right to left.

When working back and forth every other row is worked from the right side: from right to left and every other row is worked from the wrong side: from left to right.

When working in the round, every row in the diagram are worked from the right side, from right to left.

When working a circular diagram you start in the middle and work your way outwards, counter clockwise, row by row.

The rows usually start with a given number of chain stitches (equivalent to the height of the following stitch), this will either be depicted in the diagram or explained in the pattern.

See DROPS lesson: How to read crochet diagrams

Instructions for working several diagrams after each other on the same row/round, will often be written like so: “work A.1, A.2, A.3 a total of 0-0-2-3-4 times". This means you work A.1 once, then A.2 is worked once, and A.3 is repeated (in width) the number of times provided for your size – in this case like so: S = 0 times, M = 0 times, L=2 times, XL= 3 times and XXL = 4 times.

The diagrams are worked as usual: begin with the first row in A.1, then work the first row in A.2 etc.

See DROPS lesson: How to read knitting diagrams

See DROPS lesson: How to read crochet diagrams

The total width of the garment (from wrist-to-wrist) will be larger in the larger sizes, despite the actual sleeves being shorter. The larger sizes have longer sleeve caps and wider shoulders, so there will be a good fit in all sizes.

The measurement sketch/schematic drawing provides information regarding the full length of the garment. If it’s a jumper or a jacket the length is measured from the highest point on the shoulder closest to the neckline, and straight down to the bottom of the garment. It is NOT measured from the tip of shoulder. Similarly, the length of yoke is measured from the highest point on the shoulder and down to where yoke is split into body and sleeves.

On a jacket measures are never taken along bands, unless specifically stated. Always measure inside band stitches when measuring the length.

See DROPS lesson: How to read a schematic drawing

Diagrams are often repeated on the round or in height. 1 repeat is the diagram the way it appears in the pattern. If it says to work 5 repeats of A.1 in the round, then you work A.1 a total of 5 times after/next to each other in the round. If it says to work 2 repeats of A.1 vertically/in height you work the entire diagram once, then begin again at the start and work the entire diagram one more time.

Chain stitches are slightly narrower than other stitches and to avoid working the cast-on edge too tight, we simply chain more stitches to begin with. The stitch count will be adjusted on the following row to fit the pattern and measurement sketch.

The rib edge is more elastic and will contract slightly compared to, for example, stocking stitch. By increasing before the rib edge, you avoid a visible difference in width between the rib edge and the rest of the body.

It’s very easy to cast off too tightly, and by making yarn overs while casting off (and simultaneously casting these off) you avoid a too tight cast off edge.

See DROPS video: How to bind off with yarn overs (yo)

To achieve an even increase (or decrease) you can increase on, for example: every 3rd and 4th row alternately, like so: work 2 rows and increase on the 3rd row, work 3 rows and increase on the 4th. Repeat this until the increase is complete.

See DROPS lesson: Increase or decrease 1 st on every 3rd and 4th row alternately

Should you prefer to work in the round instead of back and forth, you may of course adjust the pattern. You’ll need to add steeks mid-front (usually 5 stitches), and follow the instructions. When you would normally turn and work from the wrong side, simply work across the steek and continue in the round. At the end you’ll cut the piece open, pick up stitches to work bands, and cover the cut edges.

See DROPS video: How to knit steeks and cut open

Should you prefer to work back and forth instead of in the round, you may of course adjust the pattern so you work the pieces separately and then assemble them at the end. Divide the stitches for the body in 2, add 1 edge stitch in each side (for sewing) and work the front and back pieces separately.

See DROPS lesson: Can I adapt a pattern for circular needles into straight needles?

Pattern repeats can vary slightly in the different sizes, in order to get the correct proportions. If you’re not working the exact same size as the garment in the photo, yours might deviate slightly. This has been carefully developed and adjusted so that the complete impression of the garment is the same in all sizes.

Make sure to follow instructions and diagrams for your size!

If you have found a pattern you like which is available in women’s size it’s not very difficult to convert it to men’s size. The biggest difference will be the length of sleeves and body. Start working on the women size that you think would fit across the chest. The additional length will be worked right before you cast off for the armhole/sleeve cap. If the pattern is worked top-down you can add the length right after the armhole or before the first decrease on sleeve.

Regarding additional yarn amount, this will depend on how much length you add, but it is better with a skein too many than too few.

All yarns will have excess fibres (from production) that might come off as lint or shedding. Brushed yarns (ie hairier yarns) have more of these loose, excess fibres, causing more shedding.

Shedding also depends on what is worn under or over the garment, and whether this pulls at the yarn fibres. It’s therefore not possible to guarantee that there will be no shedding

Below are some tips on how to get the best result when working with hairier yarns:

1. When the garment is finished (before you wash it) shake it vigorously so the looser hairs come off. NOTE: do NOT use a lint roller, brush or any method that pulls at the yarn.

2. Place the garment in a plastic bag and put it in your freezer - the temperature will cause the fibres to become less attached to each other, and excess fibres will come off easier.

3. Leave in the freezer for a few hours before taking it out and shaking it again.

4. Wash the garment according to the instructions on the yarn label.

Pilling is a natural process that happens to even the most exclusive of fibers. It's a natural sign of wear and tear that is hard to avoid, and that is most visible in high friction areas of your garment like a sweater's arms and cuffs.

You can make your garment look as new by removing the pilling, using a fabric comb or a pill/lint remover.

Still can't find the answer you need? Then scroll down and leave your question so one of our experts can try to help you. This will be done normally within 5 to 10 working days.
In the meantime, you can read the questions and answers that others have left to this pattern or join the DROPS Workshop on Facebook to get help from fellow knitters/crocheters!

You might also like...

Post a comment to pattern DROPS 171-24

We would love to hear what you have to say about this pattern!

If you want to leave a question, please make sure you select the correct category in the form below, to speed up the answering process. Required fields are marked *.

Comments / Questions (39)

country flag Ewa wrote:

Nie jest dla mnie jasny opis dodawania oczek na raglan. Mam dodawać oczka, a tymczasem narzuty wokół raglanu nie zwiększają ilości oczek, tylko ulegają przesunięciu, bo równocześnie przerabiam po dwa oczka razem (przed i po schemacie A2). Będę wdzięczna za dodatkowe wyjaśnienie.

30.07.2016 - 18:50

DROPS Design answered:

Cieszę się, że się udało Ewo. Koniecznie pochwal się rezultatem na naszym profilu na facebooku. Pozdrawiamy!

31.07.2016 - 09:07

country flag Steffi Vogel wrote:

Wo sind die Strickschriften Diagramme zu der Anleitung?

29.06.2016 - 12:19

DROPS Design answered:

Liebe Steffi, die Diagramme sind jetzt sichtbar.

30.06.2016 - 13:32

country flag Paula wrote:

Hallo , dit patroon is niet volledig het geeft geen telpatroon aan. gr.Paula.

29.06.2016 - 09:47

DROPS Design answered:

Hoi Paula. Heb je onderaan het patroon gekeken? Hier staan alle telpatronen.

29.06.2016 - 13:20

country flag Bärbel wrote:

Das Diagramm fehlt noch

29.06.2016 - 08:07

country flag Paula wrote:

Hele mooie trui ik hoop ook dat die uit gekoozen word. gr.

11.06.2016 - 19:27

country flag Karin wrote:

So einfach, so edel!

06.06.2016 - 12:11

country flag Monika wrote:

Edles Garn, elegante Farbe - klasse Pullover!

04.06.2016 - 22:26

country flag Silvia wrote:

Ga ik zeker maken, hoop dat deze erin komt

03.06.2016 - 21:40

country flag Franca wrote:

Bellissimo!

03.06.2016 - 15:50