
Popular categories
Looking for a yarn?


|
||||||||||||||||||||||
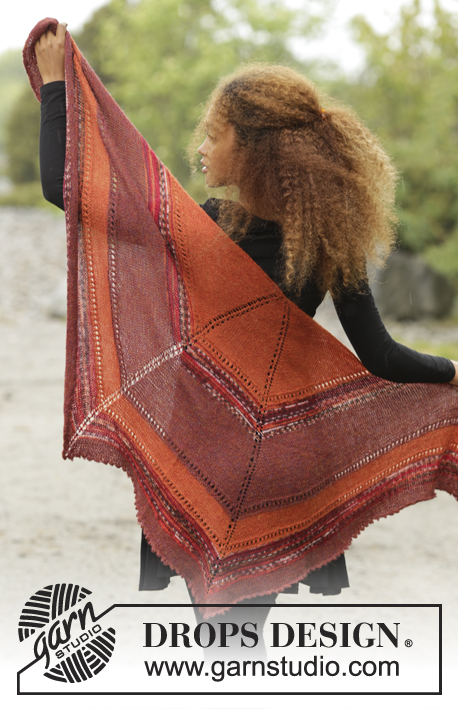
Shades of Eire |
||||||||||||||||||||||
|
|
||||||||||||||||||||||
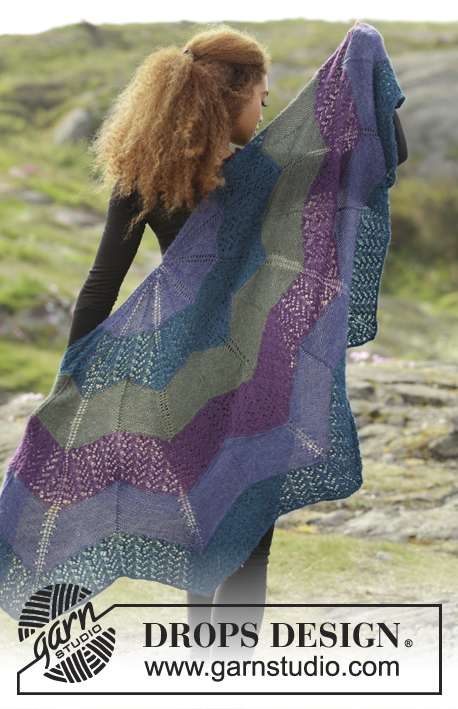
Knitted DROPS shawl with short rows, lace pattern and stripes, worked top down in 2 strands "Alpaca".
DROPS 171-8 |
||||||||||||||||||||||
|
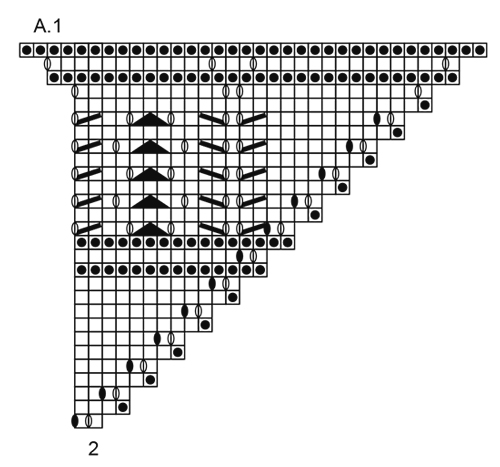
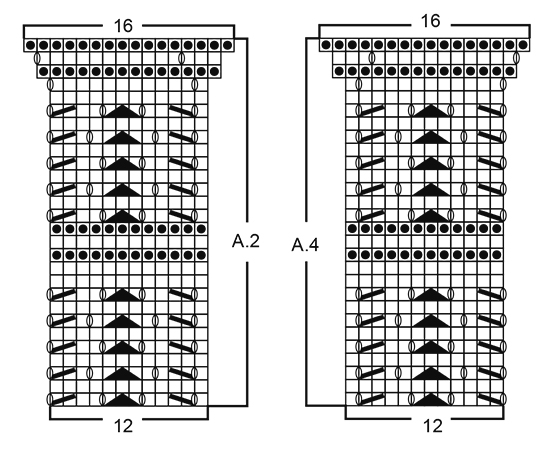
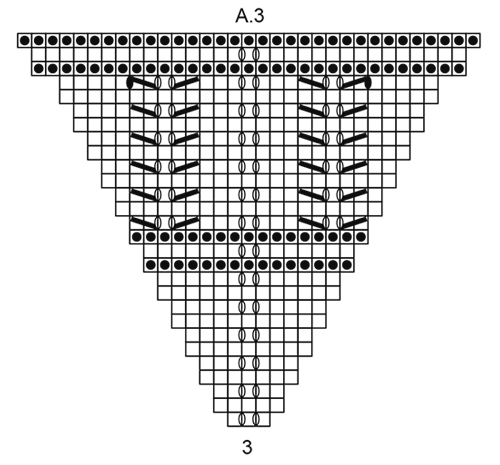
STRIPES: Work stripes as follows: Cast on with 2 strands olive and work 1st-12th row, then repeat 5th-12th ROW 7 more times = 105 sts. Switch to 1 strand olive and 1 strand dark olive, repeat 5th-12th ROW 9 times in total = 213 sts. Switch to 1 strand dark olive and 1 strand green/turquoise, repeat 5th-12th ROW 8 times in total = 309 sts. Then work pattern A.1-A.5 with 2 strands green/turquoise. GARTER ST (back and forth on circular needle): K all rows. PATTERN: See diagrams A.1-A.5. The diagrams show all rows in pattern seen from RS. ---------------------------------------------------------- SHAWL: Cast on 3 sts on circular needle size 5 mm with 2 strands olive. Work STRIPES - see explanation above and work as follows: ROW 1 (= RS): K all sts. ROW 2 (= WS): K 1, 1 YO, P 1, 1 YO, K 1 = 5 sts. ROW 3 (= RS): K 1, 1 YO, K 1, 1 YO, K 1, 1 YO, K 1, 1 YO, K 1 = 9 sts. Insert 1 marker in the middle st (= mid st). ROW 4 (= WS): 1 edge sts in GARTER ST - see explanation above, work P until 1 st remains and finish with 1 edge st in garter st. Continue to work and inc as follows with 1 edge st in garter st in each side: ROW 5 (= RS): 1 edge st in garter st, 1 YO, K 1, 1 YO, K until mid st, 1 YO, K 1 (mid st), 1 YO, K until 2 sts remain on row, 1 YO, K 1, 1 YO and 1 edge st in garter st. ROW 6 (= WS): 1 edge st in garter st, P 2, P next YO twisted to avoid hole, P until 4 sts remain on row, P first YO twisted, P 2 and finish with 1 edge st in garter st. ROW 7 (= RS): 1 edge st in garter st, 1 YO, K 1, 1 YO, K until mid st, 1 YO, K 1 (= mid st), 1 YO, K until 2 sts remain on row, 1 YO, K 1, 1 YO and 1 edge st in garter st. ROW 8 (= short row from WS): 1 edge st in garter st, K 2, K 1 twisted (to avoid hole), K 4, turn piece. NOTE: K this row from WS to make a ridge seen from RS. ROW 9 (= RS): Slip 1st st as if to K, tighten yarn and K 7. ROW 10 (= WS): 1 edge st in garter st, P until 4 sts remain on row, P first YO twisted (to avoid hole), P 2 and finish with 1 edge st in garter st. ROW 11 (= short row from RS): 1 edge st in garter st, K 7, turn piece. ROW 12 (= WS): Slip 1st st as if to K, tighten yarn and K 7. NOTE: K this row from WS to make a ridge seen from RS. REMEMBER THE KNITTING TENSION Repeat 5th-12th ROW back and forth BUT on every repetition work 2 sts more on short rows until short rows have been worked over 26 sts in total in each side. Then work short rows over only over 26 sts until finished measurements (work the other sts in stocking st as before). After every repetition 12 new sts inc (inc 5th and 7th ROW). After last stripe and repetition of 5th-12th ROW there are 309 sts on needle. Switch to 2 strands green/turquoise. K 1 row from RS while inc 10 sts as follows: Inc as before in each side and at mid st (= 6 sts) and inc in addition 4 sts evenly (i.e. 2 sts on each side of middle st, inc these sts with YOs that are worked twisted on next row) = 319 sts on needle. K 1 row from WS (work edge sts in garter st as before). Then work according to diagram as follows: A.1 over 2 sts, repeat A.2 until 1 st before mid st, work A.3 over the next 3 sts (mid st is in the middle of A.3), repeat A.4 until 2 sts remain and work A.5 over these sts. Then work diagram 1 time in total vertically. Do not cut the yarn but cast off with picot - see explanation below. CAST-OFF EDGE WITH PICOT: Loosely cast off with K from RS as follows: K 1, ((** insert right needle in between the first 2 sts on left needle (i.e. between sts on needle, not through sts), make 1 YO on right needle, pull YO forwards between sts and slip YO on left needle **, repeat from **-** 2 more times (= 3 new sts on left needle). * K first st on left needle, pass first st on right needle over last st worked *)), repeat from *-* 6 times in total and repeat from ((-)) along the entire shawl until 1 st remains, cut the yarn and pull it through last st. |
||||||||||||||||||||||
Diagram explanations |
||||||||||||||||||||||
|
||||||||||||||||||||||
|
||||||||||||||||||||||
|
||||||||||||||||||||||
|
||||||||||||||||||||||

|
||||||||||||||||||||||
|
Have you made this or any other of our designs? Tag your pictures in social media with #dropsdesign so we can see them! Do you need help with this pattern?You'll find tutorial videos, a Comments/Questions area and more by visiting the pattern on garnstudio.com. © 1982-2024 DROPS Design A/S. We reserve all rights. This document, including all its sub-sections, has copyrights. Read more about what you can do with our patterns at the bottom of each pattern on our site. |
||||||||||||||||||||||


With over 40 years in knitting and crochet design, DROPS Design offers one of the most extensive collections of free patterns on the internet - translated to 17 languages. As of today we count 304 catalogues and 11422 patterns - 11422 of which are translated into English (UK/cm).
We work hard to bring you the best knitting and crochet have to offer, inspiration and advice as well as great quality yarns at incredible prices! Would you like to use our patterns for other than personal use? You can read what you are allowed to do in the Copyright text at the bottom of all our patterns. Happy crafting!
Comments / Questions (43)
Eindelijk begonnen. Twee rijen dubbele draad groen tussen tweede en derde streep voor mooiere overgang. Alleen. Vind hem toch erg breed en niet zo diep nog. Zou ik bij laatste streep de verkorte toeren achterwege kunnen laten en vier keer meerderen om de rij om zo wat meer richting driehoek weer te gaan of zou dat hele rare vorm geven? Groet manon
04.02.2018 - 22:00DROPS Design answered:
Hoi Manon, Als je ineens stopt met de verkorte toeren komt er a.h.w. een 'knik' in de bovenrand. Een beter idee is (maar dat is achteraf) om over de hele lengte minder verkorte toeren te maken en ook de meerderingen over de hele omslagdoek te verdelen. Houd er wel rekening mee dat je met het aantal steken uitkomt met de ajourrand onderaan.
07.02.2018 - 21:10Hoi! Wat is het effect van de verkorte rijen op de vorm? wordt sjaal breder/smaller als ik die niet doe? Groet Manon
07.11.2017 - 14:10DROPS Design answered:
Hoi Manon, De verkorte toeren zorgen ervoor dat de omslagdoek aan de bovenkant over de gehele breedte wat breder wordt, terwijl hij aan de onderkant de vorm van punt van een driehoek blijft houden.
08.11.2017 - 08:56Hei, etter at jeg har oppnådd 26 m på de forkortede pinnene 8 og 11. Skal jeg da fortsette med 26 m på de neste gjentakelsene av de samme pinnene?
15.04.2017 - 19:02DROPS Design answered:
Hej Malene, Ja når du har nået 26 m i de forkortede pinne, så fortsætter du med forkortede pinne over disse 26 m til ferdig mål. God fornøjelse!
28.04.2017 - 08:16Kan ikke legge in under spørsmål. Er nå kommet bra ned til kanten. Har klippet alle diagrammer ut og lagt ved siden av hverandre, men: Dig 1 og 2 passer ikke sammen. Hvis jeg legger A 2 maskene under linjen, passer resten, men vrangsiden kommer sammen med rettsiden og omvendt. skyver jeg A2 oppover, passer toppen ikke samme, men vrang og rettsiden. Hva er galt?
05.02.2017 - 12:55DROPS Design answered:
Hej Anita. Der er lige mange pinne i A.1 som A.2. Der er 14 p op til "anden" gentagelse af hulmönstret paa A.1 (som er siden) og der er ogsaa 14 p op til "anden" gentagelse i A.2 og A.4, det samme gaelder for A.3 som strikkes i midten. Saa de burde ikke komme forskelligt paa r og vr.
09.02.2017 - 14:45Hvorfor kan en under kommentarer ikke klage noe på mønsteroppsett uten å bli stoppet med ignorerende tekst. En kan også gi positive tips til andre til å klare mønsteret. Flytte teksten til skriveprogram og forstørre skriften til 18 eller 20. Kontrollere masketall og striper etter hver 5-12 rad. Etter noen cm kommer kommer mønsteret fram og det blir lettere og følge med. Ikke gi opp!!
19.01.2017 - 14:53Dette trekantsjalet må det vil gå an og strikke på et enklere måte. Ingen hjelpestilling heller. Hvorfor oppgis ikke masketallet etter for eks. 12. , 18. osv. Omgang? at en vet det er riktig så langt. Det hele er ekstremt forvirrende. Omgangslinjene burde skilles med mellomrom. Har startet om og om igjen, og komme ikke videre. Her burde det opplyses på mønsteret, at sjalet er meget vanskelig å strikke.👎🏿👎🏿👎🏿
16.01.2017 - 17:01Hallo, im letzten Streifen würde ich den 2ten Umschlag (der verschränkt gestrickt wird) weglassen. Da in jeder 2ten Reihe zugenommen wird, wie in der Mitte , sonst geht es zu weit auseinander, es sieht nicht aus.
03.01.2017 - 09:16Hallo, leider gibt es hier keinerlei Kommentare oder Antworten auf Deutsch. Ich habe ein echtes Problem. Ich habe mir die Wolle für dieses schöne Tuch gekauft und komme nun mit den verkürzten Reihen in der Anleitung g nicht klar. Für so viele Tücher habt Ihr tolle Videoanleitungen, wie die Anfänge gestrickt werden, aber für das Tuch 171-8 habt Ihr nur Videos über die gängigen Sachen, die jeder kann. Aber speziell die hier in der Anleitung angegebenen verkürzten Reihen kapiere ich einfach nicht.
15.12.2016 - 23:43DROPS Design answered:
Liebe Christiane, die ersten verkürzten Reihen sind bei der 8. (= Rückreihe) und 11. R (= Hinreihe), wo sie dann 2 Reihe über die ersten 8 Maschen auf der Seite stricken - wenn Sie die Reihe 5-12 das nächste Mal wiederholen, stricken Sie die verkürzte Reihen wie zuvor über 2 M mehr = 10 M (anstatt 8), und so weiter arbeiten, bis 26 M bei den verkürtzten Reihen gestrickt werden, dann immer nur diese verkürzten Reihen über 26 M (beidseitig) stricken. Viel Spaß beim stricken!
16.12.2016 - 09:38Ååh, tusen takk for hjelpen :-)
22.11.2016 - 21:27Takk for svar :-) Men skulle gjerne fått det forklart litt mer.. 2 m mer på forkortet p. Hvor på p skal jeg øke maskene? Er det samme hvor bare jeg øker med 2?
21.11.2016 - 21:28DROPS Design answered:
Hej Malene. Du skal ikke öge, du skal strikke 2 m mere. Dvs, har du strikket 7 m förste gang för du vender, strikker du 9 naeste gang, saa 11 osv.
22.11.2016 - 15:40