DROPS Air
DROPS Air
65% Alpaca, 28% Polyamide, 7% Wool
from 6.45 $ /50g
Get the yarn to make this pattern from 77.40$.

The yarn cost is calculated from the pattern’s smallest size and the yarn’s cheapest product type. Looking for an even better price? You might find it on the DROPS Deals!

DROPS SS24

Alanna

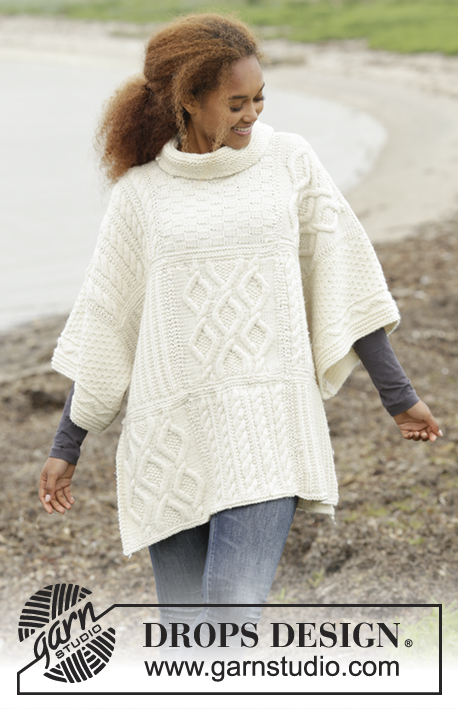
Knitted DROPS poncho with cables, turtle neck and tassels in “Air”. Size: S - XXXL.

DROPS 171-49
DROPS design: Pattern no ai-039
Yarn group C or A + A
----------------------------------------------------------
Size: S/M - L/XL - XXL - XXXL
Materials:
DROPS AIR from Garnstudio
600-700-800-800 g color no 10, fog

DROPS CIRCULAR NEEDLE (80 cm / 32'') SIZE 5 mm/US 8 - or size needed to get 17 sts x 22 rows in stockinette st = 4'' x 4'' (10 x 10 cm).
DROPS CIRCULAR NEEDLE (40 and 80 cm / 16'' and 32'') SIZE 4.5 mm/US 7 for edges in garter st and turtle neck - or size needed to get 18 sts x 23 rows in stockinette st = 4'' x 4'' (10 x 10 cm).
DROPS CABLE NEEDLE - for cables.

-------------------------------------------------------

Alternative Yarn – See how to change yarns here
Yarn Groups A to F – Use the same pattern and change the yarn here
Yarn usage using an alternative yarn – Use our yarn converter here

-------------------------------------------------------

DROPS Air
DROPS Air
65% Alpaca, 28% Polyamide, 7% Wool
from 6.45 $ /50g
Get the yarn to make this pattern from 77.40$.

The yarn cost is calculated from the pattern’s smallest size and the yarn’s cheapest product type. Looking for an even better price? You might find it on the DROPS Deals!

Pattern instructions

NOTE: This pattern is written in American English. All measurements in charts are in cm. For conversion from inches to cm - click here. There are different terms for crocheting in American and British English. If this pattern includes crochet, click for "crochet terms" here. For this pattern in British English, please click here.
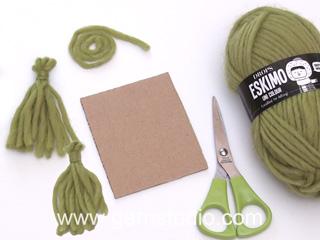
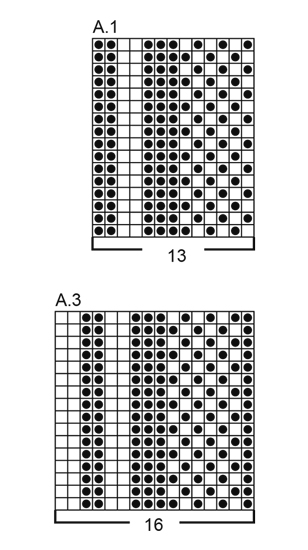
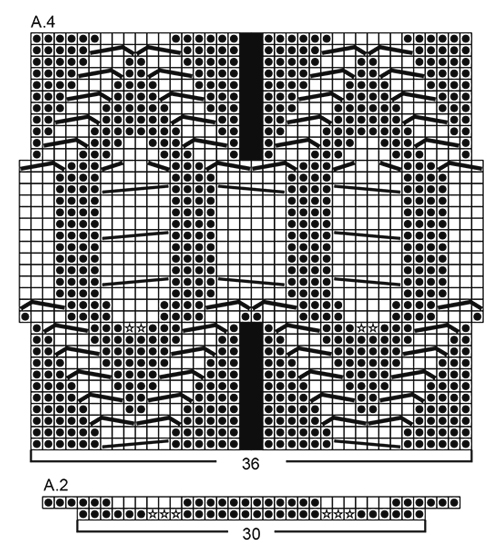
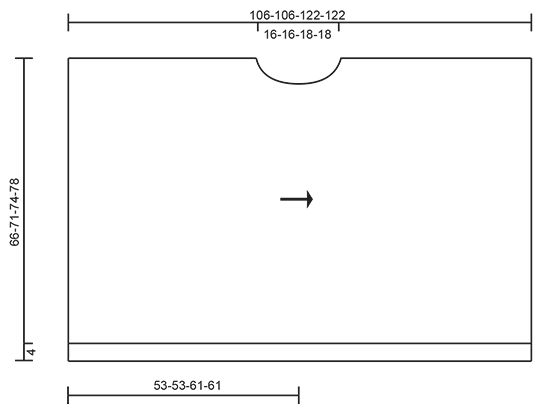
GARTER ST (back and forth):
K all rows. 1 ridge = K2 rows.

PATTERN:
See diagrams A.1 to A.4. The diagrams show all rows in pattern seen from RS.
----------------------------------------------------------

PONCHO:
Piece is worked sideways and front and back on circular needle in 2 parts.

FRONT PIECE:
Cast on 112-120-126-132 sts on circular needle size 4.5 mm / US 7 with Air. Work 6 ridges in GARTER ST - see explanation above. Switch to circular needle size 5 mm / US 8 and work next row from RS as follows: 6 edge st in garter st, 45-53-59-65 sts in stockinette st, A.1 (= 13 sts), A.2 (= 30 sts), A.3 (= 16 sts) and 2 edge sts in garter st. Work back from WS the same way = 118-126-132-138 sts. Work next row as follows from RS: 6 edge sts in garter st, 45-53-59-65 sts in stockinette st, continue A.1 over the next 13 sts, work A.4 over the next 36 sts, continue A.3 over the next 16 sts and finish with 2 edge sts in garter st. Continue pattern like this. REMEMBER THE KNITTING GAUGE When piece measures approx. 45-45-52-52 cm / 17 3/4"-17 3/4"-20½"-20½", insert 1 marker at the end of row from RS, i.e. if the knitting gauge is kept vertically, there should now remain 8 cm / 3 1/8'' in size S/M + L/XL before finishing with one whole repetition of A.4 vertically and 9 cm / 3½'' in size XXL + XXXL before finishing with half a repetition of A.4 vertically – i.e. 8-8-9-9 cm / 3"-3"-3½"-3½" remain before piece measures 53-53-61-61 cm / 21"-21"-24"-24" (= mid front).
Now bind off for neck at beg of every row from WS as follows: bind off 3 sts 1 time, 2 sts 2 times and 1 st 3 times = 108-116-122-128 sts. Continue pattern as before with 1 edge st in garter st towards the neck until piece measures 8-8-9-9 cm / 3"-3"-3½"-3½" from marker and insert 1 new marker (= mid front). Work until piece measures 2-2-3-3 cm / 3/4"-3/4"-1"-1" from marker mid front.
Now cast on sts for neck at the end of every row from RS as follows: Cast on 1 st 3 times, 2 sts 2 times and 3 sts 1 time = 118-126-132-138 sts on needle (piece measures now approx. 16-16-18-18 cm / 6 1/4"-6 1/4"-7"-7" from first marker (= neck). Continue pattern over all sts as before until piece measures approx. 102-102-118-118 cm / 40"-40"-46½"-46½" – finish after one whole repetition of A.4 vertically (= 6-6-7-7 repetitions in total with A.4 vertically). Work 1 row from RS as before but work the 6 sts in each cable K tog two by two = 112-120-126-132 sts remain on needle. Switch to circular needle size 4.5 mm / US 7, work 6 ridges and bind off with K from RS (make sure to avoid a tight bind-off edge).

BACK PIECE:
Cast on and work as front piece. When binding off for neck, this is done the same way but bind off like this: bind off 1 sts 1 time and 2 sts 1 time = 115-123-129-135 sts on needle. When 6-6-7-7 cm / 2½"-2½"-2 3/4"-2 3/4" have been worked from marker mid back, cast on new sts for neck the same way as on front piece but cast on as follows: Cast on 2 sts 1 time and 1 sts 1 time = 118-126-132-138 sts on needle. Then continue the same way as on front piece.

ASSEMBLY:
Sew the 2 parts tog on the shoulder - sew edge to edge in outer loops of edge sts so that the seam is flat. Sew if needed a little stitch in each side approx. 30-35 cm / 11 3/4"-13 3/4" from shoulder and down.

TURTLE NECK:
Pick up from RS approx. 68 to 78 sts around the neck on a short circular needle size 4.5 mm / US 7. K 1 round while inc evenly to 96-96-104-112 sts (divisible by 4). Work rib in the round (= K 2/P 2). When rib measures 10 cm / 4'', inc every other 2 K sts to 3 K sts = 108-108-117-126 sts. When rib measures 18 cm / 7'', inc the remaining 2 K sts to 3 K sts = 120-120-130-140 sts. Continue in the round with K 3/P 2 until neck measures approx. 20-22-22-24 cm / 8"-8 3/4"-8 3/4"-9½ and loosely bind off with K over K and P over P. Fold the neck down.

TASSEL:
Use a cardboard piece or similar measuring approx. 15 cm / 6''. Twine the yarn 25 times around this (or do desired thickness). Use another strand to fasten tightly around the strands in one end. Use another strand and thread through loop now made at the top of tassel and use strand to fasten the tassel to the poncho. Cut the strands in the other end of tassel. Fasten one tassel in each corner on poncho (= 4 tassels).

Diagram

All measurements in charts are in cm.

symbols = K from RS, P from WS
symbols = P from RS, K from WS
symbols = work 1 sts in front and back loop of same st (= 1 st inc)
symbols = no stitch, skip this square
symbols = K 2 tog
symbols = slip 1 st as if to K, K 1, psso
symbols = slip 1 st on cable needle behind piece, K 3, P 1 from cable needle
symbols = slip 3 st on cable needle in front of piece, P 1, K 3 from cable needle
symbols = slip 3 sts on cable needle in front of piece, K 3, K 3 from cable needle
symbols = slip 3 sts on cable needle behind piece, K 3, K 3 from cable needle
symbols = knitting direction
diagram
diagram
diagram
Do you have a question? See a list of frequently asked questions (FAQ)

Knitting tension is what determines the final measurements of your work, and is usually measured per 10 x 10 cm. It is provided like so: number of stitches in width x number of rows in height - eg: 19 stitches x 26 rows = 10 x 10 cm.

The knitting tension is very individual; some people knit/crochet loosely while others work tightly. You adjust the knitting tension with the needle size, which is why the suggested needle size only serve as a guide! You need to adjust this (up or down) to ensure that YOUR knitting tension matches the knitting tension provided in the pattern. If you work with a different knitting tension than provided you will have a different yarn consumption, and your work will have different measurements than what the pattern suggests.

The knitting tension also determines which yarns can replace each other. As long as you achieve the same knitting tension you can replace one yarn with another.

See DROPS lesson: How to measure your tension/gauge

See DROPS video: How to make a gauge tension swatch

The required amount of yarn is provided in grams, eg: 450 g. To calculate how many balls you’ll need you first need to know how many grams are in 1 ball (25g, 50g or 100g). This information is available if you click on the individual yarn quality on our pages. Divide the amount required with the amount of each ball. For example, if each ball is 50g (the most common amount), the calculation will be as follows: 450 / 50 = 9 balls.

The important thing when changing from one yarn to another is that the knitting/crochet tension remains the same. This is so that the measurements of the finished piece will be the same as on the sketch provided. It is easier to achieve the same knitting tension using yarns from the same yarn group. It is also possible to work with multiple strands of a thinner yarn to achieve the knitting tension of a thicker one. Please try our yarn converter. We recommend you to always work a test swatch.

Please NOTE: when changing yarn the garment might have a different look and feel to the garment in the photo, due to individual properties and qualities of each yarn.

See DROPS lesson: Can I use a different yarn than the one mentioned in the pattern?

All our yarns are categorised into yarn groups (from A to F) according to thickness and knitting tension – group A contains the thinnest yarns and group F the thickest. This makes it easier for you to find alternative yarns to our patterns, should you wish to switch yarn. All yarns within the same group have a similar knitting tension and can easily replace each other. However, different yarn qualities have different structures and properties which will give the finished work a unique look and feel.

Click here for an overview of the yarns in each yarn group

At the top of all our patterns you’ll find a link to our yarn converter, which is a helpful tool should you wish to use a different yarn than suggested. By filling in the yarn quality you wish to replace, the amount (in your size) and number of strands, the converter will present good alternative yarns with the same knitting tension. Additionally it will tell you how much you’ll require in the new qualities and whether you’ll need to work with multiple strands. Most skeins are 50g (some are 25g or 100g).

If the pattern is worked with multiple colours, every colour will have to be converted separately. Similarly, if the pattern is worked with several strands of different yarns (for example 1 strand Alpaca and 1 strand Kid-Silk) you will have to find alternatives for each, individually.

Click here to see our yarn converter

Since different yarns have different qualities and textures we have chosen to keep the original yarn in our patterns. However, you can easily find options among our available qualities by using our yarn converter, or simply pick a yarn from the same yarn group.

It is possible that some retailers still have discontinued yarns in stock, or that someone has a few skeins at home that they would like to find patterns for.

The yarn converter will provide both alternative yarn as well as required amount in the new quality.

If you think it's hard to decide what size to make, it can be a good idea to measure a garment you own already and like the size of. Then you can pick the size by comparing those measures with the ones available in the pattern's size chart.

You'll find the size chart at the bottom of the pattern.

See DROPS lesson: How to read size chart

The needle size provided in the pattern serves only as a guide, the important thing is to follow the knitting tension. And since knitting tension is very individual, you will have to adjust the needle size to ensure that YOUR tension is the same as in the pattern – maybe you’ll have to adjust 1, or even 2 needle sizes, up or down to achieve the correct tension. For this, we recommend that you work test swatches.

Should you work with a different knitting tension than the one provided, the measurements of the finished garment might deviate from the measurement sketch.

See DROPS lesson: How to measure your tension/gauge

See DROPS video: How to make a gauge tension swatch

Working a garment top-down provides more flexibility and room for personal adjustment. For example it is easier to try the garment on while working, as well as making adjustments to length of yoke and shoulder caps.

The instructions are carefully explaining every step, in the correct order. Diagrams are adjusted to the knitting direction and are worked as usual.

The diagram depicts all rows/rounds, and every stitch seen from the right side. It is read from bottom to top, from right to left. 1 square = 1 stitch.

When working back and forth, every other row is worked from the right side and every other row is worked from the wrong side. When working from the wrong side, the diagram will have to be worked reversed: from left to right, knit stitches are purled, purl stitches are knit etc.

When working in the round every round is worked from the right side and the diagram are worked from right to left on all rounds.

See DROPS lesson: How to read knitting diagrams

The diagram depicts all rows/rounds, and every stitch seen from the right side. It is worked from bottom to top, from right to left.

When working back and forth every other row is worked from the right side: from right to left and every other row is worked from the wrong side: from left to right.

When working in the round, every row in the diagram are worked from the right side, from right to left.

When working a circular diagram you start in the middle and work your way outwards, counter clockwise, row by row.

The rows usually start with a given number of chain stitches (equivalent to the height of the following stitch), this will either be depicted in the diagram or explained in the pattern.

See DROPS lesson: How to read crochet diagrams

Instructions for working several diagrams after each other on the same row/round, will often be written like so: “work A.1, A.2, A.3 a total of 0-0-2-3-4 times". This means you work A.1 once, then A.2 is worked once, and A.3 is repeated (in width) the number of times provided for your size – in this case like so: S = 0 times, M = 0 times, L=2 times, XL= 3 times and XXL = 4 times.

The diagrams are worked as usual: begin with the first row in A.1, then work the first row in A.2 etc.

See DROPS lesson: How to read knitting diagrams

See DROPS lesson: How to read crochet diagrams

The total width of the garment (from wrist-to-wrist) will be larger in the larger sizes, despite the actual sleeves being shorter. The larger sizes have longer sleeve caps and wider shoulders, so there will be a good fit in all sizes.

The measurement sketch/schematic drawing provides information regarding the full length of the garment. If it’s a jumper or a jacket the length is measured from the highest point on the shoulder (usually closest to the neckline), and straight down to the bottom of the garment. It is NOT measured from the tip of shoulder. Similarly, the length of yoke is measured from the highest point on the shoulder and down to where yoke is split into body and sleeves.

See DROPS lesson: How to read a schematic drawing

Diagrams are often repeated on the round or in height. 1 repeat is the diagram the way it appears in the pattern. If it says to work 5 repeats of A.1 in the round, then you work A.1 a total of 5 times after/next to each other in the round. If it says to work 2 repeats of A.1 vertically/in height you work the entire diagram once, then begin again at the start and work the entire diagram one more time.

Chain stitches are slightly narrower than other stitches and to avoid working the cast-on edge too tight, we simply chain more stitches to begin with. The stitch count will be adjusted on the following row to fit the pattern and measurement sketch.

The rib edge is more elastic and will contract slightly compared to, for example, stocking stitch. By increasing before the rib edge, you avoid a visible difference in width between the rib edge and the rest of the body.

It’s very easy to cast off too tightly, and by making yarn overs while casting off (and simultaneously casting these off) you avoid a too tight cast off edge.

See DROPS video: How to bind off with yarn overs (yo)

To achieve an even increase (or decrease) you can increase on, for example: every 3rd and 4th row alternately, like so: work 2 rows and increase on the 3rd row, work 3 rows and increase on the 4th. Repeat this until the increase is complete.

See DROPS lesson: Increase or decrease 1 st on every 3rd and 4th row alternately

Should you prefer to work in the round instead of back and forth, you may of course adjust the pattern. You’ll need to add steeks mid-front (usually 5 stitches), and follow the instructions. When you would normally turn and work from the wrong side, simply work across the steek and continue in the round. At the end you’ll cut the piece open, pick up stitches to work bands, and cover the cut edges.

See DROPS video: How to knit steeks and cut open

Should you prefer to work back and forth instead of in the round, you may of course adjust the pattern so you work the pieces separately and then assemble them at the end. Divide the stitches for the body in 2, add 1 edge stitch in each side (for sewing) and work the front and back pieces separately.

See DROPS lesson: Can I adapt a pattern for circular needles into straight needles?

Pattern repeats can vary slightly in the different sizes, in order to get the correct proportions. If you’re not working the exact same size as the garment in the photo, yours might deviate slightly. This has been carefully developed and adjusted so that the complete impression of the garment is the same in all sizes.

Make sure to follow instructions and diagrams for your size!

If you have found a pattern you like which is available in women’s size it’s not very difficult to convert it to men’s size. The biggest difference will be the length of sleeves and body. Start working on the women size that you think would fit across the chest. The additional length will be worked right before you cast off for the armhole/sleeve cap. If the pattern is worked top-down you can add the length right after the armhole or before the first decrease on sleeve.

Regarding additional yarn amount, this will depend on how much length you add, but it is better with a skein too many than too few.

All yarns will have excess fibres (from production) that might come off as lint or shedding. Brushed yarns (ie hairier yarns) have more of these loose, excess fibres, causing more shedding.

Shedding also depends on what is worn under or over the garment, and whether this pulls at the yarn fibres. It’s therefore not possible to guarantee that there will be no shedding

Below are some tips on how to get the best result when working with hairier yarns:

1. When the garment is finished (before you wash it) shake it vigorously so the looser hairs come off. NOTE: do NOT use a lint roller, brush or any method that pulls at the yarn.

2. Place the garment in a plastic bag and put it in your freezer - the temperature will cause the fibres to become less attached to each other, and excess fibres will come off easier.

3. Leave in the freezer for a few hours before taking it out and shaking it again.

4. Wash the garment according to the instructions on the yarn label.

Pilling is a natural process that happens to even the most exclusive of fibers. It's a natural sign of wear and tear that is hard to avoid, and that is most visible in high friction areas of your garment like a sweater's arms and cuffs.

You can make your garment look as new by removing the pilling, using a fabric comb or a pill/lint remover.

Still can't find the answer you need? Then scroll down and leave your question so one of our experts can try to help you. This will be done normally within 5 to 10 working days.
In the meantime, you can read the questions and answers that others have left to this pattern or join the DROPS Workshop on Facebook to get help from fellow knitters/crocheters!

You might also like...

Post a comment to pattern DROPS 171-49

We would love to hear what you have to say about this pattern!

If you want to leave a question, please make sure you select the correct category in the form below, to speed up the answering process. Required fields are marked *.

Comments / Questions (42)

country flag Birgitta Waldt wrote:

Hej förtydligande av min förra fråga. På bilden är längden från mönster A4 till axeln mycket längre än det blir på min stickning. Skiljer ca 10 cm. Det verkar saknas en del på mönstret. Mitt maskantal stämmer mot mönstret.

06.02.2024 - 14:13

DROPS Design answered:

Hei Birgitta. Se vårt forrige svar. mvh DROPS Design

15.02.2024 - 11:29

country flag Birgitta Waldt wrote:

Hej Jag håller på att sticka denna ponchon. Men när jag tittar på bilden är längden från mönster A4 mycket längre på bilden än på det jag fått. Verkar som om en del saknas i beskrivningen. Antal maskor stämmer.

05.02.2024 - 18:28

DROPS Design answered:

Hei Birgitta. Skal ikke mangle noe i oppskriften, men husk at ponchoen strikkes sidelengs. Så når du ser på diagrammet (A.4) stående, så blir det i virkeligheten liggende på selve plagget. mvh DROPS Design

15.02.2024 - 09:42

country flag Brigitte Grizonnet-Riviere wrote:

Bonjour,c est encore moi donc le diagramme A4 n'a pas toujours la même largeur? ou bien empiète t-il sur les diagrammes qui le bordent? encore merci et bonne journée.Brigitte

02.11.2023 - 11:24

DROPS Design answered:

Bonjour Brigitte, le diagramme A.4 va avoir la même largeur tout du long, si on augmente des mailles, c'est pour conserver la même largeur pour les torsades au milieu des 2 motifs; quand ces torsades sont terminées, on va diminuer les mailles augmentées. La largeur sera ainsi la même (il faut plus de mailles pour tricoter des torsades que du jersey/jersey envers, raison pour laquelle on doit augmenter, sinon l'ouvrage deviendrait plus étroit à ce niveau (et on manquerait de mailles pour les torsades). Bon tricot!

02.11.2023 - 17:51

country flag Brigitte Grizonnet-Riviere wrote:

Bonjour, Au 12eme rang du schéma A4 faut- il augmenter de 4 mailles au total, puis diminuer de 4 mailles au 26 eme rang? merci Brigitte

31.10.2023 - 17:45

DROPS Design answered:

Bonjour Mme Grizonnet-Riviere, tout à fait, il vous suffit d'augmenter au niveau des étoiles (cf diagramme et légende) puis vous diminuerez (Cf 5ème et 6ème symboles figurant également dans le diagramme. Bon tricot!

01.11.2023 - 14:55

country flag Brigitte Grizonnet-Riviere wrote:

Bonjour,je ne comprends pas le diagramme A 4.Vous dites dans un précédent commentaire que les cases noires correspondent à des mailles que l on a précédemment diminuées.je ne comprends pas à quel moment nous avons diminué ces 2 mailles.\D\'autre part,sur le tricot, A4 contient combien de mailles(36ou38ou40)?.merci;Brigitte

31.10.2023 - 17:39

country flag Annabelle Garcia wrote:

Bonjour, je dois commencer le col et je ne comprends pas le répartition ni le nombre d'augmentations comme expliqué:Quand les côtes mesurent 10 cm, augmenter 1 m dans 1 section 2 m end sur 2 = 108-108-117-126 m. Quand les côtes mesurent 18 cm, augmenter 1 m end dans les sections 2 m end restantes = 120-120-130-140 m. Merci pour votre aide

10.10.2023 - 14:33

DROPS Design answered:

Bonjour Mme Garcia, vous devez augmenter le nombre de mailles envers des côtes 2/2, autrement dit, après la 1ère augmentation, vous aurez *2 m end, 2 m env, 3 m end, 2 m env* tout le tour; puis vous augmenterez dans les sections 2 m end restantes pour continuer en côtes 3 m end, 2 m env. Vu sur l'endroit quand le col sera replié, vos côtes se présenteront en 2 m end/3 m env. Bon tricot!

10.10.2023 - 16:26

country flag Angela Beer wrote:

Thank you so much for your reply. I feel so sorry for posting a negative review on this pattern when had read it properly in the first instance and looked at the directional arrow instead of leaping ahead, I would have realised it was sideways on!!!! I have now started the garment and hope that because I am knitting it for my daughter it'll turn out well. I love everything about Drops yarns and have used them extensively. The colour palette is amazing. Thank you.

23.10.2022 - 16:06

country flag Angela Beer wrote:

I cannot comprehend this pattern. Is it because the instructions do not go from right to left across the garment, but rather sideways, then the neck, and then the remainder of the front of the garment. Similarly the back would be knitted the same way. It is important because I have got the yarn, a lot of it, and it was going to be a present for my daughter.

19.10.2022 - 15:38

DROPS Design answered:

Dear Mrs Beer, correct, the front piece is worked sideways from the right side towards the left (when poncho is worn), then back piece is worked sideways from the left side towards the right side (when poncho is worn); you then sew pieces together on shoulder and work neck in the round around neckline. Hope it will help. Happy knitting!

19.10.2022 - 16:23

country flag Angela Beer wrote:

I have just posted a query and have been answered in not a very appropriate fashion. My comments contain forbidden words. I am sorry I do not see why I have said anything offending.

19.10.2022 - 15:33

country flag Lynda wrote:

J’ai de la difficulté avec les cases noires dans le diagramme A4. Je ne comprend pas la diminution.

25.10.2021 - 13:52

DROPS Design answered:

Bonjour Lynda, le rang precedent 4 mailles ont ete diminuees, d'ou viennent les modifications du diagramme (y compris les cases noires). Le rang suivant, vous commencez le diagramme dans le meme endroit qu'avant, les cases noires ne sont pas a tricoter, passez directement a la case suivante du diagramme. Bon tricot!

26.10.2021 - 08:15