
Popular categories
Looking for a yarn?


|
||||||||||||||||||||||||||||||||||||||||||||||
Beach Mermaid |
||||||||||||||||||||||||||||||||||||||||||||||
 |
 |
|||||||||||||||||||||||||||||||||||||||||||||
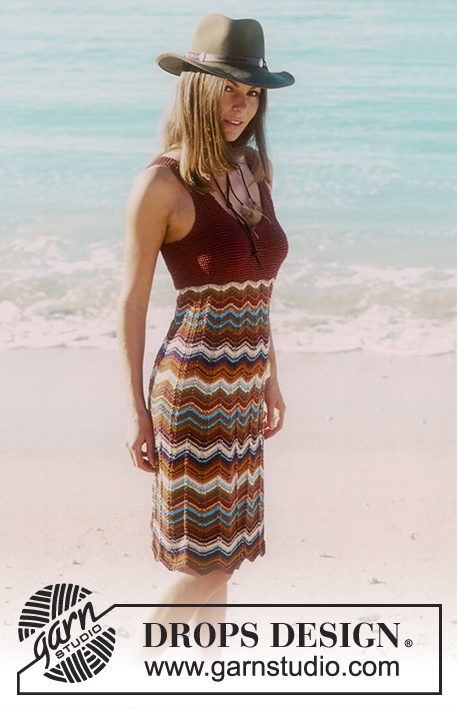
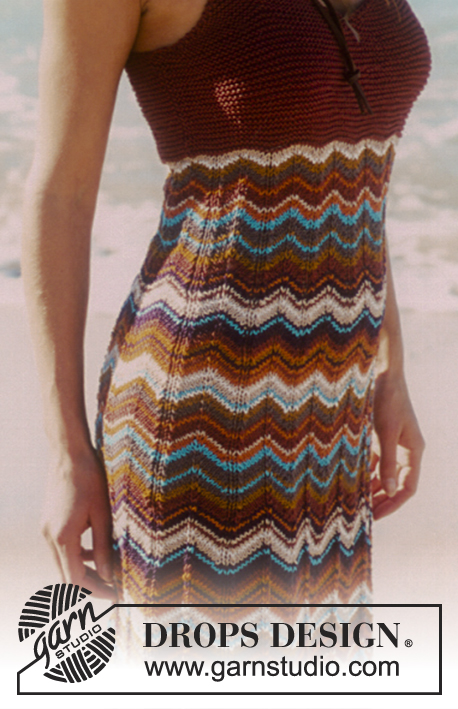
DROPS Dress in Muskat
DROPS 68-23 |
||||||||||||||||||||||||||||||||||||||||||||||
|
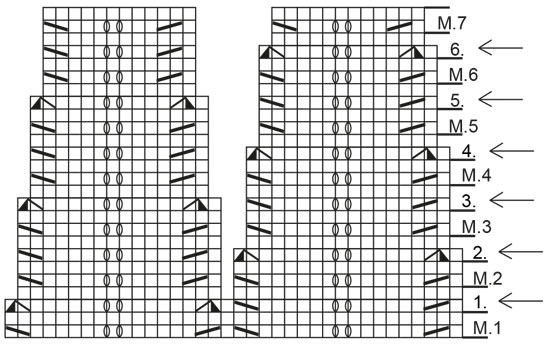
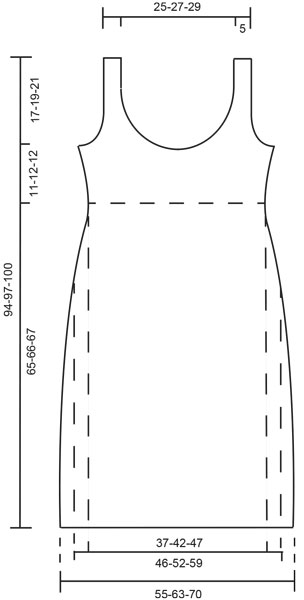
Gauge: 23 sts x 30 rows on mid-size needles in pattern = 10 x 10 cm [4" x 4"]. 23 sts x 40 rows on smallest needles in garter st = 10 x 10 cm [4" x 4"]. Pattern: See charts. The pattern is seen from the right side. The chart marked «Diag. A.1a and A.1b" indicates the stripe pattern. The other chart is for the zig-zag pattern and has lines marked «M.1", «M.2", etc. These are the Pattern numbers referred to in the instructions: «M.» is the abbreviation for «Pattern» in Norwegian. The alternate lines marked with an arrow and a number are the decrease rows – decs are made on the 2nd row of each. Garter st, when knitting flat: Knit all sts, all rows. Garter st, when knitting in the round: *Rnd 1, knit. Rnd 2, purl.* Repeat from * - *. Knitting tips-1 (for back of yoke): All decs are made on right side rows. Dec 1 st inside 1 edge st as follows: After edge st: K 2 tog. Before edge st: sl 1, K 1, psso. Knitting tips-2 (for front of yoke): All decs are made on right side rows. Dec 2 sts on the row as follows: K 1, K 3 tog, then knit across until the st before the marker, yo, K the st before the marker, sl marker, yo, knit across row until 4 sts remain, then knit as follows: Sl 1, K 2 tog, psso, K 1. -------------------------------------------- DRESS The dress is worked in the round from the bottom edge and up. Read the entire Pattern instructions above before beginning. Cast on 252-288-324 sts loosely on larger circular needles with terracotta. Work 2 rows of Pattern 1 in garter st. Change to smaller circular needles and stockinette st. Continue to work Pattern 1 with color changes as indicated in Diag. A.1a and A.1b. When the piece measures 28 cm [11"] start Dec 1. 14-16-18 sts are decreased each dec row. After Dec. 1 = 238-272-306 sts remain, work Pattern 2. When the piece measures 33 cm [13"] start Dec. 2 = 224-256-288 sts remain, then work Pattern 3. When the piece measures 38 cm [14⅞"] start Dec. 3 = 210-240-270 sts remain, then work Pattern 4. When the piece measures 42 cm [16.5"] start Dec. 4 = 196-224-252 sts remain, then work Pattern 5. When the piece measures 47 cm [18.5"] start Dec. 5 = 182-208-234 sts remain, then knit Pattern 6. When the piece measures 53 cm [20⅞"] start Dec. 6 = 168-192-216 sts, then work Pattern 7. When the piece measures 65-66-67 cm [25⅝" - 26" - 26⅜"] change to smallest circular needles and terracotta and work in garter st. Measure the piece from here. When the garter st portion measures 11-12-12 cm [4.25" - 4.75" - 4.75"], work the next row as follows: bind off 3 sts for armhole, 86-98-110 sts for the front, bind off 7 sts for armhole, 68-80-92 sts for the back, bind off 4 sts for armhole. Work each side separately. Back: = 68-80-92 sts. Dec 1 st for each armhole every other row 7-10-14 times - see knitting tips-1 = 54-60-64 sts, bind off. Front: = 86-98-110 sts. Put 43-49-55 sts at one side on a st holder. 1st strap: Mark the center st of the 43-49-55 remaining sts on needle. Knit garter st - at the same time dec at edges and inc at marker - see knitting tips-2. This decreases 2 sts per row. Dec every other row a total of 16-19-22 times = 11-11-11 sts remain. Continue to knit garter st over these 11 sts for strap. Bind off when strap measures approx. 30 cm [11.75"] or correct length - try on dress to check correct length of strap. 2nd strap: Put the 43-49-55 sts from st holder on needles and work the same as the 1st strap. Assembly: Sew side seams on bodice. Sew straps to back. |
||||||||||||||||||||||||||||||||||||||||||||||
Diagram explanations |
||||||||||||||||||||||||||||||||||||||||||||||
|
||||||||||||||||||||||||||||||||||||||||||||||

|
||||||||||||||||||||||||||||||||||||||||||||||

|
||||||||||||||||||||||||||||||||||||||||||||||
|
||||||||||||||||||||||||||||||||||||||||||||||
|
||||||||||||||||||||||||||||||||||||||||||||||
|
Have you made this or any other of our designs? Tag your pictures in social media with #dropsdesign so we can see them! Do you need help with this pattern?You'll find tutorial videos, a Comments/Questions area and more by visiting the pattern on garnstudio.com. © 1982-2024 DROPS Design A/S. We reserve all rights. This document, including all its sub-sections, has copyrights. Read more about what you can do with our patterns at the bottom of each pattern on our site. |
||||||||||||||||||||||||||||||||||||||||||||||


With over 40 years in knitting and crochet design, DROPS Design offers one of the most extensive collections of free patterns on the internet - translated to 17 languages. As of today we count 304 catalogs and 11422 patterns - 11417 of which are translated into English (US/in).
We work hard to bring you the best knitting and crochet have to offer, inspiration and advice as well as great quality yarns at incredible prices! Would you like to use our patterns for other than personal use? You can read what you are allowed to do in the Copyright text at the bottom of all our patterns. Happy crafting!
Comments / Questions (59)
Bonjour je ne comprends pas les diminutions pour le devant astuce 2 .\r\n J\'ai mis mon marqueur au milieu de mes 43m et après je suis bloquée . Merci pour votre réponse . Cordialement Evelyne
13.05.2018 - 12:27DROPS Design answered:
Bonjour Mme Vivier, placez bien votre marqueur dans la m centrale (= 21 m, mettez un marqueur dans la m suivante, 21 m). Diminuez ensuite ainsi: 1 m end, 3 m ens à l'end (= on diminue 2 m), faites 1 jeté de chaque côté de la maille avec le marqueur (= 2 augm), continuez jusqu'à ce qu'il reste 4 m et diminuez 2 m (= glissez 1 m à l'end, 2 m ens à l'end, p assez la m glissée par-dessus la m tricotée), 1 m end = vous avez diminué 4 m et augmenté 2 m = vous avez diminué 2 mailles seulement sur ce rang. Bon tricot!
14.05.2018 - 11:46Bonjour Merci pour votre réponse. J'ai bien compris la diminution mais je j'obtiens pas le bon nombre de mailles entre les jetés Pouvez vous m expliquer à nouveau Merci Evelyne
02.05.2018 - 10:07DROPS Design answered:
Bonjour Mme Vivier, à la 1ère diminution (flèche 1), tricotez les premières m comme avant: 2 m ens à l'end, 6 m end, 1 jeté, 1 m end, 1 jeté, 6 m end, 1 dim, 1 m end, puis tricotez 3 m ens à l'end (= 12ème symbole = 2 dim), 5 m end, 1 jeté, 5 m end, glissez 1 m à l'end, 2 m ens à l'end, passez la m glissée par dessus la m tricotée (= 2 diminutions = avant-dernier symbole). Bon tricot!
02.05.2018 - 10:53Bonjour je n arrive pas à faire les diminutions 1 je n'ai pas le bon nombre de mailles entre les deux Comment dois-je suivre le diagramme sur les 36m Merci Cordialement Evelyne
30.04.2018 - 15:14DROPS Design answered:
Bonjour Mme Vivier, en bas de la robe, tricotez d'abord M.1 puis diminuez en suivant les 2 rangs 1. = celui avec la flèche (= on diminue au 1er de ces 2 rangs), tricotez ensuite en suivant M.2. À 33 cm, tricotez les 2 rangs 2. avec la flèche (= diminutions) et tricotez ensuite M.3, et ainsi de suite, tricotez le diagramme indiqué puis, pour diminuer, tricotez les 2 rangs suivant avec la flèche. Bon tricot!
02.05.2018 - 09:21Hej från en nybörjare som vill prova att göra en enkel klänning och fann den här. Kan jag använda mönstret för att göra den enfärgad och utan sick-sack-mönstret eller är det bättre att jag letar upp ett annat mönster?
26.02.2018 - 19:50DROPS Design answered:
Hej Lisa, Jo men det bør du kunne, men sørg for at få samme strikkefasthed som der står i opskriften, så målene stemmer med dem du finder i måleskitsen nederst. God fornøjelse!
27.02.2018 - 13:33Hej, tak for svar. Kombinerer jeg muskat og cotton light ? og hvilke farve nr vil i foreslå at jeg bruger istedet for 22,28+35 ? Farverne snydere somme tider på en skærm :-)
15.06.2017 - 18:30DROPS Design answered:
Hei Joan. Fargevalg er så personlig at det beste er at du velger de fargene du mener passer deg best, enten i bare Muskat eller i Cotton Light. God Fornøyelse!
16.06.2017 - 06:57Hej, tak for svar. Kombinerer jeg muskat og cotton light ? og hvilke farve nr vil i foreslå at jeg bruger istedet for 22,28+35 ? Farverne snydere somme tider på en skærm :-)
11.06.2017 - 09:21Hva med bakstykket på denne kjolen? Det står at en skal felle av alle 60 m. på bakstykket. Stemmer dette? Det kan være noe jeg ikke har klart å lese av oppskriften. Forslag/erfaringer tas i mot med takk på hvordan jeg skal gjør det med bakstykket :)
10.06.2017 - 12:34DROPS Design answered:
Hei Chris. Ja, det stemmer. Kjolen strikkes på rundp fra nederkant av skjørtet og opp, når arb måler 66 cm (str M) byttes det til rundp 3 og strikkes ferdig med terrakotta og rillestrikk. Fell til ermhull, deretter strikkes for- og bakstk ferdig for seg. Bakstk: = 80 m. Videre felles det til ermhull i hver side på hver 2.p - se Felletips: 1 m i alt 10 ganger = 60 m, fell av. Du er nå ferdig med bakstykket og skal nå strikke forstykkene inkl stroppene, disse stroppene skal så festes i bakstykket. Se bildet av ryggen. God Fornøyelse!
12.06.2017 - 08:19Vil SÅ gerne lave denne kjole. Men farve nr 22,28 + 35 er udgået. Hvilket farver nr foreslår i man erstatter med ? mvh Joan
09.06.2017 - 11:01DROPS Design answered:
Hej Joan, husk at du også kan strikke den i Cotton Light - klik på garnalternativer :)
09.06.2017 - 15:38Vil SÅ gerne lave denne kjole. Men farve nr 22,28 + 35 er udgået. Hvilket farver nr foreslår i man erstatter med ? mvh Joan
09.06.2017 - 10:52Det står i starten at man skal strikke 1 rille i M1. Betyr det at det skal strikkes mønster allerede fra første pinne? Eller skal det først lages en rille uten mønster og så starte på M1?
22.01.2016 - 19:24DROPS Design answered:
Ja det betyder at du starter med 1 rille samtidig som du starter med M.1. God fornøjelse!
09.03.2016 - 16:11