DROPS Cotton Merino
DROPS Cotton Merino
50% Wool, 50% Cotton
from 3.55 £ /50g
Get the yarn to make this pattern from 35.50£.

The yarn cost is calculated from the pattern’s smallest size and the yarn’s cheapest product type. Looking for an even better price? You might find it on the DROPS Deals!

DROPS SS24
DROPS Extra 0-1284
DROPS design: Pattern no cm-045
Yarn group B
----------------------------------------------------------
Size: S - M - L - XL - XXL - XXXL
Materials:
DROPS COTTON MERINO from Garnstudio
500-550-600-650-750-800 g colour no 17, vanilla

DROPS CROCHET HOOK SIZE 3.5 mm – or size needed to get 20 tr x 10 rows/rounds = 10 x 10 cm.
DROPS MOTHER-OF-PEARL BUTTON ARCHED (white), NO 522: 4 pieces for all sizes

-------------------------------------------------------

Alternative Yarn – See how to change yarns here
Yarn Groups A to F – Use the same pattern and change the yarn here
Yarn usage using an alternative yarn – Use our yarn converter here

-------------------------------------------------------

DROPS Cotton Merino
DROPS Cotton Merino
50% Wool, 50% Cotton
from 3.55 £ /50g
Get the yarn to make this pattern from 35.50£.

The yarn cost is calculated from the pattern’s smallest size and the yarn’s cheapest product type. Looking for an even better price? You might find it on the DROPS Deals!

Pattern instructions

NOTE: This pattern is written in British English. All measurements in charts are in cm. For conversion from cm to inches - click here. There are different terms for crocheting in British and American English. If this pattern includes crochet, click for "crochet terms" here. For this pattern in American English, please click here.
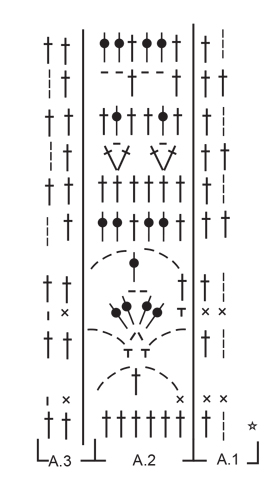
CROCHET INFO:
Replace first tr at on every tr round with 3 ch, finish the round with 1 sl st in 3rd ch from beg of round.

PATTERN:
See diagrams A.1 to A.5.
----------------------------------------------------------

DRESS: Worked in two parts. Top part is worked back and forth in one piece, from mid front to mid front, then work bottom part in the round and down from bottom edge of top part.

TOP PART:
Work 48-48-55-62-69-69 ch on hook size 3.5 mm with Cotton Merino. Turn and work 1 tr in fourth ch from hook (= 2 tr), work 1 tr in each of the next 2 ch, * skip 1 ch, work 1 tr in each of the next 6 tr *, repeat from *-* = 40-40-46-52-58-58 tr. Work 2 rows with 1 tr in every tr (= band), then work as follows - from RS: A.1 (= 2 tr), A.2 over the next 36-36-42-48-54-54 tr, finish with A.3 (= 2 tr). REMEMBER THE CROCHET TENSION! When piece measures 9-8-11-12-11-14 cm – adjust so that next row is a row with tr that is worked from WScast on 24 new, loose ch at the end of row for shoulder = 64-64-70-76-82-82 tr/ch. Work next row as follows - from WS: A.3, A.2 over the next 60-60-66-72-78-78 tr, finish with A.1. Continue like this until piece measures 19-20-21-23-24-25 cm, adjust so that next row is a row with tr worked from RS. Now work as follows: Work A.1, work A.2 over the next 30-30-30-36-36-36 tr, work A.3, turn and work back (do not work over the last 30-30-36-36-42-42 tr on row = armhole). When piece measures 25-28-31-35-40-45 cm – adjust so that next row is a row with tr that is worked from WS – cast on 30-30-36-36-42-42 new, loose ch at the end of row for shoulder = 64-64-70-76-82-82 tr/ch. Work next row as follows - from WS: A.3, A.2 over the next 60-60-66-72-78-78 tr, finish with A.1. Continue like this until piece measures 36-40-43-48-53-59 cm, adjust so that next row is a row with tr worked from RS. Now work as follows: Work A.1, work A.2 over the next 56-56-60-66-72-72 tr, work A.3, turn and work back (do not work over the last 6 tr on row = neck).

When piece measures 48-52-57-63-70-76 cm – adjust so that next row is a row with tr that is worked from WS – cast on 6 new, loose ch at the end of row for shoulder = 64-64-70-76-82-82 tr/ch. Work next row as follows - from WS: A.3, A.2 over the next 60-60-66-72-78-78 tr, finish with A.1. Continue like this until piece measures 59-64-69-76-83-90 cm, adjust so that next row is a row with tr worked from RS. Now work as follows: Work A.1, work A.2 over the next 30-30-30-36-36-36 tr, work A.3, turn and work back (do not work over the last 30-30-36-36-42-42 tr on row = armhole).

When piece measures 65-72-79-88-99-110 cm – adjust so that next row is a row with tr that is worked from WS – cast on 30-30-36-36-42-42 new, loose ch at the end of row for shoulder = 64-64-70-76-82-82 tr. Work next row as follows - from WS: A.3, A.2 over the next 60-60-66-72-78-78 tr, finish with A.1. Continue like this until piece measures 75-84-89-99-112-121 cm, adjust so that next row is a row with tr worked from RS. Now work as follows: Work A.1, work A.2 over the next 36-36-42-48-54-54 tr, work A.3, turn and work back (do not work over the last 24 tr on row = neck). Continue like this until piece measures 82-90-98-109-121-133 cm, now work 3 rows with 1 tr in every tr (= band), piece measures 84-92-100-111-123-135 cm. Fasten off.

ASSEMBLY: Sew the shoulder seams.

BOTTOM PART:
NOW MEASURE PIECE FROM HERE! Beg mid back along bottom edge of top (button band is mid front) and work 156-174-192-210-234-258 tr – work approx. 2 tr around every tr, when working over band place right front band on top of left front band and work through both layers, piece is now worked in the round. Finish round with 1 sl st in first tr.
ROUND 1: Work 1 tr in every tr.
ROUND 2: * Work 1 tr, 1 ch, skip 1 tr *, repeat from *-* the entire round.
ROUND 3: Work 1 tr in every tr and 1 tr in every ch.
ROUNDS 4-8: Work 1 tr in every tr.
Continue to work as follows: Work A.4, then repeat A.5 the entire round.
Continue the pattern downwards. When piece measures approx. 10 cm – adjust so that this is a round with tr, inc 12 tr evenly on piece, repeat inc every 7 cm 5 more times = 228-246-264-282-306-330 tr. Continue with A.4 and A.5 until piece measures 51-54-54-54-54-57 cm, piece measures 83-86-89-92-95-98 cm in total. Fasten off.

CROCHET EDGE around armhole:
Work 1 dc, * 3 ch, skip approx. 1 cm, work 1 dc *, repeat from *-* and finish with 1 sl st at beg of round.

CROCHET EDGE around neck:
Beg mid front, at the bottom of the right band: Work 1 dc, * 3 ch, skip approx. 1 cm, work 1 dc *, repeat from *-* up the band, around the neck and down along left band. Fasten 4 button evenly on left band, the top approx. 2 cm from upper edge, the bottom approx. 4 cm from bottom edge. Button through holes between tr on right band.

Diagram

symbols = ch


symbols = dc in st
symbols = dc around ch
symbols = tr in st
symbols = tr around ch
symbols = first round is explained in pattern
symbols = beg round with 4 ch and finish with 1 sl st in 4th ch
symbols = beg round with 3 ch and finish with 1 sl st in 3rd ch
symbols = sl st
symbols = crochet direction
diagram
diagram
diagram
diagram
Do you have a question? See a list of frequently asked questions (FAQ)

Knitting tension is what determines the final measurements of your work, and is usually measured per 10 x 10 cm. It is provided like so: number of stitches in width x number of rows in height - eg: 19 stitches x 26 rows = 10 x 10 cm.

The knitting tension is very individual; some people knit/crochet loosely while others work tightly. You adjust the knitting tension with the needle size, which is why the suggested needle size is only meant as a guide! You need to adjust this (up or down) to ensure that YOUR knitting tension matches the knitting tension provided in the pattern. If you work with a different knitting tension than provided you will have a different yarn consumption, and your work will have different measurements than what the pattern suggests.

The knitting tension also determines which yarns can replace each other. As long as you achieve the same knitting tension you can replace one yarn with another.

See DROPS lesson: How to measure your tension/gauge

See DROPS video: How to make a gauge tension swatch

The required amount of yarn is provided in grams, eg: 450 g. To calculate how many balls you’ll need you first need to know how many grams are in 1 ball (25g, 50g or 100g). This information is available if you click on the individual yarn quality on our pages. Divide the amount required with the amount of each ball. For example, if each ball is 50g (the most common amount), the calculation will be as follows: 450 / 50 = 9 balls.

The important thing when changing from one yarn to another is that the knitting/crochet tension remains the same. This is so that the measurements of the finished piece will be the same as on the sketch provided. It is easier to achieve the same knitting tension using yarns from the same yarn group. It is also possible to work with multiple strands of a thinner yarn to achieve the knitting tension of a thicker one. Please try our yarn converter. We recommend you to always work a test swatch.

Please NOTE: when changing yarn the garment might have a different look and feel to the garment in the photo, due to individual properties and qualities of each yarn.

See DROPS lesson: Can I use a different yarn than the one mentioned in the pattern?

All our yarns are categorised into yarn groups (from A to F) according to thickness and knitting tension – group A contains the thinnest yarns and group F the thickest. This makes it easier for you to find alternative yarns to our patterns, should you wish to switch yarn. All yarns within the same group have a similar knitting tension and can easily replace each other. However, different yarn qualities have different structures and properties which will give the finished work a unique look and feel.

Click here for an overview of the yarns in each yarn group

At the top of all our patterns you’ll find a link to our yarn calculator, which is a helpful tool should you wish to use a different yarn than suggested. By filling in the yarn quality you wish to replace, the amount (in your size) and number of strands, the calculator will present good alternative yarns with the same knitting tension. Additionally it will tell you how much you’ll require in the new qualities and whether you’ll need to work with multiple strands. Most skeins are 50g (some are 25g or 100g).

If the pattern is worked with multiple colours, every colour will have to be calculated separately. Similarly, if the pattern is worked with several strands of different yarns (for example 1 strand Alpaca and 1 strand Kid-Silk) you will have to find alternatives for each, individually.

Click here to see our yarn calculator

Since different yarns have different qualities and textures we have chosen to keep the original yarn in our patterns. However, you can easily find options among our available qualities by using our yarn calculator, or simply pick a yarn from the same yarn group.

It is possible that some retailers still have discontinued yarns in stock, or that someone has a few skeins at home that they would like to find patterns for.

The yarn calculator will provide both alternative yarn as well as required amount in the new quality.

If you think it's hard to decide what size to make, it can be a good idea to measure a garment you own already and like the size of. Then you can pick the size by comparing those measures with the ones available in the pattern's size chart.

You'll find the size chart at the bottom of the pattern.

See DROPS lesson: How to read size chart

The needle size provided in the pattern serves only as a guide, the important thing is to follow the knitting tension. And since knitting tension is very individual, you will have to adjust the needle size to ensure that YOUR tension is the same as in the pattern – maybe you’ll have to adjust 1, or even 2 needle sizes, up or down to achieve the correct tension. For this, we recommend that you work test swatches.

Should you work with a different knitting tension than the one provided, the measurements of the finished garment might deviate from the measurement sketch.

See DROPS lesson: How to measure your tension/gauge

See DROPS video: How to make a tension/gauge swatch

Working a garment top-down provides more flexibility and room for personal adjustment. For example it is easier to try the garment on while working, as well as making adjustments to length of yoke and shoulder caps.

The instructions are carefully explaining every step, in the correct order. Diagrams are adjusted to the knitting direction and are worked as usual.

The diagram depicts all rows/rounds, and every stitch seen from the right side. It is read from bottom to top, from right to left. 1 square = 1 stitch.

When working back and forth, every other row is worked from the right side and every other row is worked from the wrong side. When working from the wrong side, the diagram will have to be worked reversed: from left to right, knit stitches are purled, purl stitches are knit etc.

When working in the round every round is worked from the right side and the diagram are worked from right to left on all rounds.

See DROPS lesson: How to read knitting diagrams

The diagram depicts all rows/rounds, and every stitch seen from the right side. It is worked from bottom to top, from right to left.

When working back and forth every other row is worked from the right side: from right to left and every other row is worked from the wrong side: from left to right.

When working in the round, every row in the diagram are worked from the right side, from right to left.

When working a circular diagram you start in the middle and work your way outwards, counter clockwise, row by row.

The rows usually start with a given number of chain stitches (equivalent to the height of the following stitch), this will either be depicted in the diagram or explained in the pattern.

See DROPS lesson: How to read crochet diagrams

Instructions for working several diagrams after each other on the same row/round, will often be written like so: “work A.1, A.2, A.3 a total of 0-0-2-3-4 times". This means you work A.1 once, then A.2 is worked once, and A.3 is repeated (in width) the number of times provided for your size – in this case like so: S = 0 times, M = 0 times, L=2 times, XL= 3 times and XXL = 4 times.

The diagrams are worked as usual: begin with the first row in A.1, then work the first row in A.2 etc.

See DROPS lesson: How to read knitting diagrams

See DROPS lesson: How to read crochet diagrams

The total width of the garment (from wrist-to-wrist) will be larger in the larger sizes, despite the actual sleeves being shorter. The larger sizes have longer sleeve caps and wider shoulders, so there will be a good fit in all sizes.

The measurement sketch/schematic drawing provides information regarding the full length of the garment. If it’s a jumper or a jacket the length is measured from the highest point on the shoulder closest to the neckline, and straight down to the bottom of the garment. It is NOT measured from the tip of shoulder. Similarly, the length of yoke is measured from the highest point on the shoulder and down to where yoke is split into body and sleeves.

On a jacket measures are never taken along bands, unless specifically stated. Always measure inside band stitches when measuring the length.

See DROPS lesson: How to read a schematic drawing

Diagrams are often repeated on the round or in height. 1 repeat is the diagram the way it appears in the pattern. If it says to work 5 repeats of A.1 in the round, then you work A.1 a total of 5 times after/next to each other in the round. If it says to work 2 repeats of A.1 vertically/in height you work the entire diagram once, then begin again at the start and work the entire diagram one more time.

Chain stitches are slightly narrower than other stitches and to avoid working the cast-on edge too tight, we simply chain more stitches to begin with. The stitch count will be adjusted on the following row to fit the pattern and measurement sketch.

The rib edge is more elastic and will contract slightly compared to, for example, stocking stitch. By increasing before the rib edge, you avoid a visible difference in width between the rib edge and the rest of the body.

It’s very easy to cast off too tightly, and by making yarn overs while casting off (and simultaneously casting these off) you avoid a too tight cast off edge.

See DROPS video: How to bind off with yarn overs (yo)

To achieve an even increase (or decrease) you can increase on, for example: every 3rd and 4th row alternately, like so: work 2 rows and increase on the 3rd row, work 3 rows and increase on the 4th. Repeat this until the increase is complete.

See DROPS lesson: Increase or decrease 1 st on every 3rd and 4th row alternately

Should you prefer to work in the round instead of back and forth, you may of course adjust the pattern. You’ll need to add steeks mid-front (usually 5 stitches), and follow the instructions. When you would normally turn and work from the wrong side, simply work across the steek and continue in the round. At the end you’ll cut the piece open, pick up stitches to work bands, and cover the cut edges.

See DROPS video: How to knit steeks and cut open

Should you prefer to work back and forth instead of in the round, you may of course adjust the pattern so you work the pieces separately and then assemble them at the end. Divide the stitches for the body in 2, add 1 edge stitch in each side (for sewing) and work the front and back pieces separately.

See DROPS lesson: Can I adapt a pattern for circular needles into straight needles?

Pattern repeats can vary slightly in the different sizes, in order to get the correct proportions. If you’re not working the exact same size as the garment in the photo, yours might deviate slightly. This has been carefully developed and adjusted so that the complete impression of the garment is the same in all sizes.

Make sure to follow instructions and diagrams for your size!

If you have found a pattern you like which is available in women’s size it’s not very difficult to convert it to men’s size. The biggest difference will be the length of sleeves and body. Start working on the women size that you think would fit across the chest. The additional length will be worked right before you cast off for the armhole/sleeve cap. If the pattern is worked top-down you can add the length right after the armhole or before the first decrease on sleeve.

Regarding additional yarn amount, this will depend on how much length you add, but it is better with a skein too many than too few.

All yarns will have excess fibres (from production) that might come off as lint or shedding. Brushed yarns (ie hairier yarns) have more of these loose, excess fibres, causing more shedding.

Shedding also depends on what is worn under or over the garment, and whether this pulls at the yarn fibres. It’s therefore not possible to guarantee that there will be no shedding

Below are some tips on how to get the best result when working with hairier yarns:

1. When the garment is finished (before you wash it) shake it vigorously so the looser hairs come off. NOTE: do NOT use a lint roller, brush or any method that pulls at the yarn.

2. Place the garment in a plastic bag and put it in your freezer - the temperature will cause the fibres to become less attached to each other, and excess fibres will come off easier.

3. Leave in the freezer for a few hours before taking it out and shaking it again.

4. Wash the garment according to the instructions on the yarn label.

Pilling is a natural process that happens to even the most exclusive of fibers. It's a natural sign of wear and tear that is hard to avoid, and that is most visible in high friction areas of your garment like a sweater's arms and cuffs.

You can make your garment look as new by removing the pilling, using a fabric comb or a pill/lint remover.

Still can't find the answer you need? Then scroll down and leave your question so one of our experts can try to help you. This will be done normally within 5 to 10 working days.
In the meantime, you can read the questions and answers that others have left to this pattern or join the DROPS Workshop on Facebook to get help from fellow knitters/crocheters!

Post a comment to pattern DROPS Extra 0-1284

We would love to hear what you have to say about this pattern!

If you want to leave a question, please make sure you select the correct category in the form below, to speed up the answering process. Required fields are marked *.

Comments / Questions (11)

country flag Kate Reed wrote:

Where's the sizing information, I can't find it at the bottom

05.10.2020 - 13:41

DROPS Design answered:

Dear Mrs Reed, you will find all measurement in the bottom chart - the first chart describes the top piece worked in rows, the bottom chat shows all measurements for piece measured flat. Read more about measurements here. Happy crocheting!

05.10.2020 - 15:54

country flag Jeannine Meeus wrote:

Hallo ik heb een vraag over de haak steken van patroon DROPS EXTRA 0-1284 ik weet niet hoe ik een vaste steek om de lossen moet doen een stokje om een lossen moet doen ik heb dat nog nooit zo steken gezien of gedaan dat zou ik graag weten anders kan ik niet voort aan mijn jurk doen ik hoop dat je mij kan helpen Dank u groetjes Jeannine,

25.09.2020 - 11:46

DROPS Design answered:

Dag Jeannine,

Bij de relevante video's die bij het patroon staan, staat ook een video over wat het verschil is tussen OM de steek of IN de steek haken. Hopelijk heb je hier wat aan. Succes!

10.10.2020 - 11:19

country flag Victoria Amundsen wrote:

Beg. av arb, etter 2 rader med 1 st i hver st: Skal man følge diag. opp omg for omg, og etter hver omg snu arb. og begynne på raden over, snu arb, ny omg osv? Men da passer ikke omg. i hverandre. F eks etter å ha avsluttet omgang 2 (ikke medregnet stavene nederst, som ikke tilhører selve diagrammet), snur jeg arb. Da er lm jeg avsluttet omgang 2 helt til høyre, like ved nåla. Men da passer ikke siste stav i omgang 3 i siste lm i omgang 2, slik det ser ut som i diagrammet. Hvordan løse?

26.04.2020 - 16:05

country flag Line U. wrote:

Hei Jeg går ut ifra at jeg skal fortsette på diagram 1-2-3 ved å starte På nytt nederst i diagrammet når jeg har heklet alt en gang. Det jeg har problemer med er at både siste runde øverst og første runde nederst skal hekles fra retten, hvordan løser jeg det? Mvh Line U.

03.07.2018 - 03:22

DROPS Design answered:

Hei Line. Det stemmer at du begynner på nytt igjen. Det er 10 omganger i A.1, A.2 og A.3, så siste omgang er fra vrangen. Den nederste omgangen med staver (markert med stjerne) er ikke med i diagrammet, men indikerer omgangen før – som forklart ved tegnforklaringen til stjernen. God fornøyelse.

04.07.2018 - 09:14

country flag Eva Hammarberg wrote:

Finns det ett helt utskrivet mönster? Jag har väldigt svårt att virka efter sådana diagram och därför blir det fel hela tiden för mig. Betalar gärna för ett mönster som allt står skrivet för varje varv istället för att försöka tyda diagram. Vänliga hälsningar Eva

01.07.2018 - 23:03

DROPS Design answered:

Hej, tyvärr har vi inte möjlighet att skriva ut detta mönster i text. Pröva gärna något av våra enklare diagram över virkmönster först och se om detta hjälper. Ifall du besöker närmaste DROPS-återförsäljare hjälper de dig tyda diagrammen.

02.07.2018 - 14:19

Anca Giurgiu wrote:

The first row it is worked on RW, the next two rows from the band are worked on WS and RS, so the first row from the diagram must be worked on the WS. In the pattern description A1, A2, A3 are worked from the RS. Please explain how. Thank you!

21.08.2016 - 08:54

DROPS Design answered:

Dear Mrs Giurgiu, very first row on top part will be worked from WS, then work 1 row with tr from RS, 1 row with tr from WS so that 1st row with diagrams A.1, A.2 and A.3 is worked from RS. Happy crocheting!

22.08.2016 - 09:34

country flag Berit Rönning wrote:

Man ska lägga upp nya maskor på avigsidan I slutet av varvet och sedan virka från avigsidan på överdelen - hur går detta till? Dessutom vilket är rätsidan? 1:a varvet på mönstret a1-a3 är det bara stolpar? Tacksam för svar Berit R.

16.07.2016 - 11:59

Susan Weinberg wrote:

Love the pattern. Looking forward to the diagrams being in place.

29.06.2016 - 03:21

country flag Lauren McRoberts wrote:

You misunderstood me before. The diagrams are not visible on the pattern so the pattern cannot be worked. I know how to work diagrams, but they are not there. This is a technical issue. Please fix so the design can be worked.

28.06.2016 - 18:35

DROPS Design answered:

Dear Mrs McRoberts, see answer below, the diagrams should be visible soon, thanks in advance for your patience! Happy crocheting!

28.06.2016 - 23:15

country flag Lauren McRoberts wrote:

You misunderstood me. I know how to work diagrams, but they are not visible on this pattern, meaning they do not show up on the pattern. Please post the diagrams so this pattern can be worked.

28.06.2016 - 17:47

DROPS Design answered:

Dear Mrs McRoberts, sorry for misunderstanding, they should be visible soon, thanks in advance for your patience! Happy crocheting!

28.06.2016 - 17:57