
Popular categories
Looking for a yarn?


|
|||||||||||||||||||||||||||||||||||||||||||||||||||||||
Bohemian Sunset |
|||||||||||||||||||||||||||||||||||||||||||||||||||||||
 |
 |
||||||||||||||||||||||||||||||||||||||||||||||||||||||
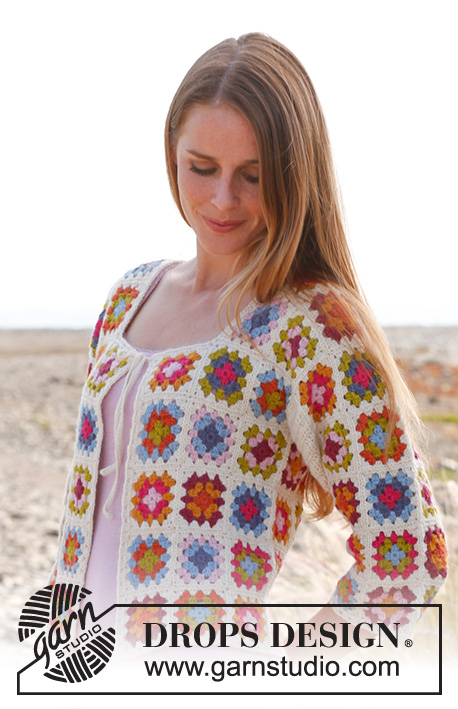
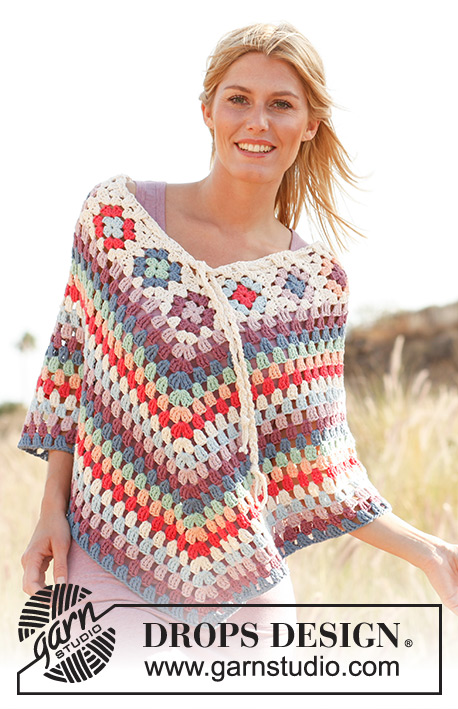
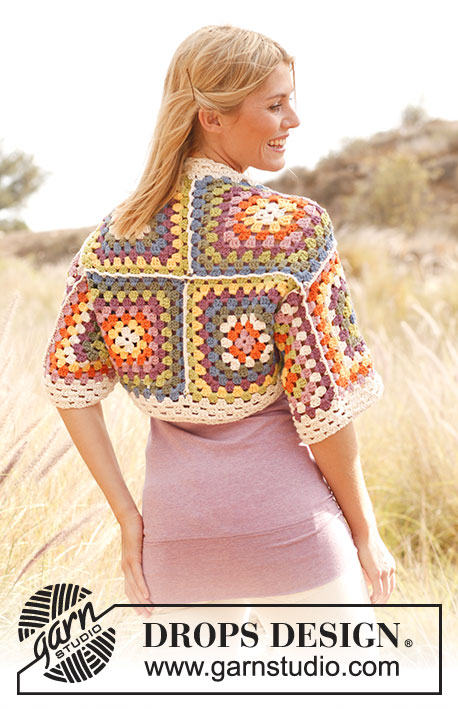
Crochet DROPS jacket in "Tynn Cotton Chenille" and "Muskat"
DROPS 68-21 |
|||||||||||||||||||||||||||||||||||||||||||||||||||||||
|
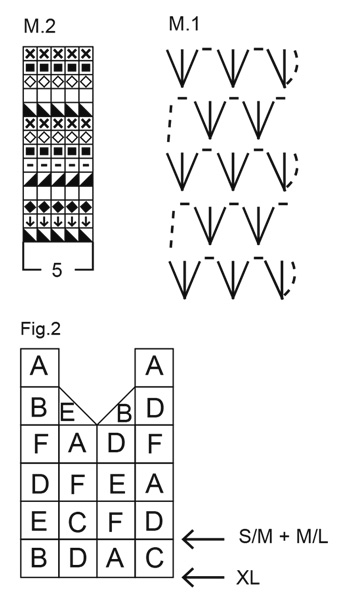
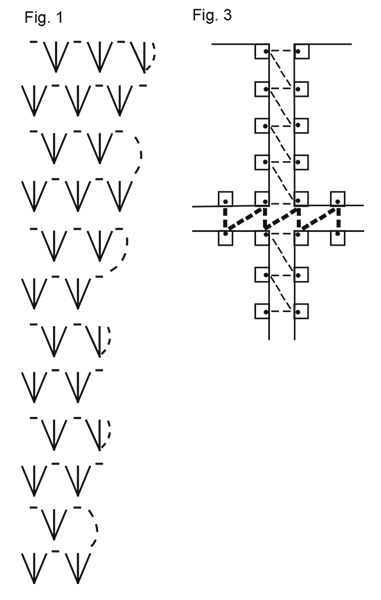
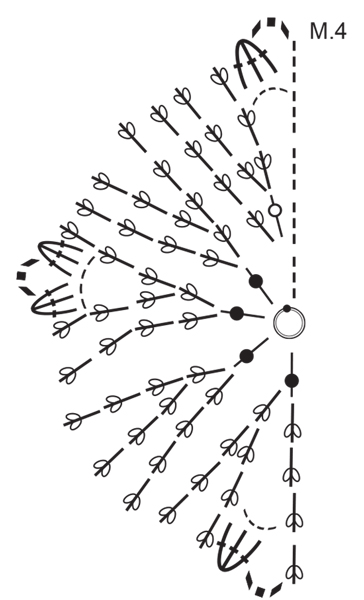
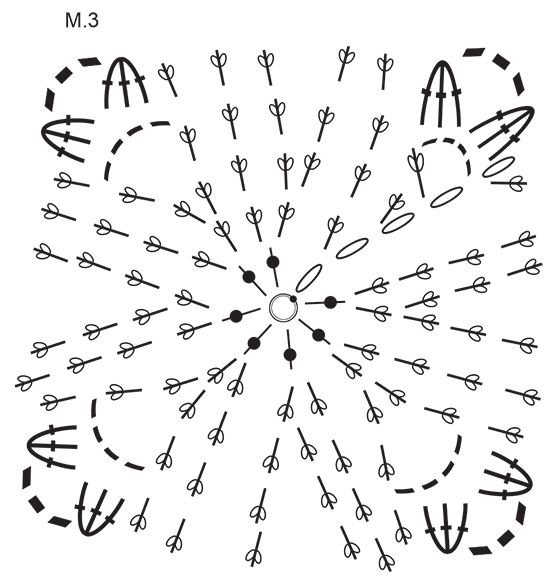
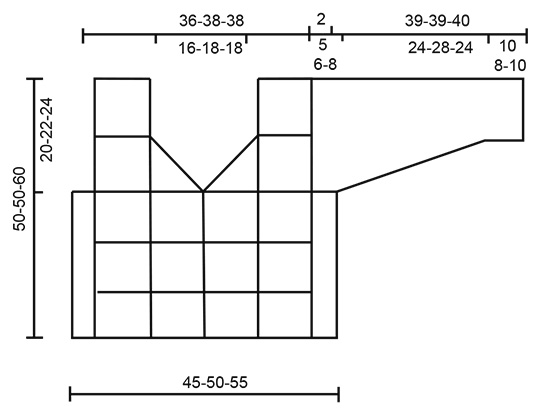
Crochet tension: 1 square with hook size 4 mm = approx. 9.5 x 9.5 cm. 4.5 treble crochet groups x 10 rows of M.1 with colour change after M.2 and hook size 4 mm = 10 x 10 cm. Remember hook size is only a guide! Pattern: See diagrams - M.1 and M.2. Colours of squares: Work 6 different squares: A, B, C, D, E and F. Square A: Round 1: Petrol green Chenille no 905, Round 2: Burgundy Chenille no 925, Round 3: Rust Muskat no 21, Round 4: Dark orange Muskat no 39, Round 5: Red Chenille no 906. Square B: Round1: Dark lilac Chenille no 927, Round 2: Burgundy Chenille no 925, Round 3: Light plum Muskat no 33, Round 4: Heather Muskat no 39, Round 5: Red Chenille no 906. Square C: Round 1: Rust Muskat no 21, Round 2: Red Chenille no 906, Round 3: Dark orange Muskat no 49, Round 4: Rust Muskat no 21, Round 5: Deep red Chenille no 924. Square D: Round 1: Dark orange Muskat no 49, Round 2: Heather Muskat no 39, Round 3: Light plum Muskat no 33, Round 4: Burgundy Chenille no 925, Round 5: Deep red Chenille no 924. Square E: Round 1: Red Chenille no 906, Round 2: Heather Muskat no 39, Round 3: Light plum Muskat no 33, Round 4: Burgundy Chenille no 925, Round 5: Dark lilac Chenille no 927. Square F: Round 1: Petrol green Chenille no 905, Round 2: Dark lilac Chenille no 927, Round 3: Heather Muskat no 39, Round 4: Light plum Muskat no 33, Round 5: Petrol green Chenille no 905. ------------------------------------------------------- START THE PIECE HERE: ------------------------------------------------------- Crochet squares: The squares are worked in different colours - see description above. Use crochet hook size 4 mm and work diagram M.3 and M.4 or use the written pattern below. Square: Crochet 5 chain stitches with colour 1 and join together into a ring with 1 slip stitch. Round 1: Colour 1: 3 chain stitches, 7 treble crochets in ring and then 1 slip stitch in 3rd chain stitch from beginning of round = 8 stitches. Turn piece. Round 2: Colour 2: 3 chain stitches + 1 treble crochet in first treble crochet from round 1 * 2 treble crochets in each treble crochet from round 1 *, repeat from *-* a total of 7 times. Finish with 1 slip stitch in the 3rd chain stitch from beginning of round = 16 stitches. Turn piece. Round 3: Colour 3: 3 chain stitches + 1 treble crochet in first treble crochet from round 2, 1 treble crochet in next treble crochet from round 2, * continue by working alternately 2 and 1 treble crochet(s) in each treble crochets from round 2 *, repeat from *-* a total of 7 times = 23 treble crochets + 3 chain stitches. Finish with 1 slip stitch in the 3rd chain stitch from beginning of round. Turn piece. Round 4: Colour 4: 3 chain stitches in first treble crochet from round 3, 4 chain stitches, 1 treble crochet in same treble crochet, * 1 treble crochet in each of the next 6 treble crochets, 4 chain stitches, 1 more treble crochet in the last of the 6 treble crochets *, repeat from *-* a total of 3 times, 1 treble crochet in each of the last 5 treble crochets on round, finish with 1 slip stitch in the 3rd chain stitch from beginning of round. Turn piece. Round 5: Colour 5: 3 chain stitches in first treble crochet, 1 treble crochet in each of the next 6 treble crochets, * 3 treble crochets in chain-space, 3 chain stitches, 3 treble crochets in same chain-space, 1 treble crochet in each of the next 7 treble crochets, * repeat from *-* a total of 3 times, 3 treble crochets in next chain-space, 3 chain stitches, 3 treble crochets in same chain-space, finish with 1 slip stitch in 3rd chain stitch from beginning of round. 1/2 Square: The half squares are also worked in different colours - see description above. Work 5 chain stitches with colour 1 and form them to a ring with 1 slip stitch. Round 1: Colour 1: 3 chain stitches, 4 treble crochets in ring. Turn piece. Round 2: Colour 2: 3 chain stitches + 1 treble crochet in the 3rd chain stitch from previous round, 2 treble crochets in each of the next treble crochets from previous round = 10 stitches. Turn piece. Round 3: Colour 3: 3 chain stitches + 1 treble crochet in first treble crochet from round 2, then work alternately 2 and 1 treble crochet(s) in each of the treble crochets from round 2 = 15 stitches. Turn piece. Round 4: Colour 4: 3 chain stitches, 4 chain stitches, 1 treble crochet in same treble crochet as the 3 chain stitches, * 1 treble crochet in each of the next 7 treble crochets, 4 chain stitches, 1 more treble crochet in the last of the 7 treble crochets *, repeat from *-* a total of 2 times. Turn piece. Round 5: Colour 5: 6 chain stitches, 3 treble crochets in chain-space, 1 treble crochet in each of the next 7 treble crochets from previous round, 3 treble crochets in chain-space, 3 chain stitches, 3 treble crochets in same chain space, 1 treble crochet in each of the next 7 treble crochets from previous round, 3 treble crochets in chain-space, 3 chain stitches, 1 treble crochet in same chain-space. ---------------------------------------------------------- Jacket: The front piece is worked in squares, while sleeves, back and side pieces are worked in stripes, i.e. M.1. Back + side pieces: The back piece is worked together with the side pieces. Work with hook size 4 mm and rust Muskat, 98-114-130 loose chain stitches (incl. 1 chain stitch to turn) Next row: Work 1 double crochet in each chain stitch. Then continue with M.1 as follows: 3 treble crochets in first double crochet, * 1 chain stitch, skip 3 double crochets, 3 treble crochets in next double crochet *, repeat from *-* to end of row (= 24-28-32 treble crochet groups + 3 treble crochets on row). Work M.1 upwards with colour change after M.2. Remember the crochet tension! When piece measures approx. 30-28-36 cm decrease for armholes by working 4-5.5-7.5 treble crochet groups less in each side = 16-17-17 treble crochet groups + 3 treble crochets left on back piece. When piece measures approx. 48-48-58 cm (you have now 2 rows left - adjust so that the last row is worked in Muskat) cast off for neck by not working the middle 6.5-7.5-7.5 treble crochet groups. Work 1 row on each side of neck. The next row is worked as follows: M.1 over 4.5 treble crochet groups, continue with double crochets over the "cast off" treble crochet groups in neck - work quite tightly with 1 double crochet in each treble crochet, M.1 over 4.5 treble crochet groups. Finish off, piece measures approx. 50-50-60 cm. Front piece: Work 4-4-5 x square A, 1-1-2 x square B, 1-1-2 x square C, 4-4-5 x square D, 2-2-2 x square E and 4-4-4 x square F = 16-16-20 squares - see description above. Then work 1/2 square B and E (= neckline). Work the squares together with rust Muskat - see fig. 2 and 3 - Fig. 3 shows how the squares are worked together. Work first vertically, according to the thin lines, and then horizontally, according to the thick lines. Sleeve: Work with rust Muskat and hook size 4 mm, 42-46-50 loose chain stitches (incl. 1 chain stitch to turn). Next row: Work 1 double crochet in each chain stitch. Then continue with M.1 as follows: * 3 treble crochets in first chain stitch, 1 chain stitch, skip 3 double crochets *, repeat from *-* a total of 10-11-12 times, finish with 3 treble crochets in last double crochet. Work M.1 upwards with colour change after M.2. When piece measures 10-8-10 cm increase 1/2 treble crochet group in each side - see fig. 1 - a total of 6-7-8 times every 4th-3rd-3rd row = 16-18-20 treble crochet groups. At the same time, when piece measures 28 cm (there is now 13-13-14 cm to finished length); begin to not work 2 treble crochet groups on each side. This is done so that you do not have too much "material" under the sleeves. Repeat this decrease every 5th row to finished length. Finish off when piece measures approx. 39-39-40 cm. Assembly: All parts are worked together with rust Muskat and hook size 4 mm. Work shoulder seams and side seams in the same way as you worked together squares on front piece - see fig. 3. Work sleeves together as follows: Start at bottom with * 1 double crochet in one side, 2 chain stitches, 1 double crochet in other side, 2 chain stitches *, repeat from *-* until there are 3-4-6 rows left. Work sleeves to body in the same way as you have just worked the sleeve seams. Crochet 1 row of double crochets around the whole body, up along the bands and around the neck Ties: Work with 2 strands rust Muskat: 2 chain stitch-cords of approx. 30 cm each. Fasten 1 in each side mid front of neck where the neckline starts. You can work 2 more cords, if you wish, and fasten these 1 square beneath the first. |
|||||||||||||||||||||||||||||||||||||||||||||||||||||||
Diagram explanations |
|||||||||||||||||||||||||||||||||||||||||||||||||||||||
|
|||||||||||||||||||||||||||||||||||||||||||||||||||||||
|
|||||||||||||||||||||||||||||||||||||||||||||||||||||||
|
|||||||||||||||||||||||||||||||||||||||||||||||||||||||
|
|||||||||||||||||||||||||||||||||||||||||||||||||||||||
|
|||||||||||||||||||||||||||||||||||||||||||||||||||||||
|
|||||||||||||||||||||||||||||||||||||||||||||||||||||||
|
Have you made this or any other of our designs? Tag your pictures in social media with #dropsdesign so we can see them! Do you need help with this pattern?You'll find tutorial videos, a Comments/Questions area and more by visiting the pattern on garnstudio.com. © 1982-2024 DROPS Design A/S. We reserve all rights. This document, including all its sub-sections, has copyrights. Read more about what you can do with our patterns at the bottom of each pattern on our site. |
|||||||||||||||||||||||||||||||||||||||||||||||||||||||


With over 40 years in knitting and crochet design, DROPS Design offers one of the most extensive collections of free patterns on the internet - translated to 17 languages. As of today we count 304 catalogues and 11422 patterns - 11422 of which are translated into English (UK/cm).
We work hard to bring you the best knitting and crochet have to offer, inspiration and advice as well as great quality yarns at incredible prices! Would you like to use our patterns for other than personal use? You can read what you are allowed to do in the Copyright text at the bottom of all our patterns. Happy crafting!
Comments / Questions (35)
Buenas tardes, no sé si entiendo bien las restantes disminuciones para la copa de la manga. ¿Cada 5 filas se disminuyen otros 2 grupos a cada lado? En 13 cm sólo habrá 1 o 2 disminuciones más, y quedan como escalones ¿es así como debo hacerlo?
04.08.2019 - 18:44DROPS Design answered:
Hola Ana. Las disminuciones en el ganchillo se trabajan de la siguiente manera: al inicio de la fila se saltan los grupos de puntos altos que hay que disminuir (cortando el hilo) o se trabajan puntos enanos sobre ellos. Para disminuir al final de la fila, se termina la fila antes del número de grupos de puntos altos que hay que disminuir.
17.11.2019 - 20:26Buenas tardes. Me gustaría hacer una chaqueta con este patrón pero en color blanco nieve con beige mazapán. En los cuadrados las vueltas impares blancas y las pares beige. En el resto ir haciendo 2 vueltas blancas y 1 beige, además me gustaría que uno de los dos colores algo de tuviera brillo. Por favor ¿podrías recomendarme los materiales y la cantidad que necesitaría para un talla mediana? Gracias
08.05.2019 - 19:08Buongiorno nn capisco come diminuire per gli scalfi, cosa vuol dire lavorare su 4-5, 5-7, 5 gruppi? Poteye spiegarmi meglio come fare le diminuzioni? Grazie
31.01.2019 - 14:27DROPS Design answered:
Buongiorno Ida. Abbiamo modificato leggermente il testo: sono gruppi di maglie alte. Quindi p.es nella taglia S/M, per gli scalfi, non deve lavorare sui primi e sugli ultimi 4 gruppi di maglie alte della riga. Analogamente per le altre taglie. Buon lavoro!
31.01.2019 - 16:47Petit souci... Les carrés comportent 7 B entre chaque coin. (Le coin ayant 6B + 3ml) Comment faire ensuite pour l'assemblage 3 B par 3 B ...? Merci d'avance.
30.06.2018 - 10:43DROPS Design answered:
Bonjour Martine, le dernier rang de chaque carré a 7 brides + 3 brides dans chacun des 2 coins. Crochetez les ms de l'assemblage à intervalles réguliers le long de ces 13 brides, par ex: 1 ms dans l'arceau, sautez 3 B, 1 ms entre les brides, sautez 3 B, 1 ms dans la B suiv, sautez 3 B, 1 ms entre les B, sautez 3 B, 1 ms dans l'arceau (avec les 3 ml entre chaque ms). Bon crochet!
02.07.2018 - 10:46Buongiorno, vorrei realizzare questo modello in lana, mantenendo però l'effetto vivace (soprattutto per i colori) che appare in foto. ho visto l'elenco dei filati alternativi,ma non conoscendo la differenza tra T-C-Chenille e Muskat entramai usati in modo alternato non riesco a scegliere eventuali abbinamenti
14.07.2017 - 13:07DROPS Design answered:
Buongiorno Cecilia I filati proposti sono filati estivi, quindi diversi in composizione e pesantezza rispetto a filati invernali. Per realizzare il capo con filati invernali, le consigliamo di seguire il proprio gusto personale in base anche alla cartella dei colori. Può usare anche un solo tipo di filato. Per un aiuto più personalizzato, può rivolgersi al suo rivenditore Drops di fiducia. Buon lavoro!
14.07.2017 - 13:57Bonjour Pour la realisréalisation des carrés, au 5ième rang : après avoir crocheté dans les arceaux, il faut faire 7 brides, et non pas 6 ? Merci pour tout
11.03.2017 - 20:37DROPS Design answered:
Bonjour Philipp, il semble qu'effectivement il faut 7 B entre les 3B,3ml,3B dans chaque arceau. Une correction sera faite prochainement. Merci. Bon crochet!
13.03.2017 - 10:36Erreur dans les explications des carrés : Rang 5 : commencez par 3ml, puis 1B dans chacune des 5 B suivantes (et non pas 6B !!!). Merci
13.01.2017 - 05:09DROPS Design answered:
Bonjour Philipp, au début du rang 5, on a tourné et le tour commence par 3 ml et 1 B dans chacune des 6 B du rang précédent (entre les arceaux, on a 7 B au rang 4). Bon crochet!
13.01.2017 - 09:12Bonjour, Désolée de vous importuner mais je débute le crochet et ai besoin de quelques explications ..... Pour la réalisations des manches, que voulez-vous dire par : "augmenter 1/2 groupe de maille en V de chaque côté" ? Mille mercis !
03.03.2016 - 09:31DROPS Design answered:
Bonjour Mme Philip, pour les augmentations des manches, suivez le diag. Fig.1 de chaque côté, répétez les rangs de ce diagramme jusqu'à ce que vous ayez le nbe indiqué de groupes de B pour votre taille. Bon crochet!
03.03.2016 - 09:38Concernant la réalisation des carrés au crochet : 1ère question : Rang 2 : il est écrit "1 B dans la première m du rang précédent, 2 B dans chaque B du rang précédent ......" Faut-il faire les brides dans les BRIDES (B) du rang précédent ou dans les mailles (m) ?? Idem pour le rang 4. Il y a une confusion dans les explications entre "m" et "B" ?? 2ème question : à la fin de chaque rang, il est écrit "tourner". Pour quelle raison faut-il tourner l'ouvrage à chaque fois ?
27.02.2016 - 14:57DROPS Design answered:
Bonjour Mme Philip, au 1er rang, on n'a que des brides, ainsi, on va crocheter 1 B dans la 1ère B du rang précédent - (idem au rang 4). Le choix de tourner à la fin de chaque tour revient à la styliste. Bon crochet!
27.02.2016 - 16:23Bonjour, je suis en plein dans la réalisation de ce modèle que je trouve superbe, mais au niveau du dos et des côtés, je rencontre des difficultés car je ne vois pas très bien comment rabattre les emmanchures en ne crochetant pas 5.5 groupes de mailles de chaque côtés, j'aurais donc souhaité quelques précisions. Merci d'avance.
29.08.2015 - 12:50DROPS Design answered:
Bonjour Sophie, quand vous arrivez au niveau des emmanchures, vous pouvez soit couper le fil et reprendre après 5,5 groupes de B à partir du bord, soit sans couper le fil, faire des mc sur les 5,5 premiers groupes de B, continuez ensuite comme avant jusqu'à ce qu'il reste 5,5 groupes de B à la fin du rang, tournez sans crocheter ces mailles: vous avez le même nombre de groupes de B de chaque côté non travaillé pour les emmanchures. Bon crochet!
31.08.2015 - 10:20