
Popular categories
Looking for a yarn?


|
|||||||||||||||||||||||||||||||||||||||||||||||||||||||
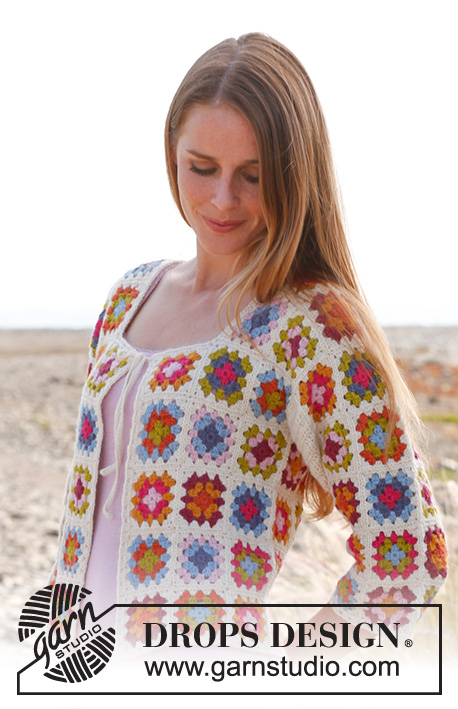
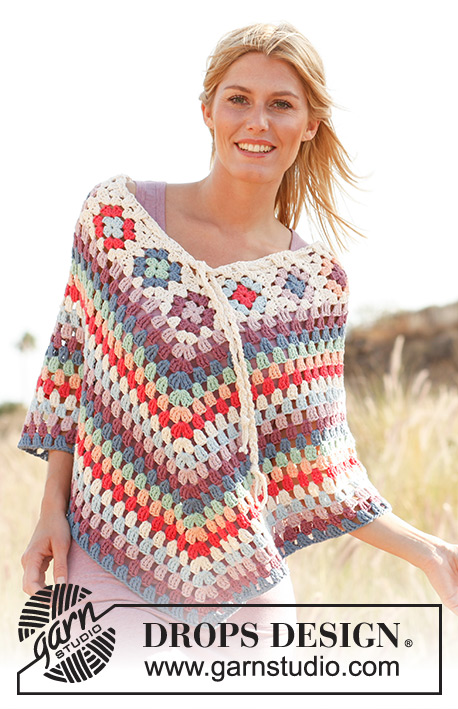
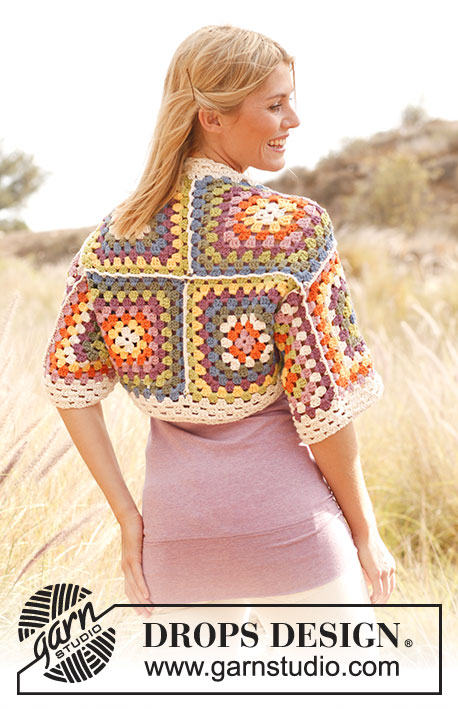
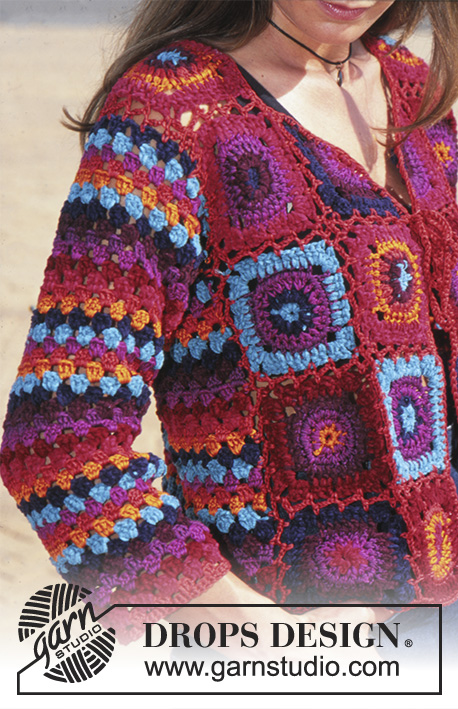
Bohemian Sunset |
|||||||||||||||||||||||||||||||||||||||||||||||||||||||
 |
 |
||||||||||||||||||||||||||||||||||||||||||||||||||||||
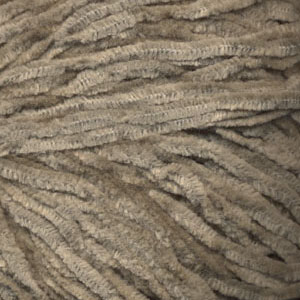
DROPS Crocheted Cardigan in Tynn Chenille and Muskat.
DROPS 68-21 |
|||||||||||||||||||||||||||||||||||||||||||||||||||||||
|
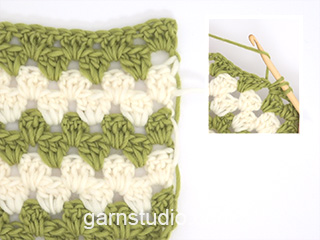
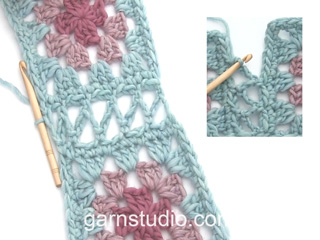
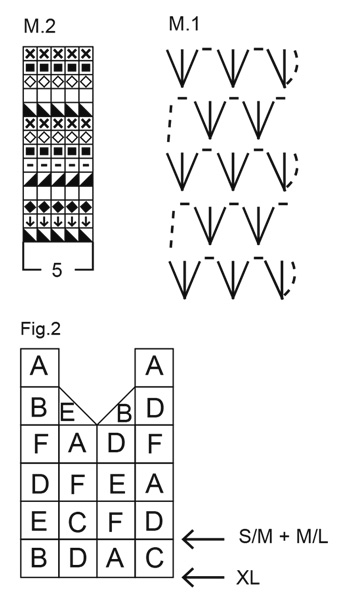
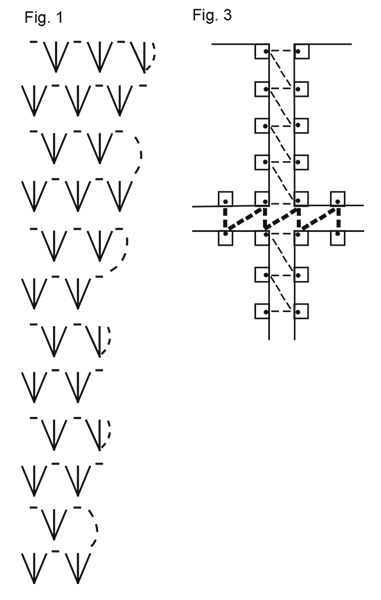
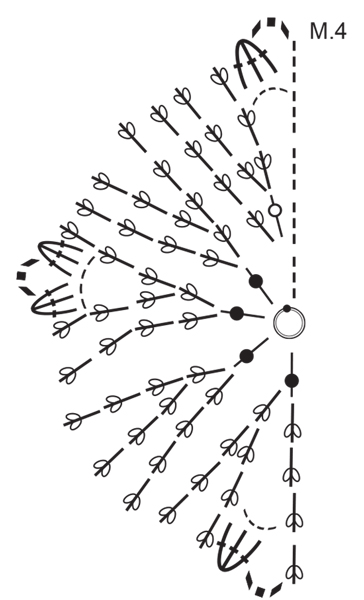
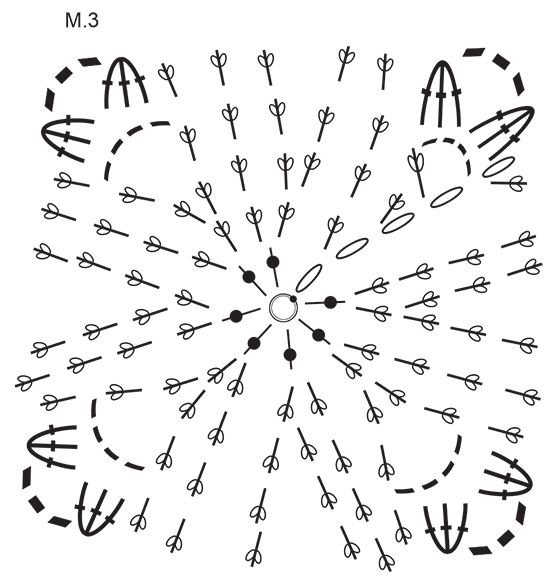
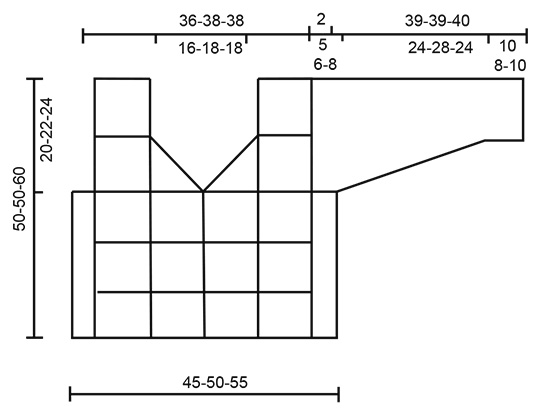
Crochet gauge: 1 square = approx. 9.5 x 9.5 cm = [3.75" x 3.75"]. 4.5 V-st groups x 10 rows of Pattern 1 = 10 x 10 cm [4" x 4"]. Pattern: See charts. 68. The pattern is seen from the right side. The chart for Pattern 1 shows the V-stitch pattern, which is crocheted in stripe pattern following the chart for Pattern 2. Color Combinations of Squares: Crochet 6 different squares: A, B, C, D, E and F. Square A (make 4-4-5): round 1: Petrol green Chenille nr 905, round 2: Burgundy Chenille nr 925, round 3: Rust Muskat nr 21, round 4: Dark orange Muskat nr 49, round 5: red Chenille nr 906. Square B (make 1-1-2 + 1 half square): round 1: Dark lilac Chenille nr 927, round 2: Burgundy Chenille nr 925, round 3: Light plum Muskat nr 33, round 4: raspberry Muskat nr 39, round 5: red Chenille nr 906. Square C (make 1-1-2): round 1: Rust Muskat nr 21, round 2: red Chenille nr 906, round 3: Dark orange Muskat nr 49, round 4: Rust Muskat nr 21, round 5: Dark red Chenille nr 924. Square D (make 4-4-5): round 1: Dark orange Muskat nr 49, round 2: raspberry Muskat nr 39, round 3: Light plum Muskat nr 33, round 4: Burgundy Chenille nr 925, round 5: Dark red Chenille nr 924. Square E (make 2-2-2 + 1 half square): round 1: red Chenille nr 906, round 2: raspberry Muskat nr 39, round 3: Light plum Muskat nr 33, round 4: Burgundy Chenille nr 925, round 5: Dark lilac Chenille nr 927. Square F (make 4-4-4): round 1: Petrol green Chenille nr 905, round 2: Dark lilac Chenille nr 927, round 3: raspberry Muskat nr 39, round 4: Light plum Muskat nr 33, round 5: Petrol green Chenille nr 905. ------------------------------------------------------- START THE PIECE HERE: ------------------------------------------------------- Crocheted Square: Make squares in color combinations as described above. Use crochet hook size 4 mm = US 6 and work diagram M.3 and M.4 or use the written pattern below. Square: Crochet 5 chain stitches with colour 1 and join together into a ring with 1 slip stitch. Ch 5 with color 1 and join into a ring with sl st. Round 1: color 1: ch 3, 7 dc in the ring and then 1 sl st in 3rd ch at beginning of row = 8 sts. Turn the work. Round 2: color 2: ch 3 + 1 dc in first st of previous row. * 2 dc in every st from previous row *, repeat from * - * a total of 7 times. Finish with 1 sl st in 3rd ch at beginning of row = 16 sts. Turn the work. Round 3: color 3: ch 3 + 1 dc in first st of previous row, 1 dc in the next st from previous row, * then crochet alternately 2 dc and 1 dc in every st from previous row *, repeat from * - * a total of 7 times = 23 st + 3 ch. Finish with 1 sl st in the 3rd ch at beginning of row. Turn the work. Round 4: color 4: ch 3 in first st of previous row, ch 4, 1 dc in the same st, * 1 dc in each of the following 6 dc, ch 4, 1 dc in the last of the 6 dc *, repeat from * - * a total of 3 times, 1 dc in each of the last 5 dc on row, finish with 1 sl st in the 3rd ch at beginning of row. Turn the work. Round 5: color 5: ch 3 in first st of previous row, 1 dc in each of the following 6 dc, * 3 dc in ch-st bow, ch 3, 3 dc in the same ch-st bow, 1 dc in each of the following 7 dc, * repeat from * - * a total of 3 times, 3 dc in the next ch-st bow, ch 3, 3 dc in the same ch-st bow, finish with 1 sl st in the 3rd ch at beginning of row. Fasten off. Half Square: Make squares in color combinations as described above. Ch 5 with color 1 and join into a ring with a sl st. Round 1: color 1: ch 3, 4 dc in the ring. Turn the work. Round 2: color 2: ch 3 + 1 dc in the 3 rd chain stitch from of previous row, 2 dc in each of the following dc from previous row = 10 sts. Turn the work. Round 3: color 3: ch 3 + 1 dc in first st of previous row, crochet alternately 1 dc and 2 dc in each dc from previous row = 15 sts. Turn the work. Round 4: color 4: ch 3, ch 4, 1 dc in the same st as the ch 3, * 1 dc in each of the following 7 dc, ch 4, 1 dc in the last of the 7 dc *, repeat from * - * a total of 2 times. Turn the work. Round 5: color 5: ch 6, 3 dc in ch-st bow, 1 dc in each of the following 7 dc from previous row, 3 dc in ch-st bow, ch 3, 3 dc in the same ch-st bow, 1 dc in each of the following 7 dc from previous row, 3 dc in ch-st bow, ch 3, 1 dc in the same ch-st bow. Cardigan: The fronts are made with squares, and the sleeves, back and sides are crocheted in stripes in Pattern 1. Back + sides: The Back and Sides are crocheted in one piece. Ch 98-114-130 loosely with rust Muskat. Turn and crochet 1 row sc = 97-113-129 sc. On the next row, begin Pattern 1 as follows: 3 dc in 1st sc, * ch 1, skip over 3 sc, 3 dc in the next sc *, repeat from * - * (= 24-28-32 V-groups + 3 dc on row). Continue to crochet Pattern 1 with stripes according to Pattern 2. Note: turn all rows with ch 3 + ch 1. When the piece measures approx. 30-28-36 cm [11.75" - 11" - 14⅛"] bind off for armhole by crocheting over 4-5.5-7.5 V-groups less at each side = 16-17-17 V-groups + 3 dc remain on back. When the piece measures approx. 48-48-58 cm [18⅞" - 18⅞" - 22⅞"] (there are now 2 rows remaining - adjust so that the last rows are crocheted with Muskat) bind off for the neck by not crocheting over the center 6.5-7.5-7.5 V-groups – crochet 1 row at each side of neck. Crochet the next row as follows: Pattern 1 over 4.5 V-groups, continue with sc over the neck opening - 1 sc in each dc - Pattern 1 over 4.5 V-groups. Fasten off, the piece measures approx. 50-50-60 cm [19.75" - 19.75" - 23⅝"]. Front: Make 4-4-5 squares of A, 1-1-2 squares of B, 1-1-2 squares of C, 4-4-5 squares of D, 2-2-2 squares of E and 4-4-4 squares of F = 16-16-20 squares - see instructions above. Then make 1 half square each of B and E (neckband). Crochet squares together with rust Muskat - see Figs. 2 and 3 - Fig. 3 shows how squares are crocheted together. First join in strips according to the thin line and then join strips according to the thick line. Sleeve: Ch 42-46-50 loosely with rust Muskat. Turn and work 1 row of sc = 41-45-49 sc. Begin Pattern 1 on the next row as follows: * 3 dc in 1st sc, ch 1, skip over 3 sc *, repeat from * - * a total of 10-11-12 times, finish with 3 dc in last sc. Crochet Pattern 1 with stripes according to Pattern 2. Note: turn all rows with ch 3 + ch 1. When the piece measures 10-8-10 cm [4" - 3⅛" - 4"] inc 1/2 V-group at each side - see Fig. 1 - a total of 6-7-8 times every 4-3-3 rows = 16-18-20 V-groups. When the piece measures 28 cm [11"] (13-13-14 cm [5⅛" - 5⅛" - 5.5"] remain to finished measurements) shape sleeve cap by beginning row 2 V-groups in from each side. Repeat this dec every 5 rows to finished dimensions. Finish when the piece measures approx. 39-39-40 cm [15.25" - 15.25" - 15.75"]. Assembly: All pieces are crocheted together with rust Muskat. Crochet shoulder and side seams in the same way as squares were crocheted together - see Fig. 3. Crochet the sleeve seam as follows: start at the bottom with * 1 sc in one side, ch 2, 1 sc in the other side, ch 2 *, repeat from * - * until 3-4-6 rows remain. Crochet the sleeve to the Body in the same way. Crochet 1 row sc around entire Body, up along button bands and around the neck. Neck ties: Make 2 chains approx. 30 cm [11.75"] long with 2 strands rust Muskat. Fasten 1 tie at each side of center front at start of neck shaping. Make 2 more ties and fasten these 1 square below the first ones. |
|||||||||||||||||||||||||||||||||||||||||||||||||||||||
Diagram explanations |
|||||||||||||||||||||||||||||||||||||||||||||||||||||||
|
|||||||||||||||||||||||||||||||||||||||||||||||||||||||
|
|||||||||||||||||||||||||||||||||||||||||||||||||||||||
|
|||||||||||||||||||||||||||||||||||||||||||||||||||||||
|
|||||||||||||||||||||||||||||||||||||||||||||||||||||||
|
|||||||||||||||||||||||||||||||||||||||||||||||||||||||
|
|||||||||||||||||||||||||||||||||||||||||||||||||||||||
|
Have you made this or any other of our designs? Tag your pictures in social media with #dropsdesign so we can see them! Do you need help with this pattern?You'll find tutorial videos, a Comments/Questions area and more by visiting the pattern on garnstudio.com. © 1982-2024 DROPS Design A/S. We reserve all rights. This document, including all its sub-sections, has copyrights. Read more about what you can do with our patterns at the bottom of each pattern on our site. |
|||||||||||||||||||||||||||||||||||||||||||||||||||||||


With over 40 years in knitting and crochet design, DROPS Design offers one of the most extensive collections of free patterns on the internet - translated to 17 languages. As of today we count 304 catalogs and 11422 patterns - 11417 of which are translated into English (US/in).
We work hard to bring you the best knitting and crochet have to offer, inspiration and advice as well as great quality yarns at incredible prices! Would you like to use our patterns for other than personal use? You can read what you are allowed to do in the Copyright text at the bottom of all our patterns. Happy crafting!
Comments / Questions (35)
Guten Tag, mir gefällt die Häkeljacke Hippi Modell Nr. H-036 Wie kann ich die original Wolle bei ihnen bestellen. Gibt es evtl. Ein komplettes Packet zu dem Modell ?
28.02.2024 - 09:31DROPS Design answered:
Liebe Frau Bordas, die benötige Garnmenge finden Sie beim Kopfteil, da Tynn Cotton Chenille ausgelaufen ist, könne Sie unseren Garnumrechner benutzen; gerne kann Ihnen Ihr DROPS Händler damit helfen, die beste passende Garne/Farben -auch per Telefon oder per E-Mail- weiterempfehlen. Viel Spaß beim häkeln!
28.02.2024 - 15:23Door wat kan Tynn Chenille vervangen worden in dit patroon? Heeft het dan hetzelfde effect?
14.02.2023 - 14:21DROPS Design answered:
Dag Ingrid,
We hebben helaas geen garen wat hetzelfde effect heeft als Tynn Chenille. Wel zou je het garen kunnen vervangen voor een garen uit Categorie C, zodat je ongeveer dezelfde dikte en dus stekenverhouding hebt. Een katoengaren uit categorie C is DROPS Paris.
15.02.2023 - 20:51Den danske version af opskriften mangler alle diagrammer.
04.02.2023 - 16:11DROPS Design answered:
Hei Ingelise. Det skal vi få ordnet. mvh DROPS Design
06.02.2023 - 14:54I am unclear what is meant by... The chart for Pattern 1 shows the V-stitch pattern, which is crocheted in stripe pattern following the chart for Pattern 2. I do not see a Pattern 2 in the directions.
10.03.2022 - 17:55DROPS Design answered:
Dear Kelly, diagram M.2 is the one just left to M.1 and is showing the stripes, ie 1st row = 1st symbol under diagram key = colour rust Muskat; 2nd row = 2nd symbol = colour red, Chenille, etc.. Happy crocheting!
10.03.2022 - 18:31Buongiorno, Lo stesso modello si potrebbe trasformare in un cappotto? Oppure avete modelli di cappotti cricket? Grazie ,cordialmente saluto. Laura
25.08.2021 - 15:05DROPS Design answered:
Buonasera Laura, può lavorarlo più lungo e portarlo in forma per un cappotto. Buon lavoro!
25.08.2021 - 15:13On this pattern I don’t know what V-Group means? I have difficulty understanding Fig 1 in your pattern
22.06.2021 - 11:31DROPS Design answered:
Dear Gail, these are thes ame as the symbols in diagram M.1 - 1 "|" (11th symbol) = 1 treble crochet (UK English)/double crochet (US-English), so that when there are 3 | together, you will work 3 treble/double crochets in the same space (around the 2 treble/double crochets groupes from previous row). Happy crocheting!
22.06.2021 - 16:30I would like to make the front panels in stripes as well in place of the squares. I have never made such a project. Would you be able to advise? Thank you so much! I have been looking for something like this for agrs!
09.03.2021 - 19:38DROPS Design answered:
Dear Estrela, please understand, that we cannot rewrite our patterns for each individual request, You do have the schematic drawing on the bittom, and the stripe pattern, you will have to work from there, Happy Crafting!
09.03.2021 - 19:51In M2 gebruiken jullie 2 x dezelfde kleur, Muskat nr39 maar wordt de ene keer als dieprood en de nadere keer als heidekruid gebruikt. Hoe zit dit?
20.12.2019 - 11:31DROPS Design answered:
Dag Janke,
Er stond inderdaad een foutje en het bovenste symbool is nu aangepast naar donker rood Chenille nr. 924. Bedankt voor het doorgeven!
26.12.2019 - 19:11Hej, Jag vill gärna sticka 68-21 som man ska sticka med Muskat och Tunn Cotton Chenille. Det har angivits många olika möjligheter att byta ut Chenille garnet mot annat garn. Undrar nu vilket garn ni skulle rekommendera mig att byta ut Chernille mot när det gäller jackan 68-21. Vänliga hälsningar Eve Suurvee
12.09.2019 - 09:36DROPS Design answered:
Hej. Vill du sticka den i bomullsgarn så kan du sticka den helt i Muskat eller så kan du välja Belle eller Cotton Light. Vill du hellre sticka den i ullgarn så är det ett av de andra garnen i garngrupp B du får välja. Lycka till!
12.09.2019 - 12:19En cuanto a los aumentos de la manga, en la talla pequeña, si aumento cada 4 filas, llego a los 28 cm de labor sin haber alcanzado los 16 grupos, ¿hay algún error y debo aumentar cada 3 filas?
04.08.2019 - 18:49DROPS Design answered:
Hola Ana. El patrón está correcto. Tienes que comprobar la tensión del tejido. ( 10 filas del patrón 1 = 10 cm). Si trabajas más flojo puede ser que alcances las medidas en cm antes de trabajar todas las filas según el patrón.
17.11.2019 - 20:16