DROPS Cotton Merino
DROPS Cotton Merino
50% Wool, 50% Cotton
from 4.45 $ /50g
Get the yarn to make this pattern from 57.85$.

The yarn cost is calculated from the pattern’s smallest size and the yarn’s cheapest product type. Looking for an even better price? You might find it on the DROPS Deals!

DROPS SS24

Graceful Mermaid

Crochet DROPS poncho with lace pattern, worked top down in ”Cotton Merino”. Size: S - XXXL.

DROPS 168-29
DROPS design: Pattern no cm-048
Yarn group B
----------------------------------------------------------
Size: S/M - L/XL - XXL /XXXL
Materials:
DROPS COTTON MERINO from Garnstudio
650-750-800 g color no 09, ice blue

DROPS CROCHET HOOK size 3.5 mm/E/4 – or size needed to get 20 dc x 10 rows = 4" x 4" (10 x 10 cm).

-------------------------------------------------------

Alternative Yarn – See how to change yarns here
Yarn Groups A to F – Use the same pattern and change the yarn here
Yarn usage using an alternative yarn – Use our yarn converter here

-------------------------------------------------------

DROPS Cotton Merino
DROPS Cotton Merino
50% Wool, 50% Cotton
from 4.45 $ /50g
Get the yarn to make this pattern from 57.85$.

The yarn cost is calculated from the pattern’s smallest size and the yarn’s cheapest product type. Looking for an even better price? You might find it on the DROPS Deals!

Pattern instructions

NOTE: This pattern is written in American English. All measurements in charts are in cm. For conversion from inches to cm - click here. There are different terms for crocheting in American and British English. If this pattern includes crochet, click for "crochet terms" here. For this pattern in British English, please click here.
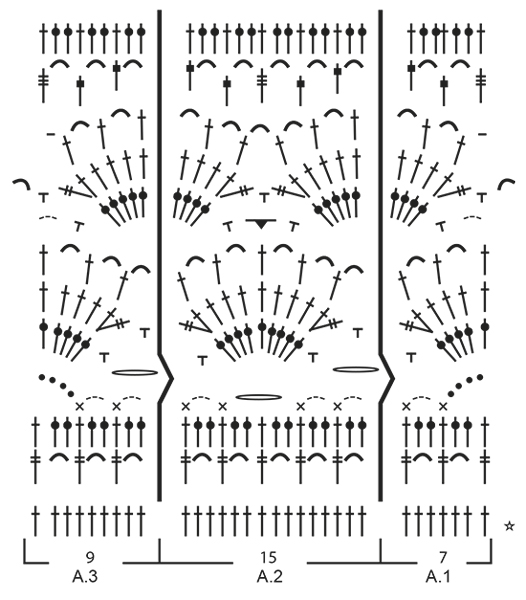
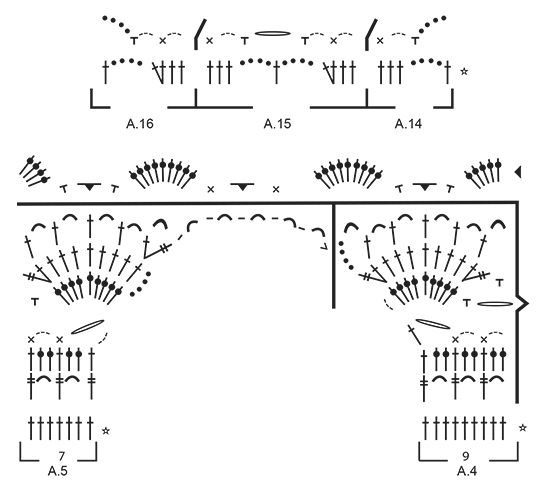
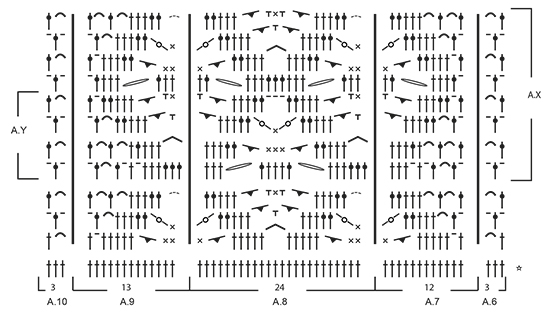
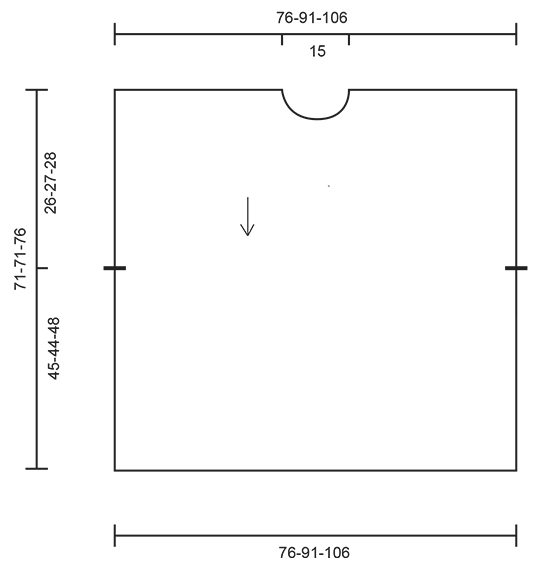
PATTERN:
See diagrams A.1 to A.16.

CROCHET INFO:
Replace first dc at beg of every dc row with 3 ch.
Replace first tr at beg of every tr row with 4 ch.
Replace first sc at beg of every sc row with 1 ch.
----------------------------------------------------------

PONCHO:
The poncho is the same at the front and back with opening in the sides. Work back and forth, top down.

RIGHT SHOULDER - FRONT PIECE:
Work 80-98-117 ch on hook size 3.5 mm/E/4 with Cotton Merino. Turn and work 1 dc in 4th ch from hook (= 2 dc), 1 dc in each of the next 1-4-3 ch, * skip ch 1, 1 dc in each of the next 4 ch *, repeat from *-* the entire row = 63-78-93 dc (includes 2 edge sts in the side).
Work next row (= from RS) as follows: READ CROCHET INFO! 1 dc in each of the first 2 dc (= edge sts), A.1 over the next 7 dc, A.2 over the next 45-60-75 dc (= 3-4-5 times), finish with A.4 over the next 9 dc. Work to and with 6th row. Put piece aside and work left shoulder. REMEMBER THE CROCHET GAUGE!

LEFT SHOULDER - FRONT PIECE:
Work first row as on right shoulder - front piece = 63-78-93 dc.
Work next row (= from RS) as follows: A.5 over the first 7 dc, A.2 over the next 45-60-75 dc (= 3-4-5 times), A.3 over the next 9 dc, finish with 1 dc in each of the next 2 dc (= edge sts). Work to and with 6th row - NOTE: Fasten sl st at the end of A.5 in right shoulder so that the shoulder are fastened tog. Cut the yarn and beg to work from RS over both shoulders.

FRONT PIECE:
Continue on diagram (= 7th row), i.e. work next row (= from RS) as follows: 1 sc in each of the first 2 dc (= edge sts), A.1 over the next 7 dc, A.2 over the next 135-165-195 dc/ch (= 9-11-13 times) - NOTE: See last row in A.4/A.5 on how 7th row of A.2 is worked over the middle (A.4, 15 ch, A.5), A.3 over the next 9 dc, finish with 1 sc in each of the next 2 dc (= edge st). Work diagram A.1/A.2/A.3 1 time in total vertically (NOTE! You also begin and finish with 1 sc in first and last 2 sc's on row 8 and hereafter you work 1 dc in first 2 and last st on remaining rows) = 155-185-215 dc on last row.
Work next row (= from WS) as follows: 1 dc in each of the first 2 dc, A.10 over the next 51-66-69 dc (= 17-22-23 times), A.9 over the next 13 dc, A.8 over the next 24-24-48 dc (= 1-1-2 times), A.7 over the next 12 dc, A.6 over the next 51-66-69 dc (= 17-22-23 times), finish with 1 dc in each of the next 2 dc. Work to and with 3rd row. Then work A.X 2-2-3-3 times in total vertically. Then work A.Y 1-1-0-0 times in total vertically.
Work next row (= from RS) as follows: Work 1 dc in every dc/sc, 1 dc around every ch, 2 dc around every ch-space with ch 2, 3 dc around every ch-space with 3 ch and 4 dc around every ch-space with 5 ch = 155-185-215 dc.
Work next row (= from WS) as follows: Work 1 dc in each of the first 2 dc, A.3 over the next 9 dc, A.2 over the next 135-165-195 dc (= 9-11-13 times), A.1 over the next 7 dc, finish with 1 dc in each of the next 2 dc. Work A.3/A.2/A.1 1 time in total vertically = 155-185-215 dc on last row.
Work next row (= from RS) as follows: Work 1 dc in each of the first 2 dc, A.11 over the next 7 dc, A.12 over the next 135-165-195 dc (= 9-11-13 times), A.13 over the next 7 dc, finish with 1 dc in each of the next 2 dc. Work A.11/A.12/A.13 1 time in total vertically.
Work next row (= from WS) as follows: Work 1 dc in each of the first 2 dc, A.16 over A.13, A.15 over A.12 and A.14 over A.11. Then work 4th and 5th row in A.1/A.2/A.3, i.e. work next row (= from RS) as follows: Work 1 dc in each of the first 2 dc, A.1 over A.14, A.2 over A.15, A.3 over A.16, finish with 1 dc in each of the next 2 dc. Fasten off.

LEFT SHOULDER - BACK PIECE:
Work in left shoulder on front piece but in opposite direction, beg from WS. Instead of working ch and first dc-row work as follows: Work 1 sc in each of the 78-93-108 dc. Then work as right shoulder - front piece.

RIGHT SHOULDER - BACK PIECE:
Work in right shoulder on front piece but in opposite direction, beg from WS. Instead of working ch and first dc-row work as follows: Work 1 sc in each of the 78-93-108 dc. Then work as left shoulder - front piece.

BACK PIECE:
Continue as on front piece.

NECK EDGE:
Beg on one shoulder, work as follows along the entire neck from RS: 2 sc around every dc-row, ch 1, 3 sc around every tr row/ch-space, 1 ch etc. Finish with 1 sl st in first sc. Fasten off.

TWINED STRING:
Cut 2 lengths Cotton Merino yarn of 6 metres each. Twine the strands tog until they resist, fold the string double so that it twines again. Tie a knot in each end and thread it through a hole in the side on front and back piece, approx. 26-27-28 cm / 10¼"-10⅝"-11" down from shoulder, tie a bow. Make another string and fasten it to the other side of poncho.

This pattern has been corrected.

Updated online: 31.08.2016
Several changes to pattern in all 3 sizes; no of stitches, repeats of A.2 and few minor changes.
Updated online: 08.06.2017
FRONT PIECE(was written 4 sizes, but it is only 3 sizes): ... Work to and with 3rd row. Then work A.X 2-2-3 times in total vertically. Then work A.Y 1-1-0 times in total vertically...
Updated online: 19.03.2019
Correction: whether it is worked from RS or WS has been corrected several places on front piece

Diagram

All measurements in charts are in cm.

symbols = ch
symbols = sc in st
symbols = sc around ch
symbols = 2 ch
symbols = 3 ch
symbols = 4 ch
symbols = 5 ch
symbols = 6 ch
symbols = 7 ch
symbols = 8 ch
symbols = dc in st
symbols = dc around ch/ch-space
symbols = 2 dc tog: Work 1 dc in st but wait with last pull through (= 2 loops on hook), then work next dc in next dc but on last pull through, pull yarn through all 3 loops on hook
symbols = 2 dc tog around ch-space
symbols = 2 dc tog in same dc
symbols = tr in dc
symbols = tr around ch/ch-space
symbols = dtr around ch/ch-space
symbols = last row on previous diagram/pattern, this row has already been worked
symbols = shows how next row in A.2 is worked over these ch
symbols = sl st in 4th ch
symbols = crochet direction
diagram
diagram
diagram
diagram
diagram
Do you have a question? See a list of frequently asked questions (FAQ)

Knitting tension is what determines the final measurements of your work, and is usually measured per 10 x 10 cm. It is provided like so: number of stitches in width x number of rows in height - eg: 19 stitches x 26 rows = 10 x 10 cm.

The knitting tension is very individual; some people knit/crochet loosely while others work tightly. You adjust the knitting tension with the needle size, which is why the suggested needle size only serve as a guide! You need to adjust this (up or down) to ensure that YOUR knitting tension matches the knitting tension provided in the pattern. If you work with a different knitting tension than provided you will have a different yarn consumption, and your work will have different measurements than what the pattern suggests.

The knitting tension also determines which yarns can replace each other. As long as you achieve the same knitting tension you can replace one yarn with another.

See DROPS lesson: How to measure your tension/gauge

See DROPS video: How to make a gauge tension swatch

The required amount of yarn is provided in grams, eg: 450 g. To calculate how many balls you’ll need you first need to know how many grams are in 1 ball (25g, 50g or 100g). This information is available if you click on the individual yarn quality on our pages. Divide the amount required with the amount of each ball. For example, if each ball is 50g (the most common amount), the calculation will be as follows: 450 / 50 = 9 balls.

The important thing when changing from one yarn to another is that the knitting/crochet tension remains the same. This is so that the measurements of the finished piece will be the same as on the sketch provided. It is easier to achieve the same knitting tension using yarns from the same yarn group. It is also possible to work with multiple strands of a thinner yarn to achieve the knitting tension of a thicker one. Please try our yarn converter. We recommend you to always work a test swatch.

Please NOTE: when changing yarn the garment might have a different look and feel to the garment in the photo, due to individual properties and qualities of each yarn.

See DROPS lesson: Can I use a different yarn than the one mentioned in the pattern?

All our yarns are categorised into yarn groups (from A to F) according to thickness and knitting tension – group A contains the thinnest yarns and group F the thickest. This makes it easier for you to find alternative yarns to our patterns, should you wish to switch yarn. All yarns within the same group have a similar knitting tension and can easily replace each other. However, different yarn qualities have different structures and properties which will give the finished work a unique look and feel.

Click here for an overview of the yarns in each yarn group

At the top of all our patterns you’ll find a link to our yarn converter, which is a helpful tool should you wish to use a different yarn than suggested. By filling in the yarn quality you wish to replace, the amount (in your size) and number of strands, the converter will present good alternative yarns with the same knitting tension. Additionally it will tell you how much you’ll require in the new qualities and whether you’ll need to work with multiple strands. Most skeins are 50g (some are 25g or 100g).

If the pattern is worked with multiple colours, every colour will have to be converted separately. Similarly, if the pattern is worked with several strands of different yarns (for example 1 strand Alpaca and 1 strand Kid-Silk) you will have to find alternatives for each, individually.

Click here to see our yarn converter

Since different yarns have different qualities and textures we have chosen to keep the original yarn in our patterns. However, you can easily find options among our available qualities by using our yarn converter, or simply pick a yarn from the same yarn group.

It is possible that some retailers still have discontinued yarns in stock, or that someone has a few skeins at home that they would like to find patterns for.

The yarn converter will provide both alternative yarn as well as required amount in the new quality.

If you think it's hard to decide what size to make, it can be a good idea to measure a garment you own already and like the size of. Then you can pick the size by comparing those measures with the ones available in the pattern's size chart.

You'll find the size chart at the bottom of the pattern.

See DROPS lesson: How to read size chart

The needle size provided in the pattern serves only as a guide, the important thing is to follow the knitting tension. And since knitting tension is very individual, you will have to adjust the needle size to ensure that YOUR tension is the same as in the pattern – maybe you’ll have to adjust 1, or even 2 needle sizes, up or down to achieve the correct tension. For this, we recommend that you work test swatches.

Should you work with a different knitting tension than the one provided, the measurements of the finished garment might deviate from the measurement sketch.

See DROPS lesson: How to measure your tension/gauge

See DROPS video: How to make a gauge tension swatch

Working a garment top-down provides more flexibility and room for personal adjustment. For example it is easier to try the garment on while working, as well as making adjustments to length of yoke and shoulder caps.

The instructions are carefully explaining every step, in the correct order. Diagrams are adjusted to the knitting direction and are worked as usual.

The diagram depicts all rows/rounds, and every stitch seen from the right side. It is read from bottom to top, from right to left. 1 square = 1 stitch.

When working back and forth, every other row is worked from the right side and every other row is worked from the wrong side. When working from the wrong side, the diagram will have to be worked reversed: from left to right, knit stitches are purled, purl stitches are knit etc.

When working in the round every round is worked from the right side and the diagram are worked from right to left on all rounds.

See DROPS lesson: How to read knitting diagrams

The diagram depicts all rows/rounds, and every stitch seen from the right side. It is worked from bottom to top, from right to left.

When working back and forth every other row is worked from the right side: from right to left and every other row is worked from the wrong side: from left to right.

When working in the round, every row in the diagram are worked from the right side, from right to left.

When working a circular diagram you start in the middle and work your way outwards, counter clockwise, row by row.

The rows usually start with a given number of chain stitches (equivalent to the height of the following stitch), this will either be depicted in the diagram or explained in the pattern.

See DROPS lesson: How to read crochet diagrams

Instructions for working several diagrams after each other on the same row/round, will often be written like so: “work A.1, A.2, A.3 a total of 0-0-2-3-4 times". This means you work A.1 once, then A.2 is worked once, and A.3 is repeated (in width) the number of times provided for your size – in this case like so: S = 0 times, M = 0 times, L=2 times, XL= 3 times and XXL = 4 times.

The diagrams are worked as usual: begin with the first row in A.1, then work the first row in A.2 etc.

See DROPS lesson: How to read knitting diagrams

See DROPS lesson: How to read crochet diagrams

The total width of the garment (from wrist-to-wrist) will be larger in the larger sizes, despite the actual sleeves being shorter. The larger sizes have longer sleeve caps and wider shoulders, so there will be a good fit in all sizes.

The measurement sketch/schematic drawing provides information regarding the full length of the garment. If it’s a jumper or a jacket the length is measured from the highest point on the shoulder (usually closest to the neckline), and straight down to the bottom of the garment. It is NOT measured from the tip of shoulder. Similarly, the length of yoke is measured from the highest point on the shoulder and down to where yoke is split into body and sleeves.

See DROPS lesson: How to read a schematic drawing

Diagrams are often repeated on the round or in height. 1 repeat is the diagram the way it appears in the pattern. If it says to work 5 repeats of A.1 in the round, then you work A.1 a total of 5 times after/next to each other in the round. If it says to work 2 repeats of A.1 vertically/in height you work the entire diagram once, then begin again at the start and work the entire diagram one more time.

Chain stitches are slightly narrower than other stitches and to avoid working the cast-on edge too tight, we simply chain more stitches to begin with. The stitch count will be adjusted on the following row to fit the pattern and measurement sketch.

The rib edge is more elastic and will contract slightly compared to, for example, stocking stitch. By increasing before the rib edge, you avoid a visible difference in width between the rib edge and the rest of the body.

It’s very easy to cast off too tightly, and by making yarn overs while casting off (and simultaneously casting these off) you avoid a too tight cast off edge.

See DROPS video: How to bind off with yarn overs (yo)

To achieve an even increase (or decrease) you can increase on, for example: every 3rd and 4th row alternately, like so: work 2 rows and increase on the 3rd row, work 3 rows and increase on the 4th. Repeat this until the increase is complete.

See DROPS lesson: Increase or decrease 1 st on every 3rd and 4th row alternately

Should you prefer to work in the round instead of back and forth, you may of course adjust the pattern. You’ll need to add steeks mid-front (usually 5 stitches), and follow the instructions. When you would normally turn and work from the wrong side, simply work across the steek and continue in the round. At the end you’ll cut the piece open, pick up stitches to work bands, and cover the cut edges.

See DROPS video: How to knit steeks and cut open

Should you prefer to work back and forth instead of in the round, you may of course adjust the pattern so you work the pieces separately and then assemble them at the end. Divide the stitches for the body in 2, add 1 edge stitch in each side (for sewing) and work the front and back pieces separately.

See DROPS lesson: Can I adapt a pattern for circular needles into straight needles?

Pattern repeats can vary slightly in the different sizes, in order to get the correct proportions. If you’re not working the exact same size as the garment in the photo, yours might deviate slightly. This has been carefully developed and adjusted so that the complete impression of the garment is the same in all sizes.

Make sure to follow instructions and diagrams for your size!

If you have found a pattern you like which is available in women’s size it’s not very difficult to convert it to men’s size. The biggest difference will be the length of sleeves and body. Start working on the women size that you think would fit across the chest. The additional length will be worked right before you cast off for the armhole/sleeve cap. If the pattern is worked top-down you can add the length right after the armhole or before the first decrease on sleeve.

Regarding additional yarn amount, this will depend on how much length you add, but it is better with a skein too many than too few.

All yarns will have excess fibres (from production) that might come off as lint or shedding. Brushed yarns (ie hairier yarns) have more of these loose, excess fibres, causing more shedding.

Shedding also depends on what is worn under or over the garment, and whether this pulls at the yarn fibres. It’s therefore not possible to guarantee that there will be no shedding

Below are some tips on how to get the best result when working with hairier yarns:

1. When the garment is finished (before you wash it) shake it vigorously so the looser hairs come off. NOTE: do NOT use a lint roller, brush or any method that pulls at the yarn.

2. Place the garment in a plastic bag and put it in your freezer - the temperature will cause the fibres to become less attached to each other, and excess fibres will come off easier.

3. Leave in the freezer for a few hours before taking it out and shaking it again.

4. Wash the garment according to the instructions on the yarn label.

Pilling is a natural process that happens to even the most exclusive of fibers. It's a natural sign of wear and tear that is hard to avoid, and that is most visible in high friction areas of your garment like a sweater's arms and cuffs.

You can make your garment look as new by removing the pilling, using a fabric comb or a pill/lint remover.

Still can't find the answer you need? Then scroll down and leave your question so one of our experts can try to help you. This will be done normally within 5 to 10 working days.
In the meantime, you can read the questions and answers that others have left to this pattern or join the DROPS Workshop on Facebook to get help from fellow knitters/crocheters!

You might also like...

Post a comment to pattern DROPS 168-29

We would love to hear what you have to say about this pattern!

If you want to leave a question, please make sure you select the correct category in the form below, to speed up the answering process. Required fields are marked *.

Comments / Questions (83)

country flag Rebecca wrote:

Please see previous post: Respectfully, I have to disagree. You can see it in the picture based on number of pattern repeats. I spent a long time trying to figure out where I had made the mistake, only to discover that it wasn't me to begin with. I'm just trying to save anyone else the trouble. I apologize if it seems I'm being rude, but did anyone really check this out before responding that the stitch count in the patterns is correct? Just trying to help.

22.03.2016 - 22:02

DROPS Design answered:

Dear Rebecca, I have may miscounted, your feedback has been forwarded to our Design team and they will check. Thank you. Happy crocheting!

23.03.2016 - 09:48

country flag Rebecca wrote:

I believe the stitch count is off. After you join the right and left shoulder pieces and finish working diagram A1/A2/A3 vertically for the "front piece" you have 185 sts for the smallest size. Not 155. I believe the pattern is not accounting for the sts that are added at the neck edge of A4/A5.

19.03.2016 - 14:48

DROPS Design answered:

Dear Rebecca, you should get 155 sts after A.1,A.2 and A.3 on front piece after joining both shoulders, work over the sts on neckline as shown in 7th row in A.4-A.5. Happy crocheting!

21.03.2016 - 13:43

country flag Rebecca wrote:

Please see previous correspondence, this is a continuation: I'm unsure of how to handle the 2 edge stitches over the rest of the pattern- beyond the first couple of rows. This is not explained. Also, based on your previous answer, I believe there may be an error in the pattern. Under "right shoulder-front piece" work next row (=from RS) it says to dc in the first 2 edge sts. Since this is a tr row, shouldn't it say to tr these 2 sts instead of dc?

15.03.2016 - 21:47

DROPS Design answered:

Dear Rebecca, your feedback has been forwarded to our Design team to check how these 2 edge sts are worked throughout the diagrams. Happy crocheting!

16.03.2016 - 08:52

country flag Rebecca wrote:

In the first couple rows of this project (right shoulder-front piece) the pattern has you set up 2 "edge stitches" in the side. Once you move on to following the chart, there is no mention of how to handle those 2 "edge sts" and they are not included in the chart. I see the note about the "crochet info" but that says to "replace the first stitch..." It doesn't address the 2 edge stitches. I'm stuck. And confused. Please help. Thank you.

14.03.2016 - 18:24

DROPS Design answered:

Dear Rebecca, the 2 edge sts are worked at beg of row from RS (right shoulder front piece), they are not included in diagram, you crochet as follows from RS: 1 tr in each of the first 2 tr (= edge sts), A.1 over the next 7 tr, A.2 over the next 60-75-90 tr (= 4-5-6 times), finish with A.4 over the next 9 tr - and from WS: A.4 over the first 9 tr, A.2 4-5-6 times, A.1 over the next 7 tr and 2 edge sts. Happy crocheting!

15.03.2016 - 08:50

country flag Colley wrote:

Bonjour j aimerais savoir quel est le diagramme ax et ay je ne vois que des diagramme avec des chiffres. merci d avance

14.03.2016 - 00:40

DROPS Design answered:

Bonjour Mme Colley, vous trouverez les diagrammes A.X et A.Y dans celui avec A.6, A.7, A.8, A.9 et A.10: les rangs de A.X sont encadrés à droite et ceux de A.7 sont encadrés à gauche. Bon crochet!

14.03.2016 - 10:00

country flag Annette wrote:

Hallo, ich häkle dieses Modell in der mittleren Größe - die Maschenprobe stimmt (91 cm), jedoch ist der Halsausschnitt sehr viel zu klein. Verstehe ich es richtig, dass die Verbindung vom linken zum rechten Schulterteil lediglich 15 Luftmaschen beträgt, oder habe ich etwas falsch verstanden? Vielen Dank und Gruß

11.03.2016 - 14:33

DROPS Design answered:

Liebe Annette, der Abstand zwischen den Schultern beträgt 15 cm. zusammen mit der Tiefe des Ausschnitts (vorne und hinten) ergibt es die Ausschnittgrösse, die auf dem Foto und der Schnitteichnung gezeigt wird. Ich würde den Ausschnitt nicht grösser machen, damit der Poncho nicht über die Schultern rutscht.

14.03.2016 - 08:47

country flag Leonie Kooistra wrote:

Hoi! Ik ben begonnen aan deze poncho in de maat S/M. Ik kom echter na deel 1 uit op 185 stokjes ipv 155. Nu zag ik in het zweeds al een vraag over dit ontwerp op hetzelfde punt., misschien goed om het even na te kijken. Groetjes, Leonie

09.03.2016 - 15:29

DROPS Design answered:

Hoi Leonie. Je begint en eindigt met 155 stk: 2 kantstk, A.1 (= 7 st), 135 st volgens A.2 (9 herhalingen), 9 st volgens A.3 en 2 kantstk. Het aantal verandert onderweg, maar in de laatste toer heb je weer hetzelfde aantal st.

11.03.2016 - 11:29

country flag Anna Wärlander wrote:

Hej! jag Har börjat på denna poncho men får det inte att stämma. Har gjort hela första mönstret 1gång dvs början på framstycket och i strl L/XL ska det vara 185 stolpar och jag har många fler. Var kan jag ha gjort fel. Har tittat på mönstret flera gånger och hittar inget fel. MVH Anna

07.03.2016 - 17:01

DROPS Design answered:

Hej Anna, Du virkar A.2 11 ggr och du har 15 st når du börjar diagrammet och även när du slutar diagrammet. Sätt i en märktråd efter varje rapport m 15 st, så ser du om du har rätt antal m i varje rapport. Lycka till!

08.03.2016 - 09:08

country flag Alejandra Rosillo Castro wrote:

Me encanta! Estaba deseando ver el patrón. Gracias!!!

13.02.2016 - 14:19

country flag Eva wrote:

Diese geniale Anleitung würde meine Kreativität für diese Saison vervollständigen. Ich warte ungeduldig darauf.

08.02.2016 - 08:50