
Popular categories
Looking for a yarn?


|
|||||||||||||||||||||||||||||||||||||||||||||||||||||||||||||||||||
Graceful Mermaid |
|||||||||||||||||||||||||||||||||||||||||||||||||||||||||||||||||||
|
|
|||||||||||||||||||||||||||||||||||||||||||||||||||||||||||||||||||
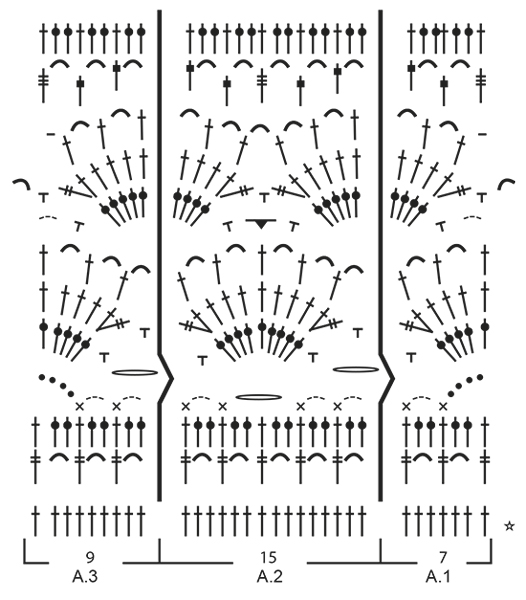
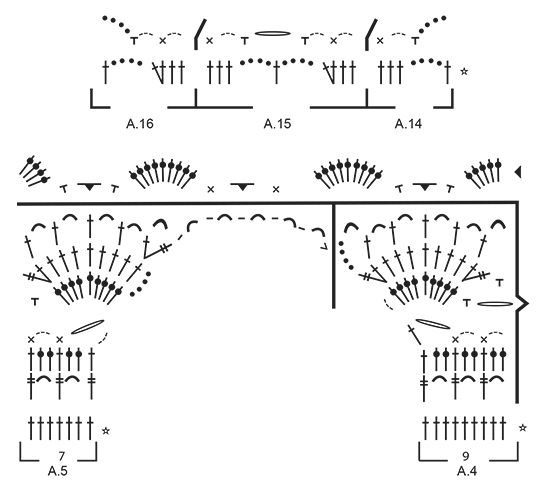
Crochet DROPS poncho with lace pattern, worked top down in ”Cotton Merino”. Size: S - XXXL.
DROPS 168-29 |
|||||||||||||||||||||||||||||||||||||||||||||||||||||||||||||||||||
|
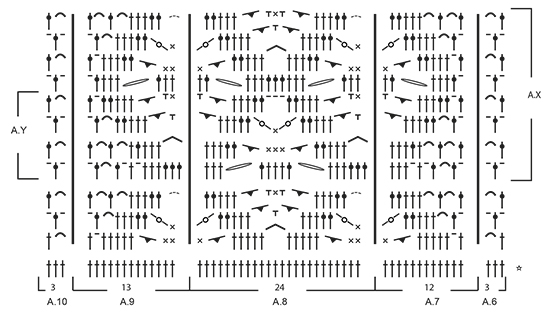
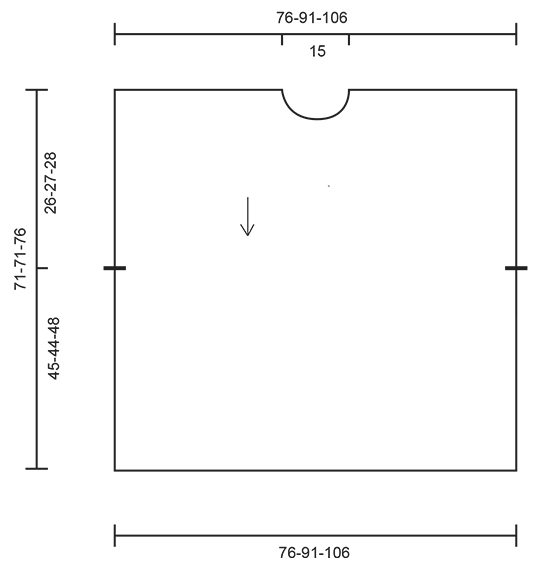
PATTERN: See diagrams A.1 to A.16. CROCHET INFO: Replace first dc at beg of every dc row with 3 ch. Replace first tr at beg of every tr row with 4 ch. Replace first sc at beg of every sc row with 1 ch. ---------------------------------------------------------- PONCHO: The poncho is the same at the front and back with opening in the sides. Work back and forth, top down. RIGHT SHOULDER - FRONT PIECE: Work 80-98-117 ch on hook size 3.5 mm/E/4 with Cotton Merino. Turn and work 1 dc in 4th ch from hook (= 2 dc), 1 dc in each of the next 1-4-3 ch, * skip ch 1, 1 dc in each of the next 4 ch *, repeat from *-* the entire row = 63-78-93 dc (includes 2 edge sts in the side). Work next row (= from RS) as follows: READ CROCHET INFO! 1 dc in each of the first 2 dc (= edge sts), A.1 over the next 7 dc, A.2 over the next 45-60-75 dc (= 3-4-5 times), finish with A.4 over the next 9 dc. Work to and with 6th row. Put piece aside and work left shoulder. REMEMBER THE CROCHET GAUGE! LEFT SHOULDER - FRONT PIECE: Work first row as on right shoulder - front piece = 63-78-93 dc. Work next row (= from RS) as follows: A.5 over the first 7 dc, A.2 over the next 45-60-75 dc (= 3-4-5 times), A.3 over the next 9 dc, finish with 1 dc in each of the next 2 dc (= edge sts). Work to and with 6th row - NOTE: Fasten sl st at the end of A.5 in right shoulder so that the shoulder are fastened tog. Cut the yarn and beg to work from RS over both shoulders. FRONT PIECE: Continue on diagram (= 7th row), i.e. work next row (= from RS) as follows: 1 sc in each of the first 2 dc (= edge sts), A.1 over the next 7 dc, A.2 over the next 135-165-195 dc/ch (= 9-11-13 times) - NOTE: See last row in A.4/A.5 on how 7th row of A.2 is worked over the middle (A.4, 15 ch, A.5), A.3 over the next 9 dc, finish with 1 sc in each of the next 2 dc (= edge st). Work diagram A.1/A.2/A.3 1 time in total vertically (NOTE! You also begin and finish with 1 sc in first and last 2 sc's on row 8 and hereafter you work 1 dc in first 2 and last st on remaining rows) = 155-185-215 dc on last row. Work next row (= from WS) as follows: 1 dc in each of the first 2 dc, A.10 over the next 51-66-69 dc (= 17-22-23 times), A.9 over the next 13 dc, A.8 over the next 24-24-48 dc (= 1-1-2 times), A.7 over the next 12 dc, A.6 over the next 51-66-69 dc (= 17-22-23 times), finish with 1 dc in each of the next 2 dc. Work to and with 3rd row. Then work A.X 2-2-3-3 times in total vertically. Then work A.Y 1-1-0-0 times in total vertically. Work next row (= from RS) as follows: Work 1 dc in every dc/sc, 1 dc around every ch, 2 dc around every ch-space with ch 2, 3 dc around every ch-space with 3 ch and 4 dc around every ch-space with 5 ch = 155-185-215 dc. Work next row (= from WS) as follows: Work 1 dc in each of the first 2 dc, A.3 over the next 9 dc, A.2 over the next 135-165-195 dc (= 9-11-13 times), A.1 over the next 7 dc, finish with 1 dc in each of the next 2 dc. Work A.3/A.2/A.1 1 time in total vertically = 155-185-215 dc on last row. Work next row (= from RS) as follows: Work 1 dc in each of the first 2 dc, A.11 over the next 7 dc, A.12 over the next 135-165-195 dc (= 9-11-13 times), A.13 over the next 7 dc, finish with 1 dc in each of the next 2 dc. Work A.11/A.12/A.13 1 time in total vertically. Work next row (= from WS) as follows: Work 1 dc in each of the first 2 dc, A.16 over A.13, A.15 over A.12 and A.14 over A.11. Then work 4th and 5th row in A.1/A.2/A.3, i.e. work next row (= from RS) as follows: Work 1 dc in each of the first 2 dc, A.1 over A.14, A.2 over A.15, A.3 over A.16, finish with 1 dc in each of the next 2 dc. Fasten off. LEFT SHOULDER - BACK PIECE: Work in left shoulder on front piece but in opposite direction, beg from WS. Instead of working ch and first dc-row work as follows: Work 1 sc in each of the 78-93-108 dc. Then work as right shoulder - front piece. RIGHT SHOULDER - BACK PIECE: Work in right shoulder on front piece but in opposite direction, beg from WS. Instead of working ch and first dc-row work as follows: Work 1 sc in each of the 78-93-108 dc. Then work as left shoulder - front piece. BACK PIECE: Continue as on front piece. NECK EDGE: Beg on one shoulder, work as follows along the entire neck from RS: 2 sc around every dc-row, ch 1, 3 sc around every tr row/ch-space, 1 ch etc. Finish with 1 sl st in first sc. Fasten off. TWINED STRING: Cut 2 lengths Cotton Merino yarn of 6 metres each. Twine the strands tog until they resist, fold the string double so that it twines again. Tie a knot in each end and thread it through a hole in the side on front and back piece, approx. 26-27-28 cm / 10¼"-10⅝"-11" down from shoulder, tie a bow. Make another string and fasten it to the other side of poncho. |
|||||||||||||||||||||||||||||||||||||||||||||||||||||||||||||||||||
Diagram explanations |
|||||||||||||||||||||||||||||||||||||||||||||||||||||||||||||||||||
|
|||||||||||||||||||||||||||||||||||||||||||||||||||||||||||||||||||
|
|||||||||||||||||||||||||||||||||||||||||||||||||||||||||||||||||||
|
|||||||||||||||||||||||||||||||||||||||||||||||||||||||||||||||||||
|
|||||||||||||||||||||||||||||||||||||||||||||||||||||||||||||||||||

|
|||||||||||||||||||||||||||||||||||||||||||||||||||||||||||||||||||
|
|||||||||||||||||||||||||||||||||||||||||||||||||||||||||||||||||||
|
Have you made this or any other of our designs? Tag your pictures in social media with #dropsdesign so we can see them! Do you need help with this pattern?You'll find tutorial videos, a Comments/Questions area and more by visiting the pattern on garnstudio.com. © 1982-2024 DROPS Design A/S. We reserve all rights. This document, including all its sub-sections, has copyrights. Read more about what you can do with our patterns at the bottom of each pattern on our site. |
|||||||||||||||||||||||||||||||||||||||||||||||||||||||||||||||||||


With over 40 years in knitting and crochet design, DROPS Design offers one of the most extensive collections of free patterns on the internet - translated to 17 languages. As of today we count 304 catalogs and 11422 patterns - 11417 of which are translated into English (US/in).
We work hard to bring you the best knitting and crochet have to offer, inspiration and advice as well as great quality yarns at incredible prices! Would you like to use our patterns for other than personal use? You can read what you are allowed to do in the Copyright text at the bottom of all our patterns. Happy crafting!
Comments / Questions (83)
Ik heb ondertussen het voorpand af, maar hoewel de breedte aardig klopt.... is de lengte 10 cm te kort. Vooral het stuk van a6 tm a10 is erg ineengekrompen vergeleken met de foto. Toch heb ik de herhalingen goed gedaan. Zijn er niet toevallig dubbele stokjes gebruikt? Verder lijkt de hals met 15 cm erg smal. Ik ga wel verder met de achterkant, al denk ik erover om een tussenstuk in te voegen boven.
02.05.2016 - 09:47DROPS Design answered:
Hoi Petra. Wij hebben het patroon bekeken en het moet stk zijn en de halsopening is ook correct. Bekijk eventueel of je stekenverhouding klopt in de hoogte.
01.09.2016 - 12:43Hier nog iemand die na al, a2 en a3 ook 185 steken heeft in plaats van 155. Ben best benieuwd of er dan allemaal op dezelfde plek de fout in gaan of dat het wellicht toch niet klopt. Ik heb al vaak gekeken maar zie het echt niet.....
30.04.2016 - 12:52Ik haak de maat s/m en ben nu bij dit aangekomen. Haak dan A.X 2-2-3-3 keer in totaal in de hoogte. Haak dan A.Y 1-1-0-0 keer in totaal in de hoogte. Houdt dit in dat ik voor mijne 2 keer a.x haak en 1 keer à.y of begrijp ik dit verkeerd🙈
27.04.2016 - 00:42DROPS Design answered:
Hoi Shannon. Ja, dat is correct.
27.04.2016 - 13:25Excuses! Heb kennelijk over jullie reactie heen gelezen... Om de vraag te beantwoorden: ik tel alleen de stokjes (de laatste toer heeft alleen maar stokjes). Ik ben benieuwd naar de uitkomst, ik wacht het rustig af. Vast bedankt!
18.04.2016 - 21:20Zo jammer dat er niet gereageerd wordt... :-/
11.04.2016 - 19:03DROPS Design answered:
Hoi Jeanette. Je ziet mijn reactie onder je vraag. Ik had je eerste vraag beantwoord met een vraag. Verder had ik overlegd met een collega, wij kijken nu het patroon na, en dat kan even duren ;-) Dus graag geduld. Fijn weekend!
15.04.2016 - 10:25Herstel: ik had 93 steken bij beide schouders, overeenkomstig de beschrijving.
06.04.2016 - 12:45Even ter aanvulling, het werk meet 106 cm in de breedte, wat past bij XXL/XXXL. Voor L/XL zou het 91 cm moeten zijn. Ik ben een ervaren haakster, en heb exact het patroon gevolgd. Bij beide schouders had ik, overeenkomstig de beschrijving, 75 steken. Ergens gaat het mis...
06.04.2016 - 12:24DROPS Design answered:
Hoi Jeanette. Wij kijken op dit moment na op dit patroon, dat kan even duren. Dus graag even geduld ;-) Je kan mijn reacties zien onder je vraag.
15.04.2016 - 10:19Ik haak deze poncho in L/XL en heb de laatste toer van A.1 t/m A.3 afgerond. Volgens de beschrijving moet ik 185 steken hebben, maar ik heb er 214. Heb het idee dat de 2 bogen die je over de verbinding haakt niet zijn meegeteld. Nu kom ik niet uit met het volgende schema A.6 t/m A.10. Ergens klopt het niet; 185-4 (kantsteken) = 181 en dat is niet deelbaar door 3 (laatste toer worden er 3 stokjes in elk vakje gehaakt).
06.04.2016 - 12:15DROPS Design answered:
Hoi Jeanette. Je telt alleen de stokjes niet de steken? (dus bijvoorbeeld geen lussen meetellen)
08.04.2016 - 12:24Hallo. Ich versuche den Poncho in der großen Größe zu arbeiten nun meine Frage. Für den Halsausschnitt häkle ich da 15 lm am Ende der Linken vorderen Schulter? Dann komme ich in der 12 Reihe aber nicht auf 215 Maschen.
02.04.2016 - 17:55DROPS Design answered:
Liebe Christine, ich muss leider nachfragen, ich habe die Stelle mit den 15 Lm nicht gefunden. Könnten Sie mir die Stelle bitte genauer beschreiben?
04.04.2016 - 09:51When working "FRONT PIECE," after you finish working charts AX and AY, the pattern reads, "Work next row (= from RS)..." And the very next row again it reads, "Work next row (= from RS)..." Needless to say, from this point forward when the pattern says RS, it is actually the WS and vice versa. Disappointed in the number of mistakes in the pattern.
28.03.2016 - 22:55