
Popular categories
Looking for a yarn?


|
|||||||||||||||||||||||||||||||||||||
Summer Bliss Vest |
|||||||||||||||||||||||||||||||||||||
 |
 |
||||||||||||||||||||||||||||||||||||
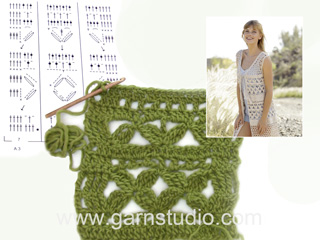
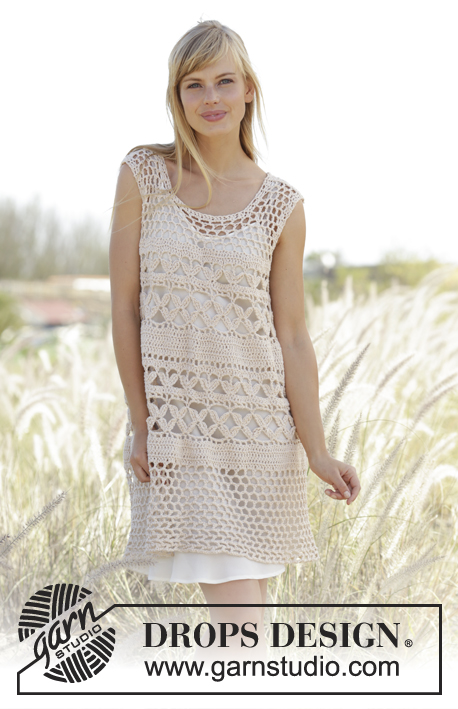
Crochet DROPS vest with A-shape, lace pattern and ties in ”Belle”. Size S-XXXL.
DROPS 167-19 |
|||||||||||||||||||||||||||||||||||||
|
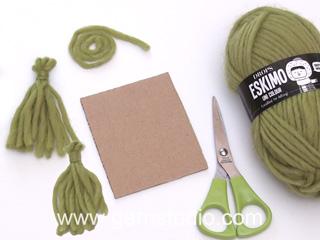
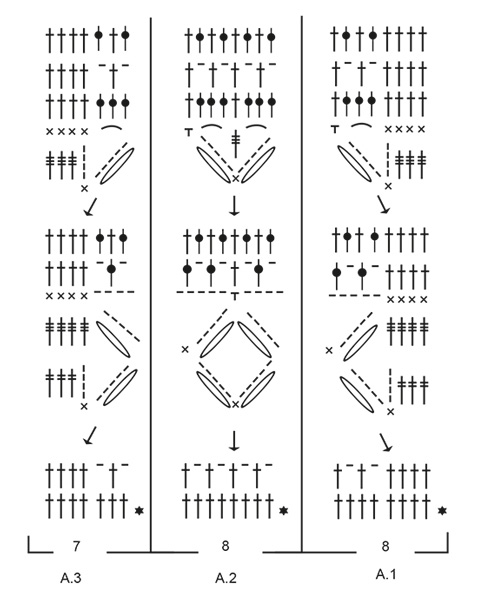
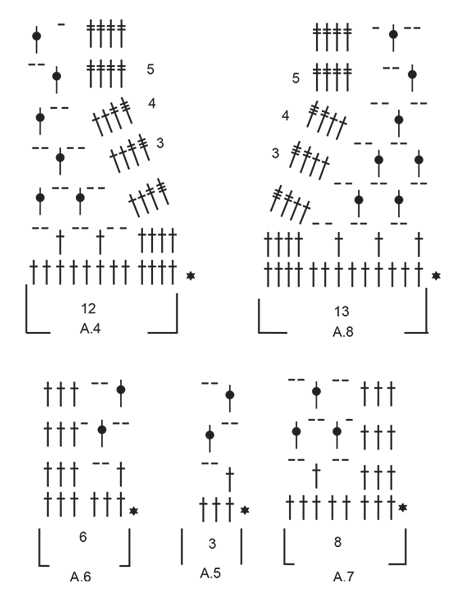
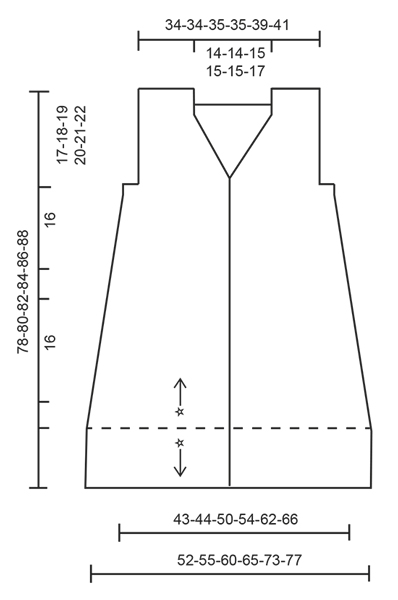
CROCHET INFO: On every dc row replace first dc with 4 ch. Replace first tr on every tr row with 5 ch. Replace first dtr on every dtr row with 6 ch. Beg every sc row with 1 ch. Ch does not replace first sc. PATTERN: See diagrams A.1 to A.8. DECREASE TIP: Dec 1 dc by working the next 2 dc tog as follows: Work 1 dc but wait with last pull through (= 2 loops on hook), then work next dc but on last pull through, pull yarn through all 3 loops on hook. DECREASE TIP CH-SPACES: Dec 1 ch-space at beg of row as follows seen from RS: Work ch 2, skip the first ch-space, work 1 dc around next ch-space. On next row skip the last ch-space seen from WS (= first ch-space seen from RS). Dec 1 ch-space at end of row as follows seen from RS: Work until 1 ch-space remains, ch 2, skip the last ch-space, work 1 st in each of the remaining sts. On next row skip the first ch-space, work ch 2, and 1 dc around next ch-space seen from WS (= last ch-space seen from RS). ---------------------------------------------------------- VEST: Worked back and forth, bottom up. Then divide piece at the armholes and work front and back piece separately. Work an edge at the bottom of with mesh pattern at the end. Work 197-206-225-244-272-290 loose ch (includes 4 ch to turn with) on hook size 4.5 mm/US 7 with Belle. Turn and work as follows: Work 1 dc in 5th ch from hook, then work 1 dc in each of the next 3-5-3-1-1-5 ch, * skip ch 1, work 1 dc in each of the next 6 ch *, repeat from *-* 26-27-30-33-37-39 more times = 166-174-190-206-230-246 dc and 4 ch to turn with - READ CROCHET INFO. REMEMBER THE CROCHET GAUGE! Continue back and forth with 1 dc in every dc until piece measures 5-5-6-6-7-7 cm / 2''-2''-2 3/8''-2 3/8''-2 3/4''-2 3/4''. Now work pattern from 2nd row in diagram from RS as follows: Work A.1 (= 8 dc), then work A.2 (= 8 dc) 19-20-22-24-27-29 times in width, A.3 (= 7 dc). On last row in diagram A.1 to A.3 dec 32 dc evenly in all sizes - READ DECREASE TIP = 135-143-159-175-199-215 dc. Continue with 1 dc in every dc until piece measures 25-25-26-26-27-27 cm / 9 3/4"-9 3/4"-10 1/4"-10 1/4"-10½"-10"½ vertically. Then work pattern from 2nd row in A.1, A.2 and A.3 as before (but now work 15-16-18-20-23-25 repetitions of A.2 in width). Finish before the last 2 rows in diagram A.1 to A.3. Now work 1 row with 1 dc in every dc and adjust no of sts to 136-140-161-173-197-210 dc. Cut the yarn. Insert a marker here. NOW MEASURE THE PIECE FROM HERE. Now divide the piece into 2 front pieces and one back piece. RIGHT FRONT PIECE: Work first row as follows: A.4 over the first 12 dc, then work A.5 over the next 15-15-21-24-30-33 dc (= 5-5-7-8-10-11 repetitions in width), A.6 over the next 6 dc = 9-9-11-12-14-15 ch-spaces on first row. Now work as explained in the different sizes below: SIZE S and M: Continue back and forth until 4th row in A.4 has been worked vertically. NOTE: Repeat 2nd and 3rd row in A.5 and A.6 vertically. 2 ch-spaces have been dec for neck mid front in both sizes. Then repeat 3rd and 4th row in diagram A.4 3-3 more times vertically = 5-5 ch-spaces dec in total for neck mid front and 4-4 ch-spaces (with 2 ch) remain for shoulder. Piece measures approx. 13-13 cm / 5"-5". SIZE L, XL, XXL and XXXL: Continue back and forth with ch-spaces, AT THE SAME TIME on next row dec ch-spaces for neck towards mid front and dec ch-spaces for armhole as follows: DECREASE ARMHOLE: On next row dec 1 ch-space for armhole – READ DECREASE TIP CH-SPACES. Repeat dec 0-1-2-2) more times = 1-2-3-3 ch-spaces dec in total for armhole. DECREASE NECK: When 4th row in A.4 has been worked, 2 ch-spaces have been dec in size L, XL, XXL and XXXL. Then repeat dec for neck (i.e. 3rd and 4th row in A.4) 3-3-3-4 more times = 6-6-6-7 ch-spaces dec in total for neck. ALL SIZES: Continue with ch-spaces as before but now work 5th and 6th row in A.4 towards the neck until piece measures 16-17-18-19-20-21 cm / 6¼''-6¾''-7''-7½''-8''-8¼''. Turn and work 16-16-16-16-19-19 dc evenly over shoulder. Fasten off. Piece measures approx. 17-18-19-20-21-22 cm / 6¾''-7''-7½''-8''-8¼''-8¾''. BACK PIECE: Beg at armhole on right front piece and skip 4-6-6-6-6-8 dc for armhole. Work A.7 (= 8 dc), A.5 (= 3 dc) 16-16-19-21-25-26 times in width, work A.6 (= 6 dc) = 19-19-22-24-28-29 ch-spaces on first row. Continue as explained in the different sizes below: SIZE S and M: Continue back and forth with pattern as shown on 2nd and 3rd row in A.5 to A.7 until piece measures 14-15 cm / 5½"-6" – adjust so that next row is worked as 3rd row. SIZE L, XL, XXL and XXXL: Continue back and forth with pattern as shown on 2nd and 3rd row in A.5 to A.7, AT THE SAME TIME on next row bind off for armholes in each side inside 3 sts - READ DECREASE TIP CH-SPACES. NOTE: Work 3 tr instead of 3 dc in each side on the rows with dec (this is done to avoid tight edges). Repeat dec 0-1-2-2 more times (= 1-2-3-3 dec in total in each side) = 20-20-22-23 ch-spaces remain. Then continue with ch-spaces as shown on 2nd and 3rd row in diagram A.5 to A.7 until piece measures 16-17-18-19 cm / 6 1/4"-6 3/4"-7"-7½" – adjust so that next row is worked as 3rd row. Then continue as explained below in all sizes: Work 1 dc in each of the first 3 dc and 4-4-4-4-5-5 whole ch-spaces (i.e. ch-spaces with 2 ch), work 1 dc in next dc, then work 24-24-26-26-26-28 dc evenly over the next 10-10-11-11-11-12 ch-spaces from previous row, work 1 dc in next dc, and 1 dc around next ch-space, continue with 4-4-4-4-5-5 whole ch-spaces (i.e. ch-spaces with 2 ch) and 1 dc in each of the outermost 3 dc. There are now 26-26-28-28-28-30 dc consecutively in the middle of back piece. Then finish each shoulder separately. Turn, work 1 dc in each of the first 3 dc, then work as before over the 4-4-4-4-5-5 ch-spaces, work 1 dc in each of the first 3 dc of the 26-26-28-28-28-30 dc. Turn and work 16-16-16-16-19-19 dc evenly over shoulder. Fasten off. Work the other shoulder the same way but reversed. Beg at the armhole, and work 1 dc in each of the outermost 3 dc, then work ch-spaces as before over the 4-4-4-4-5-5 ch-spaces, and 1 dc in each of the next 3 dc. Turn and work 16-16-16-16-19-19 dc evenly over shoulder. Fasten off. LEFT FRONT PIECE: Beg at armhole on back piece and skip 4-6-6-6-6-7 dc for armhole. Work A.7 (= 8 dc), A.5 (= 3 dc) 4-4-6-7-9-10 times in width, finish with A.8 (= 13 dc). Continue like this back and forth as on right front piece but reversed. Adjust according to right front piece. ASSEMBLY: Sew the shoulder seams tog. Sew one and one stitch neatly tog and make sure to avoid a tight seam. Fasten off. EDGE AT THE BOTTOM: Now work an edge at the bottom of vest as follows: ROW 1: Fasten yarn with 1 sc and 3 ch in the first ch worked at beg of piece, work 1 dc in each of the next 3 ch (= band), then work * ch 2, skip approx. 1½ cm / ½'', work 1 dc in next ch *, repeat from *-* along entire edge until approx. 1½ cm / ½'' remain before the last 4 ch on row, work 2 ch and finish with 1 dc in each of the last 4 ch. There are now approx. 66-69-76-83-93-99 ch-spaces and 4 dc for band in each side - remember crochet info. ROW 2: Work 1 dc in each of the first 4 dc, work ch 1, 1 dc around next ch-space, * ch 2, 1 dc around next ch-space * in every ch-space on row, and finish with 1 ch and 1 dc in each of the 4 dc for band. ROW 3: Work 1 dc in each of the first 4 dc, work ch 2, skip 1 ch and 1 dc, * 1 dc around next ch-space, 2 ch *, repeat from *-* until 1 ch-space remains with ch 2, work 1 dc around this ch-space, ch 2, and finish with 1 dc in each of the 4 dc for band. Repeat 2nd and 3rd row until piece measures 78-80-82-84-86-88 cm / 30¾''-31½''-32¼''-33''-33 7/8''-34 5/8'' in total (measured from shoulder) or to desired length. Fasten off. TIES WITH TASSEL: Cut 2 lengths of yarn of 90 cm / 35½''. Twine them until the resist. Thread one end through last dc-row worked before piece was divided for front pieces and back piece and place tie double so that it twines again. Tie a knot in the loose end. Repeat in the other side. Then make a tassel in the end of each of the ties: Cut 14 strands of 24 cm / 9½'', thread them through one end on one of the ties and distribute the ends so that they are even. Wind a strand several times around the tassel approx. 1 cm / 3/8'' from the top, to get a nice top and fasten the strand. |
|||||||||||||||||||||||||||||||||||||
Diagram explanations |
|||||||||||||||||||||||||||||||||||||
|
|||||||||||||||||||||||||||||||||||||
|
|||||||||||||||||||||||||||||||||||||
|
|||||||||||||||||||||||||||||||||||||
|
|||||||||||||||||||||||||||||||||||||
|
Have you made this or any other of our designs? Tag your pictures in social media with #dropsdesign so we can see them! Do you need help with this pattern?You'll find tutorial videos, a Comments/Questions area and more by visiting the pattern on garnstudio.com. © 1982-2024 DROPS Design A/S. We reserve all rights. This document, including all its sub-sections, has copyrights. Read more about what you can do with our patterns at the bottom of each pattern on our site. |
|||||||||||||||||||||||||||||||||||||


With over 40 years in knitting and crochet design, DROPS Design offers one of the most extensive collections of free patterns on the internet - translated to 17 languages. As of today we count 304 catalogs and 11422 patterns - 11417 of which are translated into English (US/in).
We work hard to bring you the best knitting and crochet have to offer, inspiration and advice as well as great quality yarns at incredible prices! Would you like to use our patterns for other than personal use? You can read what you are allowed to do in the Copyright text at the bottom of all our patterns. Happy crafting!
Comments / Questions (83)
Goedemorgen, ik snap het patroon, echter waar ik niet uitkom is de onderste tekening met de maatvoering. Ik hou de maatvoering XL aan en zie aan de onderkant van de tekening met 2 strepen en begrijp dat 65cm de breedte is, maar is dat voor het achterpand of voor de voorkant en de achterkant samen? Ik kijk uit naar uw reactie. Met vriendelijke groet, Martine
19.09.2016 - 11:30DROPS Design answered:
Beste Martine, dat is de breedte van het kledingstuk als het voor je ligt, dus als de breedte 65 cm is, dan heb je een omtrek van 130 cm. De bovenste, korte streep is voor de breedte op borsthoogte en de onderste, lange streep voor de breedte van de onderkant.
19.09.2016 - 13:23Is there a written pattern available, written row by row, not using only the graph?
24.08.2016 - 15:56DROPS Design answered:
Dear Mrs McCallie, there is not only diagrams to this pattern, but also a video showing how to work diagrams A.1, A.2 and A.3 to help you reading diagrams. Happy crocheting!
25.08.2016 - 09:55Ik snap na 10 x lezen en 3x proberen te haken dit hele stukje niet: Ga verder heen en weer tot de 4e toer in A.4 klaar is in de hoogte. LET OP: herhaal 2e en 3e toer in A.5 en A.6 in de hoogte. 2 l-lussen zijn geminderd voor de hals middenvoor in beide maten. Herhaal dan 3e en 4e toer in telpatroon A.4 3-nog 3 keer in de hoogte = 5-5 l-lussen minder in totaal voor de hals middenvoor en 4-4 l-lussen (met 2 l) over voor de schouder.
23.08.2016 - 15:43DROPS Design answered:
Hoi Tr. Je haakt verder tot na de 4e toer van A.4 in de hoogte. Je herhaalt tegelijkertijd steeds toer 2-3 van A.5 en A.6. Na de 4e toer van A.4 heb je 2 l-lussen geminderd voor de hals in beide maten. Daarna herhaal je steeds toer 3-4 nog 3 keer in de hoogte (voor beide maten) en je hebt 5 l-lussen geminderd in totaal voor de hals en je hebt 4 l-lussen met 2 l tussen over voor de schouder.
24.08.2016 - 11:56Het is al gelukt! Was wel ff goed lezen...! En de onderkant zijn 2 opties begrijp ik? Of rand langs de onderkant of strikbanden mn et franje?
22.08.2016 - 00:28Ik begrijp het niet vanaf het rechtervoorpand. Heb A4 gehaakt, daarna A5 (21 stk) en nu a6= 6 stokjes. In totaal heb ik dan 29 stokjes. Hoezo dan: 11 l-lussen. Wat zijn l-lussen? En moet ik daarna mn werk keren en verder met de 2e toer van a4-a6?
21.08.2016 - 12:45DROPS Design answered:
Hoi Josien. L-lussen zijn de 2 l tussen de stk. En ja, je keert het werk en haakt verder volgens het telpatroon. Kijk ook hier hoe je onze telpatronen moet lezen
24.08.2016 - 12:42Hallo zusammen, Die Häkelschrift kann ich mittlerweile ganz gut lesen. Nur hänge ich an der Anleitung/Erklärung und versteh gerade nur Bahnhof. Folgende Schwierigkeit für mich : Rechtes Vorderteil :ich fange auf der "rechten" Seite an die erste R. wie folgt häkeln ...... bis zum Rapport von A.5 klar, aber dann ... A.6 über die nächsten 6 Stb = 9-9-11-12... Lm-Bögen in der ersten R. Was muss ich da tun ??? Kann mir bitte jemand helfen?? Ich möchte einfach nicht aufgeben, LG Kiki
18.08.2016 - 17:34DROPS Design answered:
Liebe Kiki, häkeln Sie, wie in der Häkelschrift angegeben, dann ergibt sich insgesamt die erwähnte Anzahl von Lm-Bogen.
27.08.2016 - 15:45Wat zijn de l-lussen in het patroon als je bij de armsgaten bent.splitsing voor en achterpand
08.08.2016 - 21:24DROPS Design answered:
Dat zijn de 2 l die tussen de stokjes worden gehaakt. Ik vermoed dat de eerste toer, met het sterretje, in A.4 - A.6 de laatste toer voor het splitsen is, dus deze toer is al gehaakt. Dat klopt niet precies met de uitleg in het patroon helaas. Ik ga deze vraag uitzetten bij onze designafdeling, maar het kan lang duren voor daar een antwoord van komt vanwege de vakanties. U kunt doorgaan door de tweede toer in het telpatroon te haken boven de stokje.
09.08.2016 - 09:47Hallo, hoeveel l-lussen heb je bij maat xxl aan de bovenkant van het voorpand en achterpand voordat je toer 5 en 6 van A4 haakt?
05.08.2016 - 16:58DROPS Design answered:
Per herhaling van A.4 hebt u 1 lus. Het totale aantal kunt u dan zelf uitrekenen met de rest van de gegeven steken.
06.08.2016 - 17:00Ik ben al een tijdje bezig om het patroon te bestuderen voordat ik aan mijn vest begin. Ik loop alleen vast bij de maten. Klopt het dat de afgebeelde 43 cm alleen voor de voorkant geldt?
26.07.2016 - 13:18DROPS Design answered:
Hoi Veronika. Nee, dat is de breedte van het vest/achterpand na het afkanten van de armsgaten (borstbreedte) voor de kleinste maat. 52 cm is dan de breedte van het vest/achterpand langs de onderkant.
26.07.2016 - 15:24Bij het begin van A1,A2, A3, moeten we 32 steken minderen, dat houd in dat je dus een st over gaat slaan, en dus twee steken als tussen ruimte krijgt, heb ik dat goed begrepen.
25.07.2016 - 11:00DROPS Design answered:
Hoi Trudy. Nee, je haakt de stk samen (2 samen haken tot 1) zoals beschreven bovenaan het patroon in TIP VOOR HET MINDEREN. Zie ook deze video:
25.07.2016 - 15:43