
Popular categories
Looking for a yarn?


|
||||||||||||||||||||||||||||
Seashore Bliss Top |
||||||||||||||||||||||||||||
|
|
||||||||||||||||||||||||||||
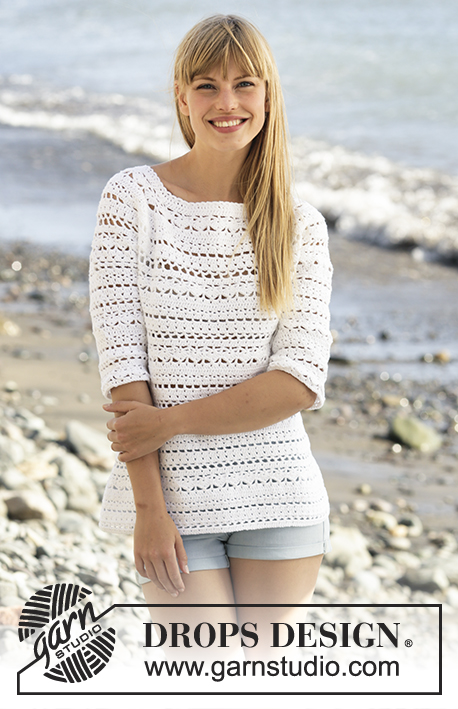
Crochet DROPS top with lace pattern and round yoke in ”Muskat”. The piece is worked top down. Size: S - XXXL.
DROPS 169-26 |
||||||||||||||||||||||||||||
|
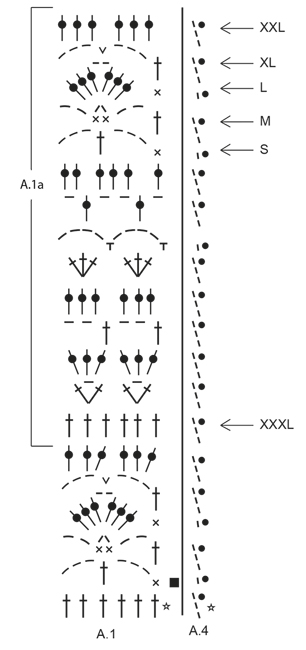
PATTERN: See diagrams A.1 to A.4. Diagram A.4 shows how round beg and ends. CROCHET INFO: Replace first dc at beg of every dc round with 3 ch. Finish round with 1 sl st in 3rd ch at beg of round. Replace first sc at beg of every sc round with 1 ch. Finish every round with 1 sl st in ch from beg of round. INCREASE TIP: Inc 1 dc by working 2 dc in same dc. DECREASE TIP: Dec 1 dc by working 2 dc tog as follows: Work 1 dc but wait with last pull through (= 2 sts on hook), then work next dc but on last pull through, pull yarn through all 3 sts on hook. TIP ARMHOLE: Size S, M and XL: In the last repeat of A.1 before marker 1 and marker 3 (= beginning of armhole), replace the last chain stitch with a double crochet in the last stitch of the same repeat on previous row. ---------------------------------------------------------- TOP: The piece is worked top down. NOTE: It is important to keep the crochet gauge vertically so that the measurements on yoke will be correct. YOKE: Work 108-108-117-117-124-124 ch on hook size 4 mm / G/6 with Muskat and form 1 ring with 1 sl st in first ch. Work first round as follows: Work 3 ch (= 1 dc) - READ CROCHET INFO, 1 dc in each of the next 3-3-5-5-5-5 ch, * skip ch 1, 1 dc in each of the next 6 ch *, repeat from *-* the entire row = 94-94-102-102-108-108 dc. Work 1 round with 1 dc in every dc and inc 18-18-22-22-28-40 dc evenly - READ INCREASE TIP = 112-112-124-124-136-148 dc. Work next round and insert 8 markers in the piece as follows: A.4 shows how round beg and ends. Insert 1st marker at beg of round, work A.2 over the first 4 dc, insert 2nd marker, A.1 over the next 12 dc (= 2 times in width), insert 3rd marker, A.2 over the next 4 dc, insert 4th marker, work A.1 over the next 36-36-42-42-48-54 dc (= 6-6-7-7-8-9 times in width), insert 5th marker, A.2 over the next 4 dc, insert 6th marker, A.1 over the next 12 dc (= 2 times in width), insert 7th marker, A.2 over the next 4 dc, insert 8th marker, A.1 over the last 36-36-42-42-48-54 dc (= 6-6-7-7-8-9 times in width). REMEMBER THE CROCHET GAUGE! SIZE XXL-XXXL: On 5th round (round with dc) in A.1 inc evenly as follows: Between 2nd and 3rd marker and 6th and 7th marker: Inc 6-6 dc. 12-12 dc have been inc in total on round (= 18-18 dc between 2nd and 3rd marker and 6th and 7th marker). Repeat A.1 3-3 times between 2nd and 3rd marker and between 6th and 7th marker: ALL SIZES: On 6th round (round with dc) in A.1 inc evenly as follows: Between 2nd and 3rd marker and 6th and 7th marker: Inc 0-0-6-6-6-6 dc (= 12-12-18-18-24-24 dc between these markers). Between 4th and 5th marker and 8th and 1st marker: Inc 0-6-6-6-6-6 dc (= 36-42-48-48-54-60 dc between each of these markers). Then repeat diagram A.1 2-2-3-3-4-4 times between 2nd and 3rd marker, 6-7-8-8-9-10 times between 4th and 5th marker, 2-2-3-3-4-4 times between 6th and 7th marker and 6-7-8-8-9-10 times between 8th and 1st marker. Work A.2 as before. SIZE XL-XXL-XXXL: On 8th round (round with dc) in A.1 inc evenly as follows: Between 4th and 5th marker and 8th and 1st marker: Inc 6-6-6 dc (= 54-60-66 dc between each of these markers). 12-12-12 dc have been inc in total on round. Repeat A.1 9-10-11 times between 4th and 5th marker and between 8th and 1st marker. Repeat inc on 10th round in A.1 (= 60-66-72 dc between each of these markers). Repeat diagram A.1 10-11-12 times between 4th and 5th marker and between 8th and 1st marker. ALL SIZES: On last round in A.2 insert 1 new marker in the middle of each A.2 (i.e. 18 dc on each side of marker in A.2 = 4 markers). Remove the old markers (= 4 markers remain in piece). Sts between markers are for sleeves (= 48-48-54-54-60-60 dc on each sleeve). When A.2 has been worked 1 time vertically, there are 240-252-276-300-324-336 dc on round. Yoke is now done in size S. SIZE M-L-XL-XXL-XXXL: Continue with pattern A.1 as before but over dc in A.2 (= 36 dc) work A.3 2 times in total in width (marker is in the middle of these repetitions). Work 1-2-3-4-5 rounds of A.3 (see arrow in diagram for correct size). Piece now measures 17-18-19-20-21-22 cm / 6¾"-7"-7½"-8"-8¼"-8¾" vertically. ALL SIZES: Work A.1a (see arrow on where pattern beg in the different sizes) 3 times in total in width until first marker - SEE ARMHOLE TIP, work 8-8-8-10-10-10 ch, skip sts between the 2 markers (= sleeve), work A.1a 12-13-14-16-17-18 times in total in width until next marker (= front piece), work 8-8-8-10-10-10 ch, skip sts between the 2 markers (= sleeve), work A.1a 9-10-11-13-14-15 times in total in width (= 160-172-184-212-224-236 sts). Fasten off. BODY: Beg round mid under sleeve as follows: Size S-L: Work 1 sl st in 5th ch, ch 1, work 1 sc in each of the next 3-3 ch, work A.1a as before until ch under 2nd sleeve, 1 sc in each of the 8-8 ch under sleeve, work A.1a as before the rest of round. Work the 8-8 sts under each sleeve as 1st st in A.1a. SIZE M-XL-XXL-XXXL: Work 1 sl st in 5th ch, ch 3, work 1 dc in each of the next 3-5-5-5 ch, work A.1a as before until ch under 2nd sleeve, 1 dc in each of the 8-10-10-10 ch under sleeve, work A.1a as before the rest of round. Work the 8-10-10-10 sts under each sleeve as 1st st in A.1a. ALL SIZES: Insert 1 marker in piece, NOW MEASURE PIECE FROM HERE. On first round with dc dec 4-4-4-2-2-2 dc evenly - READ DECREASE TIP = 156-168-180-210-222-234 dc. Then repeat A.1a 26-28-30-35-37-39 times in width. Repeat A.1a vertically. When piece measures 12 cm / 4¾", adjust so that next round is with dc, dec 6 dc evenly = 150-162-174-204-216-228 dc. Now repeat A.1a 25-27-29-34-36-38 times in width. SIZE XL: Repeat dec when piece measures 16 cm / 6¼" from marker = 198 dc. Now repeat A.1a 33 times in width. ALL SIZES: When piece measures 20-21-22-23-24-25 cm / 8"-8¼"-8¾"-9"-9½"-9¾" from marker – adjust so that next round is with dc, inc 6 dc evenly. Repeat inc every 2-2-1½-1½-1½-1½ cm / ¾"-¾"-½"-½"-½"-½ 5-5-7-7-7-7 more times = 186-198-222-246-264-276 dc. Repeat A.1a 1 more in width on every inc. When all inc are done, repeat A.1a 31-33-37-41-44-46 times in width. Work until piece measures 36-37-38-39-40-41 cm / 14¼"-14½"-15"-14¼"-15¾"-16⅛" from marker, adjust to finish nicely according to pattern. Fasten off. SLEEVE EDGE: SIZE S: Beg by working mid under sleeve as follows: Work 1 sl st in 4th ch of the 8 ch worked in armhole on body. Work 1 ch (= 1 sc). Then work with 1 sc in each of the next ch 4, work A.3 over the next 18 dc, work A.1 (adjust pattern according to A.3) 2 times in total in width as before, work A.3 over the next 18 dc, finish with 1 sc in each of the last 3 ch. Work as 1st st in A.3 in the 8 sts under sleeve. On last round in A.3 dec 10 dc evenly = 46 dc. SIZE M-XL-XXL: Beg by working mid under sleeve as follows: Work 1 sl st in 4th ch of the 8-10-10 ch worked in armhole on body. Work 3 ch (= 1 dc). Then work with 1 dc in each of the next 4-6-6 ch, work A.3 as before, work A.1 (adjust pattern according to A.3) 2-3-4 times in total in width as before, work A.3, finish with 1 dc in each of the last 3 ch. Work as 1st st in A.3 in the 8-10-10 sts under sleeve. On last round in A.3 dec 10 dc evenly = 46-54-60 dc. SIZE L: Beg by working mid under sleeve as follows: Work 1 sl st in 4th ch of the 8 ch worked in armhole on body. Work 1 ch (= 1 sc). Then work 1 sc in each of the next ch 4, work A.3 as before, work A.1 (adjust pattern according to A.3) 3 times in total in width as before, work A.3, finish with 1 sc in each of the last 3 ch. Work as 1st st in A.3 in the 8 sts under sleeve. On last round in A.3 dec 10 dc evenly = 52 dc. SIZE XXXL: Beg by working mid under sleeve as follows: Work 1 sl st in 4th ch of the 10 ch worked in armhole on body. Work 3 ch (= 1 dc). Then work 1 dc in each of the next ch 6, work 1 dc in each of the 60 dc, finish with 1 dc in each of the last 3 ch. Work 1 dc in every dc and dec 10 dc evenly = 60 dc. ALL SIZES: Work * 1 sc in first/next dc, 1 ch, skip approx. 1 cm / ⅜" *, repeat from *-* around the entire sleeve. Fasten off. Work the other sleeve the same way. NECK EDGE: Crochet an edge around the neck. Beg mid back. Work * 1 sc in first/next dc, ch 3, skip approx. 1 cm / ⅜" *, repeat from *-* around the entire neck. Make sure to avoid a tight neck edge, adjust to finish with 1 sl st in first ch. Fasten off. |
||||||||||||||||||||||||||||
Diagram explanations |
||||||||||||||||||||||||||||
|
||||||||||||||||||||||||||||
|
||||||||||||||||||||||||||||

|
||||||||||||||||||||||||||||

|
||||||||||||||||||||||||||||

|
||||||||||||||||||||||||||||
|
Have you made this or any other of our designs? Tag your pictures in social media with #dropsdesign so we can see them! Do you need help with this pattern?You'll find tutorial videos, a Comments/Questions area and more by visiting the pattern on garnstudio.com. © 1982-2024 DROPS Design A/S. We reserve all rights. This document, including all its sub-sections, has copyrights. Read more about what you can do with our patterns at the bottom of each pattern on our site. |
||||||||||||||||||||||||||||


With over 40 years in knitting and crochet design, DROPS Design offers one of the most extensive collections of free patterns on the internet - translated to 17 languages. As of today we count 304 catalogs and 11422 patterns - 11417 of which are translated into English (US/in).
We work hard to bring you the best knitting and crochet have to offer, inspiration and advice as well as great quality yarns at incredible prices! Would you like to use our patterns for other than personal use? You can read what you are allowed to do in the Copyright text at the bottom of all our patterns. Happy crafting!
Comments / Questions (131)
Hallo iwie komme ich mit runde 6 Größe m nicht hin weil iwie die Maschen Zahl immer komisch ist was mache ich denn falsch? :-(
25.05.2016 - 13:43DROPS Design answered:
Liebe Djamila, häkeln Sie denn geanu so, wie im Diagramm angegeben? Ich habe das Diagramm nochmals geprüft und es ist eigentlich alles korrekt. Beschrieben Sie uns doch bitte genauer, was bei Ihnen nicht passt.
07.06.2016 - 08:07I'd like to point out at the front where you write the hook size you wrote 4 mm/G/6 instead of 4.25mm/G/6. It's not a huge mess up, but it did throw me off there for a second. However, if there really is a crochet hook that size, I apologize profusely. P.S. Thank you so much for this pattern it is adorable and VERY useful, however a little confusing, but that's probably just me.
17.04.2016 - 23:00Na het haken van de pas (maar M), staat bij alle maten dat er in "toer 6 (toer met stk)" gemeerderd moet worden. Maar dan tel ik denk ik niet goed, want de 3e toer was waar ik de markeerders moest plaatsen (= 2e toer op de tekening, dus de 1e toer na die met *)... Als ik dan naar toer 6 doortel, kom ik uit op een toer waar juist GEEN stokjes in zitten?
14.04.2016 - 06:14DROPS Design answered:
Hoi Monique. Toer 6 is de toer met stokjes net voor het begin van A.1a (Je telt alle rijen inclusief de eerste die gemarkeerd is met een sterretje in het telpatroon).
14.04.2016 - 15:39Claire wrote:
Size M round 6 says increase evenly in A. 1 by 6 dc between 4th and 5th and 8th and 1st marker. It's not clear to me where to place the dc increases. There are 6 fans between these markers, if I add one dc to the side of each fan it gives me the right number of stitches at the end of the round, however on the next round it says : Then repeat diagram A.1 7 times between 4th and 5th and 8th and 1st marker, but I can only fit 6 repeats in. Have I missed something? Thanks
09.04.2016 - 20:25DROPS Design answered:
Dear Claire, you inc 6 dc evenly between 4th-5th marker and between 8th and 1st marker, and then continue A.1 over all sts as before (A.1 is worked over 6 sts, you will then have 1 repeat extra in width after inc) - read more here how to inc evenly. Happy crocheting!
11.04.2016 - 10:57J'ai finalisé ce modèle et il est très beau, merci pour vos bons conseils.
06.04.2016 - 21:57I'm creating a size L and I'm confused: under YOKE: ALL SIZES: It says "Then repeat diagram A.1" x times between markers 2-3, 4-5, 6-7 & between 8-1." What rows of A.1 do I repeat ? How do I know to go to the next row of the diagram? What do I do between markers 1-2, 3-4, 5-6 and 7-8? Then it says "Work A.2 as before." Confused: because when I worked A.2 it was alternated with A.1 (in the 4th row of the yoke, counting chain-row 1.
04.04.2016 - 20:35DROPS Design answered:
Dear Mrs Colby, continue working A.1 and A.2 row after row (inc are included in A.2 but not in A.1), and at the same time, inc in A.1: 6 sts on round 6 in A.1 between markers 2-3 + between markers 6-7 + between markers 4-5 and between markers 8-1. You have then enough sts to work A.1: a total of 3 times between 2-3rd marker, 8 times between 4-5 martker, 3 times between 6-7 markers and 8 times between 8-1st marker. Happy crocheting!
05.04.2016 - 09:16Skal mønster a4 hekles også
18.03.2016 - 13:24DROPS Design answered:
Hej Anne, ja se her: MØNSTER: Se diag A.1 til A.4. Diag A.4 viser hvordan omg starter og slutter. God fornøjelse!
30.03.2016 - 14:58Ekaterina wrote:
Why does the yoke pattern say to inc on row 5 for XXL-sizes, but for all sizes it's row 6? Which row exactly is 6?
28.02.2016 - 17:40DROPS Design answered:
Dear Ekaterina, in both larger size, you will inc on row 5 in A.1 (round with dc - UK-English terminology) + inc on round 6 in A.1 (as for all sizes). Round 5 is the round with dc in ch-spaces, round 6 the round with 1 dc in each dc. Happy crocheting!
29.02.2016 - 09:57Hello - I am making a size large. I have completed A2 vertically, but I don't understand these instructions: "Continue with pattern A.1 as before but over dc in A.2 (= 36 dc) work A.3 2 times in total in width (marker is in the middle of these repetitions). Work 1-2-3-4-5 rounds of A.3 (see arrow in diagram for correct size" Should I be working A.1 or A.2? For the two rounds to size large before moving on?
27.02.2016 - 00:00DROPS Design answered:
Dear Hannah, after you have finished A.2 in height, there are 36 sts. Work now A.3 (= 18 sts) a total of 2 times in width over the sts in A.2. Continue A.1 as before between A.3. In size L work 2 rounds in A.3 (see arrow in diagram for this size). Piece should measure now 18 cm. Happy crocheting!
27.02.2016 - 16:01Merci infiniment. Encore une question. Drops 169-26. Taille S-L. "Crocheter les 8-8 m. sous chaque manche comme la 1ère maille de A.1a", qu'est-ce que ceci veut dire ? Ce patron me donne quelques soucis.... J'ai tricoté et crocheté plusieurs de vos patrons, je les aime beaucoup, tout est très bien expliqué mais celui-ci me donne quelques soucis. Merci beaucoup de votre patience....
25.02.2016 - 15:48DROPS Design answered:
Bonjour Mme Larochelle, la 1ère m de A.1a peut être soit 1 B soit 1 ms en fonction du rang crocheté, sous les manches, crochetez soit 8 B, soit 8 ms en fonction du rang. Bon crochet!
26.02.2016 - 10:41