
Popular categories
Looking for a yarn?


|
|||||||||||||||||||||||||||||||||||||
Elvira |
|||||||||||||||||||||||||||||||||||||
|
|
|||||||||||||||||||||||||||||||||||||
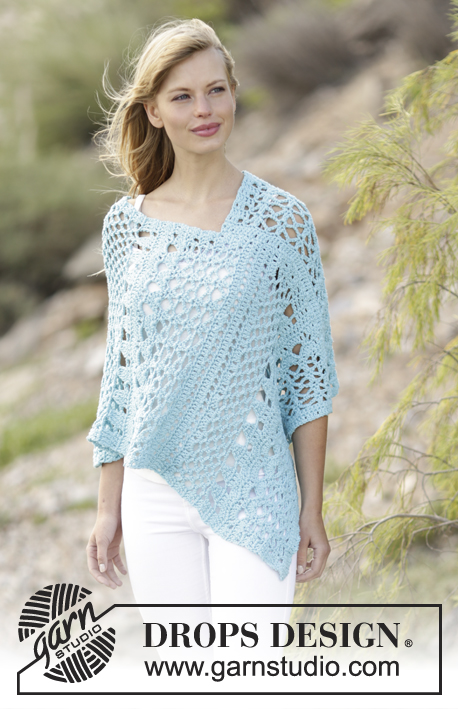
Crochet DROPS top with crochet squares in “Belle”. Size: S - XXL.
DROPS 168-11 |
|||||||||||||||||||||||||||||||||||||
|
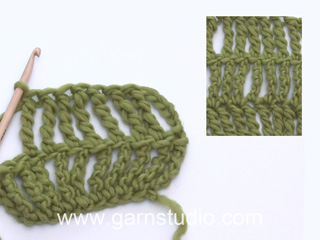
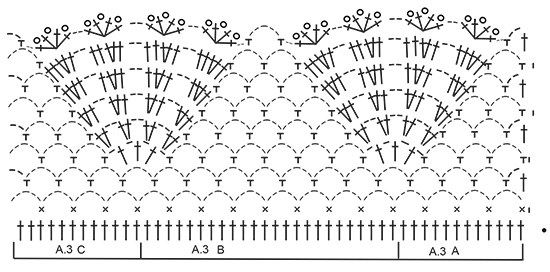
MAGIC CIRCLE: To avoid hole in the middle beg with this technique: Hold yarn end in the left hand and make a loop around left index finger (from left to right). Hold the loop with left thumb and index finger. Insert hook through loop, get the yarn from ball, pull yarn through loop, make 1 YO on hook and pull YO through st on hook = 1 dc, work 3 ch, then work 11 tr around loop, finish with 1 sl st in third ch. Continue as explained in pattern – AT THE SAME TIME pull yarn end so that loop is tighten tog and the hole disappears. CROCHET INFO: Replace first dc on round with 1 ch. Finish round with one sl st in first ch. Replace first tr on round/row with 3 ch. Finish round with one sl st in third ch. Replace first dtr on round with 4 ch. Finish round with one sl st in fourth ch. PATTERN: See diagrams A.1 to A.3. 4-DTR: Make 4 YOs on hook, insert hook in first tr on row and pull yarn through first tr, * 1 YO on hook, pull yarn through the next 2 loops on hook *, repeat from *-* 4 more times = 1 st on hook. ---------------------------------------------------------- CROCHET TOP: Top is worked in 2 parts that are sewn tog in the sides and on shoulders, then work an edge at the bottom. FRONT PIECE: Work front piece in a circle, then as a square from mid front. Work a MAGIC CIRCLE on hook size 4 mm with Belle – see explanation above = 12 tr around circle. Then work according to A.1, work A.1 3 times around the magic circle. NOTE: Sl sts show at beg of A.1 are worked at end of round. READ CROCHET INFO! REMEMBER THE CROCHET TENSION! When A.1 has been worked 1 time vertically, there are 147 tr on circle. Continue to work as follows: ROUND 1: Work 1 tr in every tr AT THE SAME TIME inc 1 tr = 148 tr. ROUND 2: Work *1 dc in each of the first 8 tr, 1 htr in each of the next 2 tr, 1 tr in each of the next 2 tr, 1 dtr in each of the next 3 tr, 1 triple tr in each of the next 3 tr, 1 4-dtr – SEE EXPLANATION ABOVE, in next tr, 5 ch, 1 4-dtr in next tr, 1 triple tr in each of the next 3 tr, 1 dtr in each of the next 3 tr, 1 tr in each of the next 2 tr, 1 htr in each of the next 2 tr, 1 dc in each of the next 7 tr *, repeat from *-* 3 more times. ROUND 3: Work 1 tr in every st, around ch-space in each corner work 3 tr + 3 ch + 3 tr = 172 tr (= 43 tr in each side). SIZE S/M: Finish square here. ROUND 4: Work 1 tr in every st, around ch-space in each corner work 3 tr + 3 ch + 3 tr = 196 tr (= 49 tr in each side). SIZE L/XL: Finish square here. ROUND 5: Work 1 tr in every st, around ch-space in each corner work 3 tr + 3 ch + 3 tr = 220 tr (= 55 tr in each side). SIZE XL/XXL: Finish square here. Square measures approx. 28-30-32 cm. Cut the yarn. Now work along side 2, 3 and 4 from crochet square (see chart). Beg in the second corner on square, work 3 tr around ch-space, work 1 tr in every tr until next corner, work 3 tr + 3 ch + 3 tr, work 1 tr in every tr until next corner, work 3 tr + 3 ch + 3 tr, work 1 tr in every tr until last corner, work 3 tr around ch-space. There are now 49-55-61 tr on each of the 3 sides. Work back and forth, now work according to A.2, finish with 1 tr in last tr before corner, in each of the two corners work 3 tr + 3 ch + 3 tr, work the new sts into A.2. Continue like this for approx. 7-10-15 cm, piece now measures 42-50-62 cm from side 2 to side 4, or adjust according to chest width. Then work a gusset in each side of top as follows: Beg along side 2 as follows (from RS). Work 1 dc in every tr until 52 tr remain, work 1 htr in each of the next 8 tr, 1 tr in each of the next 8 tr, 1 dtr in each of the next 12 tr, 1 triple tr in each of the next 12 tr, 1 4-dtr in each of the last 12 tr. Cut the yarn in size XS/S and M/L. SIZE XL/XXL: Turn and work 1 4-dtr in every 4-dtr, 1 triple tr in every triple tr, 1 dtr in every dtr, 1 tr in every tr, 1 htr in every htr and 1 dc in every dc. Cut the yarn. All sizes: Work a gusset the same way along side 4 (work from the top and down = from WS). Cut the yarn. Then work back and forth from side 1 on square as follows - from RS: Beg one row before square (i.e. in the first row worked over the other 3 sides), work 3 tr around the outermost tr in row, work 3 tr around corner on square, 1 tr in every tr, 3 tr around corner on square, and 3 tr around the outermost tr on next row = 55-61-67 tr. Then work back and forth according to A.2 (finish with 1 tr). When piece measures 7-9-11 cm, work only over the first 13 tr on row (= left shoulder). Work A.2 (finish with 1 tr up towards neck) as before over these sts until piece measures 17-19-21 cm, fasten off. Now work over the last 13 tr on row (= right shoulder), work the same way as on left shoulder. 29-35-41 tr in the middle = neck. BACK PIECE: Work the same way as on front piece. When piece measures 15-17-19 cm, work only over the first 13 tr on row (= right shoulder). Work A.2 as before over these sts until piece measures 17-19-21 cm, fasten off. Now work over the last 13 tr on row (= left shoulder), work the same way as on right shoulder. 29-35-41 tr in the middle = neck. ASSEMBLY: Sew shoulder seams and sew side seams. CROCHET EDGE AT THE BOTTOM OF TOP: Work one sl st in one corner at the bottom of top, work 1 tr in every tr along bottom edge on top, around the 4-dtr in the sides work 4 tr, AT THE SAME TIME adjust no of sts so that it is divisible by 48. Continue to work as follows: Work A.3A, repeat A.3B until 12 tr remain, work A.3C. Fasten off. CROCHET EDGE AROUND ARMHOLE: Beg between armhole and body. Work 1 dc,* skip approx. 2 cm, work 7 tr around next tr, skip approx. 2 cm, work 1 dc around next tr *, repeat from *-* and finish with one sl st at beg of round. Repeat around the other armhole. CROCHET EDGE AROUND NECK: Beg in the side of neck on back piece. Work 1 dc, * 3 ch, skip approx. 1 cm, work 1 dc *, repeat from *-* and finish with 1 sl st at beg of round. |
|||||||||||||||||||||||||||||||||||||
Diagram explanations |
|||||||||||||||||||||||||||||||||||||
|
|||||||||||||||||||||||||||||||||||||

|
|||||||||||||||||||||||||||||||||||||
|
|||||||||||||||||||||||||||||||||||||

|
|||||||||||||||||||||||||||||||||||||
|
Have you made this or any other of our designs? Tag your pictures in social media with #dropsdesign so we can see them! Do you need help with this pattern?You'll find tutorial videos, a Comments/Questions area and more by visiting the pattern on garnstudio.com. © 1982-2024 DROPS Design A/S. We reserve all rights. This document, including all its sub-sections, has copyrights. Read more about what you can do with our patterns at the bottom of each pattern on our site. |
|||||||||||||||||||||||||||||||||||||


With over 40 years in knitting and crochet design, DROPS Design offers one of the most extensive collections of free patterns on the internet - translated to 17 languages. As of today we count 304 catalogues and 11422 patterns - 11422 of which are translated into English (UK/cm).
We work hard to bring you the best knitting and crochet have to offer, inspiration and advice as well as great quality yarns at incredible prices! Would you like to use our patterns for other than personal use? You can read what you are allowed to do in the Copyright text at the bottom of all our patterns. Happy crafting!
Comments / Questions (45)
Buongiorno, vorrei sapere se il primo giro di A.2 devo lavorarlo o se ,come da grafico,questo giro è già stato lavorato. Dopo aver lavorato i lati 2,3,4,devo lavorare il bordo al lato 2 sul diritto dall'alto (però ho finito il giro sul lato 4),devo tagliare il filo e cominciare dal lato 2?Grazie!
21.06.2016 - 09:17DROPS Design answered:
Buongiorno Benedetta. Il primo giro del diagramma A.2 non deve essere lavorato: è stato riportato nel grafico per mostrare come si dispongono le m dei giri successivi. Per il bordo sul lato 2 deve lavorare con un gomitolo separato. Ripeterà poi il bordo sul lato 4. Buon lavoro!
21.06.2016 - 09:35Grazie!Credo che avrò' ancora bisogno di voi
19.06.2016 - 15:16Buongiorno , non capisco questo:"lavorare seguendo il diagramma A2,finire con 1 m alta nell'ultima m alta prima dell'angolo"fatto l'angolo devo comunque lavorare anche la 1 maglia dopo l'angolo o devo salvarla? Grazie mille x il Vs aiuto.
19.06.2016 - 13:36DROPS Design answered:
Buongiorno Benedetta. Dopo aver lavorato la m.a nell’ultima m.a prima dell’angolo, deve lavorare 3 m.a + 3 cat + 3 m.a nell'arco di cat dell'angolo. Gira il lavoro e prosegue seguendo il diagramma A.2. Buon lavoro!
19.06.2016 - 14:26Hola, me pongo en contacto con ustedes porque no entiendo la siguiente descripción del patrón. Dice "Después trabajar de ida y vuelta a lo largo del lado 1 de la aplicación de la manera siguiente – por el LD: Comenzar una hilera antes de la aplicación..." No entiendo si comienzo desde el extremo del cuadrado de los pasos anteriores o como viene en el diagrama pagina 7. Espero su contestación, gracias por su atención.
13.06.2016 - 10:44DROPS Design answered:
Hola Maria. Después de acabar de trabajar los lados 2, 3 y 4 volvemos al lado 1 y comenzamos a trabajar este lado en la misma fila donde empezamos antes a trabajar los lados 2,3 y 4. Ahora seguimos el diagrama A.2.
19.06.2016 - 10:22Linda A Thompson wrote:
I cannot read the diagrams. are there written instructions available for the diagram portions? Thank you.
24.04.2016 - 21:22DROPS Design answered:
Dear Mrs Thompson, there is no written pattern to the diagrams here, but you will find under diagram text all symbols and their explanation, just read the diagrams from the bottom corner on the right side (black dot in A.1) from the right towards the left on every round (and from the left towards the right from WS). Happy crocheting!
25.04.2016 - 10:42Linda Hillebrand wrote:
Bij A1 kom ik alleen op 147 steken als ik in elk boogje 3 stokjes haak en niet zoals jullie zeggen 3/4/3. Wat doe ik fout? Alvast bedankt voor het antwoord. Groetjes, Linda
20.04.2016 - 13:24DROPS Design answered:
Hoi Linda. Per herhaling van de laatste toer A.1 heb je 49 st - je haakt deze 3 keer = 147. Ik zou kijken of je niet een boogje of dergelijks mist. Als dat niet zo is en ben je verder tevreden, dan zou ik gewoon verder gaan.
21.04.2016 - 15:53Bonjour, je ne comprend pas la partie dos. Vous parlez de a partir 15 cm mais 15 cm de quoi ? le dos est il identique au devant ? merci de votre réponse, bonne journée.
11.04.2016 - 12:06DROPS Design answered:
Bonjour Mme Mireur, pour le dos, on crochète la partie du haut jusqu'à 15 cm pour l'encolure qui sera plus haute que celle du devant - mais la hauteur d'emmanchure sera la même = 17 cm. Bon crochet!
11.04.2016 - 12:20Bonjour pour le gousset c est le côté où on va assemblée vous dite que il faut faire des mailles serré des demi brides vous faite quoi des trois maille en l'air merci d avance
19.03.2016 - 10:41DROPS Design answered:
Bonjour Marie, pouvez-vous préciser votre question, à quelles 3 ml pensez-vous ? merci.
18.04.2016 - 15:55En taille M/L pour la bordure en bas du top combien de fois faut il crocheter le motif ?
07.03.2016 - 08:44DROPS Design answered:
Bonjour Mme Coutarel, en fonction du nombre de mailles & de rangs que vous avez le long du bas du top, crochetez bien 1 B dans chaque B et 4 B autour des quadruples B des côtés, mais ajustez bien votre nombre de mailles pour qu'il soit multiple de 48 pour avoir suffisamment de mailles pour répéter le diagramme A.3. Bon crochet!
07.03.2016 - 10:48Ou ce trouvent les demies brides et picots ?
26.02.2016 - 14:37DROPS Design answered:
Bonjour Mme Coutarel, les picots (dernier symbole du diagramme) se font au dernier rang de A.3. Bon crochet!
02.03.2016 - 10:23