
Popular categories
Looking for a yarn?


|
|||||||||||||||||||||||||||||||||||||
Elvira |
|||||||||||||||||||||||||||||||||||||
|
|
|||||||||||||||||||||||||||||||||||||
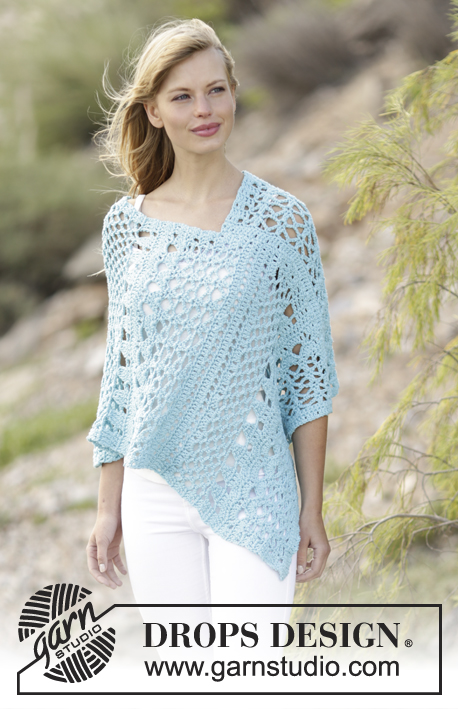
Crochet DROPS top with crochet squares in “Belle”. Size: S - XXL.
DROPS 168-11 |
|||||||||||||||||||||||||||||||||||||
|
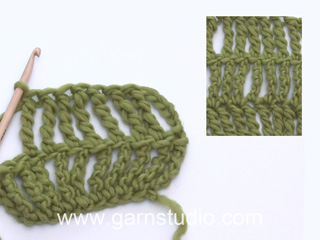
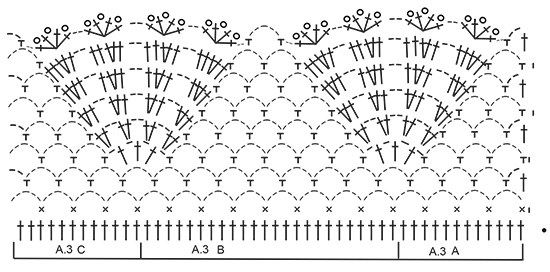
MAGIC CIRCLE: To avoid hole in the middle beg with this technique: Hold yarn end in the left hand and make a loop around left index finger (from left to right). Hold the loop with left thumb and index finger. Insert hook through loop, get the yarn from ball, pull yarn through loop, make 1 YO on hook and pull YO through st on hook = 1 dc, work 3 ch, then work 11 tr around loop, finish with 1 sl st in third ch. Continue as explained in pattern – AT THE SAME TIME pull yarn end so that loop is tighten tog and the hole disappears. CROCHET INFO: Replace first dc on round with 1 ch. Finish round with one sl st in first ch. Replace first tr on round/row with 3 ch. Finish round with one sl st in third ch. Replace first dtr on round with 4 ch. Finish round with one sl st in fourth ch. PATTERN: See diagrams A.1 to A.3. 4-DTR: Make 4 YOs on hook, insert hook in first tr on row and pull yarn through first tr, * 1 YO on hook, pull yarn through the next 2 loops on hook *, repeat from *-* 4 more times = 1 st on hook. ---------------------------------------------------------- CROCHET TOP: Top is worked in 2 parts that are sewn tog in the sides and on shoulders, then work an edge at the bottom. FRONT PIECE: Work front piece in a circle, then as a square from mid front. Work a MAGIC CIRCLE on hook size 4 mm with Belle – see explanation above = 12 tr around circle. Then work according to A.1, work A.1 3 times around the magic circle. NOTE: Sl sts show at beg of A.1 are worked at end of round. READ CROCHET INFO! REMEMBER THE CROCHET TENSION! When A.1 has been worked 1 time vertically, there are 147 tr on circle. Continue to work as follows: ROUND 1: Work 1 tr in every tr AT THE SAME TIME inc 1 tr = 148 tr. ROUND 2: Work *1 dc in each of the first 8 tr, 1 htr in each of the next 2 tr, 1 tr in each of the next 2 tr, 1 dtr in each of the next 3 tr, 1 triple tr in each of the next 3 tr, 1 4-dtr – SEE EXPLANATION ABOVE, in next tr, 5 ch, 1 4-dtr in next tr, 1 triple tr in each of the next 3 tr, 1 dtr in each of the next 3 tr, 1 tr in each of the next 2 tr, 1 htr in each of the next 2 tr, 1 dc in each of the next 7 tr *, repeat from *-* 3 more times. ROUND 3: Work 1 tr in every st, around ch-space in each corner work 3 tr + 3 ch + 3 tr = 172 tr (= 43 tr in each side). SIZE S/M: Finish square here. ROUND 4: Work 1 tr in every st, around ch-space in each corner work 3 tr + 3 ch + 3 tr = 196 tr (= 49 tr in each side). SIZE L/XL: Finish square here. ROUND 5: Work 1 tr in every st, around ch-space in each corner work 3 tr + 3 ch + 3 tr = 220 tr (= 55 tr in each side). SIZE XL/XXL: Finish square here. Square measures approx. 28-30-32 cm. Cut the yarn. Now work along side 2, 3 and 4 from crochet square (see chart). Beg in the second corner on square, work 3 tr around ch-space, work 1 tr in every tr until next corner, work 3 tr + 3 ch + 3 tr, work 1 tr in every tr until next corner, work 3 tr + 3 ch + 3 tr, work 1 tr in every tr until last corner, work 3 tr around ch-space. There are now 49-55-61 tr on each of the 3 sides. Work back and forth, now work according to A.2, finish with 1 tr in last tr before corner, in each of the two corners work 3 tr + 3 ch + 3 tr, work the new sts into A.2. Continue like this for approx. 7-10-15 cm, piece now measures 42-50-62 cm from side 2 to side 4, or adjust according to chest width. Then work a gusset in each side of top as follows: Beg along side 2 as follows (from RS). Work 1 dc in every tr until 52 tr remain, work 1 htr in each of the next 8 tr, 1 tr in each of the next 8 tr, 1 dtr in each of the next 12 tr, 1 triple tr in each of the next 12 tr, 1 4-dtr in each of the last 12 tr. Cut the yarn in size XS/S and M/L. SIZE XL/XXL: Turn and work 1 4-dtr in every 4-dtr, 1 triple tr in every triple tr, 1 dtr in every dtr, 1 tr in every tr, 1 htr in every htr and 1 dc in every dc. Cut the yarn. All sizes: Work a gusset the same way along side 4 (work from the top and down = from WS). Cut the yarn. Then work back and forth from side 1 on square as follows - from RS: Beg one row before square (i.e. in the first row worked over the other 3 sides), work 3 tr around the outermost tr in row, work 3 tr around corner on square, 1 tr in every tr, 3 tr around corner on square, and 3 tr around the outermost tr on next row = 55-61-67 tr. Then work back and forth according to A.2 (finish with 1 tr). When piece measures 7-9-11 cm, work only over the first 13 tr on row (= left shoulder). Work A.2 (finish with 1 tr up towards neck) as before over these sts until piece measures 17-19-21 cm, fasten off. Now work over the last 13 tr on row (= right shoulder), work the same way as on left shoulder. 29-35-41 tr in the middle = neck. BACK PIECE: Work the same way as on front piece. When piece measures 15-17-19 cm, work only over the first 13 tr on row (= right shoulder). Work A.2 as before over these sts until piece measures 17-19-21 cm, fasten off. Now work over the last 13 tr on row (= left shoulder), work the same way as on right shoulder. 29-35-41 tr in the middle = neck. ASSEMBLY: Sew shoulder seams and sew side seams. CROCHET EDGE AT THE BOTTOM OF TOP: Work one sl st in one corner at the bottom of top, work 1 tr in every tr along bottom edge on top, around the 4-dtr in the sides work 4 tr, AT THE SAME TIME adjust no of sts so that it is divisible by 48. Continue to work as follows: Work A.3A, repeat A.3B until 12 tr remain, work A.3C. Fasten off. CROCHET EDGE AROUND ARMHOLE: Beg between armhole and body. Work 1 dc,* skip approx. 2 cm, work 7 tr around next tr, skip approx. 2 cm, work 1 dc around next tr *, repeat from *-* and finish with one sl st at beg of round. Repeat around the other armhole. CROCHET EDGE AROUND NECK: Beg in the side of neck on back piece. Work 1 dc, * 3 ch, skip approx. 1 cm, work 1 dc *, repeat from *-* and finish with 1 sl st at beg of round. |
|||||||||||||||||||||||||||||||||||||
Diagram explanations |
|||||||||||||||||||||||||||||||||||||
|
|||||||||||||||||||||||||||||||||||||

|
|||||||||||||||||||||||||||||||||||||
|
|||||||||||||||||||||||||||||||||||||

|
|||||||||||||||||||||||||||||||||||||
|
Have you made this or any other of our designs? Tag your pictures in social media with #dropsdesign so we can see them! Do you need help with this pattern?You'll find tutorial videos, a Comments/Questions area and more by visiting the pattern on garnstudio.com. © 1982-2024 DROPS Design A/S. We reserve all rights. This document, including all its sub-sections, has copyrights. Read more about what you can do with our patterns at the bottom of each pattern on our site. |
|||||||||||||||||||||||||||||||||||||


With over 40 years in knitting and crochet design, DROPS Design offers one of the most extensive collections of free patterns on the internet - translated to 17 languages. As of today we count 304 catalogues and 11422 patterns - 11422 of which are translated into English (UK/cm).
We work hard to bring you the best knitting and crochet have to offer, inspiration and advice as well as great quality yarns at incredible prices! Would you like to use our patterns for other than personal use? You can read what you are allowed to do in the Copyright text at the bottom of all our patterns. Happy crafting!
Comments / Questions (45)
Gostaria de saber o nome do fio, link p q posso ver a especificação do tex, composição p eu achar algo semelhante! Obrigada
13.01.2018 - 02:37DROPS Design answered:
O nome do fio é Belle. A composição é única e não existe outro fio com a mesma composição. Bons trabalhos,
16.01.2018 - 15:31Also der Pullover ist so wunderschön, aber die Anleitung sehr widersprüchlich angegeben, so dass ich nun zum 3 Mal alles aufribbeln mußte. Widersprüchlich insofern, als man versteht, dass bei M1 insgesamt 4 Rapporte gehäkelt werden müssen anstelle 3. Daher erklärt sich auch, warum man in der letzten Reihe auf 196 Maschen anstatt 147 kommt.
03.01.2018 - 08:18Hola. No entiendo la instrucción para la espalda. Donde menciona que la pieza debe medir 15 cm para comenzar a tejer los hombros?
31.10.2017 - 21:37DROPS Design answered:
Hola Miritza. Se refiere a la parte del escote. En el delantero comenzamos a formar el escote cuando la labor mida 7-9-11 cm medidos desde la sisa, y en la espalda - 15-17-19 cm. A partir de aquí trabajamos solamente sobre los puntos que forman el hombro a cada lado.
04.11.2017 - 13:23J'ai terminé le diagramme A3C A3B A3A sauf .... le dernier rang ..... 4 B dans la même B ... 2 ml .... MAIS entre ces B, il y a des CERCLES ..... MERCI INFINIMENT .
28.07.2017 - 14:42DROPS Design answered:
Bonjour Rebeyrol, le petit rond correspond à un picot (=12ème symbole de la légende), soit 3 ml, puis 1 B dans la 1ère de ces 3 ml. Bon crochet!
28.07.2017 - 15:31BONJOUR .... Je suis au tout dernier rang du diagramme de la bordure en bas du top. Je comprends qu'il faut crocheter 4 brides mais entre, il y a un minuscule cercle. Que signifie cette légende ? Pouvez vous m'aider ? MERCI INFINIMENT.
28.07.2017 - 12:05DROPS Design answered:
Bonjour Mme Rebeyrol, ce petit point noir signifie que ce rang a déjà été fait (= rang précédent du bas du top), commencez au rang suivant (= 1 ml, 1 ms, 5 ml, sautez 2 m, 1 ms dans la m suiv...). Bon crochet!
28.07.2017 - 14:13J'ai mon ouvrage devant les yeux et les goussets sont en place. J'arrive donc à la pièce du haut côté 1. Si j'ai bien compris, je dois crocheter sur le premier rang mais, qui concerne seulement le carré, en laissant de côté, les parties crochetées 2 et 4 ?
25.07.2017 - 08:23DROPS Design answered:
Bonjour Mme Rebeyrol, le 1er rang va se faire le long du carré, mais on le commence par 3 brides dans le 1er rang crocheté sur le côté droit (= côté 4) et on le termine par 3 brides dans le 1er rang crocheté sur le côté gauche (= côté 2). Bon crochet!
25.07.2017 - 09:49MERCI INFINIMENT pour vos explications qui sont très claires. Lorsque j'arrive au diagramme A2, je vois que le premier tour a déjà été fait, est-ce que ça veut dire que je ne m'occupe que des 2 autres rangs en aller retour ?
22.07.2017 - 12:08DROPS Design answered:
Bonjour Mme Rebeyrol, tout à fait, dans A.2, on répète les 2 derniers rangs seulement, le 1er rang (celui avec l'étoile) montre seulement le rang précédent, pour savoir où piquer les brides du 1er rang de A.2. Bon crochet!
24.07.2017 - 09:21Je crois que j'ai compris .... Dans le rang côté 4, je dois crocheter les 26 premières ms et les 52 brides qui me restent, je commence la double B dans chacune des 8 B suivantes, 1 B dans chacune des 8 B suivantes et ainsi de suite ......
16.07.2017 - 16:39Pouvez vous m'expliquez le premier rang pour réaliser le gousset .... ce que je ne comprends pas, c'est de crocheter 1 ms dans chaque bride jusqu'à ce qu'il reste 52 B ???? ..... J' ai 79 B sur mon rang côté 4 et autant de brides sur le côté 2.
16.07.2017 - 16:24Mon ouvrage mesure 50 cm du côté 2 au côté 4 MAIS sur l'envers. J'ai donc coupé mon fil pour crocheter le gousset. Je ne comprends pas le début .... il doit me rester 52 brides sur le côté 2 et 52 brides sur le côté 4 ?
16.07.2017 - 11:23DROPS Design answered:
Bonjour Mme Rebeyrol, pour le côté 2, commencez sur l'endroit, dans le coin en haut (celui entre le côté 1 et le 2): 1 ms dans chaque m jusqu'à ce qu'il reste 52 B, puis crochetez les 52 dernières m ainsi: 1 dB dans chacune des 8 B suivantes, 1 B dans chacune des 8 B suivantes, 1 DB dans chacune des 12 B suivantes, 1 triple B dans chacune des 12 B suivantes, 1 quadruple B dans chacune des 12 dernières B, coupez le fil. Pour le côté 4, commencez sur l'envers en bas et crochetez en sens inverse: quadruple B, triple B, double B, B, demi-B sur les 52 premières mailles et en ms sur les mailles restantes. Bon crochet!
17.07.2017 - 09:13