
Popular categories
Looking for a yarn?


|
|
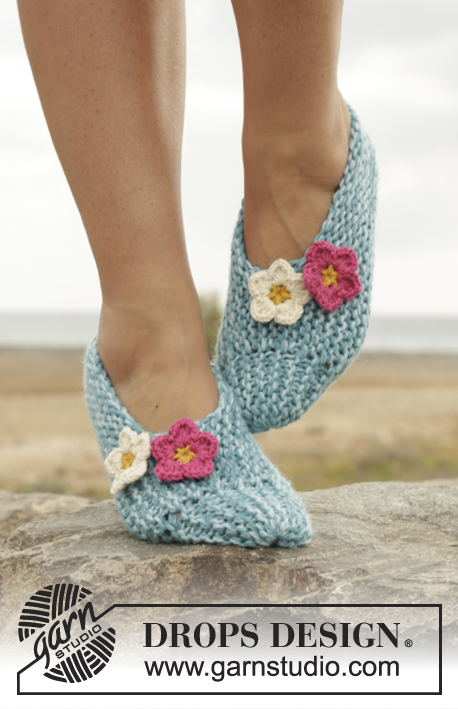
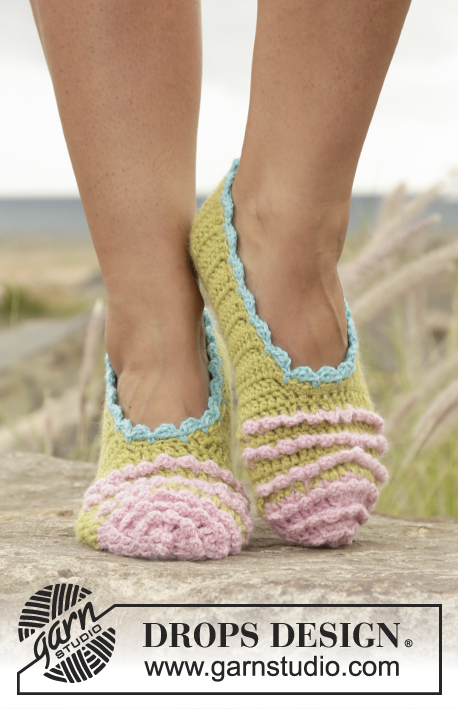
Tropical Steps |
|
 |
 |
Crochet DROPS slippers with stripes in "Lima".
DROPS 170-10 |
|
|
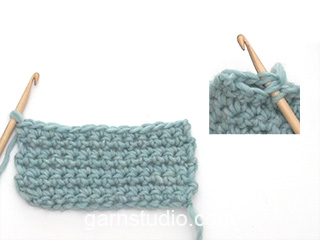
MAGIC CIRCLE: To avoid hole in the middle beg with this technique: Hold yarn end in the left hand and make a loop around left index finger (from left to right). Hold the loop with left thumb and index finger. * Insert hook through loop, get the yarn from ball, pull yarn through loop, make 1 YO on hook and pull YO through st on hook = 1 sc *, repeat from *-* until there are 8 sc in loop, finish with 1 sl st in first sc. Continue as explained in pattern – AT THE SAME TIME pull yarn end so that loop is tighten tog and the hole disappears. CROCHET INFO-1: When working in the round beg every round with 1 ch. This ch does NOT replace first sc. Finish round with 1 sl st in first ch at beg of round. This beg and end is not written in pattern but applies to every round when working in the round. COLOR CHANGE: To get a nice transition between the color changes, work last sl st on round with the new color as follows: Insert hook in first ch from beg of round, get the new yarn, make a YO with the new color and pull it through loop on hook. STRIPES-1: Work 1 round in every color in the following order: * cerise, off white, powder pink, goldenrod, off white, rust, off white *, repeat from *-*. STRIPES-2: Work 2 rows in every color in the following order: * powder pink, goldenrod, off white, rust, off white, cerise, off white *, repeat from *-*. ---------------------------------------------------------- SLIPPER: Beg working from the toe. Piece is first worked in the round, then worked back and forth. FOOT: Work a MAGIC CIRCLE - see explanation above, on hook size 3 mm / C with off white. Then work STRIPES-1 – see explanation above, AT THE SAME TIME work as explained below - READ CROCHET INFO-1 AND COLOR CHANGE. ROUND 1: * 1 sc in first/next sc, 1 ch *, repeat from *-* 8 times in total = 16 sts. ROUND 2: Work 2 sc around every ch = 16 sc. ROUND 3: * 1 sc in first/next sc, 1 ch *, repeat from *-* 16 times in total = 32 sts. REMEMBER THE CROCHET GAUGE! ROUND 4: * ch 1, 1 sc around first/next ch *, repeat from *-* 16 times in total = 32 sts. ROUND 5: * (1 sc around first/next ch, 1 ch), repeat from (-) 4 times in total, 1 sc around same ch, 1 ch *, repeat from *-* 4 times in total = 40 sts. ROUND 6: * ch 1, 1 sc around first/next ch *, repeat from *-* 20 times in total = 40 sts. ROUND 7: * 1 sc around first/next ch, 1 ch *, repeat from *-* 20 times in total = 40 sts. SIZE 5/6½ (EU35/37): ROUND 8: * (1 ch, 1 sc around first/next ch), repeat from (-) 10 times in total, ch 1, 1 sc around same ch *, repeat from *-* 2 times in total = 44 sts. The inc for size 5/6½ (EU35/37) ends here. Continue Stripes-1 in the round with 1 sc around every ch and 1 ch between every sc until piece measures 10 cm / 4'' – finish after a round with off white. SIZE 7½/9 (EU38/40): ROUND 8: * ch 1, 1 sc around first/next ch *, repeat from *-* 20 times in total = 40 sts. ROUND 9: * 1 sc around first/next ch, 1 ch *, repeat from *-* 20 times in total = 40 sts. ROUND 10: * (1 ch, 1 sc around first/next ch), repeat from (-) 5 times in total, ch 1, 1 sc around same ch *, repeat from *-* 4 times in total = 48 sts. The inc for size 7½/9 (EU38/40) ends here. Continue Stripes-1 in the round with 1 sc around every ch and 1 ch between every sc until piece measures 11 cm / 4½'' – finish after a round with off white. SIZE 9½/10½ (EU41/43): ROUND 8: * ch 1, 1 sc around first/next ch *, repeat from *-* 20 times in total = 40 sts. ROUND 9: * 1 sc around first/next ch, 1 ch *, repeat from *-* 20 times in total = 40 sts. ROUND 10: * (1 ch, 1 sc around first/next ch), repeat from (-) 4 times in total, ch 1, 1 sc around same ch *, repeat from *-* 5 times in total = 50 sts. The inc for size 9½/10½ (EU41/43) ends here. Continue Stripes-1 in the round with 1 sc around every ch and 1 ch between every sc until piece measures 12 cm / 4¾'' – finish after a round with off white. ALL SIZES: There are now 44-48-50 sts on round and piece measures approx. 10-11-12 cm / 4"-4½"-4 3/4" from cast-on. Cut the yarn. Insert 1 marker at the beg of the round. HEEL: Beg 15-16-17 sts before marker from RS and work back and forth over the first 31-33-35 sts with off white as follows (do not work over the remaining 13-15-15 sts = mid on top of foot): ROW 1: * 1 sc around first/next ch, 1 ch *, repeat from *-* 15-16-17 times in total, 1 sc in last ch, turn piece. ROW 2: ch 2, * 1 sc around first/next ch, 1 ch *, repeat from *-* until last ch and finish with 1 sc around last ch, turn piece. Then work STRIPES-2 - see explanation above and continue as follows: ROW 3: ch 2, * 1 sc around first/next ch, 1 ch *, repeat from *-* until the 2 ch from beg of previous row remain, finish with 1 sc around these ch 2, turn piece. Repeat 3rd row and continue Stripes-2. When slipper measures approx. 20-22-25 cm / 8"-8 3/4"-9 3/4", place it double and work tog mid back with 1 row sl sts from RS with off white - work through both layers. Fasten off. EDGE: Beg mid back on slipper and work around the entire opening – work from RS with off white as follows: ROUND 1: Work 1 sc in every other row and 1 ch between every row, mid on top of foot work 1 sc around every ch and 1 ch between every sc. ROUND 2: Work 1 sc around every ch and 1 ch between every sc the entire round. Fasten off. Work another slipper the same way. |
|
|
Have you made this or any other of our designs? Tag your pictures in social media with #dropsdesign so we can see them! Do you need help with this pattern?You'll find tutorial videos, a Comments/Questions area and more by visiting the pattern on garnstudio.com. © 1982-2024 DROPS Design A/S. We reserve all rights. This document, including all its sub-sections, has copyrights. Read more about what you can do with our patterns at the bottom of each pattern on our site. |
|


With over 40 years in knitting and crochet design, DROPS Design offers one of the most extensive collections of free patterns on the internet - translated to 17 languages. As of today we count 304 catalogs and 11422 patterns - 11417 of which are translated into English (US/in).
We work hard to bring you the best knitting and crochet have to offer, inspiration and advice as well as great quality yarns at incredible prices! Would you like to use our patterns for other than personal use? You can read what you are allowed to do in the Copyright text at the bottom of all our patterns. Happy crafting!
Comments / Questions (10)
When i start the heel do i have to cut the yarn and reattach it again or i can simply cintinue back and forth without ending last line regards and thanks in advance
04.05.2022 - 15:46DROPS Design answered:
Dear Mary, it might be easier to cut all yarns since you will start heel 15-16-17 stitches before marker = before beginning of previous rounds. Happy crocheting!
04.05.2022 - 15:52Rang 5, répéter 4X de ( à) et répéter 4X de " à", doit on faire 8m et 8m (16m) dans le rang ou 4x dans une même M ?
01.09.2021 - 16:02DROPS Design answered:
Bonjour Bibi, vous répétez de (à ) 4 fois puis vous terminez le motif par la 2ème * et répétez alors de *-*, autrement dit, crochetez: *(1 ms autour de la 1ère ml/de la ml suivante, 1 ml, 1 ms autour de la 1ère ml/de la ml suivante, 1 ml, 1 ms autour de la 1ère ml/de la ml suivante, 1 ml, 1 ms autour de la 1ère ml/de la ml suivante, 1 ml), 1 ms autour de la même ml, 1 ml*, répétez de *-* tout le tour = 4 fois. Bon crochet!
02.09.2021 - 08:15Hola tengo una pequeña duda cuando dice "Cuando se trabaja en redondo, comenzar cada vta con 1 p.de cad. Estos p.de cad NO sustituyen al primer p.b. Finalizar la vta con 1 p.e. en el primer p.de cad al inicio de la vta. " ¿Significa que en el caso por ejemplo de la vuelta 3, tengo 16 puntos más un punto enano, es decir un total de 17? Muchas gracias
13.04.2021 - 22:17DROPS Design answered:
Hola Brini, sí, es correcto.
09.05.2021 - 20:20Guten Tag! Führe ich die Fäden der jeweils anderen Farben in allen Runden immer mit? Danke.
07.01.2021 - 12:25DROPS Design answered:
Liebe Karoline, ja genau, die Streifen sind nicht so hoch, so am besten führen Sie die unbenutzen Fäden mit, dann haben Sie weniger Fäden zu vernähen. Viel Spaß beim häkeln!
07.01.2021 - 13:00Ik begrijp toer 5 van het voet gedeelte niet. Blijf je in dezelfe toer of moet je het werk draaien? Kan deze toer wat specifieker worden uitgelegd? Bedankt alvast
18.10.2020 - 19:05DROPS 170-10 can you please explain ROUND 1: * 1 sc in first/next sc, 1 ch *, repeat from *-* 8 times in total = 16 sts. Is it 1 single crochet in the first chain and 1 sc in the next chain then ch 1, so 1 sc in the next 2 chains then chain 1 until I have 16 stitches at the end of the row? ROUND 4: * ch 1, 1 sc around first/next ch *, repeat from *-* 16 times in total = 32 sts. Please explain this round as well?
16.04.2020 - 22:46DROPS Design answered:
Dear Bev, after magic circle there are 8 sc, crochet first round with 1 sc in each sc and 1 chain between each sc, ie you will have (1 sc, 1 ch) all the round (= 8 sc, 8 ch at the end of the round). At the end of round 3 there are 32 sts (= 16 sc, 16 ch), on round 4 you crochet 1 sc around each chain and 1 chain over each sc. (remember to start round with 1 ch - see CROCHET INFO-1). Hope this helps . Happy crocheting!
17.04.2020 - 08:41Muchas gracias simple y fácil de comprender.
29.05.2019 - 12:55Bonjour, A la fin du talon doit-on toujours avoir 31-33-35 mailles avant d'arrêter ? Merci
03.09.2016 - 18:40DROPS Design answered:
Bonjour Monique, tout à fait, on n'a pas de diminutions au niveau du talon pour ces chaussons. Bon crochet!
05.09.2016 - 09:04Simply the cutest slipper .Love, love , love these!
05.01.2016 - 20:13So cute! I love these!
14.12.2015 - 15:54