DROPS Cotton Merino uni colour 50% Wool, 50% Cotton |
3.55 £ /50g |
Order |
Clicking the ORDER button will redirect you to Wool Warehouse Direct Ltd website
The yarn cost is calculated from the pattern’s smallest size and the yarn’s cheapest product type. Looking for an even better price? You might find it on the DROPS Deals!
-------------------------------------------------------
Alternative Yarn – See how to change yarns here
Yarn Groups A to F – Use the same pattern and change the yarn here
Yarn usage using an alternative yarn – Use our yarn converter here
-------------------------------------------------------
DROPS Cotton Merino uni colour 50% Wool, 50% Cotton 3.55 £ /50g Order |
Clicking the ORDER button will redirect you to Wool Warehouse Direct Ltd website
The yarn cost is calculated from the pattern’s smallest size and the yarn’s cheapest product type. Looking for an even better price? You might find it on the DROPS Deals!
= Work 4 ch and form a ring with 1 sl st | |
= 1 ch | |
= 1 tr around st |
|
= 1 tr in tr | |
= Work 3 tr into 1 tr as follows: Work 1 tr but wait with last pull through (= 2 loops on hook), then work 2 tr more in same tr the same way (= 4 loops on hook) but on last pull through, pull yarn through all loops on hook. | |
= Work 2 tr into 1 tr as follows: Work 1 tr but wait with last pull through (= 2 loops on hook), then work next tr but on last pull through, pull yarn through all loops on hook. |
|
= beg round with 3 ch, and finish round with 1 sl st in 3rd ch at beg of round | |
= Work sl sts until first ch/ch-space. Replace first tr on this round with 3 ch. Finish round with 1 sl st in 3rd ch from beg of round. | |
= work armholes after this round |
Each of our patterns has specific tutorial videos to help you.
These step-by-step tutorials might also help you:
Why is the knitting/crochet tension so important?
Knitting tension is what determines the final measurements of your work, and is usually measured per 10 x 10 cm. It is provided like so: number of stitches in width x number of rows in height - eg: 19 stitches x 26 rows = 10 x 10 cm.
The knitting tension is very individual; some people knit/crochet loosely while others work tightly. You adjust the knitting tension with the needle size, which is why the suggested needle size is only meant as a guide! You need to adjust this (up or down) to ensure that YOUR knitting tension matches the knitting tension provided in the pattern. If you work with a different knitting tension than provided you will have a different yarn consumption, and your work will have different measurements than what the pattern suggests.
The knitting tension also determines which yarns can replace each other. As long as you achieve the same knitting tension you can replace one yarn with another.
See DROPS lesson: How to measure your tension/gauge
See DROPS video: How to make a gauge tension swatch
How do I know how many balls of yarn I need?
The required amount of yarn is provided in grams, eg: 450 g. To calculate how many balls you’ll need you first need to know how many grams are in 1 ball (25g, 50g or 100g). This information is available if you click on the individual yarn quality on our pages. Divide the amount required with the amount of each ball. For example, if each ball is 50g (the most common amount), the calculation will be as follows: 450 / 50 = 9 balls.
Can I use a different yarn than what the pattern suggests?
The important thing when changing from one yarn to another is that the knitting/crochet tension remains the same. This is so that the measurements of the finished piece will be the same as on the sketch provided. It is easier to achieve the same knitting tension using yarns from the same yarn group. It is also possible to work with multiple strands of a thinner yarn to achieve the knitting tension of a thicker one. Please try our yarn converter. We recommend you to always work a test swatch.
Please NOTE: when changing yarn the garment might have a different look and feel to the garment in the photo, due to individual properties and qualities of each yarn.
See DROPS lesson: Can I use a different yarn than the one mentioned in the pattern?
What are the yarn groups?
All our yarns are categorised into yarn groups (from A to F) according to thickness and knitting tension – group A contains the thinnest yarns and group F the thickest. This makes it easier for you to find alternative yarns to our patterns, should you wish to switch yarn. All yarns within the same group have a similar knitting tension and can easily replace each other. However, different yarn qualities have different structures and properties which will give the finished work a unique look and feel.
How do I use the yarn calculator?
At the top of all our patterns you’ll find a link to our yarn calculator, which is a helpful tool should you wish to use a different yarn than suggested. By filling in the yarn quality you wish to replace, the amount (in your size) and number of strands, the calculator will present good alternative yarns with the same knitting tension. Additionally it will tell you how much you’ll require in the new qualities and whether you’ll need to work with multiple strands. Most skeins are 50g (some are 25g or 100g).
If the pattern is worked with multiple colours, every colour will have to be calculated separately. Similarly, if the pattern is worked with several strands of different yarns (for example 1 strand Alpaca and 1 strand Kid-Silk) you will have to find alternatives for each, individually.
Why do you show discontinued yarns in the patterns?
Since different yarns have different qualities and textures we have chosen to keep the original yarn in our patterns. However, you can easily find options among our available qualities by using our yarn calculator, or simply pick a yarn from the same yarn group.
It is possible that some retailers still have discontinued yarns in stock, or that someone has a few skeins at home that they would like to find patterns for.
The yarn calculator will provide both alternative yarn as well as required amount in the new quality.
What size should I knit?
If you think it's hard to decide what size to make, it can be a good idea to measure a garment you own already and like the size of. Then you can pick the size by comparing those measures with the ones available in the pattern's size chart.
You'll find the size chart at the bottom of the pattern.
See DROPS lesson: How to read size chart
Why do I get the wrong knitting tension with the suggested needle size?
The needle size provided in the pattern serves only as a guide, the important thing is to follow the knitting tension. And since knitting tension is very individual, you will have to adjust the needle size to ensure that YOUR tension is the same as in the pattern – maybe you’ll have to adjust 1, or even 2 needle sizes, up or down to achieve the correct tension. For this, we recommend that you work test swatches.
Should you work with a different knitting tension than the one provided, the measurements of the finished garment might deviate from the measurement sketch.
See DROPS lesson: How to measure your tension/gauge
See DROPS video: How to make a tension/gauge swatch
Why is the pattern worked top-down?
Working a garment top-down provides more flexibility and room for personal adjustment. For example it is easier to try the garment on while working, as well as making adjustments to length of yoke and shoulder caps.
The instructions are carefully explaining every step, in the correct order. Diagrams are adjusted to the knitting direction and are worked as usual.
How do I work according to a knitting diagram?
The diagram depicts all rows/rounds, and every stitch seen from the right side. It is read from bottom to top, from right to left. 1 square = 1 stitch.
When working back and forth, every other row is worked from the right side and every other row is worked from the wrong side. When working from the wrong side, the diagram will have to be worked reversed: from left to right, knit stitches are purled, purl stitches are knit etc.
When working in the round every round is worked from the right side and the diagram are worked from right to left on all rounds.
See DROPS lesson: How to read knitting diagrams
How do I work according to a crochet diagram?
The diagram depicts all rows/rounds, and every stitch seen from the right side. It is worked from bottom to top, from right to left.
When working back and forth every other row is worked from the right side: from right to left and every other row is worked from the wrong side: from left to right.
When working in the round, every row in the diagram are worked from the right side, from right to left.
When working a circular diagram you start in the middle and work your way outwards, counter clockwise, row by row.
The rows usually start with a given number of chain stitches (equivalent to the height of the following stitch), this will either be depicted in the diagram or explained in the pattern.
See DROPS lesson: How to read crochet diagrams
How do I work several diagrams simultaneously on the same row/round?
Instructions for working several diagrams after each other on the same row/round, will often be written like so: “work A.1, A.2, A.3 a total of 0-0-2-3-4 times". This means you work A.1 once, then A.2 is worked once, and A.3 is repeated (in width) the number of times provided for your size – in this case like so: S = 0 times, M = 0 times, L=2 times, XL= 3 times and XXL = 4 times.
The diagrams are worked as usual: begin with the first row in A.1, then work the first row in A.2 etc.
See DROPS lesson: How to read knitting diagrams
See DROPS lesson: How to read crochet diagrams
Why are the sleeves shorter in larger sizes?
The total width of the garment (from wrist-to-wrist) will be larger in the larger sizes, despite the actual sleeves being shorter. The larger sizes have longer sleeve caps and wider shoulders, so there will be a good fit in all sizes.
Where on the garment is the length measured?
The measurement sketch/schematic drawing provides information regarding the full length of the garment. If it’s a jumper or a jacket the length is measured from the highest point on the shoulder closest to the neckline, and straight down to the bottom of the garment. It is NOT measured from the tip of shoulder. Similarly, the length of yoke is measured from the highest point on the shoulder and down to where yoke is split into body and sleeves.
On a jacket measures are never taken along bands, unless specifically stated. Always measure inside band stitches when measuring the length.
See DROPS lesson: How to read a schematic drawing
What is a repeat?
Diagrams are often repeated on the round or in height. 1 repeat is the diagram the way it appears in the pattern. If it says to work 5 repeats of A.1 in the round, then you work A.1 a total of 5 times after/next to each other in the round. If it says to work 2 repeats of A.1 vertically/in height you work the entire diagram once, then begin again at the start and work the entire diagram one more time.
Why does the piece start with more chain stitches than it’s worked with?
Chain stitches are slightly narrower than other stitches and to avoid working the cast-on edge too tight, we simply chain more stitches to begin with. The stitch count will be adjusted on the following row to fit the pattern and measurement sketch.
Why increase before the rib edge when the piece is worked top-down?
The rib edge is more elastic and will contract slightly compared to, for example, stocking stitch. By increasing before the rib edge, you avoid a visible difference in width between the rib edge and the rest of the body.
Why increase in the cast-off edge?
It’s very easy to cast off too tightly, and by making yarn overs while casting off (and simultaneously casting these off) you avoid a too tight cast off edge.
See DROPS video: How to bind off with yarn overs (yo)
How do I increase/decrease on every 3rd and 4th row/round alternately?
To achieve an even increase (or decrease) you can increase on, for example: every 3rd and 4th row alternately, like so: work 2 rows and increase on the 3rd row, work 3 rows and increase on the 4th. Repeat this until the increase is complete.
See DROPS lesson: Increase or decrease 1 st on every 3rd and 4th row alternately
How can I work a jacket in the round instead of back and forth?
Should you prefer to work in the round instead of back and forth, you may of course adjust the pattern. You’ll need to add steeks mid-front (usually 5 stitches), and follow the instructions. When you would normally turn and work from the wrong side, simply work across the steek and continue in the round. At the end you’ll cut the piece open, pick up stitches to work bands, and cover the cut edges.
See DROPS video: How to knit steeks and cut open
Can I work a jumper back and forth instead of in the round?
Should you prefer to work back and forth instead of in the round, you may of course adjust the pattern so you work the pieces separately and then assemble them at the end. Divide the stitches for the body in 2, add 1 edge stitch in each side (for sewing) and work the front and back pieces separately.
See DROPS lesson: Can I adapt a pattern for circular needles into straight needles?
Why is the pattern slightly different than what I see in the photo?
Pattern repeats can vary slightly in the different sizes, in order to get the correct proportions. If you’re not working the exact same size as the garment in the photo, yours might deviate slightly. This has been carefully developed and adjusted so that the complete impression of the garment is the same in all sizes.
Make sure to follow instructions and diagrams for your size!
How do I make a women’s size garment into a men’s size one?
If you have found a pattern you like which is available in women’s size it’s not very difficult to convert it to men’s size. The biggest difference will be the length of sleeves and body. Start working on the women size that you think would fit across the chest. The additional length will be worked right before you cast off for the armhole/sleeve cap. If the pattern is worked top-down you can add the length right after the armhole or before the first decrease on sleeve.
Regarding additional yarn amount, this will depend on how much length you add, but it is better with a skein too many than too few.
How do I prevent a hairy garment from shedding?
All yarns will have excess fibres (from production) that might come off as lint or shedding. Brushed yarns (ie hairier yarns) have more of these loose, excess fibres, causing more shedding.
Shedding also depends on what is worn under or over the garment, and whether this pulls at the yarn fibres. It’s therefore not possible to guarantee that there will be no shedding
Below are some tips on how to get the best result when working with hairier yarns:
1. When the garment is finished (before you wash it) shake it vigorously so the looser hairs come off. NOTE: do NOT use a lint roller, brush or any method that pulls at the yarn.
2. Place the garment in a plastic bag and put it in your freezer - the temperature will cause the fibres to become less attached to each other, and excess fibres will come off easier.
3. Leave in the freezer for a few hours before taking it out and shaking it again.
4. Wash the garment according to the instructions on the yarn label.
Why does my garment pill?
Pilling is a natural process that happens to even the most exclusive of fibers. It's a natural sign of wear and tear that is hard to avoid, and that is most visible in high friction areas of your garment like a sweater's arms and cuffs.
You can make your garment look as new by removing the pilling, using a fabric comb or a pill/lint remover.
Endless Love |
||||||||||||||||||||||||||||
|
|
|||||||||||||||||||||||||||
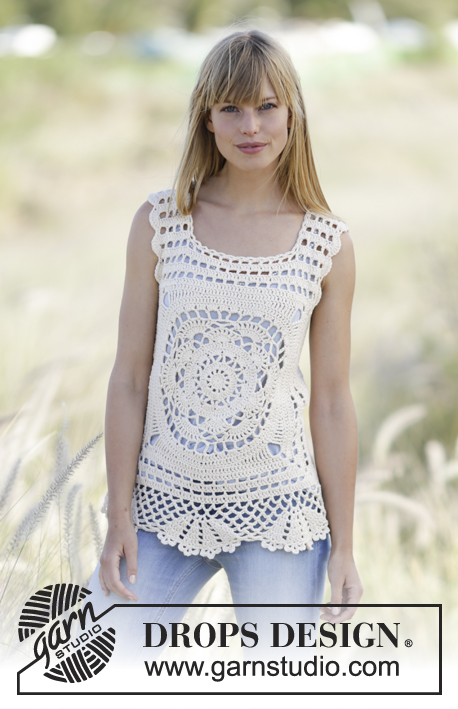
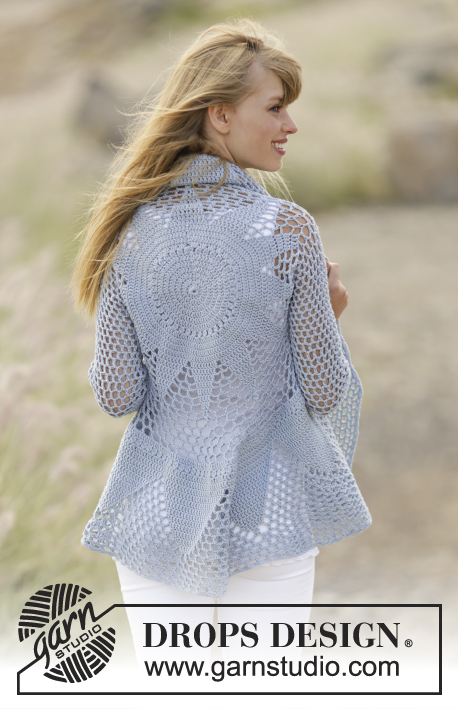
Crochet DROPS jacket worked in a circle with trebles and lace pattern in ”Cotton Merino”. Size S - XXXL.
DROPS 168-12 |
||||||||||||||||||||||||||||
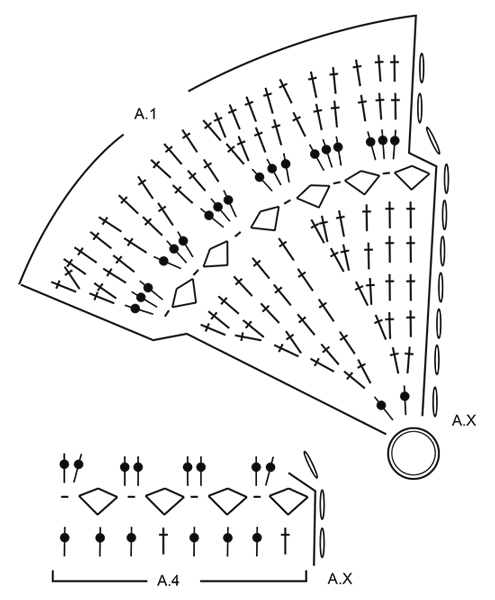
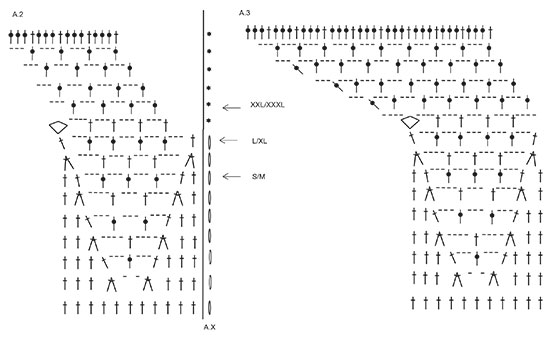
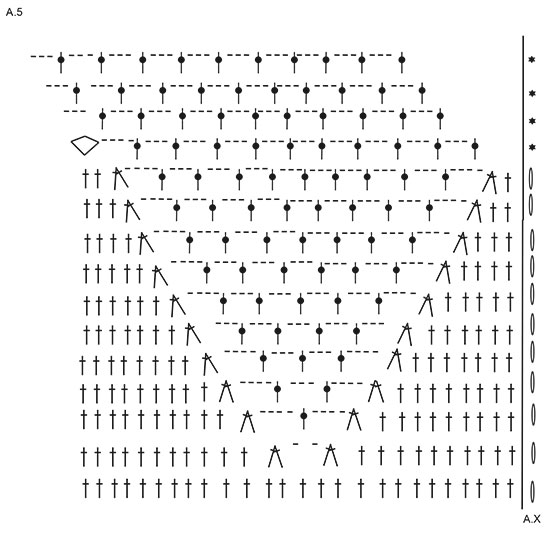
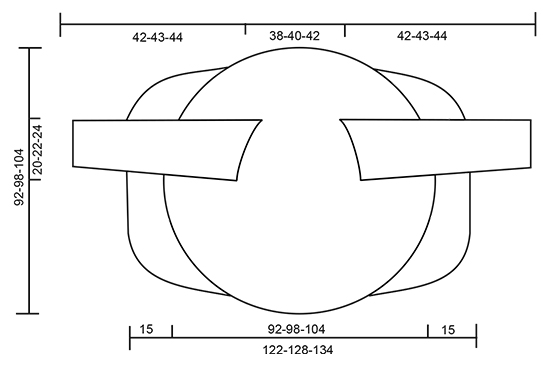
PATTERN: See diagrams A.1 to A.6. DECREASE TIP: Work 1 tr around next ch-space but wait with last pull through, work next tr around next ch-space (do not work 3 ch between tr), on last pull through, pull yarn through all 3 loops on hook. CROCHET TIP (applies to sleeve): After last tr on the round, continue to next round with 1 tr in next ch-space (= first ch-space on next round). NOTE: Insert 1 marker at the beg of round between last ch and first tr on the next round, move the marker upwards. NOTE: MAKE SURE NOT TO DISPLACE THE MARKER. ---------------------------------------------------------- JACKET WORKED IN A CIRCLE: Worked in the round from the centre and outwards. Work 4 ch with Cotton Merino on hook size 4 mm and form a ring with 1 sl st. Then work pattern according to diagram A.1 (= 6 repetitions in width) NOTE: A.x shows how every round beg and end, and is in addition to pattern. REMEMBER THE CROCHET TENSION! When entire A.1 has been worked vertically (= 132 tr), continue as follows: Work * A.2 (= 11 tr), A.3 (= 11 tr) *, repeat from *-* 6 times in total. Work up to and with arrow in diagram - see arrow for your size, there are now 228-252-264 sts on round. Work next round as follows: Continue to work over the first 34-36-38 sts, work 36-40-44 ch, and skip the next 36-40-44 sts (= armhole), work until 70-76-82 sts remain, work 36-40-44 ch and skip the next 36-40-44 sts (= armhole), continue to work over the last 34-36-38 sts. On next round continue according to pattern, work pattern as in diagram around ch-spaces in each side. When A.2 and A.3 have been worked, there are 312 tr on round. Continue with A.4 (= 39 repetitions on round). First round in A.4 shows last round in A.2/A.3, do not work this round. Continue to work as follows: Work * A.5 (= 26 tr), A.6 (= 26 tr) *, repeat from *-* 6 times in total. When A.5/A.6 have been worked, there are 600 sts on round (150 tr with 3 ch between each). Finish size S/M here. Size M/L -XXL/XXXL: Work 2-4 more rounds as last round in A.5/A.6 = 162-174 tr with 3 ch between. ALL SIZES: Piece measures approx. 46-49-52 cm from centre (92-98-104 cm in total). FRONT PIECES: Work back and forth in the one side with short rows. Cut the yarn, skip the first 13-16-19 tr on round, then work over the next 49 tr + ch-spaces as follows (insert a marker here): Work 3 ch, skip 1 ch-space, 1 dc around next ch-space, 3 ch (these 2 ch-spaces are no longer worked), 1 tr around next ch-space, work pattern as before until 2 ch-spaces remain (i.e. ch-spaces between tr, do not work around these 2 ch-spaces anymore), turn piece. Continue the short rows like this, AT THE SAME TIME inc 1 tr + 3 sts in the middle ch-space on every row (work 1 tr + 3 ch + 1 tr in this space). Continue with inc and dec on every row until piece measures 15 cm from marker. Skip 26-32-38 tr, then work short rows over the next 49 tr (13-16-19 tr remain on round). Work the same way as in the other side. CROCHET EDGE: Work an edge around the entire circle as follows: 1 dc around first ch-space, * 3 ch, 1 dc around next ch-space *, repeat from *-* and finish with 1 sl st in first dc. Fasten off. SLEEVES: Worked in the round, top down. Beg mid under one armhole, work 1 dc around first ch-space, 6 ch (= 1 tr + 3 ch), skip first tr and work 1 tr around next ch-space, * 3 ch, 1 tr around next ch-space *, repeat from *-* the entire round (work 1 tr + 3 ch around tr in corners), finish round with 1 tr around first 6 ch, then continue to work in the round without finishing it – READ CROCHET TIP = 21-23-25 tr + 21-23-25 ch-spaces. Continue with 1 tr + 3 ch around every space. When piece measures 4 cm, dec 1 ch-space before marker - READ DECREASE TIP! Repeat dec every 4½ cm 7 more times, dec alternately before and after marker = 13-15-17 tr + 13-15-17 ch-spaces. Continue until piece measures 42-43-44 cm. CROCHET EDGE SLEEVES: Crochet an edge around the sleeves as follows: 1 dc around first ch-space, * 3 ch, 1 dc around next ch-space *, repeat from *-* and finish with 1 sl st in first dc. Fasten off. Work the other sleeve the same way. |
||||||||||||||||||||||||||||
Diagram explanations |
||||||||||||||||||||||||||||
|
||||||||||||||||||||||||||||
Have you made this or any other of our designs? Tag your pictures in social media with #dropsdesign so we can see them! Do you need help with this pattern?You'll find tutorial videos, a Comments/Questions area and more by visiting the pattern on garnstudio.com. © 1982-2024 DROPS Design A/S. We reserve all rights. This document, including all its sub-sections, has copyrights. Read more about what you can do with our patterns at the bottom of each pattern on our site. |
With over 40 years in knitting and crochet design, DROPS Design offers one of the most extensive collections of free patterns on the internet - translated to 17 languages. As of today we count 304 catalogues and 11422 patterns - 11422 of which are translated into English (UK/cm).
We work hard to bring you the best knitting and crochet have to offer, inspiration and advice as well as great quality yarns at incredible prices! Would you like to use our patterns for other than personal use? You can read what you are allowed to do in the Copyright text at the bottom of all our patterns. Happy crafting!
Comments / Questions (89)
Vivi Pedersen wrote:
Jeg synes jeg mangler en diagrmforklaring på det omvendte v der første gang er i mønster A2
23.05.2018 - 22:42DROPS Design answered:
Hei Vivi. Du har helt rett i at det ser ut som det mangler - dette fordi symbolet var ganske forskjellig fra sånn det ser ut i diagrammet. Dette har nå blitt endret på, så nå er symbolene identiske. Definisjonen er som følger: Hekle 2 st til 1 st slik: Hekle 1 st, men vent med siste gjennomtrekning (= 2 m på nålen), hekle deretter neste st, men ved siste gjennomtrekning trekkes tråden gjennom alle m på nålen. Takk for beskjed og god fornøyelse.
25.05.2018 - 14:51Isabelle wrote:
Bonjour, je suis arrivée aux emmanchures en taille XXL. J'ai bien 264 m à la fin du tour avec la flèche. Quand je crochète le tour suivant donc des emmanchures, il me reste 20 m et en comptant : crocheter 38m, sauter 44m, crocheter 82m, sauter 44m et crocheter 38m = 246 m et non 264. Pourriez-vous m'aider? Où est mon erreur? Je suppose également que le tour des émanchures se crochète avec le dessin du diagramme. Ce n'est pas très clair. Merci pour votre réponse.
08.05.2018 - 06:51DROPS Design answered:
Bonjour Isabelle, avant la 2ème emmanchure vous devez crocheter jusqu'à ce qu'il reste 82 m avant la fin du tour (= et pas 82 m entre les 2 emmanchures), et terminer en sautant 44 m, crochetez 44 ml et les 38 dernières mailles du tour. Bon crochet!
08.05.2018 - 09:02Parvathi Natarajan wrote:
In L/XL size, when I start the left Front piece and I skip 16 dcs from the beg of previous rnds, it seems to be at Armhole level. I think its because the beginning of the round has shifted with the slip sts in the prior rnds. Is this normal?A lso, when I skip 32 dcs for the right front side, its not at the same level as the left front side. Only when I skip around 38 dcs and start the right front, it matches, but I have less dcs on the bottom. Is that okay?
22.03.2018 - 22:07DROPS Design answered:
Dear Mrs Natarajan, make sure both front pieces are mirrored, you should have 16 dc unworked for collar (top of jacket) and 32 dc unworked for bottom edge of jacket. Fold the jacket double in the middle, check that armholes matching and ajust if necessary. Happy crocheting!
26.03.2018 - 10:07Mette Hansen wrote:
Jeg hækler jakken I str. L/XL...alt passer til og med ærmegab. Men hvordan skal man komme fra 252m til 312m når der ingen udtagninger er? Jeg er lige ved at opgive :-( Hvad forskel er der på a2 og a3? Hvor skal a3 laves ift a2?
11.03.2018 - 18:33DROPS Design answered:
Hej Mette, jo når du fortsætter med A.2 og A.3 så tager du automatisk ud ifølge diagrammerne. Udtagningerne er tegnet ind i diagrammerne. God fornøjelse!
20.03.2018 - 10:44Valeria Medero wrote:
Hola! Terminé A5 y A6. Me quedaron los 600 puntos de mi talla S/M Cómo debo continuar con el frente? No entiendo a qué se refiere cuando dice "Trabajar hileras cortas, de ida y vuelta, a lo largo de un lado." Qué son "hileras cortas?" Gracias, Valeria
22.01.2018 - 21:36DROPS Design answered:
Hola Valeria. En este caso, trabajar las hileras cortas quiere decir que estamos trabajando solamente sobre los puntos de un delantero, no la vuelta completa. En el texto, se explican como trabajar estas filas bajo FRENTES. Al terminar un delantero, el otro delantero se trabaja de la misma manera.
28.01.2018 - 16:29Laura Wilkinson wrote:
Hi, could you please clarify something for me, when working a2 and a3 at the point of the diamond according to the pattern you do a row with 1 treble at the tip of the points and then do the row with the 3 trb into 1 trb at the tip? From what I can see on the pics it looks like you go straight onto the 3 in 1 trb row Thanks
25.11.2017 - 12:59DROPS Design answered:
Dear Mrs Wilkinson, on row 10 in A.2 and A.3 you start with 1 tr and finish each repeat with 3 tr tog. Happy crocheting!
27.11.2017 - 09:05Caroline wrote:
Voor de maat L/XL kom ik op 252 alvorens aan de mouwen te beginnen. Als ik over de eerste 36 steken moet haken, kom ik uit tussen 2 stokjes, moet ik dan eigenlijk niet op een stokje uitkomen om de 40 lussen te haken en 40 steken over te slaan? Ik kom er niet uit.. graag uw tegenberichtje, met dank!
13.09.2017 - 21:22Cindi wrote:
How do you go from a1 to a2? Do you just dc in each dc? Won't that create a pucker?
11.09.2017 - 09:54DROPS Design answered:
Dear Cindy, on first round in A.2 and A.3 as shown in diagram, ie on 1st row, work 1 dc in each dc. Happy crocheting!
11.09.2017 - 11:20Roberta wrote:
Buonasera,nella spiegazione ed anche nel diagramma del cardigan 168-12 c'è qualcosa che non quadra perché il cerchio non è piatto eppure i punti sono giusti,inoltre nella spiegazione scritta parla di ferri accorciati ma il cardigan è fatto ad uncinetto. È possibile avere una spiegazione corretta ? Grazie
01.09.2017 - 19:35DROPS Design answered:
Buonasera Roberta. Le spiegazioni del modello sono corrette. Per ulteriore aiuto può scrivere qui specificando il problema oppure rivolgersi al suo rivenditore Drops di fiducia (n quest'ultimo caso allegando eventualmente una foto del suo lavoro). Buon lavoro!
01.09.2017 - 21:13LOREDANA CECCHINATO wrote:
Buongiorno, in relazione al modello 168-12, avrei bisogno di alcuni chiarimenti: nel diagramma il simbolo * come si deve lavorare ? sarebbe utile vedere una fotografia del lavoro in quella zona, dietro il collo. spero sia possibile . Grazie.Loredana
29.08.2017 - 18:00DROPS Design answered:
Buonasera Loredana, i giri che iniziano con * si lavorano in questo modo: deve lavorare a maglie bassissime fino alla 1° catenella/arco di catenelle, sostituendo la 1° maglia alta su questo giro con 3 catenelle. Finire il giro con 1 maglia bassissima nella 3° catenella dall’inizio del giro. Le foto disponibili sono quelle sul sito, provi eventualmente a guardare tra i progetti di ravelry se qualcuna ha fatto foto più ravvicinate. Buon lavoro!
29.08.2017 - 21:45