DROPS Snow
DROPS Snow
100% Wool
from 11.00 RON /50g
DROPS Nepal
DROPS Nepal
65% Wool, 35% Alpaca
from 13.00 RON /50g
Get the yarn to make this pattern from 116.00RON.

The yarn cost is calculated from the pattern’s smallest size and the yarn’s cheapest product type. Looking for an even better price? You might find it on the DROPS Deals!

DROPS SS24

Counting Sheep

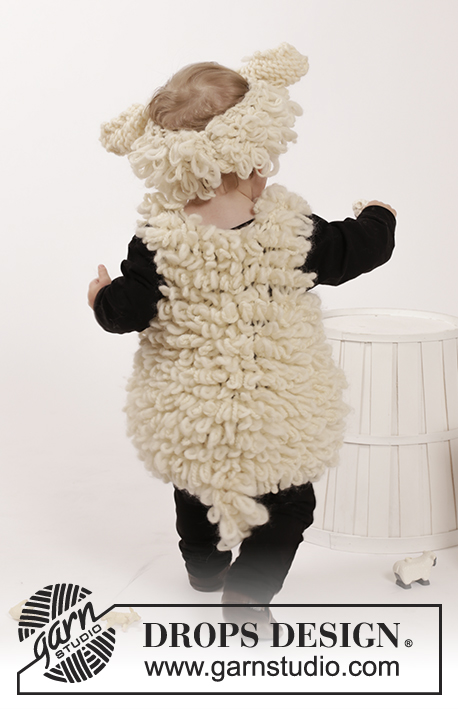
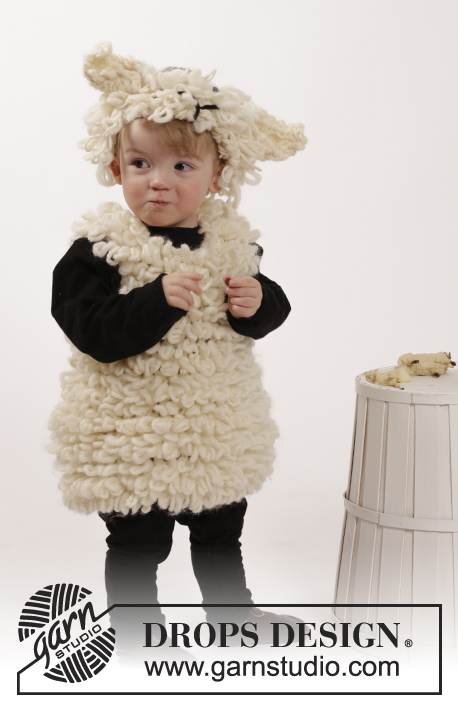
Knitted sheep set with vest and head band for children in DROPS Snow and DROPS Nepal. Set is worked with loop knitting and buttonhole loops are crochet. Size 2 - 6 years.

DROPS Extra 0-1224
DROPS design: Pattern no ee-131-bn
Yarn group E + C
----------------------------------------------------------
VEST:
Size: 2 - 3/4 - 5/6 years
Materials:
DROPS SNOW from Garnstudio
300-350-350 g colour no 01, off white
And use:
DROPS NEPAL from Garnstudio
100-150-150 g colour no 0100, off white

DROPS STRAIGHT NEEDLES SIZE 7 mm - or size needed to get 12 sts x 24 rows in garter st and 8 sts x 14 rows loop knitting with 1 strand of each yarn = 10 x 10 cm.
DROPS CROCHET HOOK SIZE 6 mm - for straps.
DROPS MOTHER-OF-PEARL BUTTON ARCHED (white), NO 521: 2 pieces for all sizes

HEAD BAND:
Head circumference: 48/50 - 50/52 - 52/53 cm
Materials:
DROPS NEPAL from Garnstudio
50 g for all sizes in colour no 0100, off white
And use:
DROPS SNOW from Garnstudio
50-50-100 g colour no 01, off white
Some left-over black for eyes and nose/mouth.

DROPS STRAIGHT NEEDLES SIZE 7 mm - or size needed to get 12 sts x 24 rows in garter st and 8 sts x 14 rows loop knitting with 1 strand of each yarn = 10 x 10 cm.

-------------------------------------------------------

Alternative Yarn – See how to change yarns here
Yarn Groups A to F – Use the same pattern and change the yarn here
Yarn usage using an alternative yarn – Use our yarn converter here

-------------------------------------------------------

DROPS Snow
DROPS Snow
100% Wool
from 11.00 RON /50g
DROPS Nepal
DROPS Nepal
65% Wool, 35% Alpaca
from 13.00 RON /50g
Get the yarn to make this pattern from 116.00RON.

The yarn cost is calculated from the pattern’s smallest size and the yarn’s cheapest product type. Looking for an even better price? You might find it on the DROPS Deals!

Pattern instructions

GARTER ST (back and forth):
K all rows. 1 ridge = 2 rows K.

STRIPES:
* 2 rows with 1 strand Nepal + 1 strand Snow (= 2 strands), 2 rows with 1 strand Snow *, repeat from *-*.

LOOP KNITTING (back and forth on needle):
Loops are worked from WS and shows on RS.
ROW 1 (= RS): K all sts.
ROW 2 (= WS): *Make a loop as follows: Twine the yarn LOOSELY around left index finger clockwise one time. K next st by pulling the 2 strands on left index finger through the st and leave the st on left needle. Then K 1 in the back loop of same st (= 1 twisted K st). There are now 2 loops and 1 twisted K st on right needle. Pass the 2 sts at the back over the first st = 1 loop st *, repeat from *-*.
Repeat these 2 rows.

DECREASE TIP:
All dec are done from RS! Dec inside 1 edge st in garter st.
Dec as follows when 2 sts remain before 1 edge st: K 2 tog.
Dec as follows after 1 edge sts: Slip 1 st as if to K, K 1, psso.
----------------------------------------------------------

VEST:
Worked back and forth on needle and is the same front and back.

FRONT PIECE:
Cast on 32-34-36 sts (incl 1 edge st in each side) on needle size 7 mm with 1 strand Nepal + 1 strand Snow (= 2 strands). Work STRIPES and LOOP KNITTING - see explanation above, with 1 edge st in GARTER ST - see explanation above - in each side: REMEMBER THE KNITTING TENSION When piece measures 15 cm, dec 1 st in each side - READ DECREASE TIP! Repeat dec every 15-17-11 cm 1-1-2 more times = 28-30-30 sts. When piece measures 34-37-41 cm, cast off the first 3-4-3 sts on the next 2 rows for armholes = 22-22-24 sts. Continue pattern as before inside 1 edge st in garter st in each side. When piece measures 42-45-50 cm, cast off the middle 6-6-8 sts for neck and finish each shoulder separately. Then cast off on every row from neck: 1 st 2 times = 6 sts. Continue like this until piece measures 46-50-55 cm, cast off. Work the other shoulder the same way.

BACK PIECE:
Cast on and work as front piece.

TAIL:
Cast on 10 sts (incl 1 edge st in each side) on needle size 7 mm with 1 strand Nepal + 1 strand Snow (= 2 strands). Work 6 rows loop knitting back and forth with 1 edge st in garter st in each side. Cast off. Sew cast-on and cast-off edge tog and fasten tail in the middle of bottom edge on back piece.

ASSEMBLY:
Sew the side seam inside edge sts. Sew left shoulder. Then crochet buttonhole loops on right shoulder on back piece (= 6 cast off sts) on hook size 6 mm with 1 strand Nepal as follows: Work 2 dc in first st, 2 ch, 1 dc in next st, 2 dc in each of the next 2 sts, 2 ch, 2 dc in last st. Fasten off. Sew 2 buttons on to right shoulder on front piece.
----------------------------------------------------------

HEAD BAND:
Worked back and forth on needle.
Cast on 7-8-8 sts (incl 1 edge st in each side) on needle size 7 mm with 1 strand Nepal + 1 strand Snow (= 2 strands). Continue LOOP KNITTING with 1 edge st in GARTER ST - see explanation above - in each side of piece. REMEMBER THE KNITTING TENSION Cast off when piece measures 43-44-45 cm.

EAR:
Worked back and forth on needle.
Cast on 10 sts (incl 1 edge st in each side) on needle size 7 mm with 1 strand Nepal + 1 strand Snow (= 2 strands). Work in stocking st with 1 edge st in GARTER ST - see explanation above - in each side. When 6 rows have been worked, dec 1 st in each side - READ DECREASE TIP! Repeat dec every other row until 4 sts remain on row, on next row from RS K the middle 2 sts tog. Cut the yarn and pull it through the remaining sts, tighten tog and fasten. Work another ear the same way.

ASSEMBLY:
Sew headband tog edge to edge on the short side. Place it flat and sew on ears approx. 5 cm in from each side at the front as follows: Fold the sides of the ear in from each side of cast-on edge (WS should be on the outside) and fasten it along the top of headband with the fold towards the head. Fasten the other ear the same way.

EYES AND NOSE/MOUTH:
Sew on nose and mouth with some left-over black Snow mid front on headband as follows: Sew 3 stitches into a Y and sew some stitches around sts over Y for eyes.

Diagram

diagram measurements
Do you have a question? See a list of frequently asked questions (FAQ)

Knitting tension is what determines the final measurements of your work, and is usually measured per 10 x 10 cm. It is provided like so: number of stitches in width x number of rows in height - eg: 19 stitches x 26 rows = 10 x 10 cm.

The knitting tension is very individual; some people knit/crochet loosely while others work tightly. You adjust the knitting tension with the needle size, which is why the suggested needle size is only meant as a guide! You need to adjust this (up or down) to ensure that YOUR knitting tension matches the knitting tension provided in the pattern. If you work with a different knitting tension than provided you will have a different yarn consumption, and your work will have different measurements than what the pattern suggests.

The knitting tension also determines which yarns can replace each other. As long as you achieve the same knitting tension you can replace one yarn with another.

See DROPS lesson: How to measure your tension/gauge

See DROPS video: How to make a gauge tension swatch

The required amount of yarn is provided in grams, eg: 450 g. To calculate how many balls you’ll need you first need to know how many grams are in 1 ball (25g, 50g or 100g). This information is available if you click on the individual yarn quality on our pages. Divide the amount required with the amount of each ball. For example, if each ball is 50g (the most common amount), the calculation will be as follows: 450 / 50 = 9 balls.

The important thing when changing from one yarn to another is that the knitting/crochet tension remains the same. This is so that the measurements of the finished piece will be the same as on the sketch provided. It is easier to achieve the same knitting tension using yarns from the same yarn group. It is also possible to work with multiple strands of a thinner yarn to achieve the knitting tension of a thicker one. Please try our yarn converter. We recommend you to always work a test swatch.

Please NOTE: when changing yarn the garment might have a different look and feel to the garment in the photo, due to individual properties and qualities of each yarn.

See DROPS lesson: Can I use a different yarn than the one mentioned in the pattern?

All our yarns are categorised into yarn groups (from A to F) according to thickness and knitting tension – group A contains the thinnest yarns and group F the thickest. This makes it easier for you to find alternative yarns to our patterns, should you wish to switch yarn. All yarns within the same group have a similar knitting tension and can easily replace each other. However, different yarn qualities have different structures and properties which will give the finished work a unique look and feel.

Click here for an overview of the yarns in each yarn group

At the top of all our patterns you’ll find a link to our yarn calculator, which is a helpful tool should you wish to use a different yarn than suggested. By filling in the yarn quality you wish to replace, the amount (in your size) and number of strands, the calculator will present good alternative yarns with the same knitting tension. Additionally it will tell you how much you’ll require in the new qualities and whether you’ll need to work with multiple strands. Most skeins are 50g (some are 25g or 100g).

If the pattern is worked with multiple colours, every colour will have to be calculated separately. Similarly, if the pattern is worked with several strands of different yarns (for example 1 strand Alpaca and 1 strand Kid-Silk) you will have to find alternatives for each, individually.

Click here to see our yarn calculator

Since different yarns have different qualities and textures we have chosen to keep the original yarn in our patterns. However, you can easily find options among our available qualities by using our yarn calculator, or simply pick a yarn from the same yarn group.

It is possible that some retailers still have discontinued yarns in stock, or that someone has a few skeins at home that they would like to find patterns for.

The yarn calculator will provide both alternative yarn as well as required amount in the new quality.

If you think it's hard to decide what size to make, it can be a good idea to measure a garment you own already and like the size of. Then you can pick the size by comparing those measures with the ones available in the pattern's size chart.

You'll find the size chart at the bottom of the pattern.

See DROPS lesson: How to read size chart

The needle size provided in the pattern serves only as a guide, the important thing is to follow the knitting tension. And since knitting tension is very individual, you will have to adjust the needle size to ensure that YOUR tension is the same as in the pattern – maybe you’ll have to adjust 1, or even 2 needle sizes, up or down to achieve the correct tension. For this, we recommend that you work test swatches.

Should you work with a different knitting tension than the one provided, the measurements of the finished garment might deviate from the measurement sketch.

See DROPS lesson: How to measure your tension/gauge

See DROPS video: How to make a tension/gauge swatch

Working a garment top-down provides more flexibility and room for personal adjustment. For example it is easier to try the garment on while working, as well as making adjustments to length of yoke and shoulder caps.

The instructions are carefully explaining every step, in the correct order. Diagrams are adjusted to the knitting direction and are worked as usual.

The diagram depicts all rows/rounds, and every stitch seen from the right side. It is read from bottom to top, from right to left. 1 square = 1 stitch.

When working back and forth, every other row is worked from the right side and every other row is worked from the wrong side. When working from the wrong side, the diagram will have to be worked reversed: from left to right, knit stitches are purled, purl stitches are knit etc.

When working in the round every round is worked from the right side and the diagram are worked from right to left on all rounds.

See DROPS lesson: How to read knitting diagrams

The diagram depicts all rows/rounds, and every stitch seen from the right side. It is worked from bottom to top, from right to left.

When working back and forth every other row is worked from the right side: from right to left and every other row is worked from the wrong side: from left to right.

When working in the round, every row in the diagram are worked from the right side, from right to left.

When working a circular diagram you start in the middle and work your way outwards, counter clockwise, row by row.

The rows usually start with a given number of chain stitches (equivalent to the height of the following stitch), this will either be depicted in the diagram or explained in the pattern.

See DROPS lesson: How to read crochet diagrams

Instructions for working several diagrams after each other on the same row/round, will often be written like so: “work A.1, A.2, A.3 a total of 0-0-2-3-4 times". This means you work A.1 once, then A.2 is worked once, and A.3 is repeated (in width) the number of times provided for your size – in this case like so: S = 0 times, M = 0 times, L=2 times, XL= 3 times and XXL = 4 times.

The diagrams are worked as usual: begin with the first row in A.1, then work the first row in A.2 etc.

See DROPS lesson: How to read knitting diagrams

See DROPS lesson: How to read crochet diagrams

The total width of the garment (from wrist-to-wrist) will be larger in the larger sizes, despite the actual sleeves being shorter. The larger sizes have longer sleeve caps and wider shoulders, so there will be a good fit in all sizes.

The measurement sketch/schematic drawing provides information regarding the full length of the garment. If it’s a jumper or a jacket the length is measured from the highest point on the shoulder closest to the neckline, and straight down to the bottom of the garment. It is NOT measured from the tip of shoulder. Similarly, the length of yoke is measured from the highest point on the shoulder and down to where yoke is split into body and sleeves.

On a jacket measures are never taken along bands, unless specifically stated. Always measure inside band stitches when measuring the length.

See DROPS lesson: How to read a schematic drawing

Diagrams are often repeated on the round or in height. 1 repeat is the diagram the way it appears in the pattern. If it says to work 5 repeats of A.1 in the round, then you work A.1 a total of 5 times after/next to each other in the round. If it says to work 2 repeats of A.1 vertically/in height you work the entire diagram once, then begin again at the start and work the entire diagram one more time.

Chain stitches are slightly narrower than other stitches and to avoid working the cast-on edge too tight, we simply chain more stitches to begin with. The stitch count will be adjusted on the following row to fit the pattern and measurement sketch.

The rib edge is more elastic and will contract slightly compared to, for example, stocking stitch. By increasing before the rib edge, you avoid a visible difference in width between the rib edge and the rest of the body.

It’s very easy to cast off too tightly, and by making yarn overs while casting off (and simultaneously casting these off) you avoid a too tight cast off edge.

See DROPS video: How to bind off with yarn overs (yo)

To achieve an even increase (or decrease) you can increase on, for example: every 3rd and 4th row alternately, like so: work 2 rows and increase on the 3rd row, work 3 rows and increase on the 4th. Repeat this until the increase is complete.

See DROPS lesson: Increase or decrease 1 st on every 3rd and 4th row alternately

Should you prefer to work in the round instead of back and forth, you may of course adjust the pattern. You’ll need to add steeks mid-front (usually 5 stitches), and follow the instructions. When you would normally turn and work from the wrong side, simply work across the steek and continue in the round. At the end you’ll cut the piece open, pick up stitches to work bands, and cover the cut edges.

See DROPS video: How to knit steeks and cut open

Should you prefer to work back and forth instead of in the round, you may of course adjust the pattern so you work the pieces separately and then assemble them at the end. Divide the stitches for the body in 2, add 1 edge stitch in each side (for sewing) and work the front and back pieces separately.

See DROPS lesson: Can I adapt a pattern for circular needles into straight needles?

Pattern repeats can vary slightly in the different sizes, in order to get the correct proportions. If you’re not working the exact same size as the garment in the photo, yours might deviate slightly. This has been carefully developed and adjusted so that the complete impression of the garment is the same in all sizes.

Make sure to follow instructions and diagrams for your size!

If you have found a pattern you like which is available in women’s size it’s not very difficult to convert it to men’s size. The biggest difference will be the length of sleeves and body. Start working on the women size that you think would fit across the chest. The additional length will be worked right before you cast off for the armhole/sleeve cap. If the pattern is worked top-down you can add the length right after the armhole or before the first decrease on sleeve.

Regarding additional yarn amount, this will depend on how much length you add, but it is better with a skein too many than too few.

All yarns will have excess fibres (from production) that might come off as lint or shedding. Brushed yarns (ie hairier yarns) have more of these loose, excess fibres, causing more shedding.

Shedding also depends on what is worn under or over the garment, and whether this pulls at the yarn fibres. It’s therefore not possible to guarantee that there will be no shedding

Below are some tips on how to get the best result when working with hairier yarns:

1. When the garment is finished (before you wash it) shake it vigorously so the looser hairs come off. NOTE: do NOT use a lint roller, brush or any method that pulls at the yarn.

2. Place the garment in a plastic bag and put it in your freezer - the temperature will cause the fibres to become less attached to each other, and excess fibres will come off easier.

3. Leave in the freezer for a few hours before taking it out and shaking it again.

4. Wash the garment according to the instructions on the yarn label.

Pilling is a natural process that happens to even the most exclusive of fibers. It's a natural sign of wear and tear that is hard to avoid, and that is most visible in high friction areas of your garment like a sweater's arms and cuffs.

You can make your garment look as new by removing the pilling, using a fabric comb or a pill/lint remover.

Still can't find the answer you need? Then scroll down and leave your question so one of our experts can try to help you. This will be done normally within 5 to 10 working days.
In the meantime, you can read the questions and answers that others have left to this pattern or join the DROPS Workshop on Facebook to get help from fellow knitters/crocheters!

You might also like...

Post a comment to pattern DROPS Extra 0-1224

We would love to hear what you have to say about this pattern!

If you want to leave a question, please make sure you select the correct category in the form below, to speed up the answering process. Required fields are marked *.

Comments / Questions (9)

country flag Lily wrote:

Thank you for coming back to me. It would be very helpful if I could have a drawing with the positions of the ears, nose and eyes relative to the headband. Thank you.

04.12.2023 - 07:44

DROPS Design answered:

Dear Lily, we don't have any drawing for the headband: the ears should be approx. 5 cm apart on mid front, embroider a Y with black in the middle of both ears and embroider some stitches for the eyes over the nose. Happy finishing!

04.12.2023 - 16:06

country flag Lily wrote:

Hi thank you so much for your Counting sheep pattern. My grandson is going to be a sheep in the school nativity play on the 14th of December and I am making the costume. I had to crochet it and adapt the pattern. The bit I am not sure with is the headband. Would it be possible to send me a close up photo or a diagram please. Thank you so much for the pattern and your help. Best regards Lily

03.12.2023 - 20:27

DROPS Design answered:

Dear Lily, unfortunately we don't have any more charts or photographs than the ones we have online. But you can ask any questions you have regarding the headband and we'll try to answer as best as we can. Happy knitting!

03.12.2023 - 23:17

country flag Franziska wrote:

Hallo, ich würde das Kostüm sehr gerne in Größe 38 (Erwachsenengröße) stricken. Wenn man die Maschenanzahl und den Wollverbrauch verdoppelt, scheint es immer noch ein wenig zu klein an bestimmten Stellen zu sein. Gibt es auch eine Anleitung für Erwachsene? Bzw. wie ist es möglich die entsprechende Maschenzahl der Größe anzupassen/ umzurechnen? Vielen Dank und liebe Grüße, Franziska

12.02.2023 - 17:01

DROPS Design answered:

Liebe Franziska, leider ist dieses Modell nur in Kinder-Größen erhältlich. Vielleicht kann Ihnen aber damit Ihr DROPS Händler (auch per Telefon oder per E-Mail) weiterhelfen. Viel Spaß beim stricken!

13.02.2023 - 10:15

country flag Channa Berg wrote:

Hallo, ich möchte dieses Kostüm gerne stricken, aber leider verstehe  sich die Beschreibung nicht so ganz. So, wie ich es verstehe geht es beim Stricken der Weste immer nur um 2 Reihen, die Hin- und die Rückreihe. Die 1. Reihe = Hin-R, wird 2 fädig in Kraus Rechts gestrickt Die 2. Reihe = Rück-Reihe dann nur 1 fädig im Schlaufenmuster. Und das dann immer im Wechsel bis zur gewünschten Höhe wiederholen? RIchtig oder falsch? Vielen Dank und Gruß Channa

26.01.2022 - 18:24

DROPS Design answered:

Liebe Frau Berg, die Streifen und das Muster werden gleichzeitig gestrickt, dh zuerst *2 Reihen mit 2 Fäden stricken (= 1 Hin- + 1 Rückreihe mit Schaufen), dann 2 Reihen mit 1 Faden Snow (= 1 Hin + 1 Rückreihe mit Schlaufen)*, von *bis* wiederholen, so haben Sie abwechslungsweise 1 x 2-Fädig-geststricke Reihe mit Schlaufen und 1 x 1-Fädig gestrickte Reihe mig Schlaufen. Kann das Ihnen helfen?

27.01.2022 - 08:33

country flag Miavdwant wrote:

Kan ik deze beschrijving in het nederlands krijgen

14.02.2021 - 19:05

country flag Anneke wrote:

Hoe vaak worden de strepen tussen de lussen herhaald? Hoe de lussen gebreid moeten worden is me ook uit de video niet duidelijk geworden, ik kan niet zien waar de 'werkdraad' blijft of waar hij heen gaat.

15.05.2020 - 17:34

DROPS Design answered:

Dag Anneke,

Je breit tegelijkertijd strepen en lussen, het is dus niet zo dat je strepen tussen de lussen breit. Dus je breit 2 naalden met 1 draad van elke kwaliteit, waarbij je de lussen aan de verkeerde kant maakt en aan de goede kant recht breit, dan brei je 2 naalden met 1 draad Eskimo, waarbij je ook lussen aan de verkeerde kant maakt. Bij de lussen maak je steeds omslagen om je linker wijsvinger en de werkdraad blijft ook steeds aan de linkerkant.

20.05.2020 - 09:07

country flag Mie wrote:

Meget fin kostume. Jeg forstår ikke hvordan man skal strikke løkker og striber samtidig? Skal der først strikkes en omgang striber og så en omgang løkker - og så forfra igen?

08.02.2019 - 16:54

DROPS Design answered:

Hei Mie. Du strikker første pinne med 1 tråd Nepal og 1 tråd Eskimo, denne pinnen er første pinne i løkkestrikk (alle masker strikkes rett). Så strikkes neste pinne kun med Eskimo, og denne pinnene er pinne 2 i løkkestrikk. Gjenta disse 2 pinnene oppover. God fornøyelse

11.02.2019 - 14:57

country flag Iben wrote:

Vil garnet kunne strikkes på 0,5-1 str mindre p, eller bliver det da for kompakt? Vil gerne strikke til str halvandet år.

05.02.2019 - 13:01

DROPS Design answered:

Hej Iben, jo det kan du godt gøre uden at det bliver for kompakt :)

06.02.2019 - 10:34

country flag Vigdis wrote:

Strikkes striper og løkkestrikk samtidig eller hver for seg? Altså at det strikkes en omg rett med begge tråder, en omg vrang med løkker og to tråder, og så frem og tilbake med én tråd, eller strikkes det frem og tilbake med to tråder, frem og tilbake med én tråd, frem med to tråder, tilbake med løkke.

11.12.2018 - 15:26

DROPS Design answered:

Hei Vigdis. Du skal strikke striper og løkker sammtidig. Altså du strikker 2 pinner med både Nepal og Eskimo, og strikker samtidig begge pinnene i Løkkestrikk. Så strikker du 2 pinner med Eskimo og samtidig begge pinnene I løkkestrikk. God fornøyelse.

12.12.2018 - 08:47