
Popular categories
Looking for a yarn?


|
||||||||||||||||||||||||||||||||||||||||||||||
Janis |
||||||||||||||||||||||||||||||||||||||||||||||
|
|
||||||||||||||||||||||||||||||||||||||||||||||
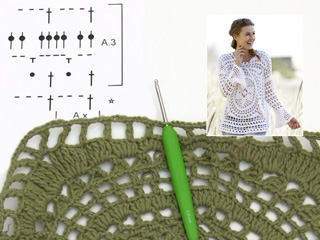
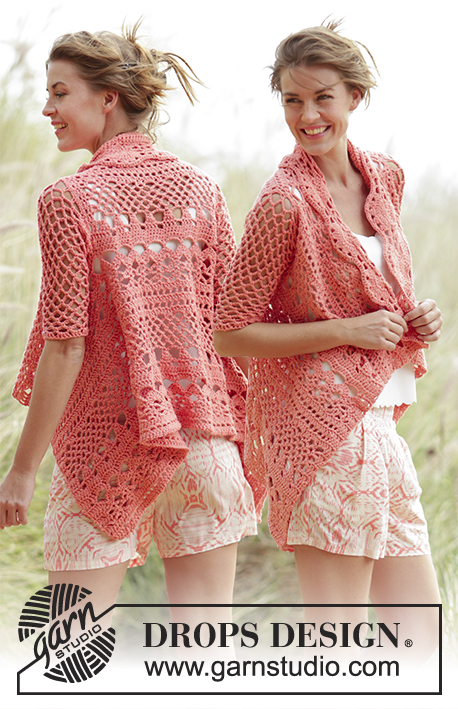
Crochet DROPS jumper worked in a square with flounce sleeves and lace pattern in ”Paris”. Size: S - XXXL.
DROPS 170-2 |
||||||||||||||||||||||||||||||||||||||||||||||
|
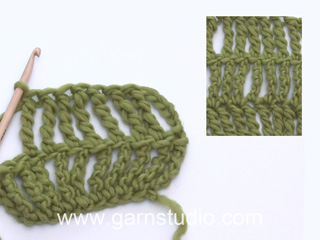
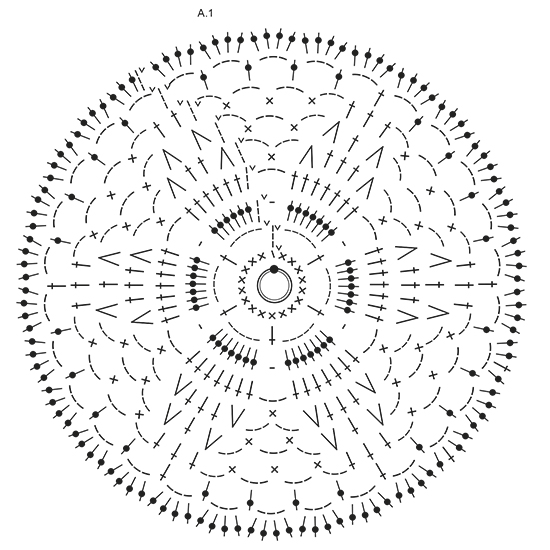
MAGIC CIRCLE: To avoid hole in the middle beg with this technique: Hold yarn end in the left hand and make a loop around left index finger (from left to right). Hold the loop with left thumb and index finger. Insert hook through loop, get the yarn from ball, pull yarn through loop, make 1 YO on hook and pull YO through st on hook = 1 sc, then work 8 sc around loop, finish with 1 sl st in first dc = 9 sc. Continue as explained in pattern – AT THE SAME TIME pull yarn end so that loop is tighten tog and the hole disappears. CROCHET INFO: Replace first sc on round with 1 ch. Finish round with one sl st in first ch from beg of round. Replace first dc on round/row with 3 ch. Finish round with one sl st in third ch from beg of round. PATTERN: See diagrams A.1 to A.4. TRIPLE TR: Make 4 YOs on hook, insert hook around ch-space and pull yarn around ch-space, * 1 YO on hook, pull yarn through the next 2 loops on hook *, repeat from *-* 4 more times = 1 loop on hook. DECREASE TIP: Dec 1 dc by working the next 2 dc tog as follows: Work 1 dc but wait with last pull through (= 2 loops on hook), then work next dc but on last pull through, pull yarn through all 3 loops on hook. ---------------------------------------------------------- JUMPER: BACK PIECE: Work back piece in a circle, then as a square from mid back. Work up along one side of square for shoulder/neck at the end. Work a MAGIC CIRCLE on hook size 4.5 mm/US 7 with Paris – see explanation above = 9 sc around circle. Then work according to A.1 (on first round in A1 work 2 sc in each of the 9 sc = 18 sc). REMEMBER THE CROCHET GAUGE! READ CROCHET INFO! When A.1 has been worked, there are 120 dc on round and piece measures approx. 22 cm / 8 3/4'' in diameter. Then work according to A.2, work 4 repetitions of A.2 around the circle - beg on second round in A.2. NOTE: Sl sts at beg of A.2 are only worked at beg of round. When A.2 has been worked, continue according to A.3. A.x shows 1 repetition of A.3 in width. Work A.3, in every corner work 1 tr + 3 ch + 1 tr, work 2 repetitions more of A.3 between every corner for every round worked. Continue with A.3 until piece measures 23-25-27-29-33-36 cm / 9"-9 3/4"-10½"-11½"-13"-14 1/4" from middle (46-50-54-58-66-72 cm / 18"-19 3/4"-21 1/4"-22 3/4"-26"-28½" in total), there are now approx. 18-20-22-24-28-30 repetitions of A.3 along each side of square. Now work piece back and forth and dec for neck in the middle of the first side of square. Cut the yarn and skip the middle 6-6-8-8-10-10 repetitions (= neck) on the first side of square, continue A.3 with inc in the corners until row has been worked, do not work over the 6-6-8-8-10-10 repetitions skipped at beg of row. Fasten off, piece measures 25-27-29-31-35-38 cm / 9 3/4"-10½"-11½"-12 1/4"-13 3/4"-15" from middle (50-54-58-62-70-76 cm / 19 3/4"-21 1/4"-22 3/4"-24½"-27½"-30" in total), there are approx. 7-8-8-9-10-11 repetitions on each shoulder, and approx. 20-22-24-26-30-32 repetitions along each of the other 3 sides. Insert 1 marker in each side, 16-17-18-19-20-21 cm / 6¼''-6¾''-7''-7½''-8''-8¼'' down from shoulder, this shows where sleeve is sewn in. FRONT PIECE: Work as back piece until piece measures 17-19-21-23-27-30 cm / 6 3/4"-7½"-8 1/4"-9"-10½"-11 3/4" from middle (32-36-40-44-52-58 cm / 12½"-14 1/4"-15 3/4"-17 1/4"-20½"-22 3/4" in total), there are now approx. 14-16-18-20-24-26 repetitions of A.3 along each side of square. Now work piece back and forth and dec for neck in the middle of the first side of square. Cut the yarn and skip the middle 2 repetitions (= neck) on the first side of square, continue with A.3 with inc in the corners until row has been worked, do not work over the 2 repetitions skipped at beg of row. Turn and work a row from WS. Cut the yarn, skip the first 2-2-3-3-4-4 repetitions, continue with A.3 and inc in the corners, but turn when 2-2-3-3-4-4 repetitions remain on row, 6-6-8-8-10-10 repetitions have been dec mid front for neck. Continue back and forth with A.3 and inc until piece measures 25-27-29-31-35-38 cm / 9 3/4"-10½"-11½"-12 1/4"-13 3/4"-15" from middle (50-54-58-62-70-76 cm / 19 3/4"-21 1/4"-22 3/4"-24½"-27½"-30" in total), there are approx. 7-8-8-9-10-11 repetitions on each shoulder, and approx. 20-22-24-26-30-32 repetitions along each of the other 3 sides, adjust according to back piece. Fasten off. Insert 1 marker in each side, 16-17-18-19-20-21 cm / 6¼''-6¾''-7''-7½''-8''-8¼'' down from shoulder, this shows where sleeve is sewn in. SLEEVE: Sleeve is worked in the round, top down. Work 64-64-69-69-74-74 ch and form a ring with one sl st in first ch. Work 3 ch (= 1 dc), 1 dc in each of the next 6-6-3-3-0-0 ch, skip ch 1, * work 1 dc in each of the next ch 7, skip 1 st *, repeat from *-* the entire round = 56-56-60-60-64-64 dc. Remember CROCHET INFO! Then work in the round and according to A.3. On 3rd round in A.3 dec 8 dc evenly - READ DECREASE TIP. Repeat dec every time 3th round in diagram is worked 3 times in total = 32-32-36-36-40-40 dc. Work A.3 until piece measures 33-32-31-30-27-25 cm / 13"-12½"-12 1/4"-11 3/4"-10½"-9 3/4", finish after 2nd or 4th round in A.3. Work 40-40-40-48-48-48 dc in total around ch-spaces. Then work according to A.4 (5-5-5-6-6-6 repetitions in width, diagram shows 2 repetitions in width), work first round as follows: * Work 1 dc in each of the first 7 dc, ch 1, skip 1 dc *, repeat from *-* 4-4-4-5-5-5 more times. NOTE: Sl sts at beg of A.4 are only worked at beg of round. Work A.4 1 time vertically. Fasten off. Sleeve measures approx. 48-47-46-45-42-40 cm / 19"-18½"-18"-17 3/4"-16½"-15 3/4". Work another sleeve the same way. ASSEMBLY: Sew the shoulder seams. Sew side seams from markers in the side and down. Sew in sleeves. TWINED STRING: Cut 2 lengths of 3 metres/3 1/4 yds each. Twine the strands tog until they resist, fold the string double so that it twines again. Make a knot at each end. Thread tie up and down around the neck. Cut 8 lengths of yarn of 20 cm / 8''. Thread the ends through the end of the tie and fold them double. Twine one of the strand around the top of tassel. Make another fringe in the other end of tie. |
||||||||||||||||||||||||||||||||||||||||||||||
Diagram explanations |
||||||||||||||||||||||||||||||||||||||||||||||
|
||||||||||||||||||||||||||||||||||||||||||||||
|
||||||||||||||||||||||||||||||||||||||||||||||

|
||||||||||||||||||||||||||||||||||||||||||||||

|
||||||||||||||||||||||||||||||||||||||||||||||

|
||||||||||||||||||||||||||||||||||||||||||||||
|
Have you made this or any other of our designs? Tag your pictures in social media with #dropsdesign so we can see them! Do you need help with this pattern?You'll find tutorial videos, a Comments/Questions area and more by visiting the pattern on garnstudio.com. © 1982-2024 DROPS Design A/S. We reserve all rights. This document, including all its sub-sections, has copyrights. Read more about what you can do with our patterns at the bottom of each pattern on our site. |
||||||||||||||||||||||||||||||||||||||||||||||


With over 40 years in knitting and crochet design, DROPS Design offers one of the most extensive collections of free patterns on the internet - translated to 17 languages. As of today we count 304 catalogs and 11422 patterns - 11417 of which are translated into English (US/in).
We work hard to bring you the best knitting and crochet have to offer, inspiration and advice as well as great quality yarns at incredible prices! Would you like to use our patterns for other than personal use? You can read what you are allowed to do in the Copyright text at the bottom of all our patterns. Happy crafting!
Comments / Questions (165)
Danke für die schnelle Antwort, auch auf den Schultern noch eine Reihe Stäbchen? LG
23.11.2018 - 13:04DROPS Design answered:
Liebe Birgit, also am besten mit den Maßnahmen anpassen, sollte es etwas zu lang für die Schulter sein, können Sie diese Reihe Stäbchen dann nur unten häkeln. Viel Spaß beim häkeln!
23.11.2018 - 15:10Hallo, laut Anleitung endet der Rücken mit der zweiten Reihe von A3. auf dem Bild sieht man jedoch dass die letzte Reihe Stäbchen sind, wann werden diese gehäkelt? Danke und liebe Grüsse
23.11.2018 - 00:21DROPS Design answered:
Liebe Birgit, einfach A.3 nach einer Reihe mit Stäbchen (= Reihe 3 in A.3) enden. Viel Spaß beim häkeln!
23.11.2018 - 11:59I, like Sharon Kerr, am having issues with A2... There is not sufficient information in the chart to allow for pattern growth, and the picture of the cardigan is not high enough quality to figure it out by zooming in. Could you please release either a new video tutorial or a new chart that has been fixed? Thank you for your time.
27.10.2018 - 08:29DROPS Design answered:
Dear Mrs Duke, start A.2 on the row after the star and, reading from the right towards the left repeat A.2 a total of 4 times in width on every round as shown in diagram. Should you need any further assistance reading diagram you are welcome to contact the store where you bought theh yarn. Happy crocheting!
29.10.2018 - 07:58Milena wrote:
Hola, dicen que el motivo A2 se repite cuatro veces, pero no se ve en el modelo que este repetido 4 veces. Será eso un error de traducción? Lo que si se ve en el modelo es que se repite A3, hasta dar la medida de la talla.
26.10.2018 - 19:32DROPS Design answered:
Hola Milena. El patrón está correcto.El diagrama A.2 se repite 4 veces alrededor del circulo ( es decir a lo largo de la vuelta, y no en vertical). Trabajando este diagrama se forma un cuadrado ( una esquina = una repetición de A.2)
27.10.2018 - 10:57Met welke steek moet het proeflapje gehaakt worden om 10x10cm te krijgen? Vasten of stokjes? met vriendelijke groet, Hilde
24.10.2018 - 10:17DROPS Design answered:
Dag Hilde,
Dit moeten stokjes zijn. Ik heb het even aangepast. Veel haakplezier.
24.10.2018 - 20:51Thank you! The video for the neck and front are a life saver. I believe I can now finish without any further problems.
06.06.2018 - 14:25After completing A2, I have now made 2 full rounds of A3 (8 rounds). My square now measures 20" total across. I am a size XS and have in fact used one hook size smaller than specified. Have I done something wrong? I have not even begun the neck portion which I am still trying to figure out what I am supposed to do with that. The instructions for this pattern are completely baffling!
05.06.2018 - 21:49DROPS Design answered:
Dear Mrs Manhartsberger, after A.2 you have to work A.3 until piece measures 18" across in first size = size S (no size XS in this pattern) (= 9" from the middle/center of square), adjust your number of rows to get the correct measurement - and remember to check and keep your gauge (= 16 dc x 9rows = 4"x4") to get the pattern matching the measurement chart and the correct size. Happy crocheting!
06.06.2018 - 10:03I am completely confused about how to make the picot in A.2.
31.05.2018 - 18:44DROPS Design answered:
Dear Mrs Manhartsberger, this video shows how to crochet such a picot: 3 ch, 1 dc in 3rd ch from hook. On next round, work the sc in the top of the picot. Happy crocheting!
01.06.2018 - 08:26Just realized my error and thought I'd share because I saw that at least one other person had the same problem I did. I downloaded the pattern in British English, so I was doing all the wrong stitches. If you're in the U.S., be sure to look for the US English version.
21.03.2018 - 18:42I have just started this pattern. It\'s gorgeous, but I\'m having trouble. I have two questions: #1: Do I do a first round of eight 8 double crochets and then start A1 with the round of 17 doubles?
21.03.2018 - 15:52DROPS Design answered:
Dear Mrs Kerr, you first start with a magic loop and 9 dc, then crochet A.1 (= 2 dc in each dc in 1st round in A.1 = 18 dc after first round in A.1).
06.04.2018 - 09:56