
Popular categories
Looking for a yarn?


|
||||||||||||||||||||||||||||||||||||||||||||||
Janis |
||||||||||||||||||||||||||||||||||||||||||||||
|
|
||||||||||||||||||||||||||||||||||||||||||||||
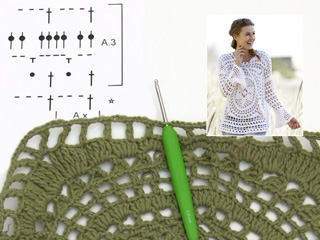
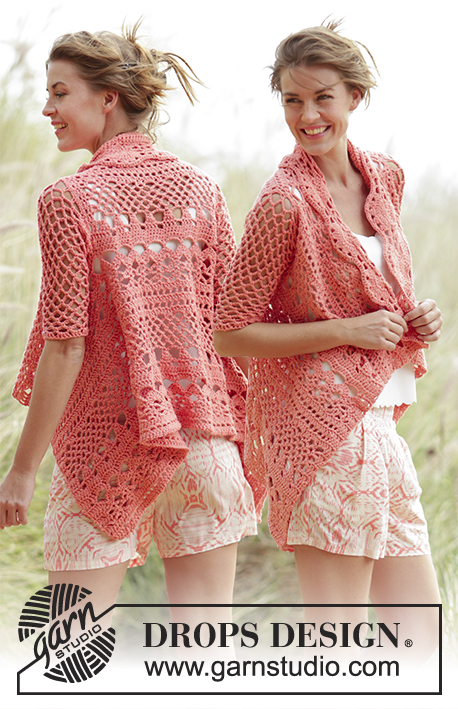
Crochet DROPS jumper worked in a square with flounce sleeves and lace pattern in ”Paris”. Size: S - XXXL.
DROPS 170-2 |
||||||||||||||||||||||||||||||||||||||||||||||
|
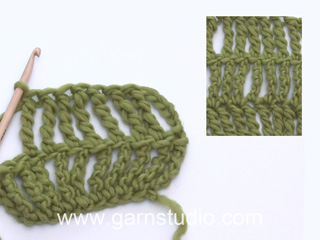
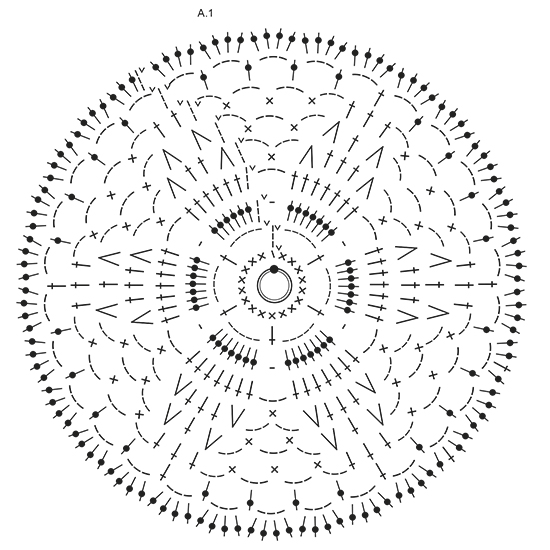
MAGIC CIRCLE: To avoid hole in the middle beg with this technique: Hold yarn end in the left hand and make a loop around left index finger (from left to right). Hold the loop with left thumb and index finger. Insert hook through loop, get the yarn from ball, pull yarn through loop, make 1 YO on hook and pull YO through st on hook = 1 sc, then work 8 sc around loop, finish with 1 sl st in first dc = 9 sc. Continue as explained in pattern – AT THE SAME TIME pull yarn end so that loop is tighten tog and the hole disappears. CROCHET INFO: Replace first sc on round with 1 ch. Finish round with one sl st in first ch from beg of round. Replace first dc on round/row with 3 ch. Finish round with one sl st in third ch from beg of round. PATTERN: See diagrams A.1 to A.4. TRIPLE TR: Make 4 YOs on hook, insert hook around ch-space and pull yarn around ch-space, * 1 YO on hook, pull yarn through the next 2 loops on hook *, repeat from *-* 4 more times = 1 loop on hook. DECREASE TIP: Dec 1 dc by working the next 2 dc tog as follows: Work 1 dc but wait with last pull through (= 2 loops on hook), then work next dc but on last pull through, pull yarn through all 3 loops on hook. ---------------------------------------------------------- JUMPER: BACK PIECE: Work back piece in a circle, then as a square from mid back. Work up along one side of square for shoulder/neck at the end. Work a MAGIC CIRCLE on hook size 4.5 mm/US 7 with Paris – see explanation above = 9 sc around circle. Then work according to A.1 (on first round in A1 work 2 sc in each of the 9 sc = 18 sc). REMEMBER THE CROCHET GAUGE! READ CROCHET INFO! When A.1 has been worked, there are 120 dc on round and piece measures approx. 22 cm / 8 3/4'' in diameter. Then work according to A.2, work 4 repetitions of A.2 around the circle - beg on second round in A.2. NOTE: Sl sts at beg of A.2 are only worked at beg of round. When A.2 has been worked, continue according to A.3. A.x shows 1 repetition of A.3 in width. Work A.3, in every corner work 1 tr + 3 ch + 1 tr, work 2 repetitions more of A.3 between every corner for every round worked. Continue with A.3 until piece measures 23-25-27-29-33-36 cm / 9"-9 3/4"-10½"-11½"-13"-14 1/4" from middle (46-50-54-58-66-72 cm / 18"-19 3/4"-21 1/4"-22 3/4"-26"-28½" in total), there are now approx. 18-20-22-24-28-30 repetitions of A.3 along each side of square. Now work piece back and forth and dec for neck in the middle of the first side of square. Cut the yarn and skip the middle 6-6-8-8-10-10 repetitions (= neck) on the first side of square, continue A.3 with inc in the corners until row has been worked, do not work over the 6-6-8-8-10-10 repetitions skipped at beg of row. Fasten off, piece measures 25-27-29-31-35-38 cm / 9 3/4"-10½"-11½"-12 1/4"-13 3/4"-15" from middle (50-54-58-62-70-76 cm / 19 3/4"-21 1/4"-22 3/4"-24½"-27½"-30" in total), there are approx. 7-8-8-9-10-11 repetitions on each shoulder, and approx. 20-22-24-26-30-32 repetitions along each of the other 3 sides. Insert 1 marker in each side, 16-17-18-19-20-21 cm / 6¼''-6¾''-7''-7½''-8''-8¼'' down from shoulder, this shows where sleeve is sewn in. FRONT PIECE: Work as back piece until piece measures 17-19-21-23-27-30 cm / 6 3/4"-7½"-8 1/4"-9"-10½"-11 3/4" from middle (32-36-40-44-52-58 cm / 12½"-14 1/4"-15 3/4"-17 1/4"-20½"-22 3/4" in total), there are now approx. 14-16-18-20-24-26 repetitions of A.3 along each side of square. Now work piece back and forth and dec for neck in the middle of the first side of square. Cut the yarn and skip the middle 2 repetitions (= neck) on the first side of square, continue with A.3 with inc in the corners until row has been worked, do not work over the 2 repetitions skipped at beg of row. Turn and work a row from WS. Cut the yarn, skip the first 2-2-3-3-4-4 repetitions, continue with A.3 and inc in the corners, but turn when 2-2-3-3-4-4 repetitions remain on row, 6-6-8-8-10-10 repetitions have been dec mid front for neck. Continue back and forth with A.3 and inc until piece measures 25-27-29-31-35-38 cm / 9 3/4"-10½"-11½"-12 1/4"-13 3/4"-15" from middle (50-54-58-62-70-76 cm / 19 3/4"-21 1/4"-22 3/4"-24½"-27½"-30" in total), there are approx. 7-8-8-9-10-11 repetitions on each shoulder, and approx. 20-22-24-26-30-32 repetitions along each of the other 3 sides, adjust according to back piece. Fasten off. Insert 1 marker in each side, 16-17-18-19-20-21 cm / 6¼''-6¾''-7''-7½''-8''-8¼'' down from shoulder, this shows where sleeve is sewn in. SLEEVE: Sleeve is worked in the round, top down. Work 64-64-69-69-74-74 ch and form a ring with one sl st in first ch. Work 3 ch (= 1 dc), 1 dc in each of the next 6-6-3-3-0-0 ch, skip ch 1, * work 1 dc in each of the next ch 7, skip 1 st *, repeat from *-* the entire round = 56-56-60-60-64-64 dc. Remember CROCHET INFO! Then work in the round and according to A.3. On 3rd round in A.3 dec 8 dc evenly - READ DECREASE TIP. Repeat dec every time 3th round in diagram is worked 3 times in total = 32-32-36-36-40-40 dc. Work A.3 until piece measures 33-32-31-30-27-25 cm / 13"-12½"-12 1/4"-11 3/4"-10½"-9 3/4", finish after 2nd or 4th round in A.3. Work 40-40-40-48-48-48 dc in total around ch-spaces. Then work according to A.4 (5-5-5-6-6-6 repetitions in width, diagram shows 2 repetitions in width), work first round as follows: * Work 1 dc in each of the first 7 dc, ch 1, skip 1 dc *, repeat from *-* 4-4-4-5-5-5 more times. NOTE: Sl sts at beg of A.4 are only worked at beg of round. Work A.4 1 time vertically. Fasten off. Sleeve measures approx. 48-47-46-45-42-40 cm / 19"-18½"-18"-17 3/4"-16½"-15 3/4". Work another sleeve the same way. ASSEMBLY: Sew the shoulder seams. Sew side seams from markers in the side and down. Sew in sleeves. TWINED STRING: Cut 2 lengths of 3 metres/3 1/4 yds each. Twine the strands tog until they resist, fold the string double so that it twines again. Make a knot at each end. Thread tie up and down around the neck. Cut 8 lengths of yarn of 20 cm / 8''. Thread the ends through the end of the tie and fold them double. Twine one of the strand around the top of tassel. Make another fringe in the other end of tie. |
||||||||||||||||||||||||||||||||||||||||||||||
Diagram explanations |
||||||||||||||||||||||||||||||||||||||||||||||
|
||||||||||||||||||||||||||||||||||||||||||||||
|
||||||||||||||||||||||||||||||||||||||||||||||

|
||||||||||||||||||||||||||||||||||||||||||||||

|
||||||||||||||||||||||||||||||||||||||||||||||

|
||||||||||||||||||||||||||||||||||||||||||||||
|
Have you made this or any other of our designs? Tag your pictures in social media with #dropsdesign so we can see them! Do you need help with this pattern?You'll find tutorial videos, a Comments/Questions area and more by visiting the pattern on garnstudio.com. © 1982-2024 DROPS Design A/S. We reserve all rights. This document, including all its sub-sections, has copyrights. Read more about what you can do with our patterns at the bottom of each pattern on our site. |
||||||||||||||||||||||||||||||||||||||||||||||


With over 40 years in knitting and crochet design, DROPS Design offers one of the most extensive collections of free patterns on the internet - translated to 17 languages. As of today we count 304 catalogs and 11422 patterns - 11417 of which are translated into English (US/in).
We work hard to bring you the best knitting and crochet have to offer, inspiration and advice as well as great quality yarns at incredible prices! Would you like to use our patterns for other than personal use? You can read what you are allowed to do in the Copyright text at the bottom of all our patterns. Happy crafting!
Comments / Questions (165)
Hallo, Ik kom er niet uit met wanneer en wat ik meerder op de hoeken. Ik heb blijkbaar ergens een fout gemaakt want ik kan niet 6 herhalingen overslaan in het midden omdat ik een oneven aantal heb... Ik haak met Parijs en dat word er niet mooier op met al dat uithalen. Is er iemand die hem al af heeft en een foto kan plaatsen, of een link zodat ik kan kijken waar ik fout zit?
03.06.2016 - 13:06DROPS Design answered:
Hoi Gerda. Kan je misschien even aangeven welke maat je maakt en waar in het patroon je precies bent? Dan kan ik makkelijker meekijken en helpen :)
08.06.2016 - 16:30Is there any photos of the back of the garment? - I think it would help people understand what to do if they could see the whole garement.
03.06.2016 - 10:00DROPS Design answered:
Dear Suzy, we do not have any pictures of back piece, but for any individual assistance, remember you will get help from the store where you bought your yarn. Happy crocheting!
03.06.2016 - 11:18Sorry I should point out - Im on the back - youve given me instructions for the front.
03.06.2016 - 09:51DROPS Design answered:
Correct - on the back piece, you will leave 8 repetitions in the middle of 1st side (join yarn outside of these unworked repetitions) and continue as before along first side, 1st corner, 2nd side, ... to the first side, leaving these 8 repetitions unworked for neckline. Turn and continue back and forth in A.3 as before. Happy crocheting!
03.06.2016 - 11:17Thanks for answering so quick. But my square doesnt end at a corner - my square is complete mid-square.? so if i cut this in mid square - then reattch where ?? is there anyway of doing a video chat so I can talk and show you what I have? I have teached many people to crochet - but Im lost here..
03.06.2016 - 09:49DROPS Design answered:
Dear Suzy, when the square measures 27 cm from middle (back piece - see next comment), join at the end of last round - you should have now 22 repetitions of A.3 along each side of the square, then cut the yarn. You will now work back and forth leaving unworked 8 repetitions in the middle of 1st side on square - skip these and continue back and forth along the square starting at one side of neck towards the other side of neck - your request for a video has been forwarded, while it is online, please feel free to contact your DROPS store (see here in Italy) for any further assistance. Happy crocheting!
03.06.2016 - 11:15** continued ** Im looking at the neck instruction now. how do you 'cut the yarn ' .... and 'continue A3....untill row has been worked' - You cant cut yarn and continue crocheting !! Unhappily crocheting :-(
03.06.2016 - 09:07DROPS Design answered:
Cut the yarn at the end of row when stated, then join yarn again to the next st, after having left first 2 middle repetitions on 1st side, then 3 more repetitions so that there are a total of 8 repetitions unworked for neckline on mid front (= on 1st side of square). Happy crocheting!
03.06.2016 - 09:30Unfortunately that answer has totally confused me ! If you look at your photo of the top it has a full row of trebles at the bottom hem. So you must end A3 with the 3rd row (before starting the neck), otherwise your bottom hem would look different - your reply told me to adjust the row to end with Ax - it doesnt make sense if all 4 sides of the square are the same. ?? Plus the size of 21cm which you told me doesnt match with the sizes on the pattern. the large size is the 3rd size listed.. ??.
03.06.2016 - 09:06DROPS Design answered:
Dear Suzy, when piece measures 21 cm from middle you are shaping neckline (front piece)= cut the yarn and join it again on 1st side on square, continue in A.3 as before leaving unworked 2 repetitions for neck. Turn and work next row and cut the yarn. Work one more row leaving 3 repetitions unworked on each side of the first middle 2 and continue A.3 (= 8 repetitions are now unworked on the side towards neckline) - continue then back and forth from necline on one side to neckline on the other side until piece mesures 29 cm from centre (in size L), ie 8 repetitions on each shoulder and approx. 24 repetitions on each of the 3 other sides of square. Happy crocheting!
03.06.2016 - 09:29Hi, Im usually very good at following patterns but I think this needs more diagrams. Im confused as to how I make it bigger for each size? Im making a large size & I am at the 'A3' stage (which consists of 4 rows). It says to continue with 'A3' till pieces measure's 23-25-27cm etc. Do I have to complete a set of 4 rows for each size increment? Im making a Large size - so would that be 3 repeats of A3 which would be 12 more rows? Not looking forward to the trying the neck :-(
29.05.2016 - 22:03DROPS Design answered:
Dear Suzy, you crochet A.3 until piece measures 21 cm (size L), adjust last round so that you have have A.X a total of 18 times in width (A.X = 1 repeat in A.3 in width). Happy crochetin!
30.05.2016 - 10:13Merci pour votre réponse mais comment faut-il faire pour se rendre sur le forum car j'ai cherché mais je ne trouve pas. Merci infinimentt
25.05.2016 - 19:21DROPS Design answered:
Bonjour Mme Dubois, cliquez ici pour accéder au forum, et vous y trouverez notamment: comment s'enregistrer, et comment se connecter. Bon crochet!
26.05.2016 - 08:30Comment dois-je faire pour avoir une aide sur un de vos modèles. Merci d'avance
25.05.2016 - 04:17DROPS Design answered:
Bonjour Mme Dubois, vous pouvez vous adresser à votre magasin DROPS et/ou au forum DROPS. Bon crochet!
25.05.2016 - 08:53Scusate se continuo a chiedere spiegazioni! Non capisco questo passaggio riferito al diagramma A3:"lavorare 2 Rip in più di A 3 tra ogni angolo per ogni giro lavorato. Grazie mille!
23.05.2016 - 11:33DROPS Design answered:
Buongiorno Benedetta. Ogni volta che inizia un nuovo giro, ha sufficienti maglie per ripetere il diagramma A.3 due volte in più tra ogni angolo. Buon lavoro!
23.05.2016 - 11:36