DROPS Cotton Light
DROPS Cotton Light
50% Cotton, 50% Polyester
from 1.80 $ /50g
Get the yarn to make this pattern from 12.60$.

The yarn cost is calculated from the pattern’s smallest size and the yarn’s cheapest product type. Looking for an even better price? You might find it on the DROPS Deals!

DROPS SS24

Holiday Bliss

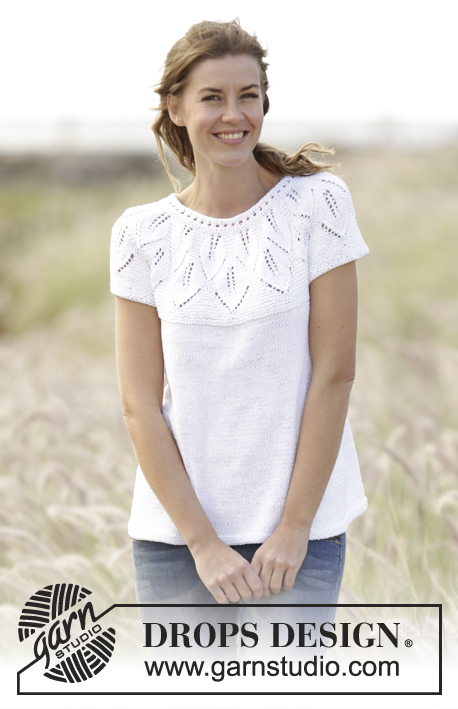
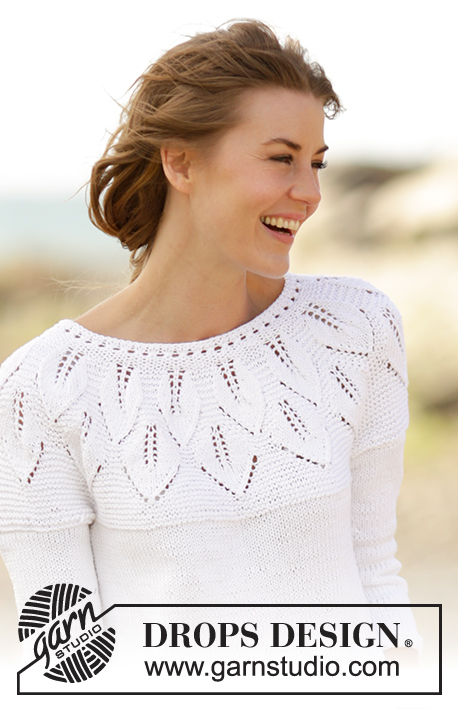
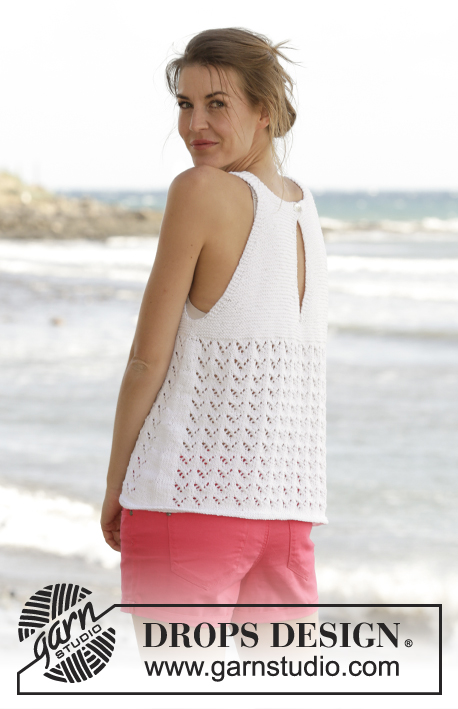
Knitted DROPS top in garter st with lace pattern and vent mid back in ”Cotton Light”. Worked top down. Size S-XXXL.

DROPS 170-24
DROPS design: Pattern no cl-059
Yarn group B
----------------------------------------------------------
Size: S - M - L - XL - XXL – XXXL
Materials:
DROPS COTTON LIGHT from Garnstudio
350-350-400-450-500-550 g color no 02, white

DROPS CIRCULAR NEEDLE (60 or 80 cm / 24'' or 32'') SIZE 4 mm/US 6 - or size needed to get 21 sts x 28 rows in stockinette st = 4'' x 4'' (10 x 10 cm).
DROPS CIRCULAR NEEDLE (60 or 80 cm / 24'' or 32'') SIZE 3.5 mm/US 4 - for garter st.
DROPS MOTHER-OF-PEARL BUTTON: Arched (white), NO 521: 1 piece for all sizes

-------------------------------------------------------

Alternative Yarn – See how to change yarns here
Yarn Groups A to F – Use the same pattern and change the yarn here
Yarn usage using an alternative yarn – Use our yarn converter here

-------------------------------------------------------

DROPS Cotton Light
DROPS Cotton Light
50% Cotton, 50% Polyester
from 1.80 $ /50g
Get the yarn to make this pattern from 12.60$.

The yarn cost is calculated from the pattern’s smallest size and the yarn’s cheapest product type. Looking for an even better price? You might find it on the DROPS Deals!

Pattern instructions

NOTE: This pattern is written in American English. All measurements in charts are in cm. For conversion from inches to cm - click here. There are different terms for crocheting in American and British English. If this pattern includes crochet, click for "crochet terms" here. For this pattern in British English, please click here.
GARTER ST (back and forth):
K all rows. 1 ridge = K2 rows.

GARTER ST (worked in the round):
1 ridge = 2 rounds. * K 1 round and P 1 round *, repeat from *-*.

PATTERN:
See diagram A.1.

INCREASE TIP-1:
Inc 1 st by making a YO. On next row K YO twisted to avoid holes.

INCREASE TIP-2:
Work until 1 st remains before marker, 1 YO, work 2 sts in garter st (marker is between these 2 sts), 1 YO. On next round K YOs twisted to avoid holes. Then work the new sts in stockinette st.

BUTTONHOLE:
Dec for 1 buttonhole on left back piece at the top in vent mid back when piece measures 1½ cm / ½'' as follows: K tog 3rd and 4th st from edge and make 1 YO.
----------------------------------------------------------

TOP:
First worked back and forth on needle in parts, then work pattern in the round. The piece is worked top down.

LEFT BACK PIECE:
Cast on 10-12-12-13-13-14 sts on circular needle size 3.5 mm / US 4 with Cotton Light. Work in GARTER ST - see explanation above. Remember BUTTONHOLE - see explanation above. When piece measures 4 cm / 1½'', inc for armhole as follows from RS: Work 3 sts in garter st, 1 YO (= 1 st inc) – READ INCREASE TIP-1, work in garter st over the remaining 7-9-9-10-10-11 sts and cast on 1 new st for neck at the end of row. Work 1 row. At the end of the next row from RS, cast on 14-15-15-16-16-17 new sts for neck = 26-29-29-31-31-33 sts. REMEMBER THE KNITTING GAUGE

Then continue inc for armhole AT THE SAME TIME dec and inc for vent mid back as follows:
ARMHOLE:
Repeat inc for armhole every 4th row 10-12-13-11-6-6 more times and then every other row 7-5-6-12-24-26 times.
VENT MID BACK:
Dec for vent as follows (from RS): Work until 5 sts remain, K 2 tog, work 3 sts in garter st. Repeat this dec every 4th row 3 more times. Then when piece measures 9-10-11-12-13-14 cm / 3½''-4''-4 3/8''-4¾''-5 1/8''-5½'' from the new sts cast on for neck, inc as follows (from RS): Work until 3 sts, 1 YO, work 3 sts in garter st. K YO twisted on next row to avoid hole. Repeat inc every 4th row 3 more times. When all inc for armholes are done, there are 43-46-48-54-61-65 sts on left back piece. Work last row from RS. Piece measures approx. 17-18-19-20-21-22 cm / 6¾''-7''-7½''-8''-8¼''-8¾''. Put piece aside and knit right back piece.

RIGHT BACK PIECE:
Cast on and work as left back piece but reversed. I.e. inc for armhole inside 3 sts in garter st at the end of row from RS and cast on for neck at the end of row from WS. When all inc are done there are 43-46-48-54-61-65 sts on right back piece. Adjust according to left back piece. Work last row from RS, cast on 3-4-5-6-6-6 sts at the end of this row, turn piece and work as follows from WS: Work in garter st over the new 3-4-5-6-6-6 sts, in garter st over the 43-46-48-54-61-65 sts from right back piece, cast on 1-0-1-1-1-0 new sts, then work in garter sts over the next 43-46-48-54-61-65 sts from left back piece from WS, cast on 3-4-5-6-6-6 sts at the end of row. There are now 93-100-107-121-135-142 sts on back piece. Continue in garter st until piece measures 24-25-27-28-30-31 cm / 9½"-9 3/4"-10½"-11"-11 3/4"-12 1/4" from shoulder – adjust so that the last row is worked from WS. Slip all sts on a stitch holder and work the front piece.

FRONT PIECE:
Left shoulder:
Cast on 10-12-12-13-13-14 sts on circular needle size 3.5 mm / US 4 with Cotton Light. Work in garter st. When piece measures 4 cm / 1½'', work as follows on next row from RS: Work until 3 sts, 1 YO (= 1 st inc), work 3 sts in garter st.
Now continue inc for armhole the same way as on right back piece, AT THE SAME TIME when piece measures 8-8-10-10-12-12 cm / 3"-3"-4"-4"-4 3/4"-4 3/4" - adjust so that last row is worked from WS, slip sts on a stitch holder and work right shoulder.

Right shoulder:
Cast on and work as left shoulder but reversed. Inc sts for armhole the same way as on left back piece (i.e. inside 3 sts in garter st at beg of row from RS).

When piece measures 8-8-10-10-12-12 cm / 3"-3"-4"-4"-4 3/4"-4 3/4", cast on 31-32-33-35-35-36 sts for neck at the end of row from RS, then work sts from stitch holder (= left shoulder) on to needle. Continue back and forth in garter st. NOTE: Continue inc for armhole as before. When all inc for armholes are done, there are 87-92-97-109-123-130 sts on needle. Adjust so that last row is from WS, cast on 3-4-5-6-6-6 sts at the end of row, turn and K over all sts, cast on 3-4-5-6-6-6 sts at the end of row = 93-100-107-121-135-142 sts on front piece. Piece measures approx. 17-18-19-20-21-22 cm / 6¾''-7''-7½''-8''-8¼''-8¾''. Continue in garter st until piece measures 24-25-27-28-30-31 cm / 9½"-9 3/4"-10½"-11"-11 3/4"-12 1/4" from shoulder – adjust according to back piece (last row is worked from WS).

BODY:
Now work in the round. Insert 1 marker in piece, NOW MEASURE PIECE FROM HERE. Switch to circular needle size 4 mm / US 6. Work as follows from RS: K the 93-100-107-121-135-142 sts on front piece, then work sts from stitch holder on back piece on to same circular needle = 186-200-214-242-270-284 sts on needle. Insert a marker in transition between front and back piece (= 93-100-107-121-135-142 sts between each marker). First marker is beg of round. K 1 round. Then work pattern as follows: 1 st in stockinette st, work A.1 (= 7 sts) 13-14-15-17-19-20 times in width, 1 st in stockinette st, (marker is here), 1 st in stockinette st, A.1 13-14-15-17-19-20 times in width, 1 st in stockinette st. Continue as follows. When piece measures 2 cm / 3/4'', inc 1 st on each side of marker in each side of piece - READ INCREASE TIP-2 (= 4 sts inc). Repeat inc every 3½-3-2½-3½-4-3 cm / 1 1/4"-1 1/8"-7/8"-1 1/4"-1½"-1 1/8" 7-8-9-7-6-9 more times = 218-236-254-274-298-324 sts. When piece measures 31-32-32-33-33-34 cm / 12 1/4"-12½"-12½"-13"-13"-13½" (adjust to finish nicely according to pattern), switch to circular needle size 3.5 mm / US 4. Work 2 ridges in GARTER ST - see explanation above. Bind off. The whole piece measures approx. 56-58-60-62-64-66 cm / 22''-22¾''-23 5/8''-24 3/8''-25¼''-26''.

ASSEMBLY:
Sew the shoulder seams. Sew tog ridges under each armhole in outer loops of edge sts (= side seams). Sew on button at the top of vent on right back piece.

Diagram

All measurements in charts are in cm.

symbols = K
symbols = K 2 tog
symbols = slip 1 st as if to K, K 1, psso.
symbols = 1 YO between 2 sts
symbols = slip 1 st as if to K, K 2 tog, psso
diagram

Each of our patterns has specific tutorial videos to help you.

Do you have a question? See a list of frequently asked questions (FAQ)

Knitting tension is what determines the final measurements of your work, and is usually measured per 10 x 10 cm. It is provided like so: number of stitches in width x number of rows in height - eg: 19 stitches x 26 rows = 10 x 10 cm.

The knitting tension is very individual; some people knit/crochet loosely while others work tightly. You adjust the knitting tension with the needle size, which is why the suggested needle size only serve as a guide! You need to adjust this (up or down) to ensure that YOUR knitting tension matches the knitting tension provided in the pattern. If you work with a different knitting tension than provided you will have a different yarn consumption, and your work will have different measurements than what the pattern suggests.

The knitting tension also determines which yarns can replace each other. As long as you achieve the same knitting tension you can replace one yarn with another.

See DROPS lesson: How to measure your tension/gauge

See DROPS video: How to make a gauge tension swatch

The required amount of yarn is provided in grams, eg: 450 g. To calculate how many balls you’ll need you first need to know how many grams are in 1 ball (25g, 50g or 100g). This information is available if you click on the individual yarn quality on our pages. Divide the amount required with the amount of each ball. For example, if each ball is 50g (the most common amount), the calculation will be as follows: 450 / 50 = 9 balls.

The important thing when changing from one yarn to another is that the knitting/crochet tension remains the same. This is so that the measurements of the finished piece will be the same as on the sketch provided. It is easier to achieve the same knitting tension using yarns from the same yarn group. It is also possible to work with multiple strands of a thinner yarn to achieve the knitting tension of a thicker one. Please try our yarn converter. We recommend you to always work a test swatch.

Please NOTE: when changing yarn the garment might have a different look and feel to the garment in the photo, due to individual properties and qualities of each yarn.

See DROPS lesson: Can I use a different yarn than the one mentioned in the pattern?

All our yarns are categorised into yarn groups (from A to F) according to thickness and knitting tension – group A contains the thinnest yarns and group F the thickest. This makes it easier for you to find alternative yarns to our patterns, should you wish to switch yarn. All yarns within the same group have a similar knitting tension and can easily replace each other. However, different yarn qualities have different structures and properties which will give the finished work a unique look and feel.

Click here for an overview of the yarns in each yarn group

At the top of all our patterns you’ll find a link to our yarn converter, which is a helpful tool should you wish to use a different yarn than suggested. By filling in the yarn quality you wish to replace, the amount (in your size) and number of strands, the converter will present good alternative yarns with the same knitting tension. Additionally it will tell you how much you’ll require in the new qualities and whether you’ll need to work with multiple strands. Most skeins are 50g (some are 25g or 100g).

If the pattern is worked with multiple colours, every colour will have to be converted separately. Similarly, if the pattern is worked with several strands of different yarns (for example 1 strand Alpaca and 1 strand Kid-Silk) you will have to find alternatives for each, individually.

Click here to see our yarn converter

Since different yarns have different qualities and textures we have chosen to keep the original yarn in our patterns. However, you can easily find options among our available qualities by using our yarn converter, or simply pick a yarn from the same yarn group.

It is possible that some retailers still have discontinued yarns in stock, or that someone has a few skeins at home that they would like to find patterns for.

The yarn converter will provide both alternative yarn as well as required amount in the new quality.

If you think it's hard to decide what size to make, it can be a good idea to measure a garment you own already and like the size of. Then you can pick the size by comparing those measures with the ones available in the pattern's size chart.

You'll find the size chart at the bottom of the pattern.

See DROPS lesson: How to read size chart

The needle size provided in the pattern serves only as a guide, the important thing is to follow the knitting tension. And since knitting tension is very individual, you will have to adjust the needle size to ensure that YOUR tension is the same as in the pattern – maybe you’ll have to adjust 1, or even 2 needle sizes, up or down to achieve the correct tension. For this, we recommend that you work test swatches.

Should you work with a different knitting tension than the one provided, the measurements of the finished garment might deviate from the measurement sketch.

See DROPS lesson: How to measure your tension/gauge

See DROPS video: How to make a gauge tension swatch

Working a garment top-down provides more flexibility and room for personal adjustment. For example it is easier to try the garment on while working, as well as making adjustments to length of yoke and shoulder caps.

The instructions are carefully explaining every step, in the correct order. Diagrams are adjusted to the knitting direction and are worked as usual.

The diagram depicts all rows/rounds, and every stitch seen from the right side. It is read from bottom to top, from right to left. 1 square = 1 stitch.

When working back and forth, every other row is worked from the right side and every other row is worked from the wrong side. When working from the wrong side, the diagram will have to be worked reversed: from left to right, knit stitches are purled, purl stitches are knit etc.

When working in the round every round is worked from the right side and the diagram are worked from right to left on all rounds.

See DROPS lesson: How to read knitting diagrams

The diagram depicts all rows/rounds, and every stitch seen from the right side. It is worked from bottom to top, from right to left.

When working back and forth every other row is worked from the right side: from right to left and every other row is worked from the wrong side: from left to right.

When working in the round, every row in the diagram are worked from the right side, from right to left.

When working a circular diagram you start in the middle and work your way outwards, counter clockwise, row by row.

The rows usually start with a given number of chain stitches (equivalent to the height of the following stitch), this will either be depicted in the diagram or explained in the pattern.

See DROPS lesson: How to read crochet diagrams

Instructions for working several diagrams after each other on the same row/round, will often be written like so: “work A.1, A.2, A.3 a total of 0-0-2-3-4 times". This means you work A.1 once, then A.2 is worked once, and A.3 is repeated (in width) the number of times provided for your size – in this case like so: S = 0 times, M = 0 times, L=2 times, XL= 3 times and XXL = 4 times.

The diagrams are worked as usual: begin with the first row in A.1, then work the first row in A.2 etc.

See DROPS lesson: How to read knitting diagrams

See DROPS lesson: How to read crochet diagrams

The total width of the garment (from wrist-to-wrist) will be larger in the larger sizes, despite the actual sleeves being shorter. The larger sizes have longer sleeve caps and wider shoulders, so there will be a good fit in all sizes.

The measurement sketch/schematic drawing provides information regarding the full length of the garment. If it’s a jumper or a jacket the length is measured from the highest point on the shoulder (usually closest to the neckline), and straight down to the bottom of the garment. It is NOT measured from the tip of shoulder. Similarly, the length of yoke is measured from the highest point on the shoulder and down to where yoke is split into body and sleeves.

See DROPS lesson: How to read a schematic drawing

Diagrams are often repeated on the round or in height. 1 repeat is the diagram the way it appears in the pattern. If it says to work 5 repeats of A.1 in the round, then you work A.1 a total of 5 times after/next to each other in the round. If it says to work 2 repeats of A.1 vertically/in height you work the entire diagram once, then begin again at the start and work the entire diagram one more time.

Chain stitches are slightly narrower than other stitches and to avoid working the cast-on edge too tight, we simply chain more stitches to begin with. The stitch count will be adjusted on the following row to fit the pattern and measurement sketch.

The rib edge is more elastic and will contract slightly compared to, for example, stocking stitch. By increasing before the rib edge, you avoid a visible difference in width between the rib edge and the rest of the body.

It’s very easy to cast off too tightly, and by making yarn overs while casting off (and simultaneously casting these off) you avoid a too tight cast off edge.

See DROPS video: How to bind off with yarn overs (yo)

To achieve an even increase (or decrease) you can increase on, for example: every 3rd and 4th row alternately, like so: work 2 rows and increase on the 3rd row, work 3 rows and increase on the 4th. Repeat this until the increase is complete.

See DROPS lesson: Increase or decrease 1 st on every 3rd and 4th row alternately

Should you prefer to work in the round instead of back and forth, you may of course adjust the pattern. You’ll need to add steeks mid-front (usually 5 stitches), and follow the instructions. When you would normally turn and work from the wrong side, simply work across the steek and continue in the round. At the end you’ll cut the piece open, pick up stitches to work bands, and cover the cut edges.

See DROPS video: How to knit steeks and cut open

Should you prefer to work back and forth instead of in the round, you may of course adjust the pattern so you work the pieces separately and then assemble them at the end. Divide the stitches for the body in 2, add 1 edge stitch in each side (for sewing) and work the front and back pieces separately.

See DROPS lesson: Can I adapt a pattern for circular needles into straight needles?

Pattern repeats can vary slightly in the different sizes, in order to get the correct proportions. If you’re not working the exact same size as the garment in the photo, yours might deviate slightly. This has been carefully developed and adjusted so that the complete impression of the garment is the same in all sizes.

Make sure to follow instructions and diagrams for your size!

If you have found a pattern you like which is available in women’s size it’s not very difficult to convert it to men’s size. The biggest difference will be the length of sleeves and body. Start working on the women size that you think would fit across the chest. The additional length will be worked right before you cast off for the armhole/sleeve cap. If the pattern is worked top-down you can add the length right after the armhole or before the first decrease on sleeve.

Regarding additional yarn amount, this will depend on how much length you add, but it is better with a skein too many than too few.

All yarns will have excess fibres (from production) that might come off as lint or shedding. Brushed yarns (ie hairier yarns) have more of these loose, excess fibres, causing more shedding.

Shedding also depends on what is worn under or over the garment, and whether this pulls at the yarn fibres. It’s therefore not possible to guarantee that there will be no shedding

Below are some tips on how to get the best result when working with hairier yarns:

1. When the garment is finished (before you wash it) shake it vigorously so the looser hairs come off. NOTE: do NOT use a lint roller, brush or any method that pulls at the yarn.

2. Place the garment in a plastic bag and put it in your freezer - the temperature will cause the fibres to become less attached to each other, and excess fibres will come off easier.

3. Leave in the freezer for a few hours before taking it out and shaking it again.

4. Wash the garment according to the instructions on the yarn label.

Pilling is a natural process that happens to even the most exclusive of fibers. It's a natural sign of wear and tear that is hard to avoid, and that is most visible in high friction areas of your garment like a sweater's arms and cuffs.

You can make your garment look as new by removing the pilling, using a fabric comb or a pill/lint remover.

Still can't find the answer you need? Then scroll down and leave your question so one of our experts can try to help you. This will be done normally within 5 to 10 working days.
In the meantime, you can read the questions and answers that others have left to this pattern or join the DROPS Workshop on Facebook to get help from fellow knitters/crocheters!

You might also like...

Post a comment to pattern DROPS 170-24

We would love to hear what you have to say about this pattern!

If you want to leave a question, please make sure you select the correct category in the form below, to speed up the answering process. Required fields are marked *.

Comments / Questions (34)

country flag Rita wrote:

Scusate...non riesco a capire ma l’asola mi viene direttamente sopra lo scalfo...nella parte dx del lavoro...e quelle 14 maglie avviate per il collo sono a sx ...su queste maglie devo lavorare lo spacco?....io non capisco proprio in che modo incominciare...paragonando il mio lavoro all’immagine viene completamente diversa....

31.03.2019 - 22:52

DROPS Design answered:

Buongiorno Rita. Gli aumenti per lo scalfo vanno fatti all'inizio del ferro sul diritto del lavoro (dopo le 3 m legaccio). Gli aumenti per lo scollo sono alla fine del ferro, sul diritto del lavoro. L'asola va fatta anche lei alla fine del ferro sul diritto del lavoro. Più avanti le diminuzioni e gli aumenti per lo spacco (l'apertura al centro sul dietro) verranno fatti alla fine del ferro sul diritto del lavoro. Buon lavoro!

01.04.2019 - 08:56

country flag Rita wrote:

Ho incominciato tre volte il dietro sinistro e non riesco a capire dove sto sbagliando...quando faccio l’asola...lavoro la terza e quarta maglia insieme dal bordo....ma bordo dx o sx... Provo a rivedere il percorso dall’ inizio per capire dove sbaglio...le spiegazioni per il dietro sinistro le trovo complicate...grazie

31.03.2019 - 11:17

DROPS Design answered:

Buongiorno Rita. Deve aprire l'asola sul bordo più vicino al centro della schiena. Buon lavoro!

31.03.2019 - 15:35

country flag Grandet wrote:

Bonjour, je voudrais vous poser ma deuxième question : comment faire pour que le passage à l'augmentation pour l'encolure soit joli (entre le tricot et les nouvelles 14 mailles montées) ? Un grand merci.

30.03.2019 - 16:28

DROPS Design answered:

Bonjour Mme Grandet, cette vidéo montre comment monter des mailles sur le côté, veillez à bien avoir la même tension lorsque vous montez ces nouvelles mailles pour que l'arrondi soit plus joli. Vous pourrez éventuellement terminer par une petite bordure au crochet si besoin (type 1 ms, 1 ou plusieurs ml) le long de l'encolure pour ajouter une bordure de finition. Bon tricot!

01.04.2019 - 12:25

country flag Grander wrote:

Bonjour, je viens de commencer ce tricot et il me semble que la boutonnière ne doit pas se trouver à 1,5 du du début de l'ouvrage mais là où commence l'encolure. Ou bien, je ne lis pas bien l'explication ? Merci de votre réponse.

30.03.2019 - 16:18

DROPS Design answered:

Bonjour Mme Grander, le top se tricote de haut en bas, on va ouvrir la boutonnière à 1,5 cm sur le demi-dos gauche côté encolure (mesurez à partir des mailles montées pour l'encolure, pas à partir du rang de montage de l'épaule). Bon tricot!

01.04.2019 - 12:23

country flag Rosie wrote:

At the end of Vent Mid Back, do you measure it at the end (17cm) from the original 10 cast on stitches? Or from where the extra stitches were cast on for the neck? Also, do you cast off these stitches or put them on a holder for the left and right back pieces?

20.07.2018 - 20:48

DROPS Design answered:

Dear Rosie, measure from cast-on edge, it's the length of armhole (see also measurement chart). Don't cast off the sts from left back piece, they will be worked together with the sts from right back piece after it has been worked the same way (reversed). Happy knitting!

23.07.2018 - 07:28

Hana wrote:

Hello. I like this top very much and I want to try to make it. I have one problem, my english is not that good. Are you planning to translate it to czech? Thank you for your answer.

10.03.2018 - 08:49

DEREZANIN FRANCOISE wrote:

Bonjour je voudrais faire le modèle 170-24 mais je ne comprends pas vos explications. Je viens de commencer le demi dos gauche. Pourriez vous m'aider en me donnant le diagramme complet pour continuer ? Merci par avance

24.01.2018 - 17:04

DROPS Design answered:

Bonjour Mme Derezanin, pour le demi-dos gauche, on va augmenter côté emmanchure (en début de rang sur l'endroit, après 3 m point mousse) et en même temps, d'abord diminuer puis augmenter en fin de rang sur l'endroit pour la fente d'encolure (pour qu'elle ait une forme de goutte). Bon tricot!

25.01.2018 - 08:03

country flag Sipos Anikó wrote:

Most komolyan, ezeket a mintákat google fordítóval fordítják vagy egyáltalán átolvassa valaki, mi kerül ide? Rettentő. Nemcsak hogy a mintát nem értem, de időnként magát a mondatot sem. Bosszantó.

17.06.2017 - 14:29

DROPS Design answered:

Kedves Anikó, sajnáljuk, hogy nem tetszenek a mintaleírások, amiket nem google fordító, hanem egy tapasztalt kötéssel foglalkozó, képzett fordító fordítja. Ha kérdése van, szívesen adunk választ, akár itt, akár a Facebook Magyar DROPS csoportjában.

19.06.2017 - 08:46

country flag Helene Trempe wrote:

Bonjour, je ne vois pas de mention pour l'échantillon pour ce patron. Merci de préciser.

02.05.2017 - 21:36

DROPS Design answered:

Bonjour Mme Trempe, vous trouverez l'échantillon sous l'onglet "Fournitures" avec la taille de aiguilles, soit pour ce modèle: 21 m x 28 rangs en jersey = 10 x 10 cm. Bon tricot!

03.05.2017 - 09:12

country flag Elke Klünder wrote:

Sorry, ich hab Zweifel, ob mein Rückenteil so stimmt. Könnt ihr bitte eine Schnittzeichnung vom Rückenteil anfügen. Ich weiss nämlich nicht, ob mein Knopfloch stimmt. Was bedeutet " hintere Mitte"? Vielen Dank.

31.01.2017 - 07:42

DROPS Design answered:

Liebe Frau Klünder, das Knopfloch muss bei der hinteren Mitte gestrickt werden, dh am Ende einer Hinreihe (von dem Schulter/Armausschnitt zur Schlitz. Viel Spaß beim stricken!

31.01.2017 - 09:28