
Popular categories
Looking for a yarn?


|
|||||||||||||||||||||||||||||||||||||||||||||||||
Light's Embrace |
|||||||||||||||||||||||||||||||||||||||||||||||||
 |
 |
||||||||||||||||||||||||||||||||||||||||||||||||
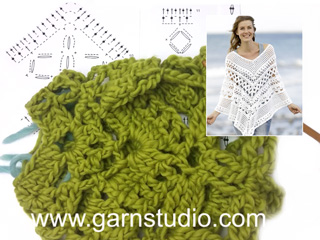
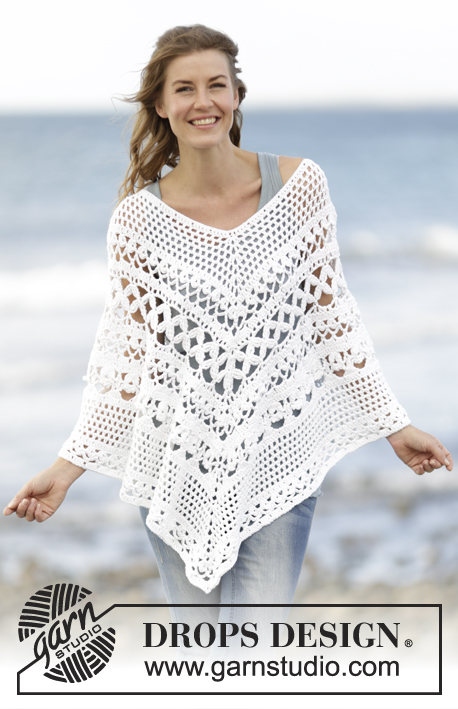
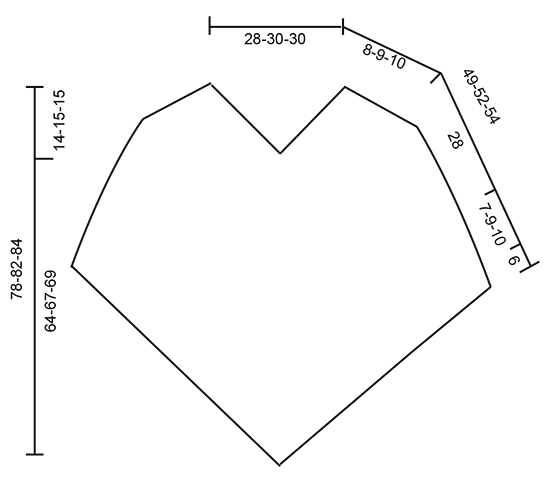
Crochet DROPS poncho with lace pattern, worked top down in ”Paris”. Size S-XXXL.
DROPS 169-4 |
|||||||||||||||||||||||||||||||||||||||||||||||||
|
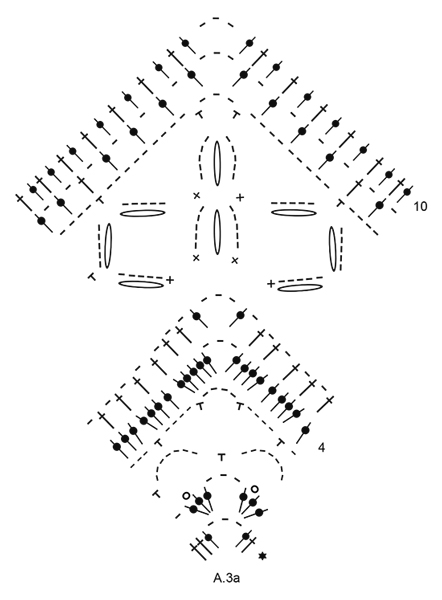
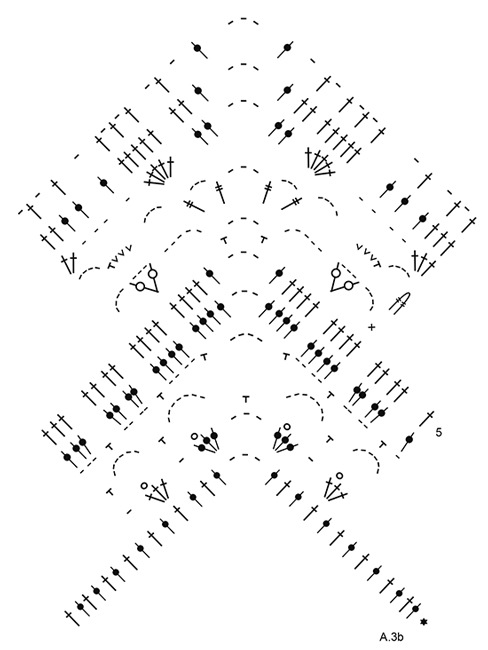
PATTERN: See diagrams A.1 to A.5. Diagrams A.1a and A.1b show how round beg and ends. CROCHET INFO: Beg every tr round with 3 ch (these ch do not replaces first tr). At the end of round work 1 sl st in 3rd ch at beg of round. NOTE: When working A.5 beg round with 3 ch. At the end of round work 1 tr in first st worked on round (i.e. st with the 3 ch in), then 1 sl st in 3rd ch at beg of round. WORK 2 DTR TOG: Work 1 dtr around ch-space below but wait with last pull through (= 2 loops on hook), skip 1 dc and work 1 dtr around next ch-space but on last pull through, pull yarn through all loops on hook. WORK 3 DTR TOG: Work 1 dtr but wait with last pull through (= 2 sts on hook), work 1 more dtr but wait with last pull through (= 3 loops on hook), work 1 more dtr but on last pull through, pull yarn through all loops on hook. MESH PATTERN: ROUND 1: * Start with 1st row of A.5, work the 4 tr in first/next tr with marker, work (1 ch, ship 1 tr, 1 tr in next tr) until 1 tr remains before next marker, work 1 ch, skip next tr *, repeat from *-* 3 times more. There is now 4 repeats of A.5 on round. ROUND 2: * Work A.5 around first/next ch-space with marker, then work 1 tr in next tr, 1 ch, 1 tr around first ch-space, (1 ch, skip 1 tr, 1 tr in next ch-space) until 1 ch-space remains before next repeat of A.5, work 1 ch, 1 tr in next tr *, repeat from *-* 3 times more. ROUND 3: * Work A.5 around first/next ch-space with marker, then work (1 ch, skip 1 tr, 1 tr around next ch-space) until next repeat of A.5, 1 ch *, repeat from *-* 3 times more. ---------------------------------------------------------- PONCHO: Worked in the round, top down. First inc mid front, mid back and on each shoulder, then inc only mid front and mid back. Work 153-163-163 ch on hook size 4.5 mm with Paris and form a ring with 1 sl st. Work 3 ch – see CROCHET INFO! Then work 1 tr in each of the next 3-1-1 ch, * skip 1 ch, 1 tr in each of the next 5 ch *, repeat from *-* 24-26-26 more times on round = 128-136-136 tr + 3 ch on round. Now insert 4 markers from beg of round without working: Insert 1 marker in 1st tr on round (= mid back), skip 31-33-33 tr, insert 1 marker in next tr (= shoulder), skip 31-33-33 tr, insert 1 marker in next tr (= mid front), skip 31-33-33 tr, insert 1 marker in next tr (= shoulder), there are now 31-33-33 tr between last marker and beg of round. Now work MESH PATTERN - see explanation above. When 1st-3rd round have been worked, repeat 2nd and 3rd round until 6-7-8 rounds with mesh pattern have been worked - see diagram A.4a and A.4b to see how to work the whole inc in each side of A.5. REMEMBER THE CROCHET TENSION! Piece measures approx. 8-9-10 cm. Work next round as follows AT THE SAME TIME dec 0-8-8 tr evenly (= 0-4-4 tr dec on each side of mid back and mid front): *Work (2 tr, 3 ch, 2 tr) around ch-space (= mid back on 1st repetition and mid front on 2nd repetition), then work 1 tr in every tr and 1 tr around every ch until next inc tr-group, work 3 tr around ch-space (= shoulder), work 1 tr in every tr and 1 tr around every ch until inc tr-group (mid front on 1st repetition and mid back on 2nd repetition)*, repeat from *-* 1 more time. There are now 117-125-133 tr between ch-space mid front and mid back (= 234-250-266 tr in total on round + 2 ch-space). Cut the yarn. NOTE: Then do not inc on each shoulder but only mid front and mid back on poncho. Work 1 sl st in the 10th st from ch-space mid back and work pattern as follows: Work A.1a (shows how round beg and end, does not replace first st), A.2a (= 8 tr) 13-14-15 times in width, A.3a (= inc mid front), continue with A.2a 14-15-16 times in width, A.3a (= inc mid back) and A.2a 1 time in all sizes. On 4th round in A.3a there are 133-141-149 tr between ch-space mid front and mid back. Continue with pattern as before (there is now room for 16-17-18 repetitions A.2a on each side of A.3a). On 10th round inc 8 tr evenly on each side of A.3a (= 16 tr in total on round) = 163-171-179 tr on each side of ch-space mid front and mid back. Continue with pattern as before, but now work A.1b over A.1a, A.2b over A.2a and A.3b over A.3a (there is now room for 19-20-21 repetitions A.2 on each side of A.3). On 4th round inc 3 tr evenly between every repetitions of A.3 (i.e. 6 tr in total on round) = 169-177-185 tr between each ch-space mid front and mid back. Continue pattern (there is now room for 21-22-23 repetitions A.2 on each side of A.3). When entire diagram has been worked vertically, piece measures 36-37-38 cm. Cut the yarn. Now work mesh pattern as at beg of piece. Beg in ch-space mid back, and work mesh pattern from 3rd round in mesh pattern. Repeat 2nd and 3rd round until 6-8-10 rounds in total have been worked (incl last round in A.2 and A.3). Work next round as follows: * Work (2 tr, 3 ch, 2 tr) around ch-space (= mid back), then work 1 tr in every tr and 1 tr around every ch until next repeat of A.5 *, repeat from *-* 1 more time = 193-209-225 tr between ch-space mid front and mid back. Cut the yarn. Now work pattern A.1a, A.2a and A.3a as follows: Work 1 sl st in 12th tr from ch-space mid back and work pattern as follows: Work A.1a (shows how round beg and end, does not replace first st), A.2a until 2 tr remain before ch-space mid front, A.3a (= inc mid front), continue with A.2a until 2 tr remain before ch-space mid back, A.3a (= inc mid back) and A.2a 1 time in all sizes. When 4th row has been worked vertically, poncho measures 49-52-54 cm. Fasten off. |
|||||||||||||||||||||||||||||||||||||||||||||||||
Diagram explanations |
|||||||||||||||||||||||||||||||||||||||||||||||||
|
|||||||||||||||||||||||||||||||||||||||||||||||||

|
|||||||||||||||||||||||||||||||||||||||||||||||||
|
|||||||||||||||||||||||||||||||||||||||||||||||||
|
|||||||||||||||||||||||||||||||||||||||||||||||||

|
|||||||||||||||||||||||||||||||||||||||||||||||||
|
|||||||||||||||||||||||||||||||||||||||||||||||||
|
Have you made this or any other of our designs? Tag your pictures in social media with #dropsdesign so we can see them! Do you need help with this pattern?You'll find tutorial videos, a Comments/Questions area and more by visiting the pattern on garnstudio.com. © 1982-2024 DROPS Design A/S. We reserve all rights. This document, including all its sub-sections, has copyrights. Read more about what you can do with our patterns at the bottom of each pattern on our site. |
|||||||||||||||||||||||||||||||||||||||||||||||||


With over 40 years in knitting and crochet design, DROPS Design offers one of the most extensive collections of free patterns on the internet - translated to 17 languages. As of today we count 304 catalogues and 11422 patterns - 11422 of which are translated into English (UK/cm).
We work hard to bring you the best knitting and crochet have to offer, inspiration and advice as well as great quality yarns at incredible prices! Would you like to use our patterns for other than personal use? You can read what you are allowed to do in the Copyright text at the bottom of all our patterns. Happy crafting!
Comments / Questions (224)
Die Anleitung ist sehr kompliziert geschrieben , nach zwei Abend Kopfzerbrechen , geb ich auf . Das ist nicht das erstmal das ich mit euren Anleitungen Schwierigkeiten habe und eigentlich bin ich eine sehr geübte handarbeiterin. Nicht nur das man ständig hin und her blättern muss , ist das mit 2a und 2b sehr verwirrend geschrieben .
13.07.2019 - 23:37DROPS Design answered:
Liebe Beatrix, Die DROPS-Muster werden von Tausenden und Abertausenden Menschen auf der ganzen Welt gestrickt und gehäkelt. Wir verstehen jedoch, dass in bestimmten Ländern mit anderen Strick- / Häkeltraditionen als in Skandinavien unsere Muster möglicherweise anders geschrieben sind als in einigen anderen Ländern. Natürlich möchten wir, dass alle unsere Muster verstehen. Aus diesem Grund haben wir eine umfangreiche Bibliothek mit Lernvideos sowie schrittweisen Lektionen erstellt, in denen erklärt wird, wie wir die verwendeten Techniken befolgen und wie die Diagramme in unseren Mustern gelesen werden. Probieren Sie es aus!
15.07.2019 - 11:39In de teltekening a3a staan in toer 4 na de 3 losse 5 stokjes in de l-lus. De rest heeft 4 stokjes. Moeten dit niet ook 4 stokjes zijn?
08.07.2019 - 08:52DROPS Design answered:
Dag Michelle,
Nee, dit zijn inderdaad 5 stokjes om goed uit te komen met de steken in de volgende toer.
12.07.2019 - 08:57Bonjour je ne comprend pas le rang 3 est ce possible qu'il y ait une erreur j'essai de le faire et ,ça ne fonctionne pas MERCI
26.05.2019 - 21:28DROPS Design answered:
Bonjour Jojo, crochetez A.5 comme indiqué dans les diagrammes: au 2ème rang de A.5, crochetez au point de filet (= A.4a) jusqu'au coin, crochetez A.5 autour de l'arceau et continuez ensuite au point de filet (= cf A.4b après A.5) et continuez ainsi à chaque coin avec A.5 - le 3ème rang va se crocheter pareil: point de filet (A.4a) jusqu'au coin, A.5 dans le coin (= autour des 3 ml du 2ème rang), puis point de filet après A.5 (cf A.4b). Bon crochet!
27.05.2019 - 11:47After the mesh pattern do i need to stop increasing for shoulders? Thank you ...
21.05.2019 - 16:57DROPS Design answered:
Dear Hulya, correct, when mesh pattern is worked (= 234-250-266 sts + 2 ch-spaces on the round), you continue without increasing on shoulders, only increasing on mid front and mid back. Happy crocheting!
22.05.2019 - 08:23Que significa en la explicación la abreviatura MP
20.05.2019 - 20:20DROPS Design answered:
Hola Lorena. MP = marcapuntos. Puedes encontrar todas las abreviaturas aquí: https://www.garnstudio.com/glossary.php?langf=es&langt=en
25.05.2019 - 18:41Mary Ryan is certainly isn't beginner material. I used both English and Dutch pattern in order to compare the writing. It was the same. Although I changed a few small things in order to get the right amount of stitches, I think the pattern is ok. But again it's not easy and you have to use your knowledge of crocheting at times. If that's not a problem for you then you should be alright. Also you can always ask here but won't get an answer right away. That's why I chose to do my own thing.
14.04.2019 - 16:35Has anyone been able to complete this pattern? Has it been correctly translated into English? Any written pattern yet or complete correct English diagram showing each row?
09.04.2019 - 13:32DROPS Design answered:
Dear Mrs Ryan, this pattern has been now edited, if you print it now, printed pattern includes all corrections - read more here about diagrams. Happy crocheting!
09.04.2019 - 13:39Hoi. Zojuist weer mijn werk uitgehaald. Ik vind het netpatroon niet duidelijk dan wel mooi worden. Ik moet iedere toer beginnen met 3l. Bij t1 kan ik dan direct in st daarna a5 starten. Bij sluiten t1 moet ik een st in laatste st vorige toer haken en dan ook een hv in 3e l. Dan heb ik dus een heel dik stokje? Dan volgende toeren zit ik steeds verder bij lus vandaan om a5 te maken. Haak ik daar eerst naar toe dmv 1l 1st patroon? Anders is rechterkant altijd anders dan linkerkant van start a5.
02.04.2019 - 21:17DROPS Design answered:
Dag Dominique,
Je kan er inderdaad naar toe haken met halve vasten, zodat je weer aan het begin van de toer bent en dat is ook de bedoeling.
04.04.2019 - 08:47I love this pretty poncho but I can't understand how to do A1, A2, and A3, the pattern isn't clear how they work together, please help
18.03.2019 - 23:59DROPS Design answered:
Dear Mrs Taylor, this lesson explains how to read crochet diagrams; and how to "Several different diagrams worked consecutively on the row/round:". Happy crocheting!
19.03.2019 - 11:27Two times chain 3 only? Pattern says 3: Sc-ch3, sc-ch3, sc-ch3, sc ... What is correct?
27.02.2019 - 16:57DROPS Design answered:
Dear Mrs Klinkenbijl, oops you are right, I missed the 3rd symbol :) you will have (1 sc, 3 ch) x 3, 1 sc around the same chain-space. Happy crocheting!
28.02.2019 - 09:18