
Popular categories
Looking for a yarn?


|
||||||||||||||||||||||||||||||||||
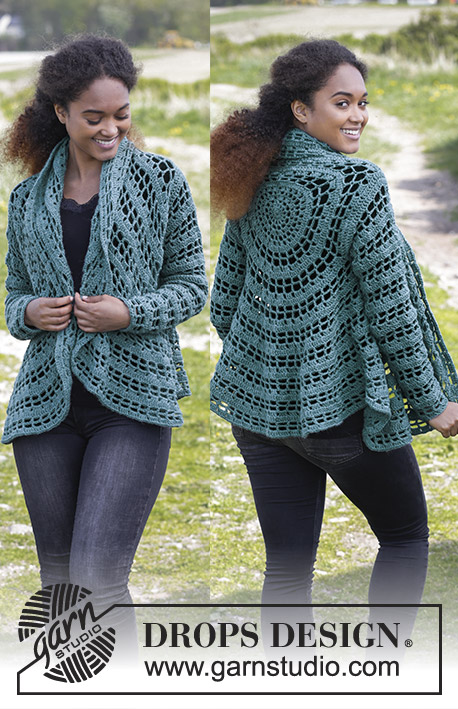
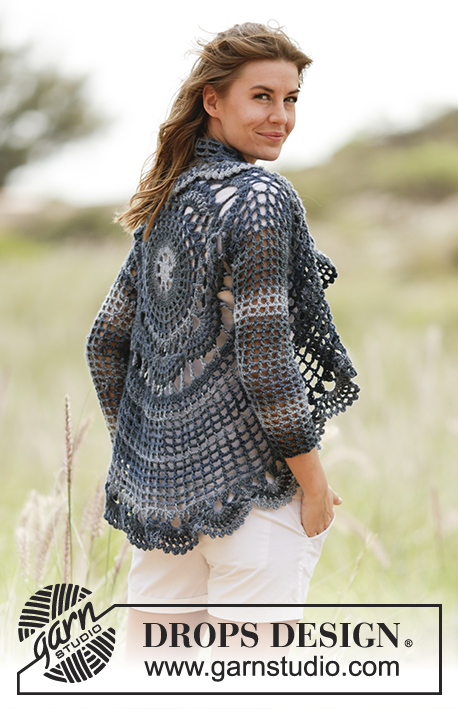
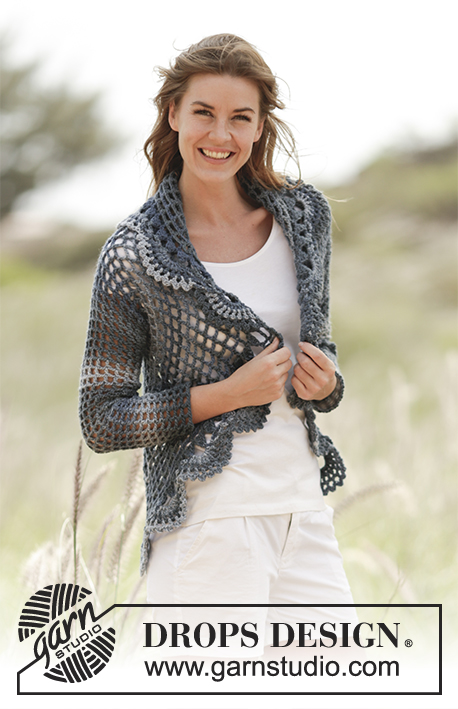
Evening Tide |
||||||||||||||||||||||||||||||||||
 |
 |
|||||||||||||||||||||||||||||||||
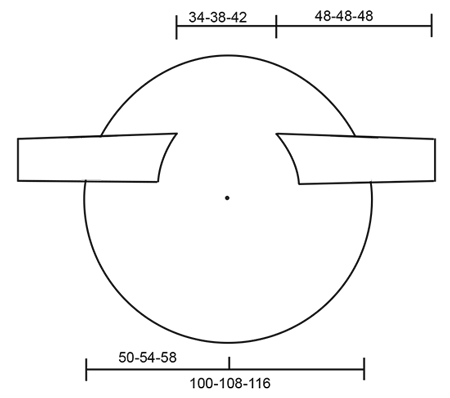
Crochet DROPS jacket worked in a circle in "Big Delight". Size S-XXXL.
DROPS 168-27 |
||||||||||||||||||||||||||||||||||
|
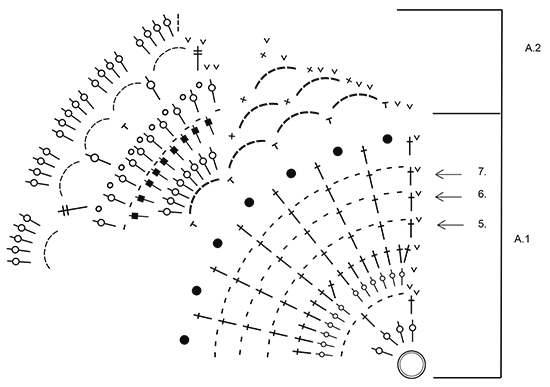
MAGIC CIRCLE: To avoid hole in the middle beg with this technique: Hold yarn end in the left hand and make a loop around left index finger (from left to right). Hold the loop with left thumb and index finger. Insert hook through loop, get the yarn from ball, pull yarn through loop, make 1 YO on hook and pull YO through st on hook = 1 sc, work ch 3, then work 15 dc around loop, finish with 1 sl st in 3rd ch = 16 dc. Continue as explained in pattern – AT THE SAME TIME pull yarn end so that loop is tighten tog and the hole disappears. PATTERN: See diagrams A.1 and A.2. CROCHET INFO: Replace first dc from beg of round with 3 ch. Finish round with 1 sl st in 3rd ch from beg of round. Replace first tr on beg of round with 4 ch. Finish round with 1 sl st in 4th ch on beg of round. ---------------------------------------------------------- JACKET WORKED IN A CIRCLE: Work a MAGIC CIRCLE - see explanation above, on hook SIZE 5.5 mm/US 9 with Big Delight. Then work according to A.1 - NOTE: First round in A.1 is explained in magic circle, work 4 repetitions of A.1 in width. Sl sts at beg of A.1 are only worked at beg of round. READ CROCHET INFO! REMEMBER THE CROCHET GAUGE! When A.1 has been worked, continue according to A.2, work 7 repetitions of A.2 in width, on last round in A.2 dec 1 dc = 160 dc. Continue to work according to A.1, now beg on 5th round - see arrow in diagram. Work 1-2-3 rounds as 5th round in diagram (= 80 dc + 2 ch), then work armholes as follows: Work * 1 dc + 2 ch in first dc *, repeat from *-* over the first 20 dc, work 22-24-26 ch, skip 10-11-12 dc (=1st armhole), work * 1 dc + 2 ch in next dc *, repeat from *-* over the next 40-38-36 dc, work 22-24-26 ch, skip 10-11-12 dc (=2nd armhole), finish with 1 sl st at beg of round. Then work as 6th round in diagram as follows: Work 1 dc + 2 ch in every dc until 1st armhole, * work 1 dc + 2 ch around ch-space *, repeat from *-* 10-11-12 more times, continue with 1 dc + 2 ch until 2nd armhole, * work 1 dc + 2 ch around ch-space *, repeat from *-* 10-11-12 more times = 82 dc with 2 ch between each. Then repeat 7th round 8-7-6 times upwards. Work 7th round 1-3-5 more times, AT THE SAME TIME inc 2 dc evenly on every row, i.e. two times on every round work as follows: 1 dc + 3 ch + 1 dc + 3 ch in 1 dc = 84-88-92 dc with 3 ch between each. Piece measures approx. 80-88-96 cm / 31½"-34½"-38" in diameter (= 40-44-48 cm / 15 3/4"-17 1/4"-19" from middle). Work last round in A.1, then work according to A.2 (= 21-22-23 repetitions in width). Fasten off. SLEEVES: Work in the round from armhole and down. Work 1 dc + 2 ch in every dc skipped, and 1 dc + 2 ch in bottom edge of every dc from the other side of armhole = 21-23-25 dc with 2 ch between each. Insert a marker mid under sleeve. Continue with 1 dc + 2 ch in every dc. When piece measures 4 cm / 1½'', dec 1 dc + 2 ch mid under sleeve as follows: Work last dc before marker but wait with last pull through, work next dc (do not work 2 ch between), on last pull through, pull yarn through all 3 loops on hook (= 1 dc + 2 ch dec). Dec every 5 cm / 2'' 7 more times, dec alternately before and after marker = 13-15-17 dc with 2 ch between each. Continue until piece measures 48 cm / 19'' in all sizes, fasten off. Work another sleeve the same way. |
||||||||||||||||||||||||||||||||||
Diagram explanations |
||||||||||||||||||||||||||||||||||
|
||||||||||||||||||||||||||||||||||
|
||||||||||||||||||||||||||||||||||
|
||||||||||||||||||||||||||||||||||
|
Have you made this or any other of our designs? Tag your pictures in social media with #dropsdesign so we can see them! Do you need help with this pattern?You'll find tutorial videos, a Comments/Questions area and more by visiting the pattern on garnstudio.com. © 1982-2024 DROPS Design A/S. We reserve all rights. This document, including all its sub-sections, has copyrights. Read more about what you can do with our patterns at the bottom of each pattern on our site. |
||||||||||||||||||||||||||||||||||


With over 40 years in knitting and crochet design, DROPS Design offers one of the most extensive collections of free patterns on the internet - translated to 17 languages. As of today we count 304 catalogs and 11422 patterns - 11417 of which are translated into English (US/in).
We work hard to bring you the best knitting and crochet have to offer, inspiration and advice as well as great quality yarns at incredible prices! Would you like to use our patterns for other than personal use? You can read what you are allowed to do in the Copyright text at the bottom of all our patterns. Happy crafting!
Comments / Questions (47)
Buongiorno a tutto lo staff! In questo momento ho terminato lo schema A1 e vorrei sapere se, x la taglia S/M, devo saltare quei 2 passaggi dello schema A2 che si trovano in alto a dx e proseguire con le maglie alte nell'arco di catenelle. Grazie Claudia
01.03.2016 - 08:20DROPS Design answered:
Buongiorno Claudia, la prima parte del lavoro fino agli scalfi è identica per tutte le taglie: dopo aver lavorato il diagramma A.1 deve lavorare tutto il diagramma A.2 in altezza e poi riprendere con il giro 5 di A.1 e seguire le spiegazioni indicate. Buon lavoro!
01.03.2016 - 10:48Die Anleitung kann nicht stimmen. Wenn für alle Grössen 80 Stb. vor dem Armausschnitt sind, kann man nicht 20+12+36+12=90 für Ärmelausschnitt arbeiten (möglich nur f. Gr. S/M); woher nimm ich die 90 Stb.?
17.02.2016 - 05:09DROPS Design answered:
Liebe Ada, 20+12+36+12=80 und nicht 90. Die Anleitung ist korrekt.
08.03.2016 - 13:38Na de magische cirkel ben ik het kwijt. Hoe moet ik nu verder? Volgens het patroon moet ik nu stokjes om de lossen haken en wat wordt bedoeld met in de breedte? Ben nog niet zo goed in het lezen van tekeningen. Heb al wel de edelweiss omslagdoek gehaakt en het lovely lilly vestje, maar dit staat stap voor stap beschreven. groeten Hillegonda
15.02.2016 - 18:44DROPS Design answered:
Hoi Hillegonda. Kijk op telpatroon A.1. De cirkel aan het begin is de magische cirkel. Eerste toer is dan 4 stk om l-lus (= 1 herhaling), Je herhaalt A.1 vier keer om de cirkel = 16 stk om de lus. Dan toer 2 is "stk in stk, 4 l, stk in stk, 4 l" herhaal 4 keer in totaal enzovoort. Zie ook hier hoe je onze teltekeningen moet lezen
17.02.2016 - 11:46Debbie wrote:
I Finished round 14 from A-2 I need to start round 9 again, I joined at the chain 3(count as first double crochet) from round 14, slip stitch one over, 1 sc between the 2nd and 3rd double crochet of round 14, chain 5, How many double crochets from round 14 do I skip to place another sc?
14.02.2016 - 21:48DROPS Design answered:
Dear Debbie, after round 14 from A.2 you have to do round 5 from A.1, making dc to every second dc. Happy crocheting!
15.02.2016 - 17:27Debbie wrote:
Chart A-1 round 2 and each round on Chart A-2 has two slip stitch symbols. What do I do there?
11.02.2016 - 00:10DROPS Design answered:
Dear Debbie, on round 2 in A.1, work 2 sl st: 1 sl st to join in the round + 1 sl st in first ch-space (only in 1st repeat), same in A.2, work 1 sl st to join in the round + another sl st in first ch-space. Happy crocheting!
11.02.2016 - 10:44At the beginning of each round on the chart it shows for a slip stitch. is this just showing the join of each round or do I do another slip stitch after the join?
10.02.2016 - 14:57DROPS Design answered:
Dear Debbie, the sl st at beg of round in diagram is the one worked to join each round. Happy crocheting!
10.02.2016 - 16:01Permettez-moi de vous déranger encore, arrivée aux emmenchures vous dites de sauter 11 brides(espacées de 2ml) et au rang suivant monter 24 mailles en l'air, cela resserre considérablement l'ouvrage et forme une toute petite emmenchure, est-ce normal ? Merci pour votre réponse
08.02.2016 - 11:17DROPS Design answered:
Bonjour Nelly, c'était la volonté de la styliste que l'emmanchure ne soit pas trop large, vous pouvez toutefois ajuster et crocheter davantage de ml si vous préférez. Bon crochet!
17.02.2016 - 09:15Grand merci d'avoir éclairé ma lanterne, et bonjour à toute l'équipe !
05.02.2016 - 11:35Votre collection est super, mais j'ai un petit souci concernant ce modèle, le picot quel est le bon ? Le point noir ou blanc car trois brides dans une maille en l'air, j'ai des doutes !!!!! Merci pour votre réponse
04.02.2016 - 15:48DROPS Design answered:
Bonjour Nelly, on a ici 2 types de picot: un petit (point noir) avec 1 B dans la 1ère des 3 ml crochetées, et un grand (rond blanc) avec 3 B dans la 1ère des 3 ml crochetées - à réaliser à 2 endroits différents du modèle. Bon crochet!
04.02.2016 - 16:41Me encanta!!
02.02.2016 - 18:15