
Popular categories
Looking for a yarn?


|
|||||||
Crayons |
|||||||
|
|
|||||||
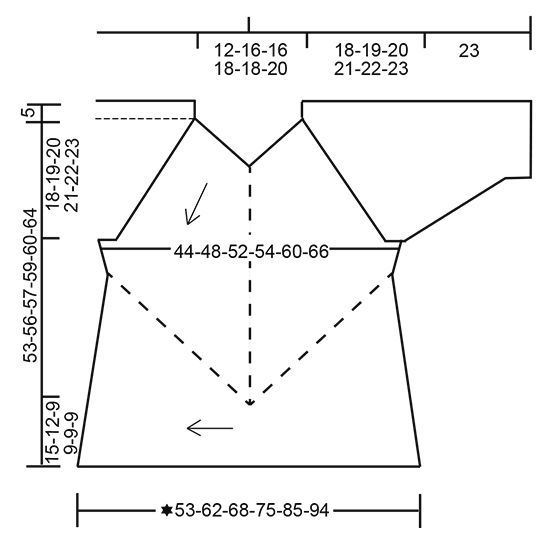
Knitted DROPS jumper worked diagonally in garter st with stripes and domino squares in ”Fabel” or "Flora". Worked top down. Size: S - XXXL.
DROPS 167-36 |
|||||||
|
FABEL: Cast on with different color so that stripes fit vertically. In size S-M-L-XXXL cast on with off white. In size XL-XXL cast on with rose mist/pink. GARTER ST (back and forth): K all rows. 1 ridge = K2 rows. GARTER ST (worked in the round): 1 ridge = 2 rounds. * K 1 round and P 1 round *, repeat from *-*. STRIPES: Work stripes in the different sizes as follows: SIZE S-M-L-XXXL: 1 ridge (work first round/row K) with off white. 1 ridge rose mist/pink. SIZE XL-XXL: 1 ridge (work first round/row K) with rose mist/pink. 1 ridge in off white. DOMINO SQUARE: SIZE S-M-L-XL: ROUND 1: P all sts. ROUND 2: Inc 1 YO before 1st-3rd-4th-6th marker and 1 YO after 1st-2nd-4th-5th marker (= 8 sts inc on round). ROUND 3 (and all uneven numbered rounds): P all sts, do not work YOs twisted; they should make holes. ROUND 4: Inc 2 YOs on each side of 1st and 4th marker (= front and back piece) as follows: Work until 1 st remains before st with marker, 1 YO, K 1, 1 YO, work st with marker, 1 YO, K 1, 1 YO (= 8 sts inc on back and front piece). ROUND 6: Work as 2nd round. ROUND 8: Inc 1 YO on each side of 1st and 4th marker as follows: Work until st with marker, 1 YO, work st with marker, 1 YO. ROUND 10: Work as 2nd round. SIZE XXL-XXXL: ROUND 1: P all sts. ROUND 2: Inc 1 YO before 1st-3rd-4th-6th marker and 1 YO after 1st-2nd-4th-5th marker (= 8 sts inc on round). ROUND 3 (and all uneven numbered rounds): P all sts, do not work YOs twisted; they should make holes. ROUND 4: Inc 2 YOs on each side of 1st and 4th marker (= front and back piece) as follows: Work until 1 st remains before st with marker, 1 YO, K 1, 1 YO, work st with marker, 1 YO, K 1, 1 YO (= 8 sts inc on back and front piece). ROUND 6: Work as 2nd round. ROUND 8: Work as 4th round. ROUND 10: Work as 2nd round. ROUND 12: Work as 2nd round. DECREASE TIP (applies to mid under sleeve): Dec on each side of marker as follows: Beg 4 sts before marker and K 2 tog, K 4 (marker is between these 4 sts), slip 1 st as if to K, K 1, psso (= 2 sts dec). MEASURING TIP: All measurements on sleeves are done when piece is held up, sleeves will be somewhat longer when used and it is therefore important not to make them too long. ---------------------------------------------------------- JUMPER: First worked back and forth, then in the round from top down. When yoke has been worked, work a bottom edge back and forth. Work entire piece in STRIPES - see explanation above. YOKE: Work first back and forth as follows: Cast on 7 sts on circular needle size 3.5 mm / US 4 with Fabel - see explanation above. Work 1 ridge in GARTER ST - see explanation above. Work as follows from RS: 2 sts in garter st, 1 YO, 1 st in garter st (insert 1 marker in this st), 1 YO, 1 st in garter st (= mid st, insert 1 marker in this st), 1 YO, 1 st in garter st (insert 1 marker in this st), 1 YO, 2 sts in garter st (= 4 sts inc) = 11 sts. Repeat inc on each side of mid st and inside 2 edge sts in garter st in each side of piece on every row from RS 5-7-7-8-8-9 more times = 31-39-39-43-43-47 sts (= 13-17-17-19-19-21 sts between mid st and markers in each side). K 1 row from WS. K 1 row from RS as follows: Work in garter st until mid st AT THE SAME TIME inc 0-0-0-1-1-1 st, 1 YO, 1 st in garter st (= mid st), 1 YO, work in garter st the rest of row AT THE SAME TIME inc 0-0-0-1-1-1 st, cast on 73-81-81-87-87-91 loose sts (= sleeves and front piece) at the end of row (= 2-2-2-4-4-4 sts inc) = 106-122-122-134-134-142 sts. Join piece tog and work the next 2 sts in garter st, round is displaced to that next round beg here. Now work in the round in GARTER ST - see explanation above and stripes as before as follows: P first rnd. Work next round as follows: Work 14-18-18-21-21-23 sts and inc 0-0-4-0-2-7 sts evenly (= half back piece), 1 YO, insert 1st marker in next st, 1 YO, work 14-18-18-21-21-23 and inc 0-0-4-0-2-7 sts evenly (= half back piece), 1 YO, insert 2nd marker in next st, work 22 sts in garter st and inc 0-0-2-2-0-0 sts evenly, insert 3rd marker in next st, 1 YO, work 14-18-18-21-21-23 sts and inc 0-0-4-0-2-7 sts evenly (= half front piece), 1 YO, insert 4th marker in next st, 1 YO, work 14-18-18-21-21-23 sts and inc 0-0-4-0-2-7 sts evenly (= half front piece), 1 YO, insert 5th marker in next st, work 22 sts in garter st and inc 0-0-2-2-0-0 sts evenly, insert 6th marker in next st, 1 YO = 114-130-150-146-150-178 sts. Work DOMINO SQUARE – see explanation above, beg to work 3rd round. REMEMBER THE KNITTING GAUGE Work 3rd to 10th-10th-10th-10th-12th-12th round 1 time, then repeat 1st to 10th-10th-10th-10th-12th-12th round 7-7-8-8-7-7 times in total. Then work the first 0-6-0-4-4-8 rounds 1 more times = 62-70-76-78-90-100 sts between 1st and 2nd marker/3rd and 4th marker/4th and 5th marker/6th and 7th marker (= front/back piece), 1 st with each of markers (= 6 sts), 70-74-78-80-88-90 sts between 2nd and 3rd marker/5th and 6th marker (= sleeves) = 394-434-466-478-542-586 sts in total. Piece now measures approx. 18-19-20-21-22-23 cm / 7''-7½''-8''-8¼''-8 ¾''-9'' measured along the shoulder. Work next round as follows: Continue with garter st and stripes as before. Work the first 2 sts tog, work in garter st until 1st marker, 1 YO, work st with marker, 1 YO, work in garter st until 2 sts remain before 2nd marker, work 2 sts tog, slip the next 72-76-80-82-90-92 sts (includes sts with 2nd and 3rd marker) on a stitch holder for sleeve, cast on 8-8-8-12-12-12 sts under sleeve (insert 1 marker in the middle of the new sts), work 2 sts tog, work in garter st until 4th marker, 1 YO, work st with marker, 1 YO, work in garter st until 2 sts remain before 5th marker, work 2 sts tog, insert the next 72-76-80-82-90-92 sts (includes sts with 5th and 6th marker) on a stitch holder for sleeve, cast on 8-8-8-12-12-12 sts under sleeve (insert 1 marker in the middle of the new sts), work in garter st the rest of round = 266-298-322-338-386-426 sts. SIZE S-M-L: ROUND 1 (= all uneven numbered rounds): P all sts, do not work YOs twisted; they should make holes. ROUND 2: Continue with stripes and in garter st as before, work until 1st marker (= mid back), 1 YO, K 1 (= st with marker), 1 YO (= 2 sts inc), work until 4 sts remain before marker under sleeve, K the next 2 tog (= 1 st dec), work 4 sts (marker is in the middle of these sts), K the next 2 tog (= 1 st dec), work until 4th marker (= mid front), 1 YO (= 1 st inc), K 1 (= st with marker), 1 YO (= 1 st inc), work until 4 sts remain before marker under sleeve, K the next 2 tog (= 1 st dec), work 4 sts (marker is in the middle of these sts), K the next 2 tog (= 1 st dec), work the rest of round. ROUND 4: Work as 2nd round. ROUND 6: Work until 1st marker (= mid back), 1, YO, K 1 (= st with marker), 1 YO (= 2 sts inc), work until 6 sts remain before marker under sleeve, * K the next 2 tog (= 1 st dec) *, repeat from *-* 1 more time (= 2 sts dec), work 4 sts (marker is in the middle of these sts), * K the next 2 tog (= 1 st dec) *, repeat from *-* 1 more times (= 2 sts dec), work until 4th marker (= mid front), 1 YO (= 1 st inc), K 1 (= st with marker), 1 YO (= 1 st inc), work until 6 sts remain before marker under sleeve, * K the next 2 tog (= 1 st dec) *, repeat from *-* 1 more time (= 2 sts dec), work 4 sts (marker is in the middle of these sts), * K the next 2 tog (= 1 st dec) *, repeat from *-* 1 more time (= 2 sts dec), work the rest of round (= 4 sts dec in total on round). Repeat 1st-6th round 4 times in total = 250-282-306 sts. ALL SIZES: = 250-282-306-338-386-426 sts. Leave sts on circular needle. They should be worked tog with an edge worked from side to side. Displace sts so that st with 1st marker is beg of round. KNIT TOGETHER: Now work from mid back, left back piece to the side, left front piece to mid, right front piece to right side then back right piece. Cast on 34-28-20-20-20-20 sts on circular needle size 3.5 mm / US 4 with off white. Now work back and forth as follows: LEFT BACK PIECE (bottom edge): Piece should now be worked tog with sts from needle from 1st marker and to marker under sleeve, from mid back on tip of domino to the left side. ROW 1 (= RS): K 1, 1 YO and K rest of row (= 1 st inc). ROW 2 (= WS): K until 1 st remains on row, do not work YOs twisted on this row, they should make holes, slip the first 2 sts from yoke back on needle, K 3 tog. Switch to rose mist/pink. ROW 3 (= RS): K 1, 1 YO and K rest of row (= 1 st inc). ROW 4 (= WS): K until 6 sts remain on row, turn piece. ROW 5 (= RS): K all sts. ROW 6 (= WS): K until 4 sts remain on row, turn piece. ROW 7 (= RS): K all sts. ROW 8 (= WS): K until 1 st remains on row, slip the first 2 sts from yoke back on needle, K 3 tog. Switch to off white. Repeat 1st-8th row until all sts before marker in the side (= left back piece) is worked tog with edge. LEFT FRONT PIECE (bottom edge): Piece is worked tog with sts from half front piece, i.e. from marker in the side and down to tip of domino mid front. ROW 1 (= RS): K 1, 1 YO, K 2 twisted tog, K 2 twisted tog, K the rest of row (= 1 st dec). ROW 2 (= WS): K until 1 st remains on row, do not work YOs twisted on this row, they should make holes, slip the first 2 sts from yoke back on needle, K 3 tog. Switch to rose mist/pink. ROW 3 (= RS): As 1st row. ROW 4 (= WS): K until 6 sts remain on row, turn piece. ROW 5 (= RS): K all sts. ROW 6 (= WS): K until 4 sts remain on row, turn piece. ROW 7 (= RS): K all sts. ROW 8 (= WS): K until 1 st remains on row, slip the first 2 sts from yoke back on needle, K 3 tog. Switch to off white. Repeat 1st-8th row down to tip mid front, on last repetition of 8th or 2nd row slip the first 3 sts from stitch holder back on needle, K 4 tog. RIGHT FRONT PIECE (bottom edge): Piece is worked tog with sts from the tip of domino mid front and up to the marker in the right side. Work as left back piece. RIGHT BACK PIECE (bottom edge): Work piece tog with sts from the side i.e. marker, to mid back i.e. tip of domino. Work as left front piece. Bind off when all sts from yoke have been worked tog with edge, adjust so that last stripe is with rose mist/pink. SLEEVE: Worked in the round on double pointed needles in GARTER ST - see explanation above and stripes. Slip sts from stitch holder in one side of piece on double pointed needles size 3.5 mm / US 4 = 72-76-80-82-90-92 sts. Cast on 8-8-8-12-12-12 sts at the end of first round = 80-84-88-94-102-104 sts. Then work stripes. Insert 1 marker in the middle of the new sts (= mid under sleeve) – NOW MEASURE PIECE FROM HERE - READ MEASURING TIP. When piece measures 2 cm / 3/4'', dec 1 st on each side of marker (= 2 sts dec) - READ DECREASE TIP, repeat dec every 1 cm / 3/8'' 6-6-10-12-17-17 times, then every 2 cm / 3/4'' 4-5-2-2-0-0 times = 60-62-64-66-68-70 sts. Bind off when piece measures 23 cm / 9''. Work the other sleeve the same way. ASSEMBLY: Sew the opening under the sleeves. Sew cast-on edge tog (i.e. the first 7 sts). |
|||||||
Diagram explanations |
|||||||
|
|||||||
|
|||||||
|
Have you made this or any other of our designs? Tag your pictures in social media with #dropsdesign so we can see them! Do you need help with this pattern?You'll find tutorial videos, a Comments/Questions area and more by visiting the pattern on garnstudio.com. © 1982-2024 DROPS Design A/S. We reserve all rights. This document, including all its sub-sections, has copyrights. Read more about what you can do with our patterns at the bottom of each pattern on our site. |
|||||||


With over 40 years in knitting and crochet design, DROPS Design offers one of the most extensive collections of free patterns on the internet - translated to 17 languages. As of today we count 304 catalogs and 11422 patterns - 11417 of which are translated into English (US/in).
We work hard to bring you the best knitting and crochet have to offer, inspiration and advice as well as great quality yarns at incredible prices! Would you like to use our patterns for other than personal use? You can read what you are allowed to do in the Copyright text at the bottom of all our patterns. Happy crafting!
Comments / Questions (81)
Ma ei saa aru Kokkukudumine- kas seal mingi viga? teen lisa silmused, siis alustan diagonaali tipust 1 par 1 õhk, koon kuni külje silmusemärkijani ja edasi järgmine rida- diagonaali äär...Ei saa aru:(
11.09.2017 - 18:45DROPS Design answered:
Tere Merike! Alates KOKKUKUDUMISEST hakatakse kuduma alumist osa lühendatud ridadega, ristipidi. St. kootakse külje suunas, tehes lühendatud ridasid, ning igal 6. real kootakse 2 silmust ülemiselt osalt kokku alumise osaga. Ja nii korratakse ümber ringi. Head kudumist!
15.05.2018 - 13:10Hej! Mönstret ska vara rättat, men jag tycker fortfarande inte att det stämmer. Man sätter i markörer m1-m6. Men ändå står det plötsligt angivna markantal mellan samtliga markörer bl.a. m6 och m7. M7? Den anges inte någon annan stans. Verkar ologiskt med en sjunde markör. Fel?
02.08.2017 - 12:06Jeg har en kunde som har lidt et problem og jeg har måtte opgive. Efter ærmegabet i Størrelse XL mangler der en passage, som er i de andre størrelser. Kan i hjælpe mig lidt ? :-)
18.11.2016 - 11:12DROPS Design answered:
Hej Stine. Det er fordi du ikke skal foretage dig mere i de 3 store str. Der har du stadig 338-386-426 m naar du begynder paa ALLE STR. Saa hun skal springe det stykke over med STR S-M-L og gaa direkte videre med ALLE STR.
21.11.2016 - 14:58DROPS Design wrote:
This pattern has been corrected (See Corrections). Het patroon is gecorrigeerd (zie Correcties). Dette mönster er rettet (Se Rettelser). Ce modèle a été corrigé (cf Corrections).
29.09.2016 - 12:43Okay, to clarify my question: I did fine knitting the back part. I cast on the additional 87 stitches and continued around, placing all the markers and blindly doing all the yarnovers. Now I have 2 to many stitches. What did I do wrong??? Thank you!
26.09.2016 - 22:37DROPS Design answered:
Dear Mrs Routh, when you have cast on the 87 sts, join and work the next 2 sts in garter st, round is displaced so that next rounds will beg here from now on. Happy knitting!
27.09.2016 - 09:41You never answered the question. I have two extra stitches. The French ladies asked last spring and still no answer. This is a serious problem for many excellent knitters! Why do I have two extra stitches??? Thank you!
17.09.2016 - 01:55DROPS Design answered:
Dear Mrs Routh, there have been some corrections to this pattern, see tab "corrections" for more informations. Pattern online is now correct. Happy knitting!
27.09.2016 - 09:41Ohjeen sivulla 3 kohdassa :yhdistä työ suljetuksi neuleeksi ja neulo seuraavilla 3 s:lla ainaoikeaa. Mitkä 3 silmukkaa? Tuleeko takakappaleen toiseen puoliskoon enempi silmiä?
07.09.2016 - 14:08DROPS Design answered:
Hej! Kun olet yhdistänyt neuleen suljetuksi neuleeksi, neulot krs:n ensimmäisillä 3 silmukalla ainaoikeaa. Tässä on jatkossa kerroksen vaihtumiskohta.
12.09.2016 - 14:32I will be knitting Size XL. I was marking my print-out of the instructions to highlight my size. After a LOT of knitting, I finish a paragraph with 386 stitches. There is a new paragraph "SIZE S-M-L" and after a lot more knitting, another new paragraph for "ALL SIZES". Did you forget SIZES XL-XXL? I expect larger women would do MORE knitting -- not LESS! Anyway, thanks for your wonderful work and please help!
20.08.2016 - 03:05DROPS Design answered:
Dear Mrs Routh, in the 3 larger sizes you don't have to work these 6 rounds, there are 338-386-426 sts on needle after you have put sts for sleeve on a st holder and there are no dec. Happy knitting!
22.08.2016 - 08:59Ich habe den Pullover nun doch gestrickt. Falsch war die Reihenfolge der Markierer beim Dominoquadrat: siehe norwegisches Original richtig Umschlag vor dem 1.-3.-4.-6. und nach 1.-2.-4.-5., Dann habe ich noch beim Zusammenstricken (unten) genau anders herum gestrickt ,nämlich von links hinten nach rechts hinten .Wenn man viel strickt bekommt man es hin. Viel Erfolg für mutige Nachstrickerinnen.
01.08.2016 - 11:47Ich wüsste auch gerne, ob die korrigierte Anleitung bald veröffentlicht wird. Eine Reaktion auf die vielen Anfragen wäre wunderbar, zumal die Wolle hier bei mir wartet zu dem schönen Pullover verarbeitet zu werden.... Vielen Dank schon einmal im Voraus
26.07.2016 - 13:02DROPS Design answered:
Liebe Jula, wir entschuldigen uns für die lange Wartezeit!
26.07.2016 - 13:19