DROPS Cotton Merino
DROPS Cotton Merino
50% Wool, 50% Cotton
from 3.55 £ /50g
Get the yarn to make this pattern from 31.95£.

The yarn cost is calculated from the pattern’s smallest size and the yarn’s cheapest product type. Looking for an even better price? You might find it on the DROPS Deals!

DROPS SS24

Berry Ripple

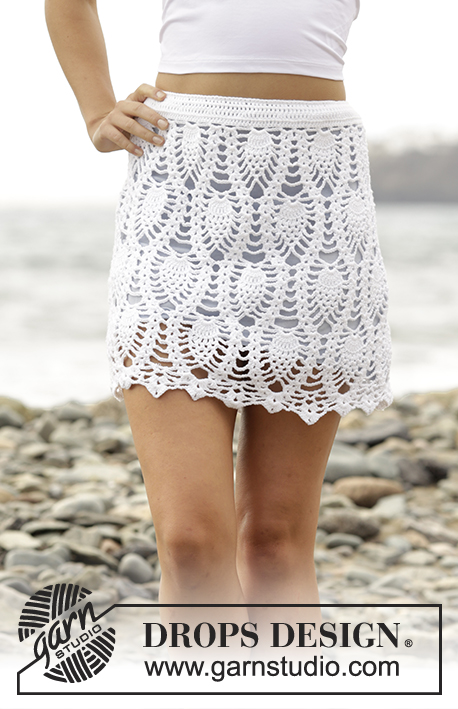
Crochet DROPS skirt with fan pattern and stripes in "Cotton Merino" The piece is worked top down. Size: S - XXXL.

DROPS 169-22
DROPS design: Pattern no cm-050
Yarn group B
----------------------------------------------------------
Size: S - M - L - XL - XXL - XXXL
Materials:
DROPS COTTON MERINO from Garnstudio
100-100-100-150-150-150 g colour no 13, coral
100-100-100-100-150-150 g colour no 14, cerise
50-50-100-100-100-100 g colour no 07, bordeaux
100 g for all sizes of the following colours:
Colour no 05, powder pink
Colour no 01, off white
NOTE: Skirt worked in one colour = 350-400-450-450-500-550 g Cotton Merino.

DROPS CROCHET HOOK SIZE 4 mm – or size needed to get 18 tr x 9 rows = 10 x 10 cm.
DROPS MOTHER-OF-PEARL BUTTON: Round (light pink), NO 618: 5 pieces in all sizes

-------------------------------------------------------

Alternative Yarn – See how to change yarns here
Yarn Groups A to F – Use the same pattern and change the yarn here
Yarn usage using an alternative yarn – Use our yarn converter here

-------------------------------------------------------

DROPS Cotton Merino
DROPS Cotton Merino
50% Wool, 50% Cotton
from 3.55 £ /50g
Get the yarn to make this pattern from 31.95£.

The yarn cost is calculated from the pattern’s smallest size and the yarn’s cheapest product type. Looking for an even better price? You might find it on the DROPS Deals!

Pattern instructions

NOTE: This pattern is written in British English. All measurements in charts are in cm. For conversion from cm to inches - click here. There are different terms for crocheting in British and American English. If this pattern includes crochet, click for "crochet terms" here. For this pattern in American English, please click here.
PATTERN:
See diagram A.1 and A.2. A.2 show how each row/round starts and ends (ie when working back and forth the sl st at the end of row will not be made).

CROCHET INFO:
Replace first tr at beg of every tr row with 3 ch.
Replace first dc at beg of every dc row with 1 ch.

STRIPES-1:
Work A.1a as follows:
ROW 1: Coral
Then repeat A.1b in stripes as follows:
ROW/ROUND 1: Powder pink - NOTE: Inc on this row/round.
ROW/ROUND 2: Cerise
ROW/ROUND 3: Bordeaux
ROW/ROUND 4: Powder pink - NOTE: Inc on this row/round.
ROW/ROUND 5: Cerise
ROW/ROUND 6: Off white
ROW/ROUND 7: Bordeaux - NOTE: Inc on this row/round.
ROW/ROUND 8: Coral
ROW/ROUND 9: Off white
ROW/ROUND 10: Off white
ROW/ROUND 11: Cerise - NOTE: Inc on this row/round.
ROW/ROUND 12: Powder pink - NOTE: Inc on this row/round.
ROW/ROUND 13: Cerise
ROW/ROUND 14: Off white
ROW/ROUND 15: Coral

INCREASE TIP:
Inc on 1st, 4th, 7th, 11th and 12th row/round in pattern A.1b (i.e. inc 6 sts evenly 5 times in total per repetition of A.1b).
Inc by working 2 tr in/around same st. To calculate how often inc should be done, use the total no of sts on row/round (e.g. 132 sts) and divide by no of inc to be done (e.g. 6) = 22. I.e. in this example inc 1 tr in every 22nd st.

STRIPES-2:
Continue to work A.1b but coral and off white switch places. I.e. on round where it says coral work with off white and vice versa.
----------------------------------------------------------

SKIRT:
Work top down. Work back and forth until the vent is finished, then work in the round.

Work 141-155-169-183-211-232 ch (incl 3 ch to turn with) on hook size 4 mm with off white. Work first row as follows: Work 1 tr in 4th ch from hook (= 2 tr) - READ CROCHET INFO, 1 tr in each of the next 4 ch, * skip 1 ch, 1 tr in each of the next 6 ch *, repeat from *-* the entire row = 120-132-144-156-180-198 tr. Work in STRIPES-1 - see explanation above. Work A.1a 20-22-24-26-30-33 times in total in width. When A.1a has been worked, work A.1b over A.1a (first row in A.1b is from WS). Continue with stripes. REMEMBER THE CROCHET TENSION!

Repeat A.1b vertically and inc as follows:
Inc 6 sts evenly - READ INCREASE TIP - 16-16-17-18-18-20 times in total = 216-228-246-264-288-318 sts. For every inc work 1 more repetition of A.1b in width AT THE SAME TIME when piece measures 12 cm, end the vent in the side and continue piece in the round, beg round in the side. When A.1b has been repeated 2 times vertically, continue with STRIPES-2 - see explanation above. Fasten off when piece measures 40-42-44-46-48-50 cm, finish neatly according to A.1b.

EDGE AT THE TOP:
Work an edge in tr from first row on skirt with coral. Work 1 row with 1 dc in every tr and the work 2 rows with 1 dc in every dc = 120-132-144-156-180-198 dc.

BUTTONHOLE LOOPS:
Along the opening on front piece work buttonhole loops with coral as follows (beg at the bottom): 2 dc (work 2 dc around tr row and 1 dc around dc row), 3 ch, skip 1 cm, * work 2 dc around next tr/dc row, 3 ch, skip 1 cm *, repeat from *-* 3 more times and finish with 2 dc around last tr row at the top, turn and work back as follows: 1 dc in every dc and 3 dc in every ch-space. Fasten off.

BUTTON FOLDING EDGE:
Along the other side of the opening work 5 rows with dc back and forth with coral (on 1st row work 2 dc around every tr row and 1 dc around every dc row), fasten off. Sew the buttons on to the button folding edge.

Diagram

symbols = ch
symbols = dc in st
symbols = dc in back loop of st from RS and in front loop of st from WS.
symbols = dc around ch
symbols = tr in st
symbols = tr around between 2 tr
symbols = tr around ch
symbols = skip 1 st, 1 tr in/around next tr/ch, 1 tr in st that was skipped
symbols = tr-group: Work 1 tr in next tr but wait with last pull through (= 2 loops on hook), work 2 tr in same tr the same way, pull yarn through all 4 loops on hook
symbols = on first row/round work 1 ch, on next row/round work 1 dtr around ch and down to dc on 2 rows/rounds before.
symbols = on these rounds/rows inc evenly - see pattern
symbols = first row is not worked, it has already been worked, it only shows how next row should be worked in st
symbols = sl st
diagram
diagram
Do you have a question? See a list of frequently asked questions (FAQ)

Knitting tension is what determines the final measurements of your work, and is usually measured per 10 x 10 cm. It is provided like so: number of stitches in width x number of rows in height - eg: 19 stitches x 26 rows = 10 x 10 cm.

The knitting tension is very individual; some people knit/crochet loosely while others work tightly. You adjust the knitting tension with the needle size, which is why the suggested needle size is only meant as a guide! You need to adjust this (up or down) to ensure that YOUR knitting tension matches the knitting tension provided in the pattern. If you work with a different knitting tension than provided you will have a different yarn consumption, and your work will have different measurements than what the pattern suggests.

The knitting tension also determines which yarns can replace each other. As long as you achieve the same knitting tension you can replace one yarn with another.

See DROPS lesson: How to measure your tension/gauge

See DROPS video: How to make a gauge tension swatch

The required amount of yarn is provided in grams, eg: 450 g. To calculate how many balls you’ll need you first need to know how many grams are in 1 ball (25g, 50g or 100g). This information is available if you click on the individual yarn quality on our pages. Divide the amount required with the amount of each ball. For example, if each ball is 50g (the most common amount), the calculation will be as follows: 450 / 50 = 9 balls.

The important thing when changing from one yarn to another is that the knitting/crochet tension remains the same. This is so that the measurements of the finished piece will be the same as on the sketch provided. It is easier to achieve the same knitting tension using yarns from the same yarn group. It is also possible to work with multiple strands of a thinner yarn to achieve the knitting tension of a thicker one. Please try our yarn converter. We recommend you to always work a test swatch.

Please NOTE: when changing yarn the garment might have a different look and feel to the garment in the photo, due to individual properties and qualities of each yarn.

See DROPS lesson: Can I use a different yarn than the one mentioned in the pattern?

All our yarns are categorised into yarn groups (from A to F) according to thickness and knitting tension – group A contains the thinnest yarns and group F the thickest. This makes it easier for you to find alternative yarns to our patterns, should you wish to switch yarn. All yarns within the same group have a similar knitting tension and can easily replace each other. However, different yarn qualities have different structures and properties which will give the finished work a unique look and feel.

Click here for an overview of the yarns in each yarn group

At the top of all our patterns you’ll find a link to our yarn calculator, which is a helpful tool should you wish to use a different yarn than suggested. By filling in the yarn quality you wish to replace, the amount (in your size) and number of strands, the calculator will present good alternative yarns with the same knitting tension. Additionally it will tell you how much you’ll require in the new qualities and whether you’ll need to work with multiple strands. Most skeins are 50g (some are 25g or 100g).

If the pattern is worked with multiple colours, every colour will have to be calculated separately. Similarly, if the pattern is worked with several strands of different yarns (for example 1 strand Alpaca and 1 strand Kid-Silk) you will have to find alternatives for each, individually.

Click here to see our yarn calculator

Since different yarns have different qualities and textures we have chosen to keep the original yarn in our patterns. However, you can easily find options among our available qualities by using our yarn calculator, or simply pick a yarn from the same yarn group.

It is possible that some retailers still have discontinued yarns in stock, or that someone has a few skeins at home that they would like to find patterns for.

The yarn calculator will provide both alternative yarn as well as required amount in the new quality.

If you think it's hard to decide what size to make, it can be a good idea to measure a garment you own already and like the size of. Then you can pick the size by comparing those measures with the ones available in the pattern's size chart.

You'll find the size chart at the bottom of the pattern.

See DROPS lesson: How to read size chart

The needle size provided in the pattern serves only as a guide, the important thing is to follow the knitting tension. And since knitting tension is very individual, you will have to adjust the needle size to ensure that YOUR tension is the same as in the pattern – maybe you’ll have to adjust 1, or even 2 needle sizes, up or down to achieve the correct tension. For this, we recommend that you work test swatches.

Should you work with a different knitting tension than the one provided, the measurements of the finished garment might deviate from the measurement sketch.

See DROPS lesson: How to measure your tension/gauge

See DROPS video: How to make a tension/gauge swatch

Working a garment top-down provides more flexibility and room for personal adjustment. For example it is easier to try the garment on while working, as well as making adjustments to length of yoke and shoulder caps.

The instructions are carefully explaining every step, in the correct order. Diagrams are adjusted to the knitting direction and are worked as usual.

The diagram depicts all rows/rounds, and every stitch seen from the right side. It is read from bottom to top, from right to left. 1 square = 1 stitch.

When working back and forth, every other row is worked from the right side and every other row is worked from the wrong side. When working from the wrong side, the diagram will have to be worked reversed: from left to right, knit stitches are purled, purl stitches are knit etc.

When working in the round every round is worked from the right side and the diagram are worked from right to left on all rounds.

See DROPS lesson: How to read knitting diagrams

The diagram depicts all rows/rounds, and every stitch seen from the right side. It is worked from bottom to top, from right to left.

When working back and forth every other row is worked from the right side: from right to left and every other row is worked from the wrong side: from left to right.

When working in the round, every row in the diagram are worked from the right side, from right to left.

When working a circular diagram you start in the middle and work your way outwards, counter clockwise, row by row.

The rows usually start with a given number of chain stitches (equivalent to the height of the following stitch), this will either be depicted in the diagram or explained in the pattern.

See DROPS lesson: How to read crochet diagrams

Instructions for working several diagrams after each other on the same row/round, will often be written like so: “work A.1, A.2, A.3 a total of 0-0-2-3-4 times". This means you work A.1 once, then A.2 is worked once, and A.3 is repeated (in width) the number of times provided for your size – in this case like so: S = 0 times, M = 0 times, L=2 times, XL= 3 times and XXL = 4 times.

The diagrams are worked as usual: begin with the first row in A.1, then work the first row in A.2 etc.

See DROPS lesson: How to read knitting diagrams

See DROPS lesson: How to read crochet diagrams

The total width of the garment (from wrist-to-wrist) will be larger in the larger sizes, despite the actual sleeves being shorter. The larger sizes have longer sleeve caps and wider shoulders, so there will be a good fit in all sizes.

The measurement sketch/schematic drawing provides information regarding the full length of the garment. If it’s a jumper or a jacket the length is measured from the highest point on the shoulder closest to the neckline, and straight down to the bottom of the garment. It is NOT measured from the tip of shoulder. Similarly, the length of yoke is measured from the highest point on the shoulder and down to where yoke is split into body and sleeves.

On a jacket measures are never taken along bands, unless specifically stated. Always measure inside band stitches when measuring the length.

See DROPS lesson: How to read a schematic drawing

Diagrams are often repeated on the round or in height. 1 repeat is the diagram the way it appears in the pattern. If it says to work 5 repeats of A.1 in the round, then you work A.1 a total of 5 times after/next to each other in the round. If it says to work 2 repeats of A.1 vertically/in height you work the entire diagram once, then begin again at the start and work the entire diagram one more time.

Chain stitches are slightly narrower than other stitches and to avoid working the cast-on edge too tight, we simply chain more stitches to begin with. The stitch count will be adjusted on the following row to fit the pattern and measurement sketch.

The rib edge is more elastic and will contract slightly compared to, for example, stocking stitch. By increasing before the rib edge, you avoid a visible difference in width between the rib edge and the rest of the body.

It’s very easy to cast off too tightly, and by making yarn overs while casting off (and simultaneously casting these off) you avoid a too tight cast off edge.

See DROPS video: How to bind off with yarn overs (yo)

To achieve an even increase (or decrease) you can increase on, for example: every 3rd and 4th row alternately, like so: work 2 rows and increase on the 3rd row, work 3 rows and increase on the 4th. Repeat this until the increase is complete.

See DROPS lesson: Increase or decrease 1 st on every 3rd and 4th row alternately

Should you prefer to work in the round instead of back and forth, you may of course adjust the pattern. You’ll need to add steeks mid-front (usually 5 stitches), and follow the instructions. When you would normally turn and work from the wrong side, simply work across the steek and continue in the round. At the end you’ll cut the piece open, pick up stitches to work bands, and cover the cut edges.

See DROPS video: How to knit steeks and cut open

Should you prefer to work back and forth instead of in the round, you may of course adjust the pattern so you work the pieces separately and then assemble them at the end. Divide the stitches for the body in 2, add 1 edge stitch in each side (for sewing) and work the front and back pieces separately.

See DROPS lesson: Can I adapt a pattern for circular needles into straight needles?

Pattern repeats can vary slightly in the different sizes, in order to get the correct proportions. If you’re not working the exact same size as the garment in the photo, yours might deviate slightly. This has been carefully developed and adjusted so that the complete impression of the garment is the same in all sizes.

Make sure to follow instructions and diagrams for your size!

If you have found a pattern you like which is available in women’s size it’s not very difficult to convert it to men’s size. The biggest difference will be the length of sleeves and body. Start working on the women size that you think would fit across the chest. The additional length will be worked right before you cast off for the armhole/sleeve cap. If the pattern is worked top-down you can add the length right after the armhole or before the first decrease on sleeve.

Regarding additional yarn amount, this will depend on how much length you add, but it is better with a skein too many than too few.

All yarns will have excess fibres (from production) that might come off as lint or shedding. Brushed yarns (ie hairier yarns) have more of these loose, excess fibres, causing more shedding.

Shedding also depends on what is worn under or over the garment, and whether this pulls at the yarn fibres. It’s therefore not possible to guarantee that there will be no shedding

Below are some tips on how to get the best result when working with hairier yarns:

1. When the garment is finished (before you wash it) shake it vigorously so the looser hairs come off. NOTE: do NOT use a lint roller, brush or any method that pulls at the yarn.

2. Place the garment in a plastic bag and put it in your freezer - the temperature will cause the fibres to become less attached to each other, and excess fibres will come off easier.

3. Leave in the freezer for a few hours before taking it out and shaking it again.

4. Wash the garment according to the instructions on the yarn label.

Pilling is a natural process that happens to even the most exclusive of fibers. It's a natural sign of wear and tear that is hard to avoid, and that is most visible in high friction areas of your garment like a sweater's arms and cuffs.

You can make your garment look as new by removing the pilling, using a fabric comb or a pill/lint remover.

Still can't find the answer you need? Then scroll down and leave your question so one of our experts can try to help you. This will be done normally within 5 to 10 working days.
In the meantime, you can read the questions and answers that others have left to this pattern or join the DROPS Workshop on Facebook to get help from fellow knitters/crocheters!

You might also like...

Post a comment to pattern DROPS 169-22

We would love to hear what you have to say about this pattern!

If you want to leave a question, please make sure you select the correct category in the form below, to speed up the answering process. Required fields are marked *.

Comments / Questions (41)

country flag Kristine wrote:

Hej Jeg har lidt svært ved at forstå hvad det nøjagtig er, der skal gøres med dbl-st, der skal om lm og ned til fm på 2. omgang før. En almindelig dobbelstangmaske er jeg med på. ... men ned til fm. hvordan gør man det?

30.04.2019 - 23:24

DROPS Design answered:

Hej Kristine, jo hvis du ser på billedet af mønsteret, så er det de lange rosa dobbelt-stangmasker som stikker ned i de hvide fastmasker fra forrige række. God fornøjelse!

03.05.2019 - 10:46

country flag Sandy wrote:

I love this skirt but not a huge pink wearning girl. Can I please get some help picking earth tones. This type of pattern is a first for me. I am challenging myself to learn how to change colours. I have never had to purchase a collection of colours. Any hep and suggestions would be great. A l9ve fall type colours.

10.02.2019 - 15:18

DROPS Design answered:

Dear Sandy! You can always look at other multicolored patterns, to see which color combination look pleasing for you. Also ou can use the colorcharts of each yarn. If I would do ths skirt, I eould probably use the brown, the beige and the rusty orange for the mai colors, and the cream, and one of teh lighter greens for contrast, but that is just one possibility. You can also copy the pictures from the corocharts and put them beside eachother and see if you like a particular combinationor not. Happy Coloring!

11.02.2019 - 03:16

Mary Selvi wrote:

Hi thank you for your free pattern....if u could explained the pattern in little more detail it would have been great for especially for beginners and intermediate.

16.12.2018 - 07:54

DROPS Design answered:

Dear Mrs Selvi, each symbol in diagram represents one stitch/group of stitch - see diagram key. Start reading the diagram at the bottom corner on the right side towards the left on every RS row (and every round when working in the round) - work the WS row reading from the left towards the right. Happy crocheting!

17.12.2018 - 10:36

country flag Marie wrote:

Volgens de beschrijving moet er 16 keer in totaal gemeerderd worden. Maar volgens het telpatroon en TIP VOOR HET MEERDEREN wordt er 5 keer gemeerderd per herhaling van A.1b. Dus bij 3 herhalingen van A.1b in de hoogte is er al 15 keer gemeerderd. Betekent dat dan dat er bij de vierde herhaling van A.1b nog één keer gemeerderd wordt op de 1e toer en daarna, op de 4e, 7e, 11e en 12e toer niet meer, ook al zegt het telpatroon van wel?

28.11.2018 - 12:43

DROPS Design answered:

Dag Marie

Per herhaling in de hoogte van A.1b meerder je 5 keer, maar je meerdert in totaal 16-16-17-18-18-20 keer, daarna stop je met meerderen. Dat betekent dus bijvoorbeeld in de kleinste maat dat je met 3 herhalingen van A.1b in de hoogte nog niet klaar bent met de meerderingen, want je hebt dan 15 keer gemeerderd, je meerdert dan nog 1 keer in de 1e toer van de volgende herhaling van A.1b in de hoogte.

Hopelijk heb ik het zo goed uitgelegd :). Je mindert dus daarna inderdaad niet meer.

12.12.2018 - 18:23

country flag Christine wrote:

I'm stuck on row 11 of A.1b - on first row/round work ch1, on next row/round work 1 tr around ch and down to sc on 2 rows/rounds before. Is there a video to demonstrate this?

30.07.2018 - 01:11

DROPS Design answered:

Dear Christine, on row/round 10, you will crochet 1 chain, on row/round 11 you will crochet 1 tr around the chain and down to sc 2 rows/rounds before (= in the sc from row/round 9). Happy crocheting!

31.07.2018 - 09:32

country flag Lisa wrote:

HELP! I would love to make the skirt but the pattern is unclear to me. I can't find how many chains to start with or skeins of yarn. From the diagram, it looks like the waist on a small is 33 inches, is that right? I'd like to try an XS. If you could please help me I'd appreciate it!

26.07.2018 - 09:05

DROPS Design answered:

Dear Lisa, you will find the number of sts to cast on and colours etc.. under written pattern (starting first with some explanations for the pattern then pattern starts under SKIRT). All measurements in diagram are taken flat from side to side and are given in cm - convert into inches here. Happy crocheting!

26.07.2018 - 10:16

country flag Alexandra wrote:

Thank you for a beautiful skirt! In the defined rows, do you always increase by 6 sts? Or is the number of inc always different ?

18.05.2018 - 10:50

DROPS Design answered:

Dear Alexandra, that's right you will increase 6 sts every increase row = 1 repeat so that you will have enought sts to work A.1 one more time in width after each increase row. Happy crocheting!

18.05.2018 - 13:28

country flag Ruby Huigen wrote:

Ook ik heb moeite met toer 11 in het strepenpatroon. Ik heb het idee dat ik hem nu snap maar wil het zeker weten. Naar mijn idee werkt hij zo: in toer 9 haak je de vasten om het waaiertje. In toer 10 worden vervolgens stokjes en lossen gehaakt. Als ik het goed begrijp, ga je in toer 11 over de lossen van toer 10 heen en steek je in in de vasten van toer 9. Nu dus de vraag: heb ik hem zo goed begrepen of moet ik nog even extra haaklessen gaan volgen, hihi? Alvast bedankt!!!

11.04.2018 - 11:31

country flag Reix wrote:

Bonjour, je souhaiterais annuler ma commande n° 224562. Je la recommanderais plus tard (finance oblige) en enlevant les aiguilles circulaires. Merci

24.03.2018 - 12:44

DROPS Design answered:

Bonjour Mme Reix, pour toute aide sur votre commande, merci de bien vouloir contacter le magasin où vous l'avez passée, retrouvez ses coordonnées dans la liste des magasins DROPS. Bon tricot!

26.03.2018 - 10:57

country flag Reix wrote:

Bonjour, combien de pelotes me faut il pour une taille 40 (l). Merci

23.03.2018 - 14:16

DROPS Design answered:

Bonjour Reix! Il vous faut: 2 pelotes coloris n° 13, corail; 2 pelotes coloris n° 14, cerise; 2 pelotes coloris n° 07, bordeaux; 2 pelotes Coloris n° 05, rose poudré; 2 pelotes Coloris n° 01, naturel. Au total 10 pelotes. Pour une jupe unie 450 g = 9 pelotes de la couleur choisie. Bon travail!

23.03.2018 - 14:50