
Popular categories
Looking for a yarn?


|
||||||||||||||||||||||||||||
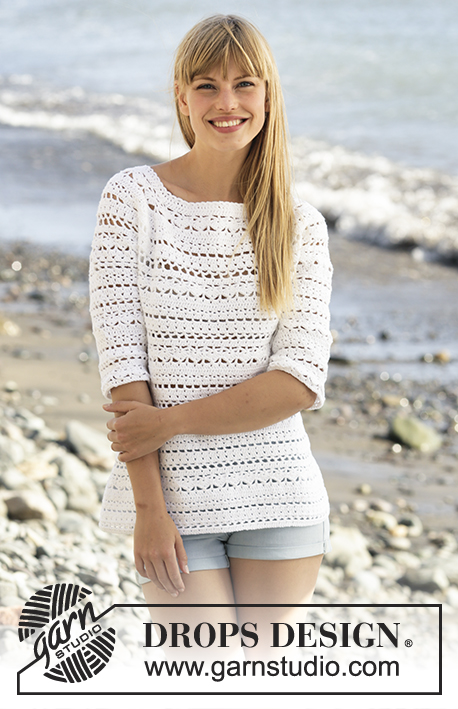
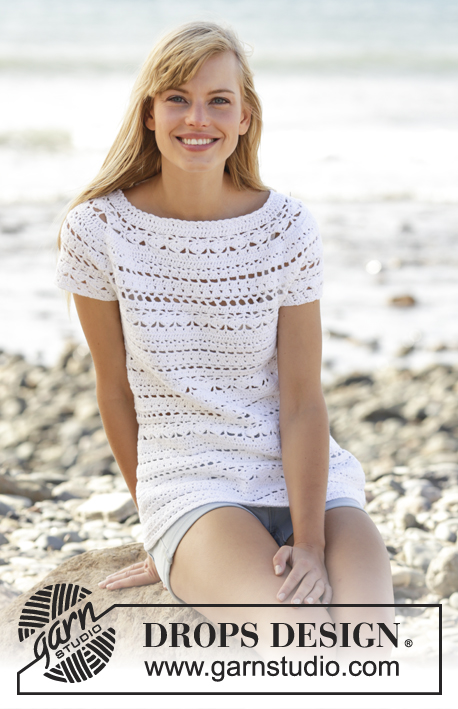
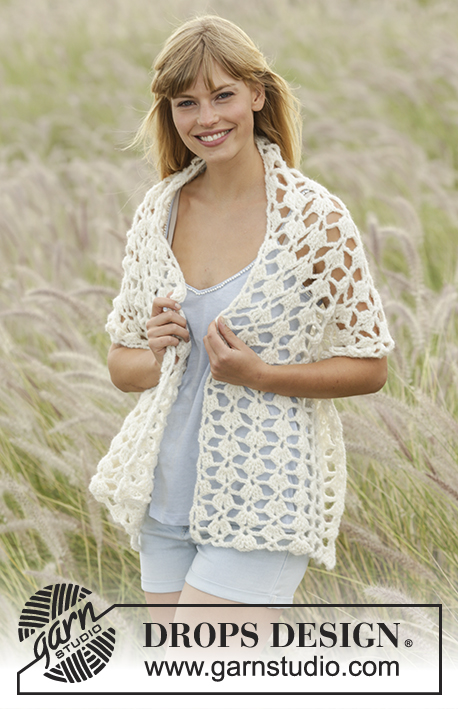
Seashore Bliss Cardigan |
||||||||||||||||||||||||||||
|
|
||||||||||||||||||||||||||||
Crochet DROPS jacket with lace pattern and round yoke in ”Cotton Light”. The piece is worked top down. Size: S - XXXL.
DROPS 169-16 |
||||||||||||||||||||||||||||
|
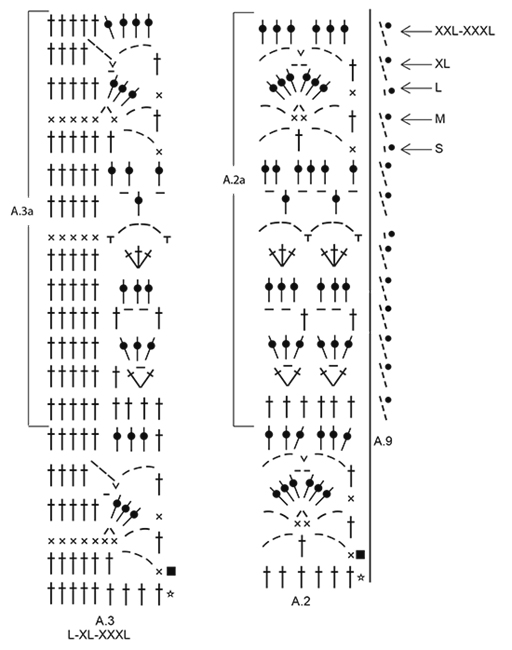
PATTERN: See diagrams A.1 to A.9. Choose diagram for correct size. Diagram A.9 show how to start and end when working in the round. CROCHET INFO: Replace first dc at beg of every dc row with 3 ch. Replace first sc at beg of every sc row with 1 ch. Replace first dc at beg of every dc round with ch 3, finish the round with 1 sl st in 3rd ch from beg of round. At beg of every sc round, replace first sc with 1 ch and finish round with 1 sl st in 1st ch from beg of round. INCREASE TIP: Inc 1 dc by working 2 dc in same dc. DECREASE TIP: Dec 1 dc by working 2 dc tog as follows: Work 1 dc but wait with last pull through (= 2 sts on hook), then work next dc but on last pull through, pull yarn through all 3 sts on hook. TIP ARMHOLE: Size S, M and XL: In the last repeat of A.2 before marker 1 and marker 3 (= beginning of armhole), replace the last chain stitch with a double crochet in the last stitch of the same repeat on previous row. ---------------------------------------------------------- JACKET: Worked back and forth, top down. NOTE: It is important to keep the crochet gauge vertically so that the measurements on yoke will be correct. YOKE: Work 123-123-134-134-138-140 ch on hook size 4 mm / G/6 with Cotton Light. Work 1 dc in 4th ch from hook (= 2 dc) - READ CROCHET INFO, 1 dc in each of the next 0-0-4-4-1-3 ch, * skip ch 1, 1 dc in each of the next 6 ch *, repeat from *-* the entire row = 104-104-114-114-117-119 dc. Work 1 row with 1 dc in every dc and inc 19-19-21-21-30-40 dc evenly - READ INCREASE TIP = 123-123-135-135-147-159 dc. Work next row and insert 8 markers in the piece as follows: Work A.1 (= 5-5-8-8-5-8 sts), repeat A.2 over the next 18-18-18-18-24-24 dc (= 3-3-3-3-4-4 times in width), insert 1st marker, A.4 over the first 4 dc, insert 2nd marker, A.2 over the next 12 dc (= 2 times in width), insert 3rd marker, A.4 over the next 4 dc, insert 4th marker, work A.2 over the next 36-36-42-42-48-54 dc (= 6-6-7-7-8-9 times in width), insert 5th marker, A.4 over the next 4 dc, insert 6th marker, A.2 over the next 12 dc (= 2 times in width), insert 7th marker, A.4 over the next 4 dc, insert 8th marker, A.2 over the next 18-18-18-18-24-24 dc (= 3-3-3-3-4-4 times in width), finish with A.3 (= 6-6-9-9-6-9 dc). REMEMBER THE CROCHET GAUGE! SIZE XXL-XXXL: On 5th row (row with dc from RS) in A.2 inc evenly as follows: Between 2nd and 3rd marker and 6th and 7th marker: Inc 6-6 dc. 12-12 dc have been inc in total on row (= 18-18 dc between 2nd and 3rd marker and 6th and 7th marker). Repeat A.2 3-3 times between 2nd and 3rd marker and between 6th and 7th marker: ALL SIZES: On 6th row (row with dc from WS) in A.2 inc evenly as follows: Before 8th marker: Inc 0-3-3-3-6-6 dc (= 24-27-30-30-36-39 dc before 8th marker). Between 7th and 6th marker and 3rd and 2nd marker: Inc 0-0-6-6-6-6 dc (= 12-12-18-18-24-24 dc between these markers). Between 5th and 4th marker: Inc 0-6-6-6-12-12 dc (= 36-42-48-48-60-66 dc between each of these markers). After 1st marker: Inc 0-3-3-3-6-6 dc (= 23-26-29-29-35-38 dc after 1st marker). There are now 179-191-215-215-251-263 dc in total on row. Work next row as follows from RS: Work A.1 over the first 5-5-8-8-5-8 dc as before, A.5 over the next 0-3-3-3-0-0 dc, repeat A.2 over the next 18-18-18-18-30-30 dc (= 3-3-3-3-5-5 times in width), A.4 as before, repeat A.2 over the next 12-12-18-18-24-24 dc (= 2-2-3-3-4-4 times in width), A.4 as before, repeat A.2 over the next 36-42-48-48-60-66 dc (= 6-7-8-8-10-11 times in width), A.4 as before, repeat A.2 over the next 12-12-18-18-24-24 dc (= 2-2-3-3-4-4 times in width), A.4 as before, repeat A.2 over the next 18-18-18-18-30-30 dc as before (= 3-3-3-3-5-5 times in width), A.5 over the next 0-3-3-3-0-0 dc, finish with A.3 over the last 6-6-9-9-6-9 dc as before. SIZE XL-XXL-XXXL: On 8th row (row with dc from WS) in A.2 inc evenly as follows: Before 8th marker: Inc 3-3-3 dc (= 33-39-42 dc before 8th marker). Between 4th and 5th marker: Inc 6-6-6 dc (= 54-66-72 dc between 4th and 5th marker). After 1st marker: Inc 3-3-3 dc (= 32-38-41 dc after 1st marker). Work next row as follows from RS: Work A.1 over the first 8-5-8 dc as before, A.5 over the next 0-3-3 dc, repeat A.2 over the next 24-30-30 dc (= 4-5-5 times in width), A.4 as before, repeat A.2 over the next 18-24-24 dc (= 3-4-4 times in width), A.4 as before, repeat A.2 over the next 54-66-72 dc (= 9-11-12 times in width), A.4 as before, repeat A.2 over the next 18-24-24 dc (= 3-4-4 times in width), A.4 as before, repeat A.2 over the next 24-30-30 dc as before (= 4-5-5 times in width), A.5 over the next 0-3-3 dc, finish with A.3 over the first 9-6-9 dc as before. ALL SIZES: On last row in A.4 (= from WS) insert 1 new marker in the middle of every A.4 (i.e. 18 dc on each side of marker in A.4 = 4 markers). Remove the old markers (= 4 markers remain in piece). Sts between markers are for sleeves (= 48-48-54-54-60-60 dc on each sleeve). When A.4 has been worked 1 time vertically, there are 251-263-287-299-335-347 dc on row. Yoke is now done in size S. SIZE M-L-XL-XXL-XXXL: Work next row from RS as follows: Work A.6 over the first 8-5-8-8-5 dc, continue with A.2 over the next 18-24-24-30-36 dc (= 3-4-4-5-6 times in width), * A.7 over the next 36 dc (= 2 times in width, marker is in the middle of these repetitions), A.2 over the next 12-18-18-24-24 dc (= 2-3-3-4-4 times in width), A.7 over the next 36 dc (= 2 times in width, marker is in the middle of these repetitions) *, A.2 over the next 42-48-54-66-72 dc as before, repeat from *-*, A.2 over the next 18-24-24-30-36 dc (= 3-4-4-5-6 times in width), finish with A.8 over the last 9-6-9-9-6 dc. Work 1-2-3-4-4 rows of A.7. ALL SIZES: Piece now measures 17-18-19-20-21-21 cm / 6¾"-7"-7½"-8"-8¼"-8¼" vertically. BODY: SIZE M-XL: Work as follows from WS: Work A.8 as before, repeat A.2a (see arrow on where pattern beg in the different sizes) 6-7 times in total in width until 1st marker (= right front piece), work 8-10 ch, skip sts between 1st and 2nd marker (= sleeve), work A.2a 13-15 times in total in width until next marker (= back piece), work 8-10 ch, skip sts between 3rd and 4th marker (= sleeve), work A.2a 6-7 times in total in width, finish with A.6. Insert 1 marker in piece, NOW MEASURE PIECE FROM HERE. SIZE S-L-XXL-XXXL: Work as follows from RS: Work A.6, repeat A.2a (see arrow on where pattern beg in the different sizes) 6-7-8-9 times in total in width until 1st marker (= left front piece), work 8-8-10-10 ch, skip sts between 1st and 2nd marker (= sleeve), work A.2a 12-14-17-18 times in total in width until 3rd marker (= back piece), work 8-8-10-10 ch, skip sts between 3rd and 4th marker (= sleeve), work A.2a 6-7-8-9 times in total in width, finish with A.8. Insert 1 marker in piece, NOW MEASURE PIECE FROM HERE. SIZE S-M-L-XL: Work A.6/A.2a/A.8 as before, work the 8-8-8-10 sts under each sleeve as 1st st in A.6. On last row in A.6 and A.8 (row with dc) dec 4-4-4-2 dc evenly on entire row – READ DECREASE TIP = 167-179-191-209 dc. When A.6 and A.8 have been worked 1 time vertically, work next row as follows from WS: Work A.3a over the first 6-6-9-9 dc, repeat A.2a 26-28-29-32 times in total in width, finish with A.1a over the last 5-5-8-8 dc. SIZE XXL-XXXL: Work from WS: A.3a over the first 6-9 dc, repeat A.2a 37-38 times in total AT THE SAME TIME dec 2-2 dc evenly – READ DECREASE TIP, finish with A.1a over the last 5-8 dc = 233-245 dc. ALL SIZES: Repeat A.1a to A.3a vertically. When piece measures 12 cm / 4¾", adjust so that next row is with dc, dec 6 dc evenly = 161-173-185-203-227-239 dc. Now repeat A.2a 25-27-28-31-36-37 times in width. SIZE XL-XXL-XXXL: Repeat dec when piece measures 16 cm / 6¼" from marker = 197-221-233 dc. Now repeat A.2a 30-35-36 times in width. ALL SIZES: When piece measures 20-21-22-23-24-25 cm / 8"-8¼"-8¾"-9"-9½"-9¾" from marker – adjust so that next row is with dc, inc 6 dc evenly. Repeat inc every 3½-3½-2½-2-2-2 cm / 1¼"-1¼"-⅞"-¾"-¾"-¾" 3-3-4-6-6-6 more times = 185-197-215-239-263-275 dc. Repeat A.2a 1 more in width on every inc. When all inc are done, repeat A.2a 29-31-33-37-42-43 times in width. Work until piece measures 36-37-38-39-40-41 cm / 14¼"-14½"-15"-14¼"-15¾"-16⅛" from marker, adjust to finish nicely according to pattern. Fasten off. SLEEVE: SIZE S: Worked in the round. Beg by working mid under armhole as follows: Work 1 sl st in 4th ch of the 8 ch worked in armhole on body. Work 1 ch (= 1 sc). Then work 1 sc in each of the next ch 4, work A.7 over the next 18 dc, work A.2a (adjust pattern according to A.7) 2 times in total in width, work A.7 over the next 18 dc, finish with 1 sc in each of the last 3 ch. Work the 8 sts under sleeve as 1st st in A.7. When A.7 has been worked 1 time vertically, there are 56 dc on last round. SIZE M-XL-XXL-XXXL: Worked in the round. Beg by working mid under sleeve as follows: Work 1 sl st in 4th ch of the 8-10-10-10 ch worked in armhole on body. Work 3 ch (= 1 dc). Then work 1 dc in each of the next 4-6-6-6 ch, work A.7 as before, work A.2a (adjust pattern according to A.7) 2-3-4-4 times in total in width as before, work A.7, finish with 1 dc in each of the last 3 ch. Work the 8-10-10-10 sts under sleeve as 1st st in A.7. When A.7 has been worked 1 time vertically, there are 56-64-70-70 dc on last round. SIZE L: Worked in the round. Beg by working mid under sleeve as follows: Work 1 sl st in 4th ch of the 8 ch worked in armhole on body. Work 1 ch (= 1 sc). Then work 1 sc in each of the next ch 4, work A.7 as before, work A.2a (adjust pattern according to A.7) 3 times in total in width as before, work A.7, finish with 1 sc in each of the last 3 ch. Work the 8 sts under sleeve as 1st st in A.7. When A.7 has been worked 1 time vertically, there are 62 dc on last round. ALL SIZES: = 56-56-62-64-70-70 dc. Repeat A.2a 9-9-10-10-11-11 times in total in width while AT THE SAME TIME on first round with dc dec 2-2-2-4-4-4 dc evenly = 54-54-60-60-66-66 dc. When piece measures 10 cm / 4", adjust so that next round is with dc, dec 6 dc evenly = 48-48-54-54-60-60 dc. Then repeat A.2a 8-8-9-9-10-10 times in width. When piece measures 23 cm / 9", adjust to finish nicely according to pattern, fasten off. Work another sleeve the same way. NECK EDGE: Crochet an edge around the neck. Beg mid front. Work * 1 sc in first dc, ch 3, skip approx. 1 cm / ⅜" *, repeat from *-* around the entire neck. Make sure to avoid a tight neck edge, adjust to finish with 1 sc in last dc on row. Fasten off. ASSEMBLY: Fasten the buttons on left front piece, fasten the top button approx. 2 cm / ¾" from neck edge, fasten the remaining buttons approx. 8-9-9-8-8-9 cm / 3"-3½"-3½"-3"-3"-3½" apart. Button between 2 dc on right front piece. |
||||||||||||||||||||||||||||
Diagram explanations |
||||||||||||||||||||||||||||
|
||||||||||||||||||||||||||||
|
||||||||||||||||||||||||||||

|
||||||||||||||||||||||||||||

|
||||||||||||||||||||||||||||

|
||||||||||||||||||||||||||||
|
||||||||||||||||||||||||||||
|
Have you made this or any other of our designs? Tag your pictures in social media with #dropsdesign so we can see them! Do you need help with this pattern?You'll find tutorial videos, a Comments/Questions area and more by visiting the pattern on garnstudio.com. © 1982-2024 DROPS Design A/S. We reserve all rights. This document, including all its sub-sections, has copyrights. Read more about what you can do with our patterns at the bottom of each pattern on our site. |
||||||||||||||||||||||||||||


With over 40 years in knitting and crochet design, DROPS Design offers one of the most extensive collections of free patterns on the internet - translated to 17 languages. As of today we count 304 catalogs and 11422 patterns - 11417 of which are translated into English (US/in).
We work hard to bring you the best knitting and crochet have to offer, inspiration and advice as well as great quality yarns at incredible prices! Would you like to use our patterns for other than personal use? You can read what you are allowed to do in the Copyright text at the bottom of all our patterns. Happy crafting!
Comments / Questions (165)
I dont understand row 7 ... what is the meaning of....repeat A2 ...over the next 18 dc A4 as before...?
26.02.2020 - 07:21DROPS Design answered:
Dear Vandana, on row 7 you work A.2 a total of 3 times in width = 6 sts x 3 = 18 sts and work A.4 as before, ie you will work next row in diagram,after the one you worked before. Hope this helps. Happy crocheting!
26.02.2020 - 09:57Hallo. Ich bin mit A4 fertig und möchte nun die Ärmel abtrennen. Ich häkel Grösse S aber die 8 Luftmaschen sind zu eng für meine Kollegin. Sie ist ist wirklich nur eine S. Wo könnte ich einen Fehler haben? Was mir auch aufgefallen ist: ich hab A4 von links und rechts gelesen, da ich aber ein Linkes und ein rechtes Vorderteil habe müsste ich doch eins spiegelverkehrt häkeln damit es synchron ist. Vielen Dank für die Antwort
20.08.2019 - 23:11DROPS Design answered:
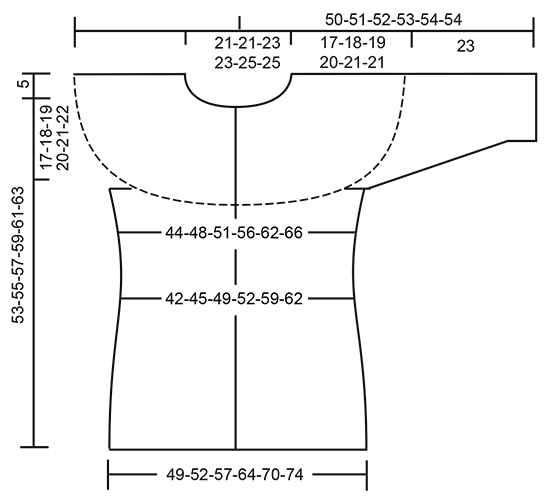
Liebe Elisabeth, wenn Sie 251 M haben dann ist es richtig, schauen Sie mal die Massen in der Maßskizze (= 17 cm + 5 cm Schulter für die Passe) - Hier lesen Sie wie man die Diagramme lesen muss. Viel Spaß beim häkeln!
21.08.2019 - 08:33Buongiorno, lavoro una taglia S. Sono arrivata a inserire i 4 segnapunti per le maniche. Il lavoro però misura 14 cm e non 17 cm, come indicato. Devo lavorare righe a m.a. finché non arrivo a 17 cm?
05.08.2019 - 23:06DROPS Design answered:
Buongiorno Alice. Il lavoro dovrebbe misurare 17 cm in quel punto. Se la larghezza è corretta, provi a lavorare qualche riga in più fino a raggiungere 17 cm, a maglie alte o con un riga del motivo senza aumentare altre maglie. Buon lavoro!
06.08.2019 - 09:24Ik wil graag weten hoeveel ik nodig heb om er een lange mouw van te maken.ik heb maat M.
26.07.2019 - 12:50DROPS Design answered:
Dag Wilma,
Het is niet precies bekend hoeveel hiervoor nodig is, maar het zal naar schatting ongeveer 1 a 2 bollen zijn.
10.08.2019 - 17:16Buongiorno, sto lavorando una taglia S. Ho lavorato la terza riga facendo nell'ordine i diagrammi: A.1 , A.2 , A.4 , A.2 , A.4 , A.2 , A4, A2, A4, A2, A3 e inserendo 8 segnapunti. Per la riga 4, dovrò seguire i diagrammi al contrario (ovver: A3, A2, A4, ecc...), leggendo gli schemi da sinistra a destra? Inoltre, i segnapunti vanno spostati? grazie mille
22.07.2019 - 13:42DROPS Design answered:
Buongiorno Alice. Sì quando torna indietro, lavora i diagrammi al contrario. I segni seguono il lavoro man mano che questo procede in altezza. Buon lavoro!
22.07.2019 - 17:02Ben ik weer...de mouwen. Ik kan in eerste plaats niet-bindend de lossen werken omdat daaromheen al de stokjes zitten van het lijf. Dit heb ik opgelost door tussen die stokje in totaal 8 stokjes te creëren. Maar nu moet ik op die acht de eerste steek van a.7 maken...maar a.7 bestaat toch uit 18 steken? Ik haak maat M ik stel de vraag ook maar op Facebook , en nee ik heb geen drops verkooppunt in de buurt waar ik terecht kan.
14.07.2019 - 21:38DROPS Design answered:
Dag Gerda,
Het is wel de bedoeling dat je in de 8 lossen haakt die je op het lijf onder de mouwen had gehaakt, ook al zijn daar steken in gehaakt voor het lijf. Je begint de mouw door 1 vaste in de 4e losse daarvan te haken, dan 1 losse en dan 1 vaste in elk van de volgende 4 lossen. Onder de mouw haak je steeds zoals de eerste steek in A.7 (m.a.w. je haakt daar dus de ene toer stokjes en de andere toer vasten)
15.07.2019 - 14:30Hi, I have a oroblem with row 6 (increase, all tr row. I have inserted the new tr and have got 195 st instead of 215 st (size L) (30-M1, 13-M2, 18-M3, 13-M4, 48-M5, 13-M6, 18-M7, 13-M8, 29). Where did I miss the rest 10 st?
13.07.2019 - 10:16DROPS Design answered:
Dear Mrs Jerasa, you should work 18 stitches on 6th row in A.4, and increase at the same time between markers, ie at the end of Row 6, you should have -seen from RS: A.1 (= 8 sts), A.2 (= 21 sts), A.4 (= 18 sts), A.2 (= 18 sts), A.4 (=18 sts), A.2 (=48 sts), A.4 (= 18 sts), A.2 (=18 sts), A.4 (= 18 sts), A.2 (= 21 sts), A.3 (= 9 sts) = 8+ 21+18+18+18+48+18+18+18+21+9=215 sts. See increases on row 6. Happy crocheting!
15.07.2019 - 09:23By any chance is this actually the written pattern and diagram there for those whom can't read written pattern?. Because its not making any sence. You write some the pattern written then some diagram. Wouldn't it be wiser. To make written pattern an those whom follow diagram seperatly. You must have loads of question people wanting to understand like my self?. Its really confusing
11.07.2019 - 03:30DROPS Design answered:
Dear Mrs Whiting, to help you reading diagram, please read here, you can also cut the different diagrams and put them together to make the reading easier. Your DROPS store might have even more tips for you, do not hesitate to contact them even per mail or telephone. Happy crocheting!
11.07.2019 - 08:37Bonjour Infiniment merci pour votre aide 💗
04.07.2019 - 18:01Merci Donc ce seront des brides pour moi Mais je coince pour le rang d'après Cela me fera 1 motif? Avec 8 brides je ne m'en sors pas Merci
04.07.2019 - 15:15DROPS Design answered:
Bonjour Marie, vous crochetez d'abord 8 brides sous chaque manche jusqu'au dernier rang de A.6 et A.8 où vous allez diminuer 4 brides (= 179 b), et vous continuez ensuite ainsi: A.3a, 28 x A.2a en largeur et A.1a. Vous aurez donc ainsi le bon nombre de mailles pour crocheter les motifs en largeur. Bon crochet!
04.07.2019 - 16:18