DROPS Muskat
DROPS Muskat
100% Cotton
from 2.80 $ /50g
Get the yarn to make this pattern from 30.80$.

The yarn cost is calculated from the pattern’s smallest size and the yarn’s cheapest product type. Looking for an even better price? You might find it on the DROPS Deals!

DROPS SS24

Beach Date

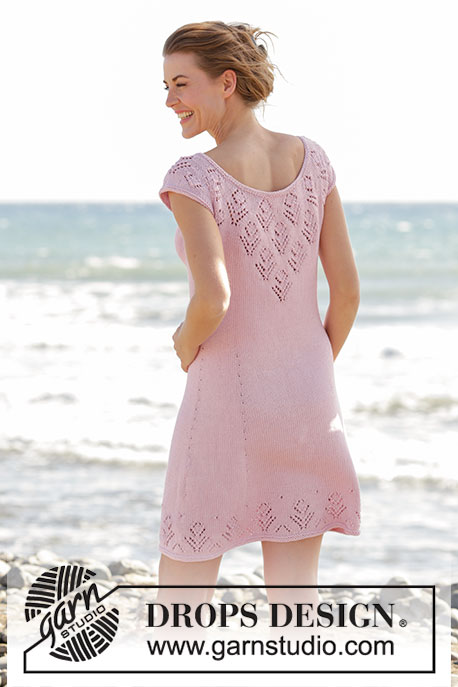
Knitted DROPS dress with round yoke and lace pattern, worked top down in ”Muskat”. Size: S - XXXL.

DROPS 167-1
DROPS design: Pattern no r-688
Yarn group B
----------------------------------------------------------
Size: S - M - L - XL - XXL - XXXL
Materials:
DROPS MUSKAT from Garnstudio
550-600-650-700-800-850 g color no 05, dusty pink

DROPS DOUBLE POINTED NEEDLES AND CIRCULAR NEEDLE (60 and 80 cm / 24'' and 32'') SIZE 4 mm/US 6 - or size needed to get 21 sts x 28 rows in stockinette st = 4'' x 4'' (10 x 10 cm).
DROPS DOUBLE POINTED NEEDLES and CIRCULAR NEEDLE (60 and 80 cm / 24'' and 32'') SIZE 3.5 mm/US 4 - for edges in garter st.

-------------------------------------------------------

Alternative Yarn – See how to change yarns here
Yarn Groups A to F – Use the same pattern and change the yarn here
Yarn usage using an alternative yarn – Use our yarn converter here

-------------------------------------------------------

DROPS Muskat
DROPS Muskat
100% Cotton
from 2.80 $ /50g
Get the yarn to make this pattern from 30.80$.

The yarn cost is calculated from the pattern’s smallest size and the yarn’s cheapest product type. Looking for an even better price? You might find it on the DROPS Deals!

Pattern instructions

NOTE: This pattern is written in American English. All measurements in charts are in cm. For conversion from inches to cm - click here. There are different terms for crocheting in American and British English. If this pattern includes crochet, click for "crochet terms" here. For this pattern in British English, please click here.
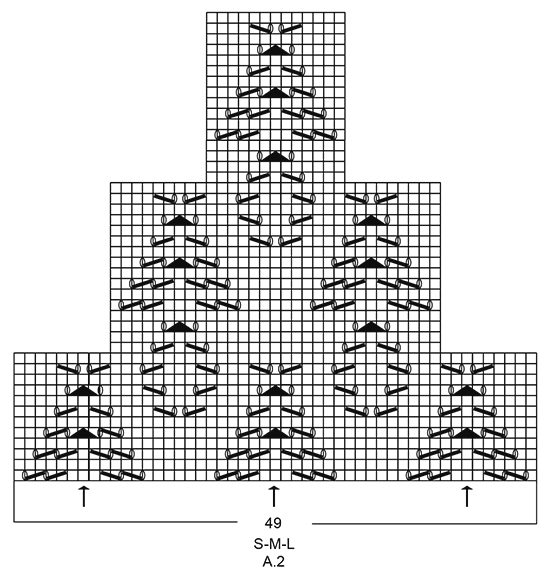
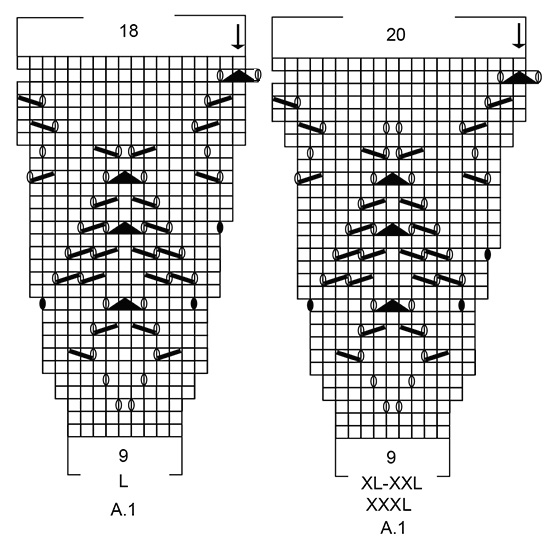
GARTER ST (worked in the round):
1 ridge = 2 rounds. * K 1 round and P 1 round *, repeat from *-*.

PATTERN:
See diagrams A.1 to A.3. See diagram for correct size.

INCREASE TIP:
Inc 1 st by making a YO. On next round K YO twisted to avoid holes. Repeat inc alternately on right and left side of the four markers.

DECREASE TIP:
Work until 4 sts remain before marker and work: Slip 1 st as if to K, K 1, psso, K 4, K 2 tog = 2 sts dec. Repeat in the other side.
----------------------------------------------------------

DRESS:
Worked in the round, top down.

YOKE:
Cast on 126-132-138-140-146-150 sts on circular needle size 3.5 mm / US 4 with Muskat. Work 2 ridges in GARTER ST - see explanation above. Switch to circular needle size 4 mm / US 6. Insert a marker at the beg of the round. Work 1 round in stockinette st while inc 4-8-6-4-7-12 sts evenly = 130-140-144-144-153-162 sts. Then work 0-0-0-0-2-2 more rounds in stockinette st. On next round work pattern A.1 - see diagram for correct size, 13-14-16-16-17-18 repetitions on round. REMEMBER THE KNITTING GAUGE When entire A.1 has been worked vertically, piece measures 11-11-12-12-13-13 cm / 4 3/8''-4 3/8''-4¾''-4¾''-5 1/8''-5 1/8'' and there are 234-252-288-320-340-360 sts on round. Now insert 2 markers in piece which marks transition for pattern continued down the back. Work the first 12-12-12-14-14-14 sts and insert a marker here. This is now beg of round. Then insert the second marker after 49-49-49-53-53-53 sts without working them first. Now work pattern - see diagram for correct size, as follows: Work A.2 (= 49-49-49-53-53-53 sts). NOTE: Pattern in A.2 should fit over pattern A.1. I.e. st with arrow in diagram A.2 should fit over st with arrows in diagram A.1. Then work in stockinette st over the remaining sts on round AT SAME TIME inc 20-26-14-14-30-42 sts evenly over sts in stockinette st = 254-278-302-334-370-402 sts.
Work next round as follows: Work pattern as before over the first 49-49-49-53-53-53 sts, 14-17-22-25-32-38 sts in stockinette st, slip the next 50-56-58-64-68-72 sts on a stitch holder (= sleeve), cast on 8 new sts under sleeve (insert a marker in the middle of these new sts, i.e. 4 new sts on each side of marker), work the next 77-83-93-103-117-129 sts, slip the next 50-56-58-64-68-72 sts on a stitch holder for sleeve, cast on 8 new sts under sleeve (insert a marker in the middle of these sts, i.e. 4 new sts on each side of marker), work the remaining 14-17-22-25-32-38 sts on round. There are now 85-91-101-111-125-137 sts for front and back piece = 170-182-202-222-250-274 sts in total.

BODY:
NOW MEASURE THE PIECE FROM HERE. Continue pattern on the back as before, and work in stockinette st over the remaining sts on round. NOTE: Continue in stockinette st on the back when the pattern has been worked.
When piece measures 4 cm / 1½'', dec 1 st on each side of marker in each side - READ DECREASE TIP. Repeat dec every 5-5½-5½-6-6½-7 cm / 2"-2 1/4"-2 1/4"-2 3/8"-2½"-2 3/4" 3 more times = 154-166-186-206-234-258 sts. When piece measures 24-26-27-29-30-32 cm / 9½"-10 1/4"-10½"-11½"-11 3/4"-12½", insert 4 new markers in piece, beg from marker in the right side:
NOTE: Remove the 2 markers on each side of the pattern on the back piece first! Work 16-17-19-21-24-27 sts, insert 1st marker, work 45-49-55-61-69-75 sts, insert 2nd marker, work 16-17-19-21-24-27 sts, marker in left side is here, work 16-17-19-21-24-27 sts, insert 3rd marker, work 45-49-55-61-69-75 sts, insert 4th marker, work the remaining 16-17-19-21-24-27 sts until marker in the right side. Move the markers upwards when working. On next round inc 1 st before all markers (= 6 sts inc) – see INCREASE TIP. Repeat inc every 6th round 1 more time, every 4th round 12-12-12-12-9-8 times, every 6th round 2-2-2-2-4-4 times = 250-262-282-302-324-342 sts. When piece measures 62-64-65-67-68-70 cm / 24½"-25 1/4"-25½"26½"-26 3/4"-27½"', inc 2-8-6-4-0-0 sts evenly = 252-270-288-306-324-342 sts. Then work pattern A.3 (= 18 sts) 14-15-16-17-18-19 repetitions in width. When entire A,3 has been worked vertically, switch to circular needle size 3.5 mm / US 4. Work 2 ridges and bind off.

SLEEVE EDGE:
Slip sts from stitch holder back on double pointed needles size 4 mm / US 6 (= 50-56-58-64-68-72 sts). Pick up 1 st in each of the 8 new sts cast on under sleeve = 58-64-66-72-76-80 sts. Work 1 round in stockinette st while dec 4 sts evenly = 54-60-62-68-72-76 sts. Continue with 2 rounds in stockinette st. Switch to double pointed needles size 3.5 mm / US 4 and work 2 ridges. Bind off. Repeat on the edge of the other sleeve.

This pattern has been corrected.

Updated online: 30.09.2016
Correction in diagram A.1 row 29 size L (YO added).

Diagram

All measurements in charts are in cm.

symbols = K
symbols = 1 YO between 2 sts On next round K the YO to make hole.
symbols = 1 YO between 2 sts On next round K YO twisted, i.e. work in the back loop of st instead of front to avoid holes.
symbols = K 2 tog
symbols = slip 1 st as if to K, K 1, psso
symbols = slip 1 st as if to K, K 2 tog, psso
symbols = st with arrow in diagram A.2 should fit over st with arrow in A.1
diagram
diagram
diagram
diagram
diagram

Each of our patterns has specific tutorial videos to help you.

Do you have a question? See a list of frequently asked questions (FAQ)

Knitting tension is what determines the final measurements of your work, and is usually measured per 10 x 10 cm. It is provided like so: number of stitches in width x number of rows in height - eg: 19 stitches x 26 rows = 10 x 10 cm.

The knitting tension is very individual; some people knit/crochet loosely while others work tightly. You adjust the knitting tension with the needle size, which is why the suggested needle size only serve as a guide! You need to adjust this (up or down) to ensure that YOUR knitting tension matches the knitting tension provided in the pattern. If you work with a different knitting tension than provided you will have a different yarn consumption, and your work will have different measurements than what the pattern suggests.

The knitting tension also determines which yarns can replace each other. As long as you achieve the same knitting tension you can replace one yarn with another.

See DROPS lesson: How to measure your tension/gauge

See DROPS video: How to make a gauge tension swatch

The required amount of yarn is provided in grams, eg: 450 g. To calculate how many balls you’ll need you first need to know how many grams are in 1 ball (25g, 50g or 100g). This information is available if you click on the individual yarn quality on our pages. Divide the amount required with the amount of each ball. For example, if each ball is 50g (the most common amount), the calculation will be as follows: 450 / 50 = 9 balls.

The important thing when changing from one yarn to another is that the knitting/crochet tension remains the same. This is so that the measurements of the finished piece will be the same as on the sketch provided. It is easier to achieve the same knitting tension using yarns from the same yarn group. It is also possible to work with multiple strands of a thinner yarn to achieve the knitting tension of a thicker one. Please try our yarn converter. We recommend you to always work a test swatch.

Please NOTE: when changing yarn the garment might have a different look and feel to the garment in the photo, due to individual properties and qualities of each yarn.

See DROPS lesson: Can I use a different yarn than the one mentioned in the pattern?

All our yarns are categorised into yarn groups (from A to F) according to thickness and knitting tension – group A contains the thinnest yarns and group F the thickest. This makes it easier for you to find alternative yarns to our patterns, should you wish to switch yarn. All yarns within the same group have a similar knitting tension and can easily replace each other. However, different yarn qualities have different structures and properties which will give the finished work a unique look and feel.

Click here for an overview of the yarns in each yarn group

At the top of all our patterns you’ll find a link to our yarn converter, which is a helpful tool should you wish to use a different yarn than suggested. By filling in the yarn quality you wish to replace, the amount (in your size) and number of strands, the converter will present good alternative yarns with the same knitting tension. Additionally it will tell you how much you’ll require in the new qualities and whether you’ll need to work with multiple strands. Most skeins are 50g (some are 25g or 100g).

If the pattern is worked with multiple colours, every colour will have to be converted separately. Similarly, if the pattern is worked with several strands of different yarns (for example 1 strand Alpaca and 1 strand Kid-Silk) you will have to find alternatives for each, individually.

Click here to see our yarn converter

Since different yarns have different qualities and textures we have chosen to keep the original yarn in our patterns. However, you can easily find options among our available qualities by using our yarn converter, or simply pick a yarn from the same yarn group.

It is possible that some retailers still have discontinued yarns in stock, or that someone has a few skeins at home that they would like to find patterns for.

The yarn converter will provide both alternative yarn as well as required amount in the new quality.

If you think it's hard to decide what size to make, it can be a good idea to measure a garment you own already and like the size of. Then you can pick the size by comparing those measures with the ones available in the pattern's size chart.

You'll find the size chart at the bottom of the pattern.

See DROPS lesson: How to read size chart

The needle size provided in the pattern serves only as a guide, the important thing is to follow the knitting tension. And since knitting tension is very individual, you will have to adjust the needle size to ensure that YOUR tension is the same as in the pattern – maybe you’ll have to adjust 1, or even 2 needle sizes, up or down to achieve the correct tension. For this, we recommend that you work test swatches.

Should you work with a different knitting tension than the one provided, the measurements of the finished garment might deviate from the measurement sketch.

See DROPS lesson: How to measure your tension/gauge

See DROPS video: How to make a gauge tension swatch

Working a garment top-down provides more flexibility and room for personal adjustment. For example it is easier to try the garment on while working, as well as making adjustments to length of yoke and shoulder caps.

The instructions are carefully explaining every step, in the correct order. Diagrams are adjusted to the knitting direction and are worked as usual.

The diagram depicts all rows/rounds, and every stitch seen from the right side. It is read from bottom to top, from right to left. 1 square = 1 stitch.

When working back and forth, every other row is worked from the right side and every other row is worked from the wrong side. When working from the wrong side, the diagram will have to be worked reversed: from left to right, knit stitches are purled, purl stitches are knit etc.

When working in the round every round is worked from the right side and the diagram are worked from right to left on all rounds.

See DROPS lesson: How to read knitting diagrams

The diagram depicts all rows/rounds, and every stitch seen from the right side. It is worked from bottom to top, from right to left.

When working back and forth every other row is worked from the right side: from right to left and every other row is worked from the wrong side: from left to right.

When working in the round, every row in the diagram are worked from the right side, from right to left.

When working a circular diagram you start in the middle and work your way outwards, counter clockwise, row by row.

The rows usually start with a given number of chain stitches (equivalent to the height of the following stitch), this will either be depicted in the diagram or explained in the pattern.

See DROPS lesson: How to read crochet diagrams

Instructions for working several diagrams after each other on the same row/round, will often be written like so: “work A.1, A.2, A.3 a total of 0-0-2-3-4 times". This means you work A.1 once, then A.2 is worked once, and A.3 is repeated (in width) the number of times provided for your size – in this case like so: S = 0 times, M = 0 times, L=2 times, XL= 3 times and XXL = 4 times.

The diagrams are worked as usual: begin with the first row in A.1, then work the first row in A.2 etc.

See DROPS lesson: How to read knitting diagrams

See DROPS lesson: How to read crochet diagrams

The total width of the garment (from wrist-to-wrist) will be larger in the larger sizes, despite the actual sleeves being shorter. The larger sizes have longer sleeve caps and wider shoulders, so there will be a good fit in all sizes.

The measurement sketch/schematic drawing provides information regarding the full length of the garment. If it’s a jumper or a jacket the length is measured from the highest point on the shoulder (usually closest to the neckline), and straight down to the bottom of the garment. It is NOT measured from the tip of shoulder. Similarly, the length of yoke is measured from the highest point on the shoulder and down to where yoke is split into body and sleeves.

See DROPS lesson: How to read a schematic drawing

Diagrams are often repeated on the round or in height. 1 repeat is the diagram the way it appears in the pattern. If it says to work 5 repeats of A.1 in the round, then you work A.1 a total of 5 times after/next to each other in the round. If it says to work 2 repeats of A.1 vertically/in height you work the entire diagram once, then begin again at the start and work the entire diagram one more time.

Chain stitches are slightly narrower than other stitches and to avoid working the cast-on edge too tight, we simply chain more stitches to begin with. The stitch count will be adjusted on the following row to fit the pattern and measurement sketch.

The rib edge is more elastic and will contract slightly compared to, for example, stocking stitch. By increasing before the rib edge, you avoid a visible difference in width between the rib edge and the rest of the body.

It’s very easy to cast off too tightly, and by making yarn overs while casting off (and simultaneously casting these off) you avoid a too tight cast off edge.

See DROPS video: How to bind off with yarn overs (yo)

To achieve an even increase (or decrease) you can increase on, for example: every 3rd and 4th row alternately, like so: work 2 rows and increase on the 3rd row, work 3 rows and increase on the 4th. Repeat this until the increase is complete.

See DROPS lesson: Increase or decrease 1 st on every 3rd and 4th row alternately

Should you prefer to work in the round instead of back and forth, you may of course adjust the pattern. You’ll need to add steeks mid-front (usually 5 stitches), and follow the instructions. When you would normally turn and work from the wrong side, simply work across the steek and continue in the round. At the end you’ll cut the piece open, pick up stitches to work bands, and cover the cut edges.

See DROPS video: How to knit steeks and cut open

Should you prefer to work back and forth instead of in the round, you may of course adjust the pattern so you work the pieces separately and then assemble them at the end. Divide the stitches for the body in 2, add 1 edge stitch in each side (for sewing) and work the front and back pieces separately.

See DROPS lesson: Can I adapt a pattern for circular needles into straight needles?

Pattern repeats can vary slightly in the different sizes, in order to get the correct proportions. If you’re not working the exact same size as the garment in the photo, yours might deviate slightly. This has been carefully developed and adjusted so that the complete impression of the garment is the same in all sizes.

Make sure to follow instructions and diagrams for your size!

If you have found a pattern you like which is available in women’s size it’s not very difficult to convert it to men’s size. The biggest difference will be the length of sleeves and body. Start working on the women size that you think would fit across the chest. The additional length will be worked right before you cast off for the armhole/sleeve cap. If the pattern is worked top-down you can add the length right after the armhole or before the first decrease on sleeve.

Regarding additional yarn amount, this will depend on how much length you add, but it is better with a skein too many than too few.

All yarns will have excess fibres (from production) that might come off as lint or shedding. Brushed yarns (ie hairier yarns) have more of these loose, excess fibres, causing more shedding.

Shedding also depends on what is worn under or over the garment, and whether this pulls at the yarn fibres. It’s therefore not possible to guarantee that there will be no shedding

Below are some tips on how to get the best result when working with hairier yarns:

1. When the garment is finished (before you wash it) shake it vigorously so the looser hairs come off. NOTE: do NOT use a lint roller, brush or any method that pulls at the yarn.

2. Place the garment in a plastic bag and put it in your freezer - the temperature will cause the fibres to become less attached to each other, and excess fibres will come off easier.

3. Leave in the freezer for a few hours before taking it out and shaking it again.

4. Wash the garment according to the instructions on the yarn label.

Pilling is a natural process that happens to even the most exclusive of fibers. It's a natural sign of wear and tear that is hard to avoid, and that is most visible in high friction areas of your garment like a sweater's arms and cuffs.

You can make your garment look as new by removing the pilling, using a fabric comb or a pill/lint remover.

Still can't find the answer you need? Then scroll down and leave your question so one of our experts can try to help you. This will be done normally within 5 to 10 working days.
In the meantime, you can read the questions and answers that others have left to this pattern or join the DROPS Workshop on Facebook to get help from fellow knitters/crocheters!

You might also like...

Beach Date

Pine Cabin Knitting, United States

167-1 Beach Date

JoeJ5, France

Beach Date

Danidula, Czech Republic

167-1 Beach Date

Christina, United States

Beach Date

Danidula, Czech Republic

Beach Date

Hanne Møller Pedersen, Denmark

Post a comment to pattern DROPS 167-1

We would love to hear what you have to say about this pattern!

If you want to leave a question, please make sure you select the correct category in the form below, to speed up the answering process. Required fields are marked *.

Comments / Questions (88)

country flag Paulien wrote:

Ik heb den vraag over de mouw: je moet de 8 steken opnemen. Doe je dat in 1x achter de 56 steken die je terug zet op de naald? En kan je dit ook met een rondbreinaald doen? Of heb je echt naalden zonder knop nodig en dan 4 stuks? Bedankt voor uw reactie alvast, dan kan ik hem afmaken. Super mooi jurkje en leuk om te breien!

28.04.2016 - 08:20

DROPS Design answered:

Hoi Paulien. Je hebt 56 st voor elke mouw, en zet dan nieuwe steken op (= 8) hieronder. Je hebt daarna in totaal 182 st op de nld. Ik zou dit altijd met een rondbreinaald doen en niet 4 breinaalden zonder knop :-)

12.05.2016 - 11:03

country flag Esther wrote:

Bonjour bonjour, Dans le diagramme A1 en L, n'y a-t-il pas une erreur au niveau de l'avant dernière ligne? En effet, il faut terminer en ayant 18 mailles or sauf erreur de ma part, vu le diagramme, si on ne fait pas un jeté en commençant le rang, on se retrouve avec 17 mailles. C'est en tout cas ainsi que j'ai résolu le problème en ce qui me concerne =)

12.04.2016 - 13:37

DROPS Design answered:

Bonjour Esther, et merci, effectivement un jeté manque au niveau de l'avant-dernier rang du diagramme A.1, taille L, merci pour votre retour. Bonne continuation!

12.04.2016 - 13:53

country flag Esther wrote:

Pour info et pour les aussi nulles que moi, le diagramme A1 en L se lit/travaille de bas en haut... donc 9 mailles pour commencer (niveau encolure) pour terminer par 18...

28.03.2016 - 21:04

DROPS Design answered:

Bonjour Esther, effectivement, sauf indication contraire, les diagrammes se lisent toujours en commençant en bas à droite (voir aussi ici). Bon tricot!

29.03.2016 - 11:47

country flag Luisa Waidner wrote:

Hallo, ist es möglich, dass bei Muster A.1 für Größe L in der letzten Reihe ein Umschlag fehlt, bevor die drei Maschen zusammengestrickt werden? In Muster A.1 für die anderen Größen ist sowohl vor als auch nach den zusammengestrickten Maschen ein Umschlag.

24.03.2016 - 12:29

DROPS Design answered:

Liebe Luisa, ja, ich denke Sie haben recht - da scheint ein Umschlag zu fehlen. Vielen Dank für die Rückmeldung, unser Designteam wird dies korrigieren.

26.03.2016 - 08:25

country flag Laplus wrote:

--11--Je suis désolée mais rien ne correspond et surtout je ne comprends absolument rien! Serait-il donc possible d'avoir des éclaircissement concernant ce passage très vague? Merci Désolée aussi pour le nombres de messages mais vous n'acceptez pas les commentaires trop long... Sinon je ferai comme d'habitude avec vos modèles, j'adapterai à ma façon... Bonne nuit ....

13.03.2016 - 00:31

DROPS Design answered:

Bonjour Mme Laplus, j'espère que les réponses ci-dessous vous aideront à continuer, je vous invite à rejoindre le forum DROPS pour toute assistance complémentaire (plus de place pour y poser pour les questions & réponses). Bon tricot!

14.03.2016 - 09:11

country flag Laplus wrote:

--10-- En ne comptant pas le 67 mailles ( = 14 premières du tour 1 et les 53 non tricotées du tour 1) Vous dites que l'on doit avoir 125 mailles pour le devant + 125 mailles pour le dos = 250 ===> 53+32+117+38=240 mailles +16 remontées= 256 au lieu des 250.... soit un total avec les mailles en attentes 256 +68+68 = 392

13.03.2016 - 00:30

DROPS Design answered:

En récapitulant, vous avez à partir du début des tours: 53 m de A.2, 32 m jersey (= dos), puis 8 m pour l'emmanchure, puis 117 m pour le devant, puis 8 m pour l'emmanchure et 32 m pour la dernière partie du dos = 53+32+8+117+8+32=250 m. Bon tricot!

14.03.2016 - 09:09

country flag Laplus wrote:

--9---Puis 32 en jersey 68 en attentes monter 8 mailles tricoter les 117 en jersey??? en suivant le diagramme???? 68 en attente monter 8 mailles Terminer avec les 38 mailles restantes en jersey??? Diagramme??? C'est très confus...

13.03.2016 - 00:30

DROPS Design answered:

Sur ce tour, on va mettre en attente les 68 mailles des manches et monter 8 m au-dessus des manches pour les emmanchures (le marqueur au milieu de ces m = repère côté): Tricotez les mailles du dos: 53 m de A.2 + 32 m (manche: glissez 68 m en attente sans les tricoter), montez 8 m, tricotez le devant (= 117 m), (manche: comme la 1ère), montez 8 m, tricotez les 32 dernières m. (Cette vidéo montre comment tricoter un pull de haut en bas, et notamment comment faire pour les manches). Bon tricot!

14.03.2016 - 09:07

country flag Laplus wrote:

--8-- Qu'ais-je donc loupé ....???? Ensuite ...Pour le tour suivant... Je laisse sans tricoter mes 14 mailles en jersey et les 53 non tricotées puisque vous dites de tricoter en suivant le diagramme. Je présume qu'elles seront tricotées plus loin dans le rangs. Je reprends donc au niveau du diagramme du rang 1=> 53 en suivant le diagramme comme au tour 1

13.03.2016 - 00:29

DROPS Design answered:

Au début du tour, vous tricotez bien les 14 m comme indiqué, c'est désormais ici que les tours vont commencer - et vous placez un autre marqueur 53 m plus loin (= partie "réservée" à A.2)- puis vous tricotez les mailles depuis le nouveau début du tour: 53 m en A.2 + 287 m jersey augmentées de 30 m = 370 m. Bon tricot!

14.03.2016 - 08:59

country flag Laplus wrote:

--7--- Tricoter ensuite en jersey le reste de mailles, il m'en reste 213 dans lesquelles j'ajoute 30 augmentations ce qui devrait selon vous me donner un total de 370 mailles= 14 premières (en jersey???) + 53 non tricotées + 53 tricotées suivant le diagramme A2 + 213 en jersey +30 augmentations j'arrive à un total de 363 et non 370....

13.03.2016 - 00:28

DROPS Design answered:

Avant de tricoter ce tour, vous avez un total de 340 m que vous tricotez ainsi: 53 m en A.2, il reste 287 m que vous tricotez en jersey en augmentant m à intervalles réguliers = 287+30= 317 m + les 53 m de A.2 = 370m.

14.03.2016 - 08:57

country flag Laplus wrote:

---6--- Je suis vos explications=> Je tricote en jersey??? les 14 ière mailles puis AM= début du tour Ensuite je glisse sans les tricoter les 53 mailles suivantes puis AM==> dois-je couper le fil puisque ces mailles ne doivent pas être tricotées Puis les 53 mailles suivantes => diagramme A2 en faisant correspondre avec les flèches de A1 celles de A2 ( ceci ok)

13.03.2016 - 00:28

DROPS Design answered:

Bonjour Mme Laplus, vous tricotez les 14 premières m du tour, et placez un marqueur - puis, sans tricoter les mailles, placez un 2ème marqueur après 53 m, mais tricotez maintenant le tour suivant comme indiqué: A.2 sur ces 53 m entre les 2 nouveaux marqueurs (A.2 continue A.1), et tricotez les mailles restantes du tour en jersey en répartissant le nbe d'augmentations correspondant à votre taille.

14.03.2016 - 08:54