
Popular categories
Looking for a yarn?


|
|
Sweet Apples |
|
|
|
|
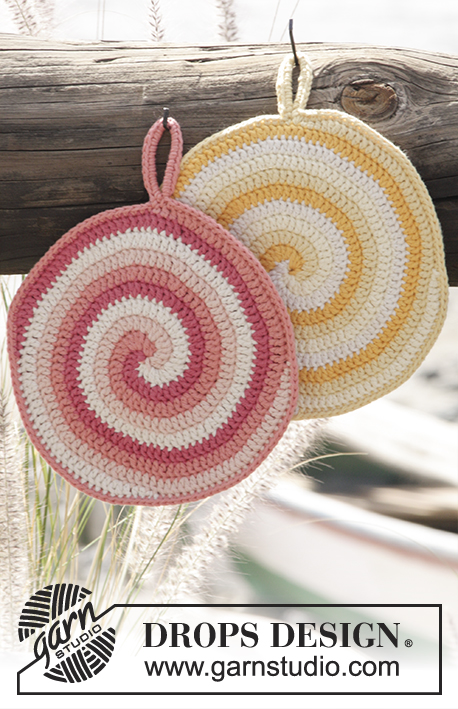
Crochet DROPS apple pot holders in "Paris".
DROPS 170-21 |
|
|
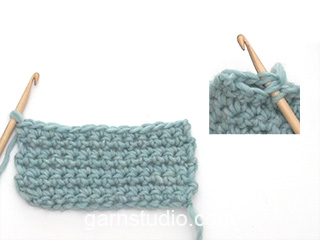
CROCHET TIP: On every tr round, replace first tr with 3 ch, finish with 1 sl st in 3rd ch. ---------------------------------------------------------- POT HOLDER: Crochet 4 ch on hook size 3.5 mm with off white and form a ring with 1 sl st in first ch. ROUND 1: Work * 1 htr, 2 tr * repeat from *-* 4 times in total around ch-ring – READ CROCHET TIP! = 4 htr and 8 tr. ROUND 2: Work 2 htr in every htr and 2 tr in every tr = 8 htr and 16 tr. REMEMBER THE CROCHET TENSION! ROUND 3: Work * 1 htr in first htr, 2 htr in next htr, 1 tr in next tr, 2 tr in next tr, 1 tr in next tr, 2 tr in next tr *, repeat from *-* 4 times in total = 12 htr and 24 tr. ROUND 4: Work * 1 htr in each of the first 2 htr, 2 htr in next htr, 1 tr in each of the next 2 tr, 2 tr in next tr, 1 tr in each of the next 2 tr, 2 tr in next tr *, repeat from *-* 4 times in total = 16 htr and 32 tr. ROUNDS 5-8: Continue with inc as before, on every round work 1 more htr/tr between inc = 32 htr and 64 tr. ROUND 9: Work 1 dc in each of the next 7 stitches, * 2 dc in the next stitch, 1 htr in each of the next 3 sts, 1 tr in each of the next 3 sts, 1 dtr in the next st, 2 dtr in the next st, 1 tr in each of the next 3 sts, 1 htr in each of the next 3 sts, 1 dc in the next st, 2 dc in the next st, 1 dc in each of the next 7 sts*, repeat from *-* a total of 4 times in the round, but finish with 1 dc in the next st and 2 dc in the last st = 108 sts ROUND 10: Switch to red, work 1 dc in every dc and 1 htr in every htr, 1 tr in every tr and work 2 dtr in every dtr and 2 tr in every tr on each side of dtr. Embroider two seeds in the middle of the front of pot holder with brown - see photo. Work another pot holder but now work pot holder in red. CROCHET TOG: Place 2 pot holders on top of each other WS against WS, and crochet them tog with red as follows: Work through both layers: Work 1 dc in every st but work 2 dc in each of the middle 4 dtr at each corner. LEAF: Work 14 ch with green, turn and work 1 dc in second ch from hook, 1 dc in next st, 1 htr in each of the next 2 ch, 1 tr in each of the next 2 ch, 1 dtr in next ch, 1 tr in each of the next 2 ch, 1 htr in each of the next 2 ch, 1 dc in next ch, 2 dc in next ch, then work on the under side of ch as follows: 1 dc in next ch, 1 htr in each of the next 2 ch, 1 tr in each of the next 2 ch, 1 dtr in next ch, 1 tr in each of the next 2 ch, 1 htr in each of the next 2 ch, 1 dc in each of the last 2 ch, fasten off. Work 2 leaves. STRAP AND STEM: Work 27 ch with brown, 1 dc in 2nd ch from hook, 1 dc in each of the next 2 ch, fasten 1 leaf to stem with 1 dc through 1 st on leaf and 1 ch on stem, repeat one more time. Do the same with next leaf, work 1 dc in each of the remaining ch, place the stem into a ring fasten with 1 sl st through all layers (both pot holder and stem). Fasten off. |
|
|
Have you made this or any other of our designs? Tag your pictures in social media with #dropsdesign so we can see them! Do you need help with this pattern?You'll find tutorial videos, a Comments/Questions area and more by visiting the pattern on garnstudio.com. © 1982-2024 DROPS Design A/S. We reserve all rights. This document, including all its sub-sections, has copyrights. Read more about what you can do with our patterns at the bottom of each pattern on our site. |


With over 40 years in knitting and crochet design, DROPS Design offers one of the most extensive collections of free patterns on the internet - translated to 17 languages. As of today we count 304 catalogues and 11422 patterns - 11422 of which are translated into English (UK/cm).
We work hard to bring you the best knitting and crochet have to offer, inspiration and advice as well as great quality yarns at incredible prices! Would you like to use our patterns for other than personal use? You can read what you are allowed to do in the Copyright text at the bottom of all our patterns. Happy crafting!
Comments / Questions (30)
I’m not an expert in crochet but usually get by and apologies if this question comes across as silly or amateurish but I’m having trouble understanding the Crochet Tip. On every dc round replace first dc with ch3 but every round starts with hdc so do you replace the first hdc with ch3? Is there a diagram available for this pattern?
02.03.2024 - 08:39DROPS Design answered:
Dear S Strandberg, the only version of the pattern available is the one shown online; there are no extra charts or written explanations. You start all rounds with ch3 and substitute the 1st stitch, regardless of the type of stitch used. Happy crochetting!
03.03.2024 - 18:51Kan i prøve at skrive omg. 9 op? Altså hvordan man får flettet udtagningerne ind i den omgang? Jeg har helt styr på de andre omgange op til, men omg. 9 giver mig hovedbrud. Kan se på kommentarerne ovenfor at andre heller ikke kan forstå den omgang.
06.02.2023 - 15:48DROPS Design answered:
Hei Wicki Her må man strikke slik det står i beskrivelsen, samtidig som det økes som tidligere og da kan det fort gå litt i surr, men jeg ser også at det er et par tall som er feil. Et sted står det "1 fm i hver av de 2 neste m". Det skal være 12 masker, ikke 2. Og det skal være 1 fastmaske i hver av de 2 siste masken (2 fastmasker i den siste masken = 3 fastmasker). Vi skal få skrevet om 9.omgang slik at det blir lettere å forstå + rette feilene. mvh DROPS Design
13.02.2023 - 14:29Ronde 9 is eigenlijk ronde 8/ round 9 is actually round 8 Als je goed op het plaatje kijkt, bestaat het lichte deel van de appel uit 8 toeren. De achtste is welke beschreven staat bij negen. Als je dan de beschrijving volgt, klopt het precies. Crochet rounds 1-7 according to the pattern description. Then skip round 8, and start with 9 right after.
26.04.2022 - 21:06Eine Freundin hat diese Topflappen bei mir bestellt. Das Material erscheint mir aber sehr dünn. Können Sie mir bestätigen, dass man sieh damit die Finger nicht verbrennt, wenn man sehr heiße Töpfe anfassen muss ... ! Vielen Dank.
15.01.2022 - 22:40DROPS Design answered:
Liebe Frau Marchal, diese Topflappen bestehen aus 2 Teilen (1 mit dem Apfel, das 2. mit nur rot) die zusammengehäkelt wurden, dh es werden 2 Stofflagen. Viel Spaß beim häkeln!
17.01.2022 - 08:48I’m totally failing. Looking at the questions people are sending it seems that round 9 is creating a big problem. Please confirm the following: first I have 96 stitches where the increase are in the 7th stich of every section. Please explain which stitch I have to add in the 7th stitch prior to increasing. If you have a document showing all the stitches I have to follow it would be great otherwise I’m abandonning and will have to find another pattern to use all the yarn I ordered.
16.12.2020 - 00:50DROPS Design answered:
Dear Mrs Diamond, you started to increase on round 4 with always 1 more stitch between each increase as on round 5 to 8: there were 1 stitch between 2 increases on round 4, there were 5 sts between 2 increases on round 8 and now you will have 6 sts between 2 increases on round 9, but at the same time, you will work all stitches as decribed under round 9, and not only with hdc and dc as before. Happy crocheting!
16.12.2020 - 07:07Round 9-can you give me the correct way to do it: the inc should be as follows: 7 sc 2 sc in eight stitch, 3 hdc 4 dc 2 tr in same stitch 1tr, 3 dc 3 hdc 2 sc in same stitch 7 sc 2 sc in same stitch 1 sc 3 hdc 3 dc etc.
15.12.2020 - 02:52DROPS Design answered:
Dear Mrs Diamond, continue to increase on same places as before (in the corners = 1 stitch more between each increase), but instead of working only hdc and dc you will crochet also sc and trebles, ie as explained under row 9. Happy crocheting!
15.12.2020 - 08:43Hola, se teje en espiral o en círculo? Y si es en círculo se cierra con punto enano?
22.11.2020 - 02:57DROPS Design answered:
Hola Gabriela, se trabaja en círculo y se termina con 1 punto enano en el 1º/2º/3º punto de cadeneta, dependiendo del punto de inicio de la vuelta.
22.11.2020 - 11:23Juste pour dire que j'ai compris en crochettant; souvenirs de granny. 😉 Merci. 🙂
14.08.2020 - 16:05DROPS Design answered:
Bonjour Gwenaël et merci :) N'hésitez pas à partager vos photos avec nous via notre groupe DROPS Workshop ou bien notre galerie #dropsfan - Bonne continuation!
17.08.2020 - 07:53J'ai beau retourner le problème dans tous les sens; je ne vois pas d'augmentation/où les mettre, ou intercaler de nouvelles mailles...; dommage que ce ne soit pas plus précis pour celles qui ne sont pas habituées au crochet ou qu'il n'y ait pas une grille, cela aurait été plus clair. 😉
14.08.2020 - 13:09DROPS Design answered:
Bonjour Gwenaël, vous continuez les augmentations commencées au tour 4, avec toujours 1 maille en plus entre chaque augmentation comme aux tours 5 à 8, autrement dit, quand vous aviez 1 maille entre 2 augmentations au tour 4, vous en aviez 5 au tour 8 et donc maintenant vous en aurez 6 au tour 9, en même temps, vous crochetez les mailles comme décrit au rang 9 et donc pas en dB et B uniquement comme avant. Bonne continuation!
14.08.2020 - 13:33Bonjour, comme beaucoup je coince au rang 9; doit-on rajouter des augmentations 2dB et 2B à intervalle régulier (12 au total)? Merci. 🙂
14.08.2020 - 10:16DROPS Design answered:
Bonjour Gwenaël, les augmentations se font comme avant (vous avez 1 maille en plus entre chaque augmentation du tour précédent), mais au lieu de ne crocheter que des demi-brides et des brides, vous allez également crocheter des mailles serrées et des double-brides. Alignez les augmentations comme avant tout simplement, et crochetez les mailles comme indiqué sur le 9ème tour pour former le carré. Bon crochet!
14.08.2020 - 11:12