
Popular categories
Looking for a yarn?


|
|||||||||||||||||||||||||
Mercy |
|||||||||||||||||||||||||
|
|
|||||||||||||||||||||||||
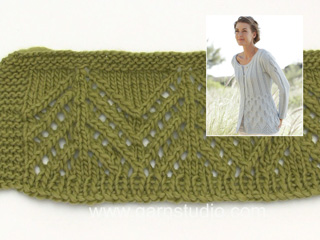
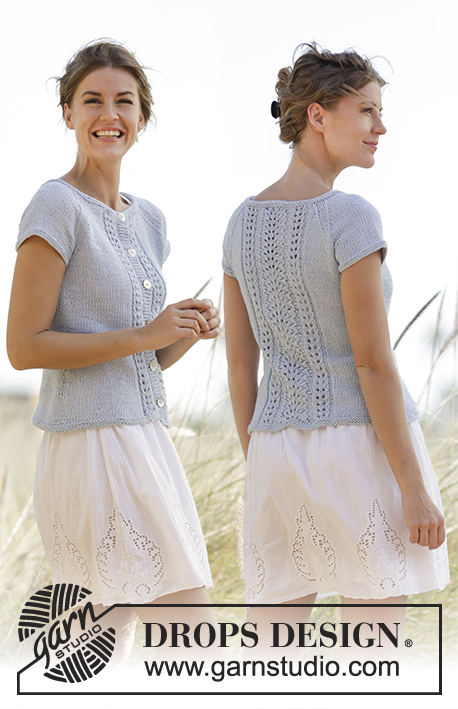
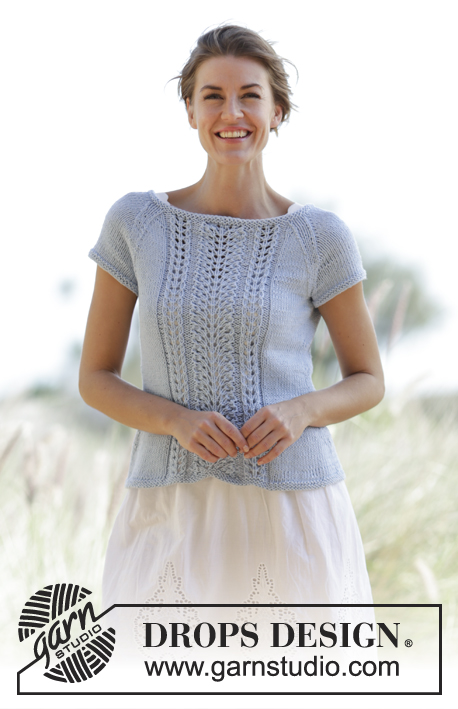
Knitted DROPS fitted jacket with leaf pattern, worked top down in “Cotton Light”. Size: S - XXXL.
DROPS 168-7 |
|||||||||||||||||||||||||
|
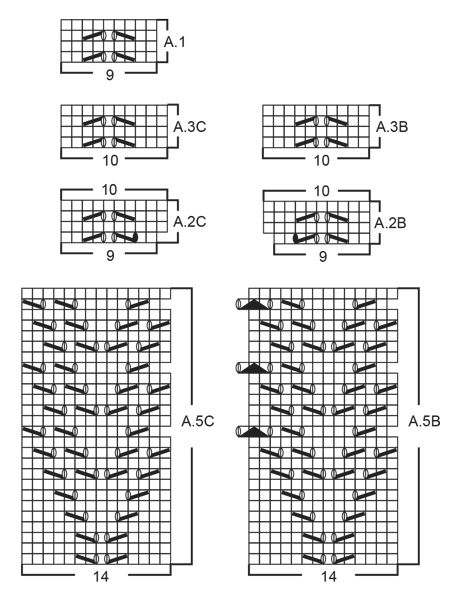
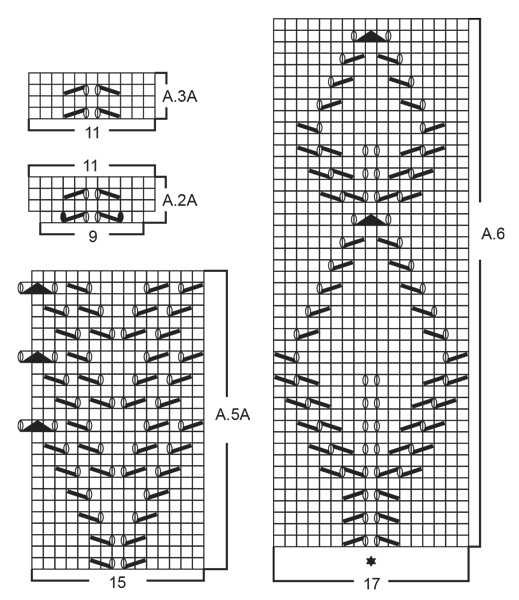
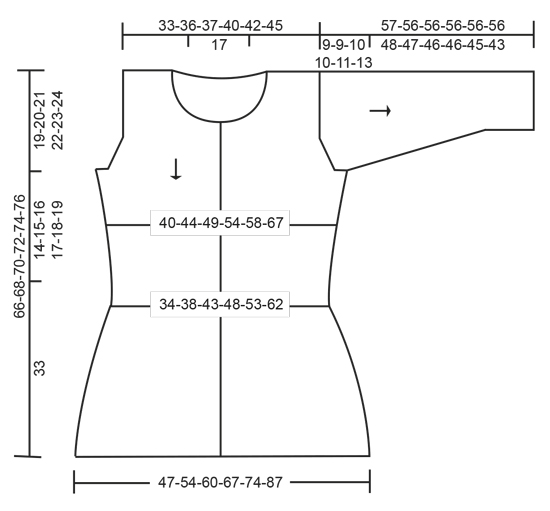
GARTER ST (back and forth): K all rows. 1 ridge = K2 rows. GARTER ST (worked in the round): 1 ridge = 2 rounds. * K 1 round and P 1 round *, repeat from *-*. PATTERN: See diagrams A.1 to A.6. The diagrams show all rows in pattern seen from RS. INCREASE TIP (applies to inc for armhole on body): All inc are done from RS. Inc inside 2 edge sts in garter st by picking up yarn between 2 sts, slip yarn on needle and K yarn twisted to avoid hole (= 1 st inc). DECREASE TIP (applies to sides on body and mid under sleeve): All dec are done from RS! Dec 1 st on each side of marker as follows: Beg 2 sts before marker, K 2 tog, marker, slip 1 st as if to K, K 1, psso (= 2 sts dec). BUTTONHOLES: Dec for buttonholes on right band. 1 button hole = beg from WS on right front piece and K tog third and fourth st from edge and make 1 YO. Dec for first buttonhole on first row from WS after neck inc is done. Then dec the next 5-5-5-6-6-6 buttonholes every 7-7½-8-7-7½-8 cm / 2 3/4"-2 7/8"-3 1/8"-2 3/4"-2 7/8"-3 1/8" downwards. ---------------------------------------------------------- JACKET: Worked top down, back and forth on circular needle. Beg with back piece, then work front pieces before slipping all parts tog and working in one piece until finished measurements. Work sleeves separately, top down. LEFT SHOULDER BACK (when garment is worn): Cast on 17-20-21-24-26-29 sts on circular needle size 3.5 mm / US 4 with Cotton Light. K 1 row from WS and K 1 row from RS. Switch to circular needle size 4 mm / US 6, P from WS until 2 sts remain on row and finish with K 2 (= edge sts towards armhole). Work next row as follows from RS: 2 edge sts in GARTER ST – see explanation above (= edge sts against armhole), 6-0-1-4-6-0 sts stockinette st, then work A.1 over the next 9-18-18-18-18-27 sts (= 1-2-2-2-2-3 repetitions of 9 sts). Continue pattern like this. When piece measures 2 cm / 3/4'', cast on 1 new st at the end of next row from RS. Work back from WS as before and then cast on 34 new sts for neck at the end of next row from RS = 52-55-56-59-61-64 sts on needle. Put piece aside and work right shoulder back. RIGHT SHOULDER BACK (when garment is worn): Cast on as on left shoulder back and K 1 row from WS and K 1 row from RS. Switch to circular needle size 4 mm / US 6, K the first 2 sts (= edge sts towards armhole) and P the rest of row. Work next row as follows from RS: Work A.1 over the first 9-18-18-18-18-27 sts (= 1-2-2-2-2-3 repetitions of 9 sts), work 6-0-1-4-6-0 stockinette st and finish with 2 edge sts in garter st towards armhole. Continue pattern like this. When piece measures 2 cm / 3/4'', cast on 1 new st at the end of row from WS = 18-21-22-25-27-30 sts on needle. Work 1 row pattern back from RS. YOKE AT THE BACK: Slip sts from left and right shoulder on to same circular needle size 4 mm / US 6 = 70-76-78-84-88-94 sts on needle. Continue pattern back and forth over all sts with 2 edge sts in garter st and 6-0-1-4-6-0 sts stockinette st in each side. REMEMBER THE KNITTING GAUGE. When piece measures 15-16-15-15-15-14 cm / 6"-6 1/4"-6"-6"-6"-5½", work next row as follows from RS: 2 edge sts in garter st, 6-0-1-4-6-0 sts stockinette st, work A.2A one time, work A.2B over the next 45-63-63-63-63-81 sts (= 5-7-7-7-7-9 repetitions of 9 sts), work 6-0-1-4-6-0 sts stockinette st and finish with 2 edge sts in garter st. When A.2 has been worked one time vertically, there are 77-85-87-93-97-105 sts on needle. Continue with A.3A over A.2A and A.3B over A.2B the same way (there is now 1 st stockinette st more between each eyelet row). AT THE SAME TIME when piece measures 17-18-17-17-17-16 cm / 6 3/4"-7"-6 3/4"-6 3/4"-6 3/4"-6 1/4", inc 1 st for armhole in each side – READ INCREASE TIP! Repeat inc every other row (i.e. every row from RS) 2-2-5-7-8-11 times in total – NOTE: Work inc sts in stockinette st. On first row from RS after last inc cast on 2-2-3-3-5-7 new sts at the end of row for armhole. Repeat on next row from WS = 85-93-103-113-123-141 sts on needle. Put pieces aside and work front piece. RIGHT FRONT PIECE (when garment is worn): Cast on 17-20-21-24-26-29 sts on circular needle size 3.5 mm / US 4. K 1 row from WS and K 1 row from RS. Switch to circular needle size 4 mm / US 6, P from WS until 2 sts remain on row and finish with K 2 (= edge sts towards armhole). Work next row as follows from RS: 2 edge sts in GARTER ST – see explanation above (= edge sts against armhole), 6-0-1-4-6-0 sts stockinette st, then work A.1 over the next 9-18-18-18-18-27 sts (= 1-2-2-2-2-3 repetitions of 9 sts). Continue pattern like this. When piece measures 5-5-5-7-7-7 cm / 2"-2"-2"-2 3/4"-2 3/4"-2 3/4", cast on new sts for neck at the end of every row from RS as follows: Cast on 1 st 4 times, 2 sts 3 times and 13 sts 1 time = 40-43-44-47-49-52 sts. Continue the pattern with 2 edge sts in garter st towards the armhole and 5 band sts in garter st towards mid front (there is now room for 3-4-4-4-4-5 repetitions of A.1). Remember BUTTONHOLES on band - see explanation above. When piece measures 15-16-15-15-15-14 cm / 6"-6 1/4"-6"-6"-6"-5½", work next row as follows from RS: Work 2 edge sts in garter st, 6-0-1-4-6-0 sts stockinette st, work A.2B over the next 27-36-36-36-36-45 sts (= 3-4-4-4-4-5 repetitions of 9 sts) and finish with 5 band sts in garter st towards mid front. When A.2B has been worked 1 time vertically, there are 43-47-48-51-53-57 sts on needle. Continue with A.3B over A.2B the same way (there is now 1 st stockinette st more between each eyelet row). AT THE SAME TIME when piece measures 17-18-17-17-17-16 cm / 6 3/4"-7"-6 3/4"-6 3/4"-6 3/4"-6 1/4", inc 1 st for armhole in the side – READ INCREASE TIP! Repeat inc every other row (i.e. every row from RS) 2-2-5-7-8-11 times in total. On first row from WS after last inc cast on 2-2-3-3-5-7 new sts at the end of row for armhole = 47-51-56-61-66-75 sts on needle. Put the piece aside and work left front piece. LEFT FRONT PIECE (when garment is worn): Cast on as on right front piece. K 1 row from WS and K 1 row from RS. Switch to circular needle size 4 mm / US 6, K the first 2 sts (= edge sts towards armhole) and P the rest of row. Work next row as follows from RS: Work A.1 over the first 9-18-18-18-18-27 sts (= 1-2-2-2-2-3 repetitions of 9 sts), work 6-0-1-4-6-0 stockinette st and finish with 2 edge sts in garter st towards armhole. Continue pattern like this and continue as on right front piece but cast on new sts for neck at the end of every row from WS (instead of every row from RS). Work pattern according to diagram A.2C (instead of A.2B) and continue pattern according to A.3C (instead of A.3B). Inc for armhole from RS and then cast on 2-2-3-3-5-7 new sts for armhole at the end of next row from RS. Work 1 row from WS as before. BODY: Now work all pieces tog from RS on circular needle size 4 mm / US 6 as follows: Work sts from left front piece (= 47-51-56-61-66-75 sts), insert 1 marker, work sts from back piece (= 85-93-103-113-123-141 sts), insert 1 marker and work sts from right front piece (= 47-51-56-61-66-75 sts) = 179-195-215-235-255-291 sts on needle - NOW MEASURE FROM HERE! Continue back and forth with pattern according to diagram A.3 and stockinette st as before and with 5 band sts in garter st in each side towards mid front. AT THE SAME TIME when piece measures 2 cm / 3/4'', dec 1 st on each side of both markers - READ DECREASE TIP (= 4 sts dec). Repeat dec in each side every 2-2-2½-2½-3-3½ cm / 3/4"-3/4"-7/8"-7/8"-1 1/8"-1 1/4" 7-6-6-6-6-5 times in total = 151-171-191-211-231-271 sts. When piece measures 14-15-16-17-18-19 cm / 5½''-6''-6¼''-6¾''-7''-7½'' (entire piece measures approx. 33-35-37-39-41-43 cm / 13''-13 3/4''-14½''-15 1/4''-16 1/8''-17'' from shoulder), remove the marker threads. Work next row as follows from RS: 5 band sts in garter st, work A.4A (= 11 sts), repeat A.4B over the next 120-140-160-180-200-240 sts (= 12-14-16-18-20-24 repetitions of 10 sts), work A.4C (= 10 sts) and finish with 5 band sts in garter st (sts worked in A.4 will now match with eyelets in A.3 on front and back piece). Continue pattern back and forth like this and inc as shown in diagram. When A.4 has been worked, there are 207-235-263-291-319-375 sts on needle. Work next row as follows from RS: 5 band sts in garter st, A.5A (= 15 sts), repeat A.5B over the next 168-196-224-252-280-336 sts (= 12-14-16-18-20-24 repetitions of 14 sts), work A.5C (= 14 sts) and finish with 5 band sts in garter st. When A.5 has been worked, piece measures approx. 65-67-69-71-73-75 cm / 25½''-26 3/8''-27 1/8''-28''-28¾''-29½'' from shoulder. Switch to circular needle size 3.5 mm / US 4 and work 3 rows rib (= with 5 band sts inK 1 / P 1) with garter st and 1 K in each side towards mid front (seen from RS). Then loosely bind off sts with K over K and P over P. Jacket measures approx. 66-68-70-72-74-76 cm / 26''-26¾''-27½''-28 3/8''-29 1/8''-30'' from shoulder. SLEEVE: Work sleeve cap back and forth on circular needle, then work sleeve in the round on double pointed needles until finished measurements. Cast on 23-25-27-31-33-37 sts on circular needle size 4 mm / US 6 with Cotton Light. Insert 1 marker in the middle st on row. READ ALL OF THE FOLLOWING SECTION BEFORE CONTINUING: Work stockinette st back and forth and cast on new sts for sleeve cap at the end of every row in each side as follows: Cast on 3 sts 1-1-2-5-4-3 times, 2 sts 7-8-6-1-1-0 times, 1 st 4-3-5-7-9-14 times and 2-2-3-3-5-7 sts 1 time = 69-73-79-85-89-97 sts on needle (piece measures approx. 9-9-10-10-11-13 cm / 3½"-3½"-4"-4"-4½"-5"). AT THE SAME TIME when piece measures 2 cm / 3/4'', work pattern according to diagram A.6 over the middle 17 sts (st with marker should match mid st in diagram – work the other sts in stockinette st). When sleeve cap has been worked, switch to double pointed needles size 4 mm / US 6. Insert 1 marker thread at beg of round (= mid under sleeve) and continue in the round in stockinette st and A.6 over the middle sts. When A.6 has been worked one time vertically, work A.1 over the middle 5 sts until finished measurements (continue the other sts in stockinette st). AT THE SAME TIME when piece measures 12-12-13-13-14-16 cm / 4 3/4"-4 3/4"-5"-5"-5½"-6 1/4'', dec 2 sts mid under sleeve - READ DECREASE TIP. Repeat dec every 2½-2½-2-2-2-1½ cm / 7/8"-7/8"-3/4"-3/4"-3/4"-½" 15-16-17-19-20-23 times in total = 39-41-45-47-49-51 sts. When sleeve measures 56-55-55-55-55-55 cm / 22"-21½"-21½"-21½"-21½"-21½" (NOTE: Shorter measurements in the larger sizes because of longer yoke) switch to double pointed needles size 3.5 mm / US 4. Work 2 ridges in GARTER ST in the round - see explanation above, and loosely bind off with K, sleeve measures approx 57-56-56-56-56-56 cm / 22½"-22"-22"-22"-22"-22". Make another sleeve the same way. ASSEMBLY: Sew shoulder seams inside bind-off edge. Place sleeve approx. ½ cm / 1/4'' in under edge in garter st along armhole and fasten neatly so that edge in garter st shows. Repeat in the other side. NECK EDGE: Pick up from RS approx. 110 to 116 sts on circular needle size 3.5 mm / US 4 with Cotton Light. K 1 row from WS, K 1 row from RS and K 1 row from WS before loosely binding off with K from RS. Sew the buttons on to the left band. |
|||||||||||||||||||||||||
Diagram explanations |
|||||||||||||||||||||||||
|
|||||||||||||||||||||||||
|
|||||||||||||||||||||||||
|
|||||||||||||||||||||||||

|
|||||||||||||||||||||||||
|
|||||||||||||||||||||||||
|
Have you made this or any other of our designs? Tag your pictures in social media with #dropsdesign so we can see them! Do you need help with this pattern?You'll find tutorial videos, a Comments/Questions area and more by visiting the pattern on garnstudio.com. © 1982-2024 DROPS Design A/S. We reserve all rights. This document, including all its sub-sections, has copyrights. Read more about what you can do with our patterns at the bottom of each pattern on our site. |
|||||||||||||||||||||||||


With over 40 years in knitting and crochet design, DROPS Design offers one of the most extensive collections of free patterns on the internet - translated to 17 languages. As of today we count 304 catalogs and 11422 patterns - 11417 of which are translated into English (US/in).
We work hard to bring you the best knitting and crochet have to offer, inspiration and advice as well as great quality yarns at incredible prices! Would you like to use our patterns for other than personal use? You can read what you are allowed to do in the Copyright text at the bottom of all our patterns. Happy crafting!
Comments / Questions (73)
Unklar ist mir Folgendes: Sind bei der Maschenanzahl für den Anschlag jeweils die 2 Randmaschen beinhaltet? Z.B. Passe Hinten: 2. Absatz 3. Reihe: ...enden mit 2 M kraus re. Ich gab sie dazu, also Anschlagmaschen plus 2 Randmaschen. Sonst habe ich am Armausschnittrand nur 1 M kraus und 1 Randmasche..
11.07.2016 - 11:06DROPS Design answered:
Liebe Anneliese, die Randmaschen müssen nicht zugegeben werden, sondern sind in der Beschreibung enthalten.
11.07.2016 - 16:38Phoebe wrote:
Hello, I am a little confused by the yoke direction "Continue with A.3A over A.2A and A.3B over A.2B the same way". Does that mean that I alternate them for the required length; OR whether after using A.2A and A.2B once, I am to replace them with A.3A and A.3B for the required length? Thank you
10.07.2016 - 07:23DROPS Design answered:
Dear Phoebe, when you have worked both diagrams A.2A and A.2B 1 time in height, work now diagrams A.3A instead of A.2A (over the sts of A.2A) and A.3B instead of A.2B (over the sts of A.2B) and repeat diagrams A.3A and A.3B in height. Happy knitting!
11.07.2016 - 09:44Det är en symbol som saknas i diagram A4. Det är omslaget längst ut till vänster på översta mönstringen i B och A samt att det saknas ett "snedstreck" varvet ovanför i B och C.
01.07.2016 - 11:41DROPS Design answered:
Hej Linda. Alle symboler er i forklaringen. Det kan vaere symbolet er "sat sammen" af to forskellige. F.eks. ta 1 m løs av p som om den skulle strikkes rett, 1 rett, løft den løse m over + hent opp løkken mellom 2 m og strikk løkken vridd rett (= ikke hull) (rk 3 og 5)
06.07.2016 - 14:46Annette King wrote:
Is the 168-7 Mercy pattern available in either English or German? I would so like to knit it. Thank you
03.06.2016 - 11:13DROPS Design answered:
Dear Mrs King, you can change language to the pattern clicking on the scrolling menu below picture and choosing the appropriate language: UK-English (cm), US-English (inch) or German. Happy knitting!
03.06.2016 - 11:19Anneliese Perinic wrote:
Ich will hier mein ganz grosses Lob für Ihre Beschreibungen ausdrücken. So genau und verlässlich! Und die Wolle und Garne finde ich einfach wunderbar.
27.05.2016 - 11:24Anneliese Perinic wrote:
Ich will hier mein ganz grosses Lob für Ihre Beschreibungen ausdrücken. So genau und verlässlich! Und die Wolle und Garne finde ich einfach wunderbar.
27.05.2016 - 11:24Kommet til mønster A4-A , A4B, A4C. Skal strikke 5 stolper beg. Og slutt. Hvilket mønsternr skal rillene følge etter første pinne og skal det økning foretas på for-og bakstykke (5-stolpe-m i rille)
26.05.2016 - 10:15DROPS Design answered:
Hei Annelise. Du strikker stolperne hele tiden i rille, der er intet mönster. I og med du strikke A.4A, B og C har du taget ud i dette mönster og har du 207-235-263-291-319-375 m på p
26.05.2016 - 16:11Hallo...kann es sein das bei A2C ein fehler bzgl der maschenzunahme drin ist?...müsste die zunahme nicht links erfolgen?...denn so hab ich zwischen den letzten beiden lochmusterreihen eine masche mehr als bei den anderen...danke schon mal im vorraus für die antwort
01.05.2016 - 01:11DROPS Design answered:
Liebe Diana, das Diagramm mit der Zunahme links ist A.2B und wird beim rechten Vorderteil gebraucht. Damit das Muster symmetrisch wird, ist beim linken Vorderteil die Zunahme auf der rechten Seite des Mustersatzes.
02.05.2016 - 09:12Bei Vorder-und Rückenteil findet bei Erreichen von 15 cm Gesamtlänge (in Gr. L) ein Musterwechsel statt. Von wo misst man die Gesamtlänge, von der Schulter oder der Ausschnittkante?
09.04.2016 - 17:22DROPS Design answered:
Liebe Sabine. Man muss die Gesamtlänge von der Schulter messen
10.04.2016 - 19:01Mi piace molto il modello ma non sono capace a lavorare con i ferri circolari... come posso trasformarlo per lavorarlo con ferri diritti? molte grazie
17.03.2016 - 12:28DROPS Design answered:
Buongiorno Paola, questo modello è un cardigan, ed è lavorato avanti e indietro sui ferri, per cui può tranquillamente usare i ferri dritti e seguire le istruzioni. Buon lavoro!
17.03.2016 - 13:05