
Popular categories
Looking for a yarn?


|
||||||||||||||||||||||||||||
Jolly May |
||||||||||||||||||||||||||||
 |
 |
|||||||||||||||||||||||||||
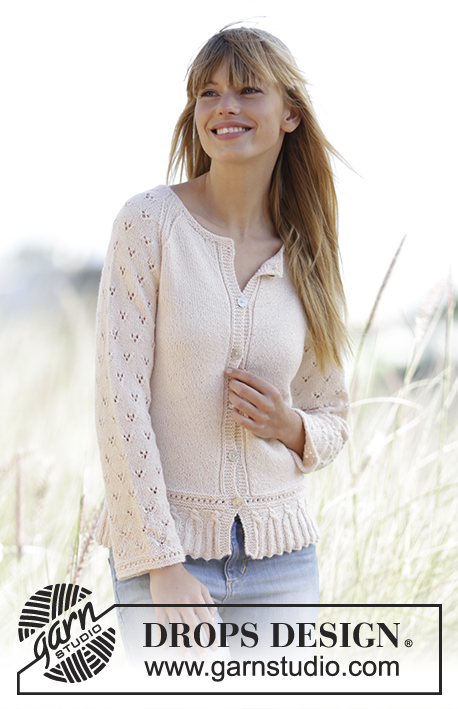
Knitted DROPS jacket with a small cable edge, lace pattern and raglan in ”BabyMerino”. Size: XS - XXXL.
DROPS 169-27 |
||||||||||||||||||||||||||||
|
GARTER ST (back and forth): K all rows. 1 ridge = K2 rows. GARTER ST (worked in the round): 1 ridge = 2 rounds. * K 1 round and P 1 round *, repeat from *-*. PATTERN: See diagrams A.1 to A.4. The diagrams show all rows in pattern seen from RS. INCREASE TIP: Inc 1 st on each side of marker as follows: Work until 1 sts remain before marker: Make 1 YO, work 2 sts in stockinette st (marker is in the middle of these 2 sts), make 1 YO. On next row work YOs twisted to avoid holes - NOTE: Work inc sts in stockinette st on front piece and in stockinette st until they fit pattern on back piece and on sleeves. RAGLAN: Dec for raglan on each side of A.4 in every transition between sleeves and body. DEC AS FOLLOWS FROM RS: Beg 2 sts before A.4, K 2 tog, A.4 (= 6 sts), slip 1 st as if to K, K 1, psso (= 2 sts dec). DEC AS FOLLOWS FROM WS: Beg 2 sts before A.4, P 2 twisted tog, A.4 (= 6 sts), P 2 tog (= 2 sts dec). BUTTONHOLES: Dec for buttonholes on right band. 1 buttonhole = bind off third and fourth st from edge and cast on 2 new sts on next row over these sts. Dec for buttonholes when piece measures (first buttonhole should be in the middle of A.2): SIZE XS: 9, 17, 24, 31, 38 and 45 cm SIZE S: 9, 17, 25, 33, 40 and 47 cm SIZE M: 9, 17, 25, 33, 41 and 49 cm SIZE L: 9, 16, 23, 29, 36, 43 and 50 cm SIZE XL: 10, 17, 24, 31, 38, 45 and 52 cm SIZE XXL: 10, 18, 25, 32, 39, 46 and 53 cm SIZE XXXL: 10, 18, 25, 33, 40, 48 and 55 cm DECREASE TIP (applies to neck edge): To calculate how often dec should be done, use the total no of sts on row (e.g. 126 sts), minus bands (e.g. 10 sts) and divide the remaining sts by no of dec to be done (e.g. 14) = 8.3. I.e. in this example work approx. every 7th and 8th st tog (and do not dec of bands). ---------------------------------------------------------- BODY: Worked back and forth on circular needle from mid front. Cast on 327-355-383-453-481-551-579 sts (includes 5 band sts in each side towards mid front) on circular needle size 2.5 mm / US 1.5 with Baby Merino. P 1 row from WS. Work next row as follows from RS: 5 band sts in GARTER ST - see explanation above - * K 2, P 5 *, repeat from *-* until 7 sts remain on needle, finish with K 2 and 5 bands sts in garter st. Continue rib like this. When piece measures 3-3-3-3-4-4-4 cm / 1 1/8''-1 1/8''-1 1/8''-1 1/8''-1½''-1½''-1½'', dec 1 st in every P-section by working the first 2 sts in every P-section P tog (from RS). Repeat dec when piece measures 4-4-4-4-5-5-5 cm / 1½''-1½''-1½''-1½''-2''-2''-2'', but now work the last 2 sts in every P-section P tog = 237-257-277-327-347-397-417 sts on needle. Work next row as follows from RS: 5 band sts as before, work pattern according to diagram A.1A until 12 sts remain on row (= 22-24-26-31-33-38-40 repetitions of 10 sts), work A.1B (= 7 sts) and finish with 5 band sts as before. When A.1 has been worked vertically, 191-207-223-263-279-319-335 sts remain on needle and piece measures approx. 7-7-7-7-8-8-8 cm / 2¾''-2¾''-2¾''-2¾''-3 1/8''- 3 1/8''- 3 1/8''. P 1 row from WS (continue bands as before) while dec 5-2-1-5-2-6-5 sts evenly - READ DECREASE TIP! (do not dec over bands) = 186-205-222-258-277-313-330 sts. Switch to circular needle size 3 mm / US 2.5 and work next row from RS as follows - remember BUTTONHOLES on band - see explanation above: 5 band sts as before, work pattern according to diagram A.2 until 5 sts remain on row, and finish with 5 band sts in garter st as before. Continue the pattern like this - NOTE: On 7th row in diagram K last st before band. After A.2 insert 1 marker 49-54-58-67-72-81-85 sts in from each side (= 88-97-106-124-133-151-160 sts between markers on back piece). Then work as follows (1st row = RS): 5 band sts as before, K 1, P 2, work in stockinette st until marker in the side, work A.3A (= 6 sts), repeat A.3B over the next 72-81-90-108-117-135-144 sts (= 8-9-10-12-13-15-16 repetitions of 9 sts), work A.3C (= 10 sts), marker, work in stockinette st until 8 sts remain on row, finish with P 2, K 1 and 5 band sts as before. Continue pattern like this. REMEMBER THE KNITTING GAUGE When piece measures 12 cm / 4¾'', inc 1 st on each side of marker in each side - READ INCREASE TIP (= 4 sts inc). Repeat inc every 5-5-6-8-10-10-10 cm / 2"-2"-2 3/8"-3"-4"-4"-4'' a total of 4-4-4-3-3-3-3 times = 202-221-238-270-289-325-342 sts - NOTE: Work inc sts in stockinette st on front piece and in stockinette st until they fit pattern on back piece. When piece measures 33-34-35-36-37-38-39 cm / 13"-13 3/8''-13¾''-14¼''-14½''-15''-15¼'', work next row from WS as follows: Work 50-55-58-66-70-79-83 sts (= left front piece), bind off 6-6-8-8-10-10-10 sts for armhole, work 90-99-106-122-129-147-156 sts (= back piece), bind off 6-6-8-8-10-10-10 sts for armhole and work the remaining 50-55-58-66-70-79-83 sts (= right front piece). Put piece aside and knit the sleeves. SLEEVE: Worked in the round on double pointed needles. Cast on 52-52-61-61-61-70-70 sts on double pointed needles size 2.5 mm / US 1.5 with Baby Merino. K 1 round. Then work pattern in the round according to diagram A.2 - NOTE: On 7th round in A.2 K last st on round (applies to size L + XL + XXL). When A.2 has been worked, switch to double pointed needles size 3 mm / US 2.5. Insert 1 marker at the beg of the round. Work next round as follows: Work A.3A (= 6 sts), work A.3B over the next 36-36-45-45-45-54-54 sts (= 4-4-5-5-5-6-6 repetitions of 9 sts) and finish with A.3C (= 10 sts). Continue pattern like this. When piece measures 5-6-6-7-5-9-9 cm, inc 2 sts mid under sleeve - READ INCREASE TIP. Repeat inc every 3-2½-3-2½-2½-2½-2 cm 14-16-13-15-16-14-17 times in total = 80-84-87-91-93-98-104 sts – NOTE: Work inc sts in stockinette st until they fit the pattern again. Work until piece measures approx. 47-47-46-46-45-45-45 cm (NOTE: Shorter measurements in the larger sizes because of longer yoke) – adjust to work the same length in repetition of A.3 as on back piece before bind off for armholes. Work next round as follows: bind off 3-3-4-4-5-5-5 sts, work 74-78-79-83-83-88-94 sts and bind off the remaining 3-3-4-4-5-5-5 sts. Put piece aside and make another sleeve. YOKE: Slip sleeves on to same circular needle size 3 mm / US 2.5 as body where armholes were bound off (without working them first) = 338-365-380-420-435-481-510 sts. Insert 1 marker in every transition between sleeves and body = 4 markers. Continue with pattern on sleeves and back piece as before and work in stockinette st with bands on front piece. Work in addition A.4 now in every transition between body and sleeves (markers are in the middle of A.4). On first row from RS beg dec for RAGLAN – see explanation above (= 8 sts dec). Repeat dec for raglan on every other row (i.e. every row from RS) 24-25-28-29-32-34-34 times in total and then every row (i.e. both from RS and WS) 4-5-2-3-0-0-3 times in total - NOTE: Work sts that do not fit A.3 on back and sleeves in stockinette st when dec. NECK: AT THE SAME TIME when piece measures approx. 46-48-50-51-53-54-56 cm / 18"-19''-19¾''-20''-21''-21¼''-22'' (1-2 rows should be worked after last buttonhole on band), slip the first 10-13-16-18-22-26-27 sts at beg of the next 2 rows on 1 stitch holder for neck (work them before slipping them on stitch holder to avoid cutting the yarn). Continue with pattern and raglan as before and bind off for neck at beg of every row in each side as follows: bind off 3 sts 0-0-0-1-1-2-2 times, 2 sts 2 times and 1 st 3-3-3-4-4-4-4 times. After all dec and bind offs for raglan and neck, 80-85-94-106-113-129-132 sts remain on needle. NECK EDGE: Pick up from RS approx. 114-126-140-164-179-209-214 sts (includes sts on stitch holders at the front) on circular needle size 2.5 mm / US 1.5. K 1 row from WS while dec evenly to 110-112-128-130-140-144-146 sts (i.e. dec approx. 4-14-12-34-39-65-68 sts) – READ DECREASE TIP. K 4 rows and loosely bind off with K from RS. ASSEMBLY: Sew the openings under the sleeves. Sew on buttons. |
||||||||||||||||||||||||||||
Diagram explanations |
||||||||||||||||||||||||||||
|
||||||||||||||||||||||||||||

|
||||||||||||||||||||||||||||

|
||||||||||||||||||||||||||||

|
||||||||||||||||||||||||||||
|
Have you made this or any other of our designs? Tag your pictures in social media with #dropsdesign so we can see them! Do you need help with this pattern?You'll find tutorial videos, a Comments/Questions area and more by visiting the pattern on garnstudio.com. © 1982-2024 DROPS Design A/S. We reserve all rights. This document, including all its sub-sections, has copyrights. Read more about what you can do with our patterns at the bottom of each pattern on our site. |
||||||||||||||||||||||||||||


With over 40 years in knitting and crochet design, DROPS Design offers one of the most extensive collections of free patterns on the internet - translated to 17 languages. As of today we count 304 catalogs and 11422 patterns - 11417 of which are translated into English (US/in).
We work hard to bring you the best knitting and crochet have to offer, inspiration and advice as well as great quality yarns at incredible prices! Would you like to use our patterns for other than personal use? You can read what you are allowed to do in the Copyright text at the bottom of all our patterns. Happy crafting!
Comments / Questions (41)
Je ne comprends pas les explications après avoir tricoté les manches; combien de mailles des manches fait-on glisser? pour terminer les devants et dos, je suppose que l'on utilise trois pelotes différentes pour laisser le passage des manches? Merci pour votre réponse
13.10.2018 - 21:28DROPS Design answered:
Bonjour Emmanuelle, on va tricoter l'empiècement en commençant sur l'endroit par le devant droit, puis la manche droite, le dos, la manche gauche et le devant gauche (= toutes les pièces en même temps) - cette vidéo montre comment placer les mailles des manches au-dessus des mailles rabattues pour les emmanchures. Bon tricot!
15.10.2018 - 09:19Dobrý den, není možné, že vzory A2 a A3... jsou zakresleny špatně? Podle obrázku vypadá vzor A2 krátky a podle nákresu je delší než A1, který má sám o sobě mít 7 cm? I v trupu (vzory A3) je mezi vzorovými oky jedna řada - vždyt podle nákresu to má být ale následující... Děkuji
09.04.2018 - 12:57DROPS Design answered:
Milá Hanicko, nákresy vzorků by měly být v pořádku. 7 cm měří celý dolní lem, nikoli vzor A.1 - schéma A.1 zobrazuje jen horní část lemu, křížení copánku. Dolní část lemu (cca 4 cm) pleteme běžným pružným vzorem dle slovního popisu v návodu, na uvedených místech postupně ujmeme. Hodně zdaru! Hana
09.04.2018 - 16:18"ATTENZIONE: Nel corso del 7° giro del diagramma A.2, lavorare a dir l’ultima m del giro (per le taglie: L + XL + XXL). " La stessa cosa vale anche per la taglia M, le maglie sono dispari e alla fine ne rimane una da sola. ^_^
03.04.2018 - 15:24DROPS Design answered:
Buonasera Dea. Abbiamo corretto il testo. La ringraziamo per la segnalazione. Buon lavoro!
03.04.2018 - 15:29Buongiorno, ho trovato un altro piccolo problema. Quando dice "ATTENZIONE: Nel corso del 7° ferro del diagramma (A2) lavorare a dir l’ultima m prima del bordo davanti." non ne rimane una, ma due dopo l'ultima gettata perchè le maglie sono pari. Scusate se ho scritto ancora.
19.03.2018 - 09:10Buonasera, dove parla delle ASOLE c'è scritto " intrecciare la 3a e la 4a m dal centro;" secondo me è meglio scrivere "dal bordo".
18.03.2018 - 20:23DROPS Design answered:
Buonasera Dea. Abbiamo modificato il testo. La ringraziamo per la segnalazione. Buon lavoro!
18.03.2018 - 21:07Ok. Sono al bordo. Dice di fare la 2° rip di dim come la 1°, quindi sul ferro a diritto del lavoro. Dopo dice di lavorare il ferro successivo (1 ferro del diagramma A1) sempre sul diritto del lavoro. La cosa è strana come è possibile lavorare due ferri sempre sul diritto del lavoro? Per me dopo le dim bisogna fare un ferro sul rovescio del lavoro lavorandole come si presentano (2 rov/3 dir) e poi il 1 del diagramma A1.
17.03.2018 - 20:19DROPS Design answered:
Buongiorno Dea. Chiederemo di verificare le indicazioni in base alle sue indicazioni. Buon lavoro!
18.03.2018 - 12:04Scusate quanti caratteri si possono usare per fare le domande? Mi impedisce di scrivere perchè dice che è troppo lungo. Grazie.
17.03.2018 - 13:41DROPS Design answered:
Buonasera Dea. Può eventualmente spezzare la domanda in più parti. Buon lavoro!
17.03.2018 - 17:57Hallo, ich komme mit der Aufnahme der Ärmel nicht zurecht. Wie bekomme ich die auf die Nadel, wenn ich die nur hinlegen soll, ohne zu Stricken? Habe auch bei den Videos nichts gefunden, was Aufschluss gibt. Bleibt die Stelle, an der abgekettet wurde, ein Loch? Wie Sie merken, hänge ich ganz schön fest....
25.01.2018 - 10:25DROPS Design answered:
Liebe Dani, dieses Video zeigt, wie man die Ärmel über die für die Ärmel abgeketteten Maschen legt. Im Video stricken wir die 1. Reihe, aber in der Anleitung legen Sie einfach die Maschen zuerst über die Ärmlöcher, Markierer einsetzen und dann wie beschrieben weiterstricken. Viel Spaß beim stricken!
25.01.2018 - 13:12Sto facendo questa bella maglia nella taglia XS. Ho finito lo schema A.1A e A.1B. Non capisco come fanno a restare 191 maglia su 237 se gli schemi non prevedono diminuzioni. Grazie per le spiegazioni
13.11.2017 - 14:46DROPS Design answered:
Buongiorno Maddalena. Sull'ultima riga dei diagrammi A.1a e A.1b, il simbolo a triangolo prevede la diminuizione di 2 maglie. Vengono quindi diminuite in tutto 46 maglie sulla riga e in questo modo sui ferri ci sono 191 maglie, per la taglia XS. Buon lavoro!
13.11.2017 - 15:33Bonjour, faut il rabattre les mailles une fois l'empiecement terminé pour relever les 114mailles pour le col ensuite. Ce n'est pas très clair sur les explications. Je vous remercie par avance pour votre réponse. Stéphanie
06.10.2017 - 11:08DROPS Design answered:
Bonjour Stéphanie, pour le col, vous reprenez les mailles du 1er devant en attente et relevez les mailles de long de l'encolure, vous reprenez les mailles en attente et relevez les mailles le long de l'autre devant et reprenez les mailles en attente du 2ème devant. Continuez ensuite le col comme indiqué. Bon tricot!
06.10.2017 - 11:48