
Popular categories
Looking for a yarn?


|
||||||||||||||||||||||
My Girl |
||||||||||||||||||||||
 |
 |
|||||||||||||||||||||
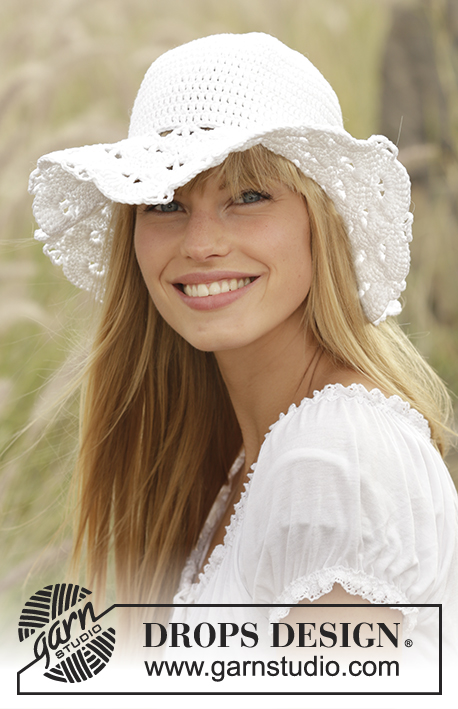
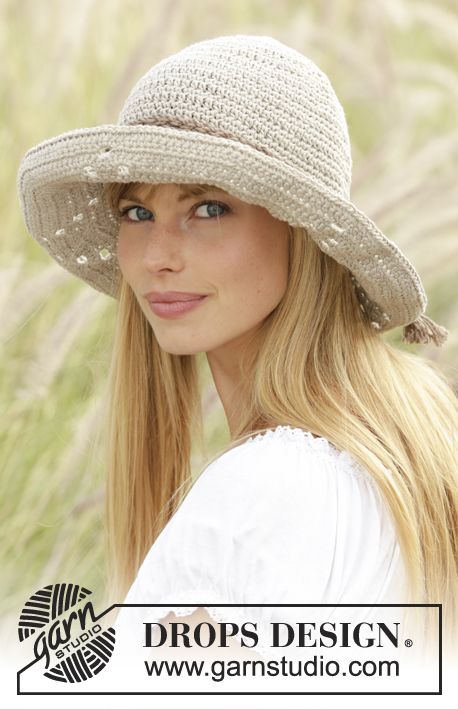
Crochet DROPS hat with lace pattern in "Bomull-Lin" or "Paris".
DROPS 167-8 |
||||||||||||||||||||||
|
PATTERN: See diagram A.1. Work diagram 5 times in total on round. CROCHET INFO: Replace first hdc at beg of every hdc round with 2 ch. Finish round with 1 sl st in 2nd ch at beg of round. Replace first sc at beg of every sc round with 1 ch. Finish round with 1 sl st in 1st ch at beg of round. ---------------------------------------------------------- HAT: The piece is worked top down. Crochet 5 ch on hook size 3.5 mm/E/4 with beige/dark beige and form a ring with 1 sl st in first ch. ROUND 1: Work 11 hdc in ch-ring – READ CROCHET INFO! ROUND 2 (and then on every even numbered round): Work 1 sc in every hdc. ROUND 3: Work 2 hdc in every sc = 22 hdc. ROUND 5: Work * 2 hdc in first/next sc, 1 hdc in next sc *, repeat from *-* the entire round = 33 hdc. ROUND 7: Work * 2 hdc in first/next sc, 1 hdc in each of the next 2 sc *, repeat from *-* the entire round = 44 hdc. REMEMBER THE CROCHET GAUGE! ROUND 9: Work * 2 hdc in first/next sc, 1 hdc in each of the next 3 sc *, repeat from *-* the entire round = 55 hdc. ROUND 11: Work * 2 hdc in first/next sc, 1 hdc in each of the next 4 sc *, repeat from *-* the entire round = 66 hdc. ROUND 13: Work * 2 hdc in first/next sc, 1 hdc in each of the next 5 sc *, repeat from *-* the entire round = 77 hdc. ROUND 15: Work * 2 hdc in first/next sc, 1 hdc in each of the next 6 sc *, repeat from *-* the entire round = 88 hdc. ROUND 17: Work * 2 hdc in first/next sc, 1 hdc in each of the next 43 sc *, repeat from *-* the entire round = 90 hdc. Continue every other round with 1 sc in every hdc and 1 hdc in every sc. Continue like this until piece measures approx. 17 cm / 6 3/4'' from the top, adjust so that last round is with sc. Work brim. BRIM: Now work A.1 as follows (repeat A.1 5 times in total on round): ROUND 1: Remember CROCHET INFO! Work ch 2, * ch 2, skip 2 sc, 1 hdc in each of the next 5 sc, 2 hdc in each of the next 2 sc, 1 hdc in each of the next 5 sc, ch 2, skip 2 sc, 2 hdc in each of the next 2 sc*, repeat from *-* the entire round, finish round with 1 sl st in 2nd ch at beg of round = 90 hdc and 10 ch-spaces. ROUND 2: Work * 3 sc around first/next ch-space, skip 1 hdc, 1 sc in each of the next 13 hdc, 3 sc around next ch-space, 1 sc in each of the next 3 hdc *, repeat from *-* the entire round = 110 sc. ROUND 3: Work * 1 hdc in each of the first/next 3 sc, ch 2, skip 2 sc, 1 hdc in each of the next 4 sc, 2 hdc in each of the next 2 sc, 1 hdc in each of the next 4 sc, ch 2, skip 2 sc, 1 hdc in each of the next 3 sc, 2 hdc in each of the next 2 sc *, repeat from *-* the entire round = 110 hdc and 10 ch-spaces. ROUND 4: Work * 1 sc in each of the first/next 3 hdc, 3 sc around next ch-space, skip 1 hdc, 1 sc in each of the next 11 hdc, 3 sc around next ch-space, skip 1 hdc, 1 sc in each of the next 6 hdc *, repeat from *-* the entire round = 130 sc. ROUND 5: Work * 1 hdc in each of the first 6 sc, ch 2, skip 2 sc, 1 hdc in each of the next 3 sc, 2 hdc in each of the next 2 sc, 1 hdc in each of the next 3 sc, ch 2, skip 2 sc, 1 hdc in each of the next 6 sc, 2 hdc in each of the next 2 sc *, repeat from *-* the entire round = 130 hdc and 10 ch-spaces. ROUND 6: Work * 1 sc in each of the first/next 6 hdc, 3 sc around next ch-space, skip 1 hdc, 1 sc in each of the next 9 hdc, 3 sc around next ch-space, skip 1 hdc, 1 sc in each of the next 9 hdc *, repeat from *-* the entire round = 150 sc. ROUND 7: Work * 1 hdc in each of the first/next 9 sc, ch 2, skip 2 sc, 1 hdc in each of the next 2 sc, 2 hdc in next sc, 1 hdc in each of the next 3 sc, ch 2, skip 2 sc, 1 hdc in each of the next 10 sc, 2 hdc in next sc *, repeat from *-* the entire round = 140 hdc and 10 ch-spaces. ROUND 8: Work * 1 sc in each of the first 9 hdc, 3 sc around first/next ch-space, skip 1 hdc, 1 sc in each of the next 6 hdc, 3 sc around next ch-space, skip 1 hdc, 1 sc in each of the next 11 sc *, repeat from *-* the entire round = 160 sc. ROUND 9: Work * 1 hdc in each of the first 12 sc, ch 2, skip 2 sc, 1 hdc in next sc, 2 hdc in next sc, 1 hdc in next sc, ch 2, skip 2 sc, 1 hdc in each of the next 12 sc, 2 hdc in next sc *, repeat from *-* the entire round = 150 hdc and 10 ch-spaces. ROUND 10: Work * 1 sc in each of the first/next 12 hdc, 3 sc around first/next ch-space, skip 1 hdc, 1 sc in each of the next 3 hdc, 3 sc around next ch-space, skip 1 hdc, 1 sc in each of the next 13 hdc *, repeat from *-* the entire round = 170 sc. ROUND 11: Work * 1 hdc in each of the first/next 16 sc, ch 2, skip 2 sc, 1 hdc in each of the next 15 sc, 2 hdc in next sc *, repeat from *-* the entire round = 165 hdc and 5 ch-spaces. ROUND 12: Work * 1 sc in each of the first/next 16 hdc, 3 sc around first/next ch-space, skip 1 hdc, 1 sc in each of the next 16 hdc *, repeat from *-* the entire round = 175 sc. ROUND 13: Work 1 hdc in every sc = 175 hdc. Fasten off. PLAITED STRING: Make a plait with 3 twined strings. Make 1 twined string as follows: Cut 2 lengths brown yarn of 8 metres/8½ yds each. Twine the strands tog until they resist, fold the string double so that it twines again. Make a knot in each end of the string. Make another 2 strings the same way. Make 1 plait of the 3 twined strings. Tie a knot approx. 4 cm / 1½'' from each end. Twirl the plait 2 times around hat and tie a knot. |
||||||||||||||||||||||
Diagram explanations |
||||||||||||||||||||||
|
||||||||||||||||||||||

|
||||||||||||||||||||||
|
Have you made this or any other of our designs? Tag your pictures in social media with #dropsdesign so we can see them! Do you need help with this pattern?You'll find tutorial videos, a Comments/Questions area and more by visiting the pattern on garnstudio.com. © 1982-2024 DROPS Design A/S. We reserve all rights. This document, including all its sub-sections, has copyrights. Read more about what you can do with our patterns at the bottom of each pattern on our site. |
||||||||||||||||||||||


With over 40 years in knitting and crochet design, DROPS Design offers one of the most extensive collections of free patterns on the internet - translated to 17 languages. As of today we count 304 catalogs and 11422 patterns - 11417 of which are translated into English (US/in).
We work hard to bring you the best knitting and crochet have to offer, inspiration and advice as well as great quality yarns at incredible prices! Would you like to use our patterns for other than personal use? You can read what you are allowed to do in the Copyright text at the bottom of all our patterns. Happy crafting!
Comments / Questions (66)
Bonjour, je viens de terminer ce chapeau et j'ai pu enrouler la tresse 4 fois !! autour du chapeau, elle est longue pourtant je fais 56cm de tour de tête. Le chapeau retombe de tous les côtés, pas de tenue du tout, dois-je l'amidonner ? Si oui, quel produit me conseillez-vous et comment procéder ? merci
18.03.2017 - 11:29DROPS Design answered:
Bonjour Iris, avez-vous bien la bonne tension (18 ms/brides = 10 cm de large)? vous pouvez essayer avec un crochet plus serré et/ou amidonner légèrement pour lui donner la tenue souhaitée. Votre magasin DROPS saura vous conseiller, même par mail ou téléphone. Bon crochet!
20.03.2017 - 08:47Hej! Är det verkligen meningen att vartannat varv skall vara fm utan ökningar? Min hatt blir alldeles toppig, som en glasstrut ungefär. Mvh
25.01.2017 - 10:53DROPS Design answered:
Hej Ann-Kristin. Nej, der tages ud i hver omg til du har 90 halv-st i omg 17. Herefter hekler du med 1 fm i hver halv-st eller 1 halv-st i hver fm til den maaler 17 cm.
25.01.2017 - 16:35Hej! Är det verkligen meningen att vartannat varv skall vara fm utan ökningar? Min hatt blir alldeles toppig, som en glasstrut ungefär. Mvh
25.01.2017 - 10:52Hola .estoy confundida cuando el patron se refiere a hace un medio punto alto sobre un punto bajo si en la vuelta anterior no Hubo puntos bajos .gracias
24.08.2016 - 07:23Hola, tengo una duda: ¿el cordón se hace con tres hilos de 8 metros?
20.08.2016 - 21:50DROPS Design answered:
Hola Mariángeles. Se hacen 3 cordones y cada cordón se trabaja con 2 hilos de 8 m cada uno
27.08.2016 - 23:08Hallo, ik heb deze hoed gehaakt, maar hoe komt de rand nu omgekruld? Dat lukt bij mijn hoed echt niet. Alvast bedankt Irma
04.08.2016 - 08:55DROPS Design answered:
Dat kunnen we op afstand natuurlijk niet goed beoordelen, maar over het algemeen kunt u dit doen? Maak het werk nat (30 min. in lauw water) en rol het vervolgens op in een handdoek. De hoed is dan vochtig. Nu kunt u hem vormen zoals u wilt en laten drogen in deze vorm, eventueel ondersteund met een bolle kom, etc.
05.08.2016 - 10:25Zrobiłam ten kapelusz i jest świetny, ale mam problem. Mianowicie jak zrobić aby on był taki sztywny. Krochmal trochę pomógł ale nadal jest taki oklapnięty, a wasz na zdjęciu trzyma się świetnie. Można poprosić o instrukcję krok po kroku? Dodam że użyta była ta sama włóczka co u was.
31.07.2016 - 11:50DROPS Design answered:
Witam. Problem może leżeć w naprężeniu nitki podczas wykonywania robótki. Jeśli kapelusz jest przerabiany zbyt luźno efekt końcowy może być taki jak Pani opisuje. Albo należało by go wykonać na mniejszym szydełku, albo dobrze wykrochmalić. Pozdrawiamy i powodzenia
02.08.2016 - 00:43Violet wrote:
Also, at round 1 of the brim it says: 2 hdc in each of the next 2 hdc *. I guess it should be 2 hdc in each of the next sc * because the last round of the hat is with sc.
11.07.2016 - 10:28DROPS Design answered:
Dear Violet, you are correct, pattern will be edited. Thank you! Happy crocheting!
11.07.2016 - 13:05Violet wrote:
Hello, Do you sl st at the end of round 2 at the brim ?
11.07.2016 - 10:15DROPS Design answered:
Dear Violet, yes, you finish each round with hdc with 1 sl st in 2nd ch at beg of round, as you did before for the top of hat. Happy crocheting!
11.07.2016 - 13:03Bonjour, après plusieurs rangs, la jonction des rangs consécutifs forme une ligne en biais et non droite, comme sur vos vidéos. Ainsi, on voit comme une couture de travers sur le chapeau. Est-ce normal ? est-ce dû aux augmentations ? Est-ce moi qui ne finit pas bien mes rangs ? Pouvez-vous m'expliquer comment rendre cette jonction invisible ? Merci :)
29.06.2016 - 15:10DROPS Design answered:
Bonjour Iris, pour des jonctions de tours bien droites, commencez chaque tour par 2 ml (ces 2 ml remplacent la 1ère dB), et terminez le tour par 1 mc dans la 2ème ml - veillez bien à ce que vos 2ml soient à la même hauteur que vos demi brides pour que le début/la fin des tours soient bien droits, crochetez en 1 de plus si besoin. Bon crochet!
29.06.2016 - 17:56