
Popular categories
Looking for a yarn?


|
|||||||||||||||||||
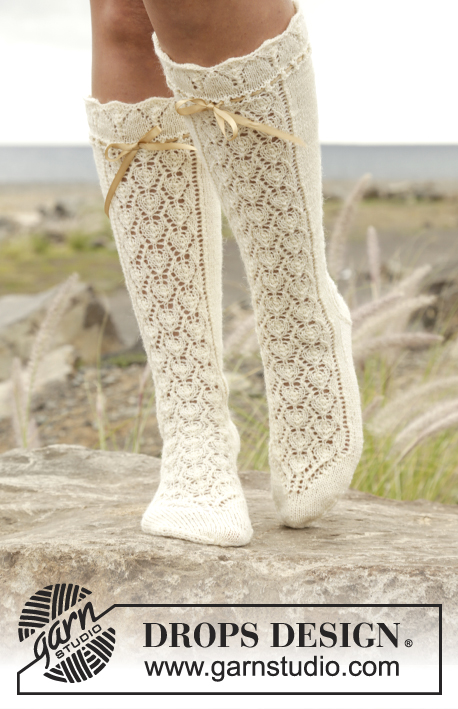
Bright Side |
|||||||||||||||||||
|
|
|||||||||||||||||||
Knitted DROPS socks with lace pattern in "Fabel".
DROPS 167-32 |
|||||||||||||||||||
|
PATTERN: See diagrams A.1 to A.4. GARTER ST (worked in the round): 1 ridge = 2 rounds. * K 1 round and P 1 round *, repeat from *-*. HEEL DECREASE: Row 1 (= RS): Work until 6-7-7 sts remain, slip next st as if to K, K 1, psso, turn piece. Row 2 (= WS): Work until 6-7-7 sts remain, slip next st as if to P, P 1, psso, turn piece. Row 3 (= RS): Work until 5-6-6 sts remain, slip next st as if to K, K 1, psso, turn piece. Row 4 (= WS): Work until 5-6-6 sts remain, slip next st as if to P, P 1, psso, turn piece. Continue dec like this with 1 st less before each dec until there are 14-14-16 sts on needle. ---------------------------------------------------------- SOCKS: Worked in the round on double pointed needles. Cast on 72-72-72 sts on double pointed needles size 2.5 mm / US 1.5 with Fabel. Work 1 ridge in GARTER ST - see explanation above. Then work A.1 over all sts. When A.1 has been worked 1 time vertically, work A.2 7 times in total in width - AT THE SAME TIME dec 2 sts evenly on first round = 70-70-70 sts. On last round in A.2, dec 6-2-2 sts evenly = 64-68-68 sts. Work A.1 over all sts. REMEMBER THE KNITTING GAUGE When A.1 has been worked 1 time vertically, work A.3 8 times in total in width - AT THE SAME TIME on first round dec 0-4-4 sts evenly = 64-64-64 sts. On last round in A.3, dec 6-4-0 sts = 58-60-64 sts. When A.3 has been worked 1 time vertically, work A.1 over all sts. Piece measures approx. 15 cm / 6''. Then continue in stockinette st until finished measurements. When piece measures 19-20-21 cm / 7½"-8"-8 1/4", dec 3-1-1 sts evenly = 55-59-63 sts. Work until piece measures 20-21-22 cm / 8"-8 1/4"-8 3/4". Now keep the first 12-13-14 sts on needle, slip the next 31-33-35 sts on a stitch holder (= mid upper foot) and keep the last 12-13-14 sts on needle = 24-26-28 sts for heel. Work in stockinette st back and forth on heel sts for 5-5½-6 cm / 2''-2 1/4''-2½''. Insert 1 marker, NOW MEASURE PIECE FROM HERE! Now dec for heel - SEE HEEL DECREASE! After heel dec, pick up 13-14-16 sts along each side of heel and slip the 31-33-35 sts from stitch holder back on needle = 71-75-83 sts. Insert 1 marker on each side of the 31-33-35 sts on top of foot. Then work in stockinette st, over sts over foot (i.e. 31-33-35 sts) work as follows: Work 5-6-7 sts in stockinette st, A.4 over the next 21 sts, 5-6-7 sts in stockinette st AT THE SAME TIME dec in each side as follows: K the last 2 sts before the 31-33-35 sts on top of foot twisted tog and K the first 2 sts after the 31-33-35 sts on top of foot tog. Repeat dec every other round a total of 9-9-11 times = 53-57-61 sts. When A.4 has been worked, work in stockinette st over all sts. Work until piece measures 18-19-21 cm / 7''-7½''-8¼'' / 7''-7½''-8¼'' from marker on heel (= 4-5-6 cm / 1½''-2''-2 3/8'' / 1½''-2''-2 3/8'' remain until finished measurements). Dec 1 st = 52-56-60 sts. Insert 1 marker in each side so that there are 26-28-30 sts both on top of foot and under foot. Continue working stockinette st over all sts while AT THE SAME TIME dec for toes on each side of both markers. Dec as follows before 1 K st and marker: K 2 tog. Dec as follows after marker and 1 K st: K 2 twisted tog. Repeat dec in each side every other round a total of 4-7-9 times and then every round a total of 6-3-2 times = 12-16-16 sts remain on needle. On next round K all sts tog 2 by 2. Cut the yarn and pull it through the remaining sts, tighten tog and fasten. Knit another sock. |
|||||||||||||||||||
Diagram explanations |
|||||||||||||||||||
|
|||||||||||||||||||

|
|||||||||||||||||||

|
|||||||||||||||||||
|
Have you made this or any other of our designs? Tag your pictures in social media with #dropsdesign so we can see them! Do you need help with this pattern?You'll find tutorial videos, a Comments/Questions area and more by visiting the pattern on garnstudio.com. © 1982-2024 DROPS Design A/S. We reserve all rights. This document, including all its sub-sections, has copyrights. Read more about what you can do with our patterns at the bottom of each pattern on our site. |
|||||||||||||||||||


With over 40 years in knitting and crochet design, DROPS Design offers one of the most extensive collections of free patterns on the internet - translated to 17 languages. As of today we count 304 catalogs and 11422 patterns - 11417 of which are translated into English (US/in).
We work hard to bring you the best knitting and crochet have to offer, inspiration and advice as well as great quality yarns at incredible prices! Would you like to use our patterns for other than personal use? You can read what you are allowed to do in the Copyright text at the bottom of all our patterns. Happy crafting!
Comments / Questions (15)
What does the diagonal line mean in the chart that is by the yarn over symbols?
12.11.2022 - 00:21DROPS Design answered:
Dear Carol, the diagonal is a different technique, which is worked next to the yarn over. Depending on the orientation of the line, it can be k2tog or slip 1 st as if to K, K 1, psso. You can see both explanations and their corresponding symbols in the diagram key, just above the diagrams themselves. Happy knitting!
13.11.2022 - 17:02Hello. I’m confused by instructions: on next round k all sts tog 2 x 2. Does that mean k2tog until there are 6 stitches left? Or to work a k2tog bind off (knit 2 together, return stitch to left needle and knit together with next stitch; repeat until all stitches are bound off)? I’m sorry if this is a silly question; I’m a self-taught knitter and haven’t seen instructions like that before now. Thank you for your help and all the wonderful patterns!!
05.01.2022 - 15:23DROPS Design answered:
Dear Kimberly, you mean at the very end of the sock, correct? then yes it means to knit 2 stitches together all the round so that there 6 sts remain at the end of the last round. this video may help you to finish the sock (just at the very end, remember that the video is jsut showing a technique, don't follow the number of sts in the video, just look at how the sock is finished). Happy knitting!
05.01.2022 - 17:13Can you suggest how I can do this pattern for a larger size ie, eu size 45 foot or can you suggest another patterns for that size with a lace or fancy pattern, not just plain or ribbed. Thank you
07.11.2021 - 15:00DROPS Design answered:
Dear Mrs O'Brien, we are unfortunately unable to adjust every pattern to every request; Please contact your DROPS store or any knitting forum for any individual assistance adapting the pattern to another size. Thanks for your comprehension.
08.11.2021 - 07:38Jag skulle vilja förlänga skaftet från 21 cm till 48 cm. Hur gör jag ?
17.08.2021 - 06:48DROPS Design answered:
Hei Elisabeth. På strømper med høyt skaft er det økt masker hvor lengre opp på foten du kommer. For å strikke disse strømpene med dette mønstret vil du ikke få den økningen. Design avd. har ikke mulighet til å omskrive/legge til nye diagram pga av økninger. Ta evnt en titt på andre høye strømper vi har, f.eks DROPS 117-12, 112-7 og 103-10. mvh DROPS design
18.08.2021 - 13:34Hei 😊 Jeg har strikket Bright Side i Drops Fabel garn, og de ble kjempe fine. Nå lurer jeg på om jeg kan bruke Drops Nord garn til samme oppskriften?
09.04.2021 - 15:02DROPS Design answered:
Hej Bjørg, ja det kan du, de to kvaliteter tilhører samme garngruppe :)
12.04.2021 - 14:47Er der noget galt med opskriften? Jeg er i A.3 og har 64 masker. Men kan ikke få det til at passe med omgang 5 i a.3
11.12.2020 - 18:54DROPS Design answered:
Hej Louise, du strikker de 8 masker i A.3 8 gange. Pind 5 strikkes således: 2 ret, 2ret sammen, 1 omslag, 1 ret, 1 omslag, tag 1 maske løst af pinden, 1 ret løft den løse m over, 1 ret Gentag disse 8 masker 8 gange. God fornøjelse!
14.12.2020 - 13:45Mönster Drops 167-32 Att sticka från början +A1, A2, A1, A3, A1 blir 74 varv vilket blir ca 22 cm enligt er lista där 34 v = 10 cm. I beskrivningen står det att det blir 15 cm, det blir fel mått på höjden. Siffrorna ska sedan ändras efter detta. Med vänlig hälsning Margareta
23.05.2020 - 17:22Is there a download for this pattern?
09.07.2019 - 17:32DROPS Design answered:
Dear Janice, you can print the patttern by clicking on the icon "print: pattern" at any time (see right above the pattern text). Choosing a virtual printer (in your computer options) will allow you to save it as a .PDF file. Happy knitting!
09.07.2019 - 21:17Thank you for answering my question so promptly. Also I am up to round 10 in A.1 and the circumference of the sock seems very big to me. Normally my socks are 64 stitch cast on. Can this be downsized and if so how would I go about that?I love the pattern, but afraid it would be way to big for me.
04.07.2019 - 14:46DROPS Design answered:
Dear Mrs Bartlett, make sure you have the correct tension in width = 26 sts = 10 cm. Note that you will decrease at the beg and at the end of A.2 (to 64 sts after A.2 in first size). Happy knitting!
04.07.2019 - 16:15How do I knit the A.1 diagram for this pattern?
04.07.2019 - 03:39DROPS Design answered:
Dear Barbara, knit the rows from the bottom up, and from the right to the left. 1st round: knit, 2nf. round purl, 3. round: knit, 4th round purl, 5th round: knit, , 6th ound knit, 7th round: *yo, k2tog*, repeat *-*, 8th round: knit, 9th round knit, 10th roun purl, 11th round: knit, 12th round purl, 13rh round knit, 14th round purl. Happy Knitting!
04.07.2019 - 09:31