
Popular categories
Looking for a yarn?


|
|||||||
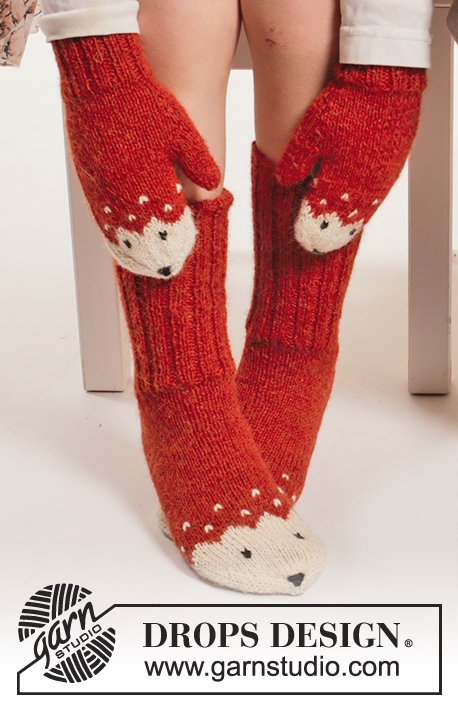
Mr. Fish |
|||||||
 |
 |
||||||
Set consists of: Knitted DROPS mittens and socks with fish pattern in “Alpaca”. SIZE 0 months - 14 years.
DROPS Extra 0-1216 |
|||||||
|
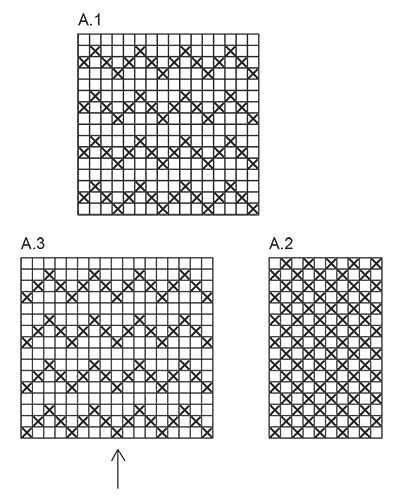
INCREASE TIP: Inc 1 st by making 1 YO. On next round K YO twisted to avoid holes. PATTERN: See diagrams A.1 to A.3. Work entire pattern in stocking st. DECREASE TIP: Work until 3 sts remain before marker and K 2 tog, K 2 (marker is in the middle of these 2 sts), slip 1 st as if to K, K 1, psso. HEEL DECREASE: Row 1 (= RS): K until (5-5-7) 7-7-7 (7-7-7) sts remain, slip next st as if to K, K 1, psso, turn piece. Row 2 (= WS): P until (5-5-7) 7-7-7 (7-7-7) sts remain, slip next st as if to P, P 1, psso, turn piece. Row 3 (= RS): K until (4-4-6) 6-6-6 (6-6-6) sts remain, slip next st as if to K, K 1, psso, turn piece. Row 4 (= WS): P until (4-4-6) 6-6-6 (6-6-6) sts remain, slip next st as if to P, P 1, psso, turn piece. Continue dec like this with 1 less st before each dec until (11-11-11) 11-9-9 (13-13-13) sts remain on needle. -------------------------------------------------------- MITTEN: Worked in the round on double pointed needles. Cast on 36-40 (44-52-56) sts on double pointed needles size 2.5 mm with denim blue. Work rib = K 2/P 2 for 5-6 (7-8-9) cm. K 1 round and dec 12-8 (8-12-8) sts evenly = 24-32 (36-40-48) sts. Work in stocking st for 1 cm. REMEMBER THE KNITTING TENSION On next round beg inc for thumb gusset and inc 1 st on each side of 2nd st on round – READ INCREASE TIP (= 2 sts inc). Repeat inc on every 3rd round a total of 3-4 (5-6-7) times = 7-9 (11-13-15) thumb sts. When piece measures 8½-10 (11½-13-14½) cm in total, slip the 7-9 (11-13-15) thumb sts on 1 stitch holder. Cast on 1 new st behind sts on stitch holder = 24-32 (36-40-48) sts on needle. Then continue pattern in the round according to diagram A.1. When piece measures 13-16 (16-19-21) cm in total (approx. 2-2 (3-3-3) cm remain until finished measurements), insert 1 marker in each side so that there are 12-16 (18-20-24) sts both on top and inside mitten. Switch to light grey green and work in stocking st in the round. On next round dec 1 st on each side of both markers – READ DECREASE TIP (= 4 sts dec). Repeat dec on every other round 2-1 (4-3-2) times in total and then on every round 2-5 (3-5-8) times in total = 8 sts remain on needle for all sizes. Cut the yarn and pull it through the remaining sts, tighten tog and fasten. The entire mitten measures approx. 15-18 (19-22-24) cm. THUMB: Slip the 7-9 (11-13-15) sts from stitch holder over thumb gusset back on double pointed needles size 2.5 mm, knit in addition up 5 sts in the edge behind the thumb sts with light grey green = 12-14 (16-18-20) sts. Work stocking st in the round until thumb measures 2½-3 (3½-4-5) cm. Then K all sts tog 2 by 2 = 6-7 (8-9-10) sts. Cut the yarn and pull it through the remaining sts, tighten tog and fasten. Embroider eyes and mouth on mitten with black. Work another mitten but reversed, i.e. when inc for thumb, inc on each side of next to last st on round (instead of on each side of 2nd st on round). -------------------------------------------------------- SOCK: Worked in the round on double pointed needles. Cast on (44-48-52) 52-56-56 (60-64-64) sts on double pointed needle size 2.5 mm with denim blue. Work rib = K 2/P 2 for (8-10-10) 12-14-14 (16-18-18) cm. Work next round as follows: K the first (25-29-29) 29-35-35 (35-39-39) sts and dec (8-8-8) 8-10-10 (10-10-10) sts evenly over these sts = (17-21-21) 21-25-25 (25-29-29) sts K, slip these sts on 1 stitch holder (= mid on top of foot). (19-19-23) 23-21-21 (25-25-25) sts remain on needle for heel. Then work pattern according to diagram A.2 back and forth over heel sts for (3-3½-4) 4-4½-4½ (5-5-5) cm. Insert 1 marker in the piece. Then work HEEL DECREASE - see explanation above. After heel decrease, pick up (8-9-10) 10-11-12 (13-13-13) sts on each side of heel and slip the (17-21-21) 21-25-25 (25-29-29) sts from the stitch holder back on needle = (44-50-52) 52-56-58 (64-68-68) sts. Insert 1 marker on each side of the (17-21-21) 21-25-25 (25-29-29) sts on top of foot. Then work pattern in the round as follows: Work 1st st after marker on top of foot in denim blue, work pattern according to diagram A.3 over the next (15-19-19) 19-23-23 (23-27-27) sts mid on top of foot – NOTE: St with arrow in diagram should fit with middle st on top of foot, work last st before next marker on top of foot in denim blue, then work A.2 between markers under foot – make sure patterns fits over heel. Continue pattern like this in the round over all sts and dec in each side as follows: K the last 2 sts before the (17-21-21) 21-25-25 (25-29-29) sts on top of foot twisted tog and K the first 2 sts after the (17-21-21) 21-25-25 (25-29-29) sts tog. Repeat dec every other round a total of (4-4-5) 5-7-5 (8-7-7) times = (36-42-42) 42-42-48 (48-54-54) sts. Continue to work until piece measures (7-8-9) 9-11-13 (14-16-18) cm from marker on heel (approx. (3-3-3) 4-4-4 (4-4-4) cm remain until finished measurements). Switch to light grey green and insert 1 marker in each side so that there are (18-21-21) 21-21-24 (24-27-27) sts both on top of foot and under foot. On next round dec 1 st on each side of both markers for toes – READ DECREASE TIP (= 4 sts dec). Repeat dec every other round (5-4-4) 7-6-5 (5-5-5) times in total and then every round a total of (1-3-3) 0-1-4 (4-5-5) times = (12-14-14) 14-14-12 (12-14-14) sts remain on needle. On next round K all sts tog 2 by 2. Cut the yarn and pull it through the remaining sts, tighten tog and fasten. Embroider on eyes and snout on toe on sock with black - see picture. Knit another sock the same way. |
|||||||
Diagram explanations |
|||||||
|
|||||||
|
|||||||
|
Have you made this or any other of our designs? Tag your pictures in social media with #dropsdesign so we can see them! Do you need help with this pattern?You'll find tutorial videos, a Comments/Questions area and more by visiting the pattern on garnstudio.com. © 1982-2024 DROPS Design A/S. We reserve all rights. This document, including all its sub-sections, has copyrights. Read more about what you can do with our patterns at the bottom of each pattern on our site. |
|||||||


With over 40 years in knitting and crochet design, DROPS Design offers one of the most extensive collections of free patterns on the internet - translated to 17 languages. As of today we count 304 catalogues and 11415 patterns - 11415 of which are translated into English (UK/cm).
We work hard to bring you the best knitting and crochet have to offer, inspiration and advice as well as great quality yarns at incredible prices! Would you like to use our patterns for other than personal use? You can read what you are allowed to do in the Copyright text at the bottom of all our patterns. Happy crafting!
Comments / Questions (7)
Hej! Supergulligt mönster. Undrar dock över ögonen. Saknas det information kring den naturfärgade "ringen" runt den svarta broderade pupillen i mönstret?
04.04.2024 - 22:32DROPS Design answered:
Hei Mr. G. Burde nok ha stått: Broder øyne og munn/snute ...... med sort og natur - se foto. Oppskriften er oversendt til design avd. for gjennomgang. mvh DROPS Design
08.04.2024 - 14:28I need this pattern .. How to make this pattern..
01.01.2023 - 10:06I drafted a simple pattern, knit and felted the bag, and it has been my daily . Other yarns can be used such as wool and nylon, cotton, merino, alpaca, etc. In reality, any yarn a knitter prefers and any weight yarn.
14.12.2022 - 07:14Ska jag fortsätta sticka enligt diagram a.2 när jag gör hälminskningen?
20.07.2019 - 11:10DROPS Design answered:
Hej. Ja det stämmer. Lycka till!
22.08.2019 - 09:08Något har blivit fel, det går inte att skriva ut själva mönstret.
01.12.2018 - 17:57Der må være fel i vanteopskriften. Har lige antal m, tager lige m ud til tommel. Efter opskrift giver det ulige antal? Hvordan?
27.12.2016 - 14:56DROPS Design answered:
Hej Susanne. Du tager ud paa hver side af den 2. m paa omgangen. Dvs, du tager f.eks. ud gange paa hver side (3 gange 2 m), saa har du 6 m + den 2. m til tomlen = 7 i alt.
10.01.2017 - 14:15What are the finished hand widths of the mittens? It gives length but not circumference and that would help in deciding size.
12.12.2015 - 11:27DROPS Design answered:
Dear Freddie, you can check the circumference with the size and tension, ie with 26 sts = 10 cm, you will have 24 sts (after thumb) x 10 divided by 26 = approx. 9 cm. Happy knitting!
14.12.2015 - 09:50