DROPS Nepal
DROPS Nepal
65% Wool, 35% Alpaca
from 3.30 $ /50g
Get the yarn to make this pattern from 13.20$.

The yarn cost is calculated from the pattern’s smallest size and the yarn’s cheapest product type. Looking for an even better price? You might find it on the DROPS Deals!

DROPS SS24

Sweet Treasures

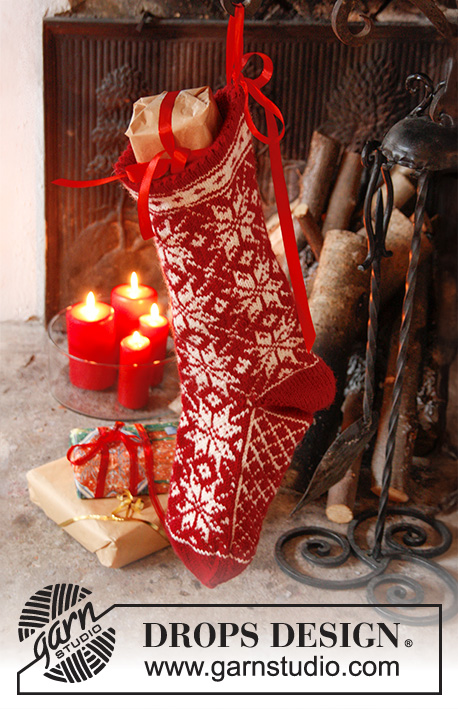
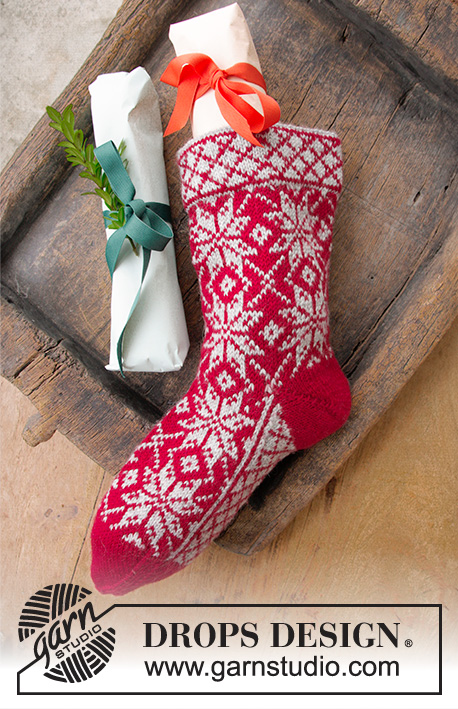
Knitted Christmas stocking in DROPS Nepal. Piece is worked with Nordic pattern and pompoms. Theme: Christmas

DROPS Extra 0-1192
DROPS design: Pattern no ne-202
Yarn group C or A + A
----------------------------------------------------------
Measurements:
Sock height: height approx. 37 cm / 14½"
Foot length: approx. 15 cm / 6"
Materials:
DROPS NEPAL from Garnstudio
100 g color no 3620, red
50 g color no 0100, off white
50 g color no 0501, gray

DROPS DOUBLE POINTED NEEDLES size 5 mm / US 8 - or size needed to get 17 sts x 22 rows in pattern = 4" x 4" (10 x 10 cm).

-------------------------------------------------------

Alternative Yarn – See how to change yarns here
Yarn Groups A to F – Use the same pattern and change the yarn here
Yarn usage using an alternative yarn – Use our yarn converter here

-------------------------------------------------------

DROPS Nepal
DROPS Nepal
65% Wool, 35% Alpaca
from 3.30 $ /50g
Get the yarn to make this pattern from 13.20$.

The yarn cost is calculated from the pattern’s smallest size and the yarn’s cheapest product type. Looking for an even better price? You might find it on the DROPS Deals!

Pattern instructions

NOTE: This pattern is written in American English. All measurements in charts are in cm. For conversion from inches to cm - click here. There are different terms for crocheting in American and British English. If this pattern includes crochet, click for "crochet terms" here. For this pattern in British English, please click here.
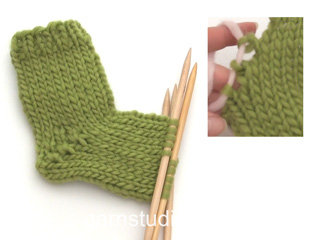
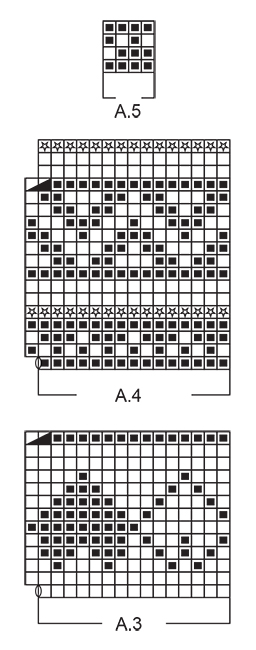
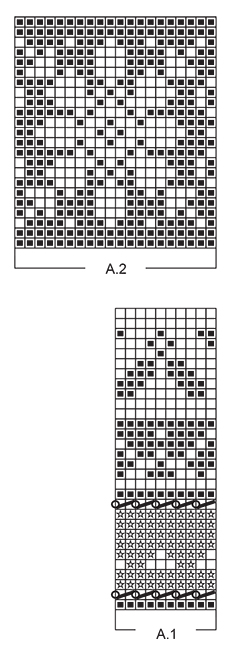
PATTERN:
See diagrams A.1 to A.5. Work entire pattern in stockinette st.

HEEL:
Worked back and forth in stockinette st with red.
ROW 1 (= RS): Work until 1 st remain, turn piece.
ROW 2 (= WS): Slip first st as if to P, tighten yarn and work until 1 st remain, turn piece.
ROW 3 (= RS): Slip first st as if to K, tighten yarn and work until 2 sts remain, turn piece.
ROW 4 (= WS): Slip first st as if to P, tighten yarn and work until 2 sts remain, turn piece.
Continue like this until 15 sts remain in the middle on the needle. Continue back and forth but now work 1 st more for every row over heel. To avoid holes in the transitions, lift the yarn before the st to be knitted up and slip it twisted on the needle. Work the yarn tog with st. Work like this until all heel sts have been worked.

DECREASE TIP:
Dec as follows before marker: Beg 3 sts before marker, K 2 tog, K 1.
Dec as follows after marker: K 1, slip 1 st as if to K, K 1, psso
----------------------------------------------------------

CHRISTMAS STOCKINETTE:
Cast on 60 sts on double pointed needles size 5 mm / US 8 with red - distribute sts so that there are 15 sts on each of the 4 double pointed needles. Work in stockinette st for 3 cm / 1". Work A.1 (= 10 sts) 6 times on round in total. REMEMBER THE KNITTING GAUGE When A.1 has been worked 1 time vertically, work A.2 (= 20 sts) 3 times on round in total. When A.2 has been worked 1 time vertically, work A.3 (= 15 sts) 4 times on round in total. When A.3 has been worked 1 time in total vertically (piece measures approx. 30 cm / 11¾"), cut the yarn.

Now work heel over sts from 1st and 4th needle (= 30 sts), slip the other 30 sts (= on top of foot) on 1 stitch holder. Beg from RS and work HEEL - see explanation above. Cut the yarn, round now beg mid under heel, i.e. in 15th st mid under heel. Then slip the 30 sts from stitch holder back on needle and work in the round over all 60 sts as follows:
Work A.4 (= 15 sts) 4 times on round in total. When A.4 has been worked 1 time vertically, work A.5 (= 4 sts) 15 times on round in total. When A.5 has been worked 1 time vertically, approx. 4.5 cm / 1¾" remain until finished measurements.

Insert 1 marker in each side so that there are 30 sts on top of foot and 30 sts under foot. Then work in stockinette st with red while AT THE SAME TIME dec for toes on each side of each marker as follows: Dec every other round 2 times in total and then every round 6 times in total - READ DECREASE TIP = 28 sts remain on needle. Fasten off. Place the sock flat and sew tog sts on the top side of toe with sts on the under side with grafting/kitchener stitches. Fasten off.

ASSEMBLY:
Fold cast-on edge inwards at first eyelet hole, fasten with small stitches on the inside without tightening.

TWINED STRING WITH POMPOMS:
Cut 2 lengths off white yarn of 3 metres each. Twine the strands tog until they resist, fold the string double so that it twines again. Make a knot at each end. Make 2 gray pompoms approx. 6 cm / 2⅜" in diameter. Thread yarn through eyelet hole below folding edge and fasten a pompom in each end of string.

TWINED STRING (LOOP):
Cut 2 lengths off white yarn of 70 cm / 27½" each. Twine the strands tog until they resist, fold the string double so that it twines again. Make a knot at each end. Thread string through 2 holes mid back on sock and tie them tog on the inside, use this to hang the Christmas stockinette.

Diagram

All measurements in charts are in cm.

symbols = off white
symbols = red
symbols = grey
symbols = K 2 tog with red
symbols = 1 YO between 2 sts, on next row K YO twisted to avoid holes
symbols = K 2 tog with grey, 1 YO On next round K the YO to make a hole.
diagram
diagram

Each of our patterns has specific tutorial videos to help you.

Do you have a question? See a list of frequently asked questions (FAQ)

Knitting tension is what determines the final measurements of your work, and is usually measured per 10 x 10 cm. It is provided like so: number of stitches in width x number of rows in height - eg: 19 stitches x 26 rows = 10 x 10 cm.

The knitting tension is very individual; some people knit/crochet loosely while others work tightly. You adjust the knitting tension with the needle size, which is why the suggested needle size only serve as a guide! You need to adjust this (up or down) to ensure that YOUR knitting tension matches the knitting tension provided in the pattern. If you work with a different knitting tension than provided you will have a different yarn consumption, and your work will have different measurements than what the pattern suggests.

The knitting tension also determines which yarns can replace each other. As long as you achieve the same knitting tension you can replace one yarn with another.

See DROPS lesson: How to measure your tension/gauge

See DROPS video: How to make a gauge tension swatch

The required amount of yarn is provided in grams, eg: 450 g. To calculate how many balls you’ll need you first need to know how many grams are in 1 ball (25g, 50g or 100g). This information is available if you click on the individual yarn quality on our pages. Divide the amount required with the amount of each ball. For example, if each ball is 50g (the most common amount), the calculation will be as follows: 450 / 50 = 9 balls.

The important thing when changing from one yarn to another is that the knitting/crochet tension remains the same. This is so that the measurements of the finished piece will be the same as on the sketch provided. It is easier to achieve the same knitting tension using yarns from the same yarn group. It is also possible to work with multiple strands of a thinner yarn to achieve the knitting tension of a thicker one. Please try our yarn converter. We recommend you to always work a test swatch.

Please NOTE: when changing yarn the garment might have a different look and feel to the garment in the photo, due to individual properties and qualities of each yarn.

See DROPS lesson: Can I use a different yarn than the one mentioned in the pattern?

All our yarns are categorised into yarn groups (from A to F) according to thickness and knitting tension – group A contains the thinnest yarns and group F the thickest. This makes it easier for you to find alternative yarns to our patterns, should you wish to switch yarn. All yarns within the same group have a similar knitting tension and can easily replace each other. However, different yarn qualities have different structures and properties which will give the finished work a unique look and feel.

Click here for an overview of the yarns in each yarn group

At the top of all our patterns you’ll find a link to our yarn converter, which is a helpful tool should you wish to use a different yarn than suggested. By filling in the yarn quality you wish to replace, the amount (in your size) and number of strands, the converter will present good alternative yarns with the same knitting tension. Additionally it will tell you how much you’ll require in the new qualities and whether you’ll need to work with multiple strands. Most skeins are 50g (some are 25g or 100g).

If the pattern is worked with multiple colours, every colour will have to be converted separately. Similarly, if the pattern is worked with several strands of different yarns (for example 1 strand Alpaca and 1 strand Kid-Silk) you will have to find alternatives for each, individually.

Click here to see our yarn converter

Since different yarns have different qualities and textures we have chosen to keep the original yarn in our patterns. However, you can easily find options among our available qualities by using our yarn converter, or simply pick a yarn from the same yarn group.

It is possible that some retailers still have discontinued yarns in stock, or that someone has a few skeins at home that they would like to find patterns for.

The yarn converter will provide both alternative yarn as well as required amount in the new quality.

If you think it's hard to decide what size to make, it can be a good idea to measure a garment you own already and like the size of. Then you can pick the size by comparing those measures with the ones available in the pattern's size chart.

You'll find the size chart at the bottom of the pattern.

See DROPS lesson: How to read size chart

The needle size provided in the pattern serves only as a guide, the important thing is to follow the knitting tension. And since knitting tension is very individual, you will have to adjust the needle size to ensure that YOUR tension is the same as in the pattern – maybe you’ll have to adjust 1, or even 2 needle sizes, up or down to achieve the correct tension. For this, we recommend that you work test swatches.

Should you work with a different knitting tension than the one provided, the measurements of the finished garment might deviate from the measurement sketch.

See DROPS lesson: How to measure your tension/gauge

See DROPS video: How to make a gauge tension swatch

Working a garment top-down provides more flexibility and room for personal adjustment. For example it is easier to try the garment on while working, as well as making adjustments to length of yoke and shoulder caps.

The instructions are carefully explaining every step, in the correct order. Diagrams are adjusted to the knitting direction and are worked as usual.

The diagram depicts all rows/rounds, and every stitch seen from the right side. It is read from bottom to top, from right to left. 1 square = 1 stitch.

When working back and forth, every other row is worked from the right side and every other row is worked from the wrong side. When working from the wrong side, the diagram will have to be worked reversed: from left to right, knit stitches are purled, purl stitches are knit etc.

When working in the round every round is worked from the right side and the diagram are worked from right to left on all rounds.

See DROPS lesson: How to read knitting diagrams

The diagram depicts all rows/rounds, and every stitch seen from the right side. It is worked from bottom to top, from right to left.

When working back and forth every other row is worked from the right side: from right to left and every other row is worked from the wrong side: from left to right.

When working in the round, every row in the diagram are worked from the right side, from right to left.

When working a circular diagram you start in the middle and work your way outwards, counter clockwise, row by row.

The rows usually start with a given number of chain stitches (equivalent to the height of the following stitch), this will either be depicted in the diagram or explained in the pattern.

See DROPS lesson: How to read crochet diagrams

Instructions for working several diagrams after each other on the same row/round, will often be written like so: “work A.1, A.2, A.3 a total of 0-0-2-3-4 times". This means you work A.1 once, then A.2 is worked once, and A.3 is repeated (in width) the number of times provided for your size – in this case like so: S = 0 times, M = 0 times, L=2 times, XL= 3 times and XXL = 4 times.

The diagrams are worked as usual: begin with the first row in A.1, then work the first row in A.2 etc.

See DROPS lesson: How to read knitting diagrams

See DROPS lesson: How to read crochet diagrams

The total width of the garment (from wrist-to-wrist) will be larger in the larger sizes, despite the actual sleeves being shorter. The larger sizes have longer sleeve caps and wider shoulders, so there will be a good fit in all sizes.

The measurement sketch/schematic drawing provides information regarding the full length of the garment. If it’s a jumper or a jacket the length is measured from the highest point on the shoulder (usually closest to the neckline), and straight down to the bottom of the garment. It is NOT measured from the tip of shoulder. Similarly, the length of yoke is measured from the highest point on the shoulder and down to where yoke is split into body and sleeves.

See DROPS lesson: How to read a schematic drawing

Diagrams are often repeated on the round or in height. 1 repeat is the diagram the way it appears in the pattern. If it says to work 5 repeats of A.1 in the round, then you work A.1 a total of 5 times after/next to each other in the round. If it says to work 2 repeats of A.1 vertically/in height you work the entire diagram once, then begin again at the start and work the entire diagram one more time.

Chain stitches are slightly narrower than other stitches and to avoid working the cast-on edge too tight, we simply chain more stitches to begin with. The stitch count will be adjusted on the following row to fit the pattern and measurement sketch.

The rib edge is more elastic and will contract slightly compared to, for example, stocking stitch. By increasing before the rib edge, you avoid a visible difference in width between the rib edge and the rest of the body.

It’s very easy to cast off too tightly, and by making yarn overs while casting off (and simultaneously casting these off) you avoid a too tight cast off edge.

See DROPS video: How to bind off with yarn overs (yo)

To achieve an even increase (or decrease) you can increase on, for example: every 3rd and 4th row alternately, like so: work 2 rows and increase on the 3rd row, work 3 rows and increase on the 4th. Repeat this until the increase is complete.

See DROPS lesson: Increase or decrease 1 st on every 3rd and 4th row alternately

Should you prefer to work in the round instead of back and forth, you may of course adjust the pattern. You’ll need to add steeks mid-front (usually 5 stitches), and follow the instructions. When you would normally turn and work from the wrong side, simply work across the steek and continue in the round. At the end you’ll cut the piece open, pick up stitches to work bands, and cover the cut edges.

See DROPS video: How to knit steeks and cut open

Should you prefer to work back and forth instead of in the round, you may of course adjust the pattern so you work the pieces separately and then assemble them at the end. Divide the stitches for the body in 2, add 1 edge stitch in each side (for sewing) and work the front and back pieces separately.

See DROPS lesson: Can I adapt a pattern for circular needles into straight needles?

Pattern repeats can vary slightly in the different sizes, in order to get the correct proportions. If you’re not working the exact same size as the garment in the photo, yours might deviate slightly. This has been carefully developed and adjusted so that the complete impression of the garment is the same in all sizes.

Make sure to follow instructions and diagrams for your size!

If you have found a pattern you like which is available in women’s size it’s not very difficult to convert it to men’s size. The biggest difference will be the length of sleeves and body. Start working on the women size that you think would fit across the chest. The additional length will be worked right before you cast off for the armhole/sleeve cap. If the pattern is worked top-down you can add the length right after the armhole or before the first decrease on sleeve.

Regarding additional yarn amount, this will depend on how much length you add, but it is better with a skein too many than too few.

All yarns will have excess fibres (from production) that might come off as lint or shedding. Brushed yarns (ie hairier yarns) have more of these loose, excess fibres, causing more shedding.

Shedding also depends on what is worn under or over the garment, and whether this pulls at the yarn fibres. It’s therefore not possible to guarantee that there will be no shedding

Below are some tips on how to get the best result when working with hairier yarns:

1. When the garment is finished (before you wash it) shake it vigorously so the looser hairs come off. NOTE: do NOT use a lint roller, brush or any method that pulls at the yarn.

2. Place the garment in a plastic bag and put it in your freezer - the temperature will cause the fibres to become less attached to each other, and excess fibres will come off easier.

3. Leave in the freezer for a few hours before taking it out and shaking it again.

4. Wash the garment according to the instructions on the yarn label.

Pilling is a natural process that happens to even the most exclusive of fibers. It's a natural sign of wear and tear that is hard to avoid, and that is most visible in high friction areas of your garment like a sweater's arms and cuffs.

You can make your garment look as new by removing the pilling, using a fabric comb or a pill/lint remover.

Still can't find the answer you need? Then scroll down and leave your question so one of our experts can try to help you. This will be done normally within 5 to 10 working days.
In the meantime, you can read the questions and answers that others have left to this pattern or join the DROPS Workshop on Facebook to get help from fellow knitters/crocheters!

You might also like...

Post a comment to pattern DROPS Extra 0-1192

We would love to hear what you have to say about this pattern!

If you want to leave a question, please make sure you select the correct category in the form below, to speed up the answering process. Required fields are marked *.

Comments / Questions (17)

country flag Carole Mayrand wrote:

DROPS design: Modèle n° ne-202 On dirait que les explications du début du patron ne correspondent pas à l'image affichée. On ne parle pas de la ligne rouge du haut. La section grise a un motif blanc mais aucune explication, et suit une section section blanc et rouge avant A!. Puis-je avoir les corrections du patron svp?

02.08.2020 - 23:03

DROPS Design answered:

Bonjour Mme Mayrand, les mailles sont montées en rouge (mention ajoutée car elle manquait), vous tricotez ensuite 3 cm jersey puis le diagramme A.1 = vous retrouverez alors toutes les couleurs indiquées dans le diagramme= 1er rang en rouge, rang suivant en gris, etc... . Bon tricot!

03.08.2020 - 08:31

country flag Louise wrote:

Hvorfor er monsteret opp ned ?

22.11.2019 - 14:14

DROPS Design answered:

Hej Louise, fordi du starter øverst på skaftet og strikker nedad. Husk at diagrammerne strikkes fra nederste højre hjørne og opad. God fornøjelse!

04.12.2019 - 11:56

country flag Linda Panighetti wrote:

Hi, on the first round of A.4, it shows the 1 yarn over symbol after last stitch. I still have 1 stitch left from the previous round. What do I do with it? Thank you for your help. Linda

12.09.2019 - 02:11

DROPS Design answered:

Dear Mrs Panighetti, you should have 60 sts on needle, and repeat A.4 a total of 4 times in the round, ie *work 15 sts, make 1 yarn over*, repeat from *-* a total of 4 times = there are now 64 sts on needle. Continue A.4 over 16 sts in each repeat until 15th row where you will K2 tog at the end of each repeat = 4 dec = 15 sts in each repeat and 60 sts on needle. Happy knitting!

12.09.2019 - 08:59

country flag Nancy Livingstone wrote:

Why does it need 100 G red yarn, when its only for one sock. Thank you

28.06.2019 - 09:19

DROPS Design answered:

Dear Nancy, probably because it is a christmas stocking and it is bigger than the average. It is possible, that you will only need a small amount from the plus one ball, but since different dyelots might be slightly different in color, it is always best to buy more yarn. If you have yarns left over most store would take back unopened, unused balls. Happy Knitting!

28.06.2019 - 10:27

country flag Shelley Allen wrote:

New to knitting socks, I have mastered all 3 graphs and am now ready to start the heel. I don't understand what I am to do with last stitch remaining on row 1 of instructions for heel. Where is this stitch to be? Can you please explain? Thanks!

01.12.2018 - 17:39

DROPS Design answered:

Dear Mrs Allen, This video shows how to knit a diagonal heel, ie how to leave 1 st unworked at the end of each row then how to knit them back for 2nd part of heel. Happy knitting!

03.12.2018 - 08:40

country flag Strikkeguri wrote:

Hei, denne ble større enn forventet😅 går det ann å tove Nepal?

14.11.2018 - 15:10

DROPS Design answered:

Hei Strikkeguri. Ja, Nepal kan toves. Du kan lese mer om garnet (vaskeanvisning med mer) her. God fornøyelse.

15.11.2018 - 09:37

country flag Melissa Emery wrote:

I can't seem to find directions for the grey cuff with eyelets. Is this in the pattern?

15.01.2018 - 03:15

DROPS Design answered:

Dear Mrs Emery, the grey cuff is worked when knitting diagram A.1. Happy knitting!

15.01.2018 - 10:19