DROPS Air
DROPS Air
65% Alpaca, 28% Polyamide, 7% Wool
from 6.45 $ /50g
Get the yarn to make this pattern from 38.70$.

The yarn cost is calculated from the pattern’s smallest size and the yarn’s cheapest product type. Looking for an even better price? You might find it on the DROPS Deals!

DROPS SS24

Aberdeen

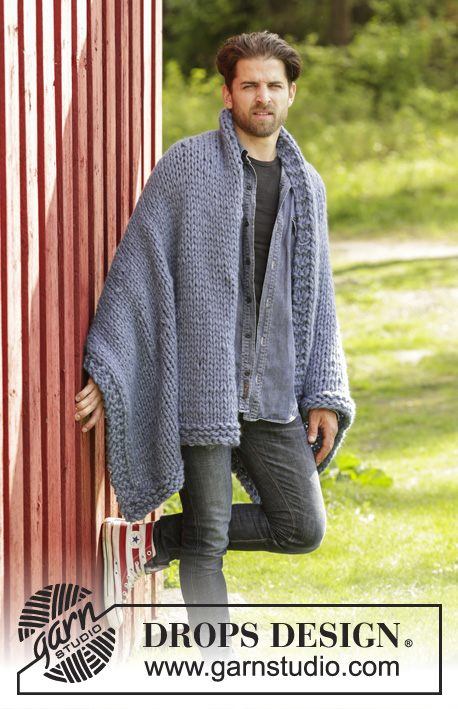
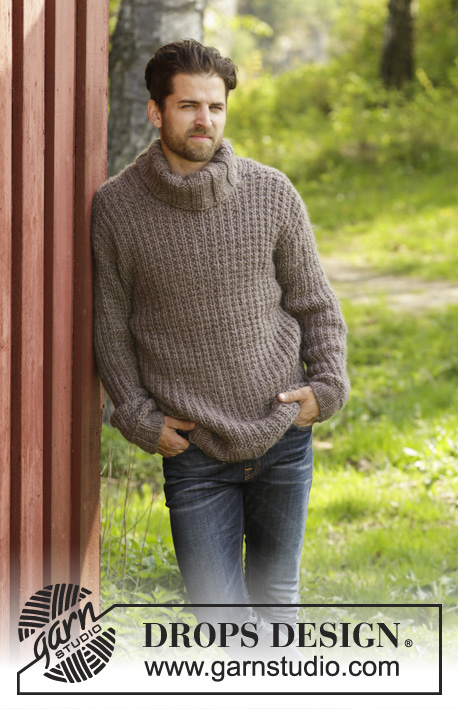
Men's knitted sweater in DROPS Air, with raglan and shawl collar. Size: S - XXXL.

DROPS Extra 0-1159
DROPS design: Pattern no ai-008
Yarn group C or A + A
----------------------------------------------------------
Size: S - M - L - XL - XXL - XXXL
Materials:
DROPS AIR from Garnstudio
300-350-350-400-450-500 g colour no 04, medium grey

DROPS DOUBLE POINTED NEEDLES AND CIRCULAR NEEDLE (40 and 80 cm / 16" and 32") SIZE 6 mm/US 10 - or size needed to get 15 sts x 19 rows in stockinette st = 4" x 4" (10 x 10 cm).
DROPS DOUBLE POINTED NEEDLES and CIRCULAR NEEDLE (80 cm / 32") SIZE 5 mm/US 8 - for rib.

-------------------------------------------------------

Alternative Yarn – See how to change yarns here
Yarn Groups A to F – Use the same pattern and change the yarn here
Yarn usage using an alternative yarn – Use our yarn converter here

-------------------------------------------------------

DROPS Air
DROPS Air
65% Alpaca, 28% Polyamide, 7% Wool
from 6.45 $ /50g
Get the yarn to make this pattern from 38.70$.

The yarn cost is calculated from the pattern’s smallest size and the yarn’s cheapest product type. Looking for an even better price? You might find it on the DROPS Deals!

Pattern instructions

NOTE: This pattern is written in American English. All measurements in charts are in cm. For conversion from inches to cm - click here. There are different terms for crocheting in American and British English. If this pattern includes crochet, click for "crochet terms" here. For this pattern in British English, please click here.
GARTER ST (back and forth):
K all rows. 1 ridge = K2 rows.

PATTERN:
See diagram A.1. The diagram shows all rows/rounds in pattern seen from RS.

RAGLAN:
All dec are done from RS!
Dec 1 st on each side of every A.1 (= 8 sts dec on row/round):
Dec as follows before A.1: Work until 2 sts before A.1, K 2 tog = 1 st dec.
Dec as follows after A.1: Slip 1 st as if to K, K 1, psso = 1 st dec.

Dec 2 sts on each side of every A.1 as follows (= 16 sts dec on row):
Dec as follows before A.1: Work until 3 sts remain before A.1, slip 1 st as if to K, K 2 tog, psso = 2 sts dec.
Dec as follows after A.1: Slip 1 st as if to K, K 2 tog, psso = 2 sts dec.

INCREASE TIP:
Inc 1 st by making 1 YO, on next round K YO twisted (i.e. work in back loop of st instead front) to avoid holes.

DECREASE TIP:
Dec inside 1 edge st in garter st. All dec are done from RS!
Dec as follows before 1 edge st: K 2 tog.
Dec after 1 edge st as follows: Slip 1 st as if to K, K 1, psso.
----------------------------------------------------------

JUMPER:
Jumper is worked in the round on circular needle up to neck. When binding off for neck, continue back and forth. Rounds start mid back.

BODY:
Cast on 176-188-204-224-244-268 sts on circular needle size 5 mm / US 8 with Air. Work rib = K 2/P 2 in the round for 6 cm / 2⅜". Then continue in stockinette st until finished measurements. On next round switch to circular needle size 6 mm / US 10 and dec 32-32-36-40-44-48 sts evenly = 144-156-168-184-200-220 sts. REMEMBER THE GAUGE! When piece measures 42-43-44-45-46-47 cm / 16½"-17"-17¼"-17¾"-18"-18½", bind off for armholes in each side as follows: Work 31-34-37-41-45-50 sts in stockinette st (= half back piece), bind off 10 sts under sleeve, work 62-68-74-82-90-100 sts in stockinette st (= front piece), bind off 10 sts and work the remaining 31-34-37-41-45-50 sts in stockinette(= half back piece). Put piece aside and knit the sleeves.

SLEEVES:
Worked in the round on double pointed needles/circular needle.
Cast on 40-40-44-44-44-48 sts on double pointed needles size 5 mm / US 8. Work rib = K 2/P 2 for 4 cm / 1½". Then continue in stockinette st until finished measurements. On next round switch to double pointed/circular needle size 6 mm / US 10 and dec 5-3-5-3-3-7 sts evenly = 35-37-39-41-41-41 sts. When sleeve measures 8cm / 3" in all sizes, insert a marker at beg of round (= mid under sleeve). On next round inc 1 st in each side of marker - Read INCREASE TIP! Repeat inc every 6-6-6-6-5-5 round 8-7-3-3-14-7 more times, then
every 5-5-5-5-4-4 round a total of 6-7-12-12-2-11 times = 65-67-
71-73-75-79 sts. Work the new stitches in stocking stitch. When
piece measures 54-53-53-53-53-53 cm = 21¼"-21"-21"-21"-21"-21", bind off 10 sts mid under sleeve (= 5 sts on each side of marker) = 55-57-61-63-65-69 sts remain on sleeve.

YOKE:
Slip sleeves on to same circular needle as body where armholes were bound off = 234-250-270-290-310-338 sts. Now continue with stockinette st and pattern in every transition between front and back piece and sleeves from beg of round: Continue in stockinette st over the first 28-31-34-38-42-47 sts, A.1 (= 7 sts), stockinette st over the next 47-49-53-55-57-61 sts, A.1, 56-62-68-76-84-94 sts in stockinette, A.1, 47-49-53-55-57-61 sts in stockinette, A.1, 28-31-34-38-42-47 sts in stockinette. Continue like this, AT THE SAME TIME dec for RAGLAN - see explanation above, and dec for neck as follows: READ ALL OF THE FOLLOWING SECTION BEFORE CONTINUING!

RAGLAN:
NOTE: Continue in the round until bind off for neck. Then work the rest of yoke back and forth.To obtain the correct measurements, make sure your gauge is always correct when working raglan!
Repeat dec for raglan every other round/every row from RS 15-16-16-17-18-18 more times (= 8 sts per dec), then dec 2 sts on each side of every raglan(= 16 sts per dec). Repeat dec 1-1-2-2-2-3 more times.
NECK DEC:
When piece measures 44-45-46-47-48-49 cm / 17¼"-17¾"-18"-18½"-19"-19¼", bind off the middle 14-16-16-16-18-20 sts on front piece for neck. Then work piece back and forth and work edge st towards the neck in GARTER ST - see explanation above. Then dec 1 st inside 1 edge st in garter st on each side of neck - Read DECREASE TIP! Repeat dec every other row until finished measurements. NOTE: Neck dec overlaps dec for raglan on front piece. I.e. when there is not enough sts to dec for raglan on front piece, continue dec for neck over A.1.

When raglan and neck dec are done piece measures approx. 66-68-70-72-74-76 cm / 26"-26¾"-27½"-28⅜"-29⅛"-30" from bottom edge to shoulder..
Now work an elevation in the neck: Beg from RS and work as before until 7 sts, turn, tighten yarn, work back until 7 sts remain, turn, tighten yarn, work until 10 sts remain, turn, tighten yarn, work until 10 sts remain, turn, tighten yarn, work until 13 sts remain, turn, tighten yarn, work until 13 sts remain, turn, tighten yarn, work until 16 sts remain, turn, tighten yarn, work until 16 sts remain. Bind off.

SHAWL COLLAR:
Start mid front on the right side of sts dec for neck. Pick up on circular needle size 5 mm / US 8 with Air: 43-45-46-48-50-52 sts up to shoulder, then pick up 26-27-27-27-29-29 sts in the back of neck, and finally 43-45-46-48-50-52 sts down along left side of neck dec = 112-117-119-123-129-133 sts. (Do not pick up sts at the front of neck where sts were bound off.) K 1 row from WS while AT THE SAME TIME inc 4-7-5-5-7-7 sts evenly = 116-124-124-128-136-140 sts. Then work rib as follows (from RS): 1 edge st in garter st, * K 2, P 2 *, repeat from *-* until 3 sts remain, finish with K 2 and 1 edge st in garter st. Continue rib like this until collar measures approx. 6 cm / 2½". Now inc 1 st in each of the middle 14 P-sections, seen from RS (= back of neck) = 130-138-138-142-150-154 sts. Continue to work until collar measures 10-11-11-11-12-13 cm / 4"-4½"-4½"-4½"-4¾"-5", bind off with K over K and P over P.

ASSEMBLY:
Lay the collar double (left side over right side) at the bottom of neck opening and sew it to the neck line at the front through both layers. Sew the openings under the sleeves.

Diagram

All measurements in charts are in cm.

symbols = K from RS, P from WS
symbols = P from RS, K from WS
diagram

Each of our patterns has specific tutorial videos to help you.

Do you have a question? See a list of frequently asked questions (FAQ)

Knitting tension is what determines the final measurements of your work, and is usually measured per 10 x 10 cm. It is provided like so: number of stitches in width x number of rows in height - eg: 19 stitches x 26 rows = 10 x 10 cm.

The knitting tension is very individual; some people knit/crochet loosely while others work tightly. You adjust the knitting tension with the needle size, which is why the suggested needle size only serve as a guide! You need to adjust this (up or down) to ensure that YOUR knitting tension matches the knitting tension provided in the pattern. If you work with a different knitting tension than provided you will have a different yarn consumption, and your work will have different measurements than what the pattern suggests.

The knitting tension also determines which yarns can replace each other. As long as you achieve the same knitting tension you can replace one yarn with another.

See DROPS lesson: How to measure your tension/gauge

See DROPS video: How to make a gauge tension swatch

The required amount of yarn is provided in grams, eg: 450 g. To calculate how many balls you’ll need you first need to know how many grams are in 1 ball (25g, 50g or 100g). This information is available if you click on the individual yarn quality on our pages. Divide the amount required with the amount of each ball. For example, if each ball is 50g (the most common amount), the calculation will be as follows: 450 / 50 = 9 balls.

The important thing when changing from one yarn to another is that the knitting/crochet tension remains the same. This is so that the measurements of the finished piece will be the same as on the sketch provided. It is easier to achieve the same knitting tension using yarns from the same yarn group. It is also possible to work with multiple strands of a thinner yarn to achieve the knitting tension of a thicker one. Please try our yarn converter. We recommend you to always work a test swatch.

Please NOTE: when changing yarn the garment might have a different look and feel to the garment in the photo, due to individual properties and qualities of each yarn.

See DROPS lesson: Can I use a different yarn than the one mentioned in the pattern?

All our yarns are categorised into yarn groups (from A to F) according to thickness and knitting tension – group A contains the thinnest yarns and group F the thickest. This makes it easier for you to find alternative yarns to our patterns, should you wish to switch yarn. All yarns within the same group have a similar knitting tension and can easily replace each other. However, different yarn qualities have different structures and properties which will give the finished work a unique look and feel.

Click here for an overview of the yarns in each yarn group

At the top of all our patterns you’ll find a link to our yarn converter, which is a helpful tool should you wish to use a different yarn than suggested. By filling in the yarn quality you wish to replace, the amount (in your size) and number of strands, the converter will present good alternative yarns with the same knitting tension. Additionally it will tell you how much you’ll require in the new qualities and whether you’ll need to work with multiple strands. Most skeins are 50g (some are 25g or 100g).

If the pattern is worked with multiple colours, every colour will have to be converted separately. Similarly, if the pattern is worked with several strands of different yarns (for example 1 strand Alpaca and 1 strand Kid-Silk) you will have to find alternatives for each, individually.

Click here to see our yarn converter

Since different yarns have different qualities and textures we have chosen to keep the original yarn in our patterns. However, you can easily find options among our available qualities by using our yarn converter, or simply pick a yarn from the same yarn group.

It is possible that some retailers still have discontinued yarns in stock, or that someone has a few skeins at home that they would like to find patterns for.

The yarn converter will provide both alternative yarn as well as required amount in the new quality.

If you think it's hard to decide what size to make, it can be a good idea to measure a garment you own already and like the size of. Then you can pick the size by comparing those measures with the ones available in the pattern's size chart.

You'll find the size chart at the bottom of the pattern.

See DROPS lesson: How to read size chart

The needle size provided in the pattern serves only as a guide, the important thing is to follow the knitting tension. And since knitting tension is very individual, you will have to adjust the needle size to ensure that YOUR tension is the same as in the pattern – maybe you’ll have to adjust 1, or even 2 needle sizes, up or down to achieve the correct tension. For this, we recommend that you work test swatches.

Should you work with a different knitting tension than the one provided, the measurements of the finished garment might deviate from the measurement sketch.

See DROPS lesson: How to measure your tension/gauge

See DROPS video: How to make a gauge tension swatch

Working a garment top-down provides more flexibility and room for personal adjustment. For example it is easier to try the garment on while working, as well as making adjustments to length of yoke and shoulder caps.

The instructions are carefully explaining every step, in the correct order. Diagrams are adjusted to the knitting direction and are worked as usual.

The diagram depicts all rows/rounds, and every stitch seen from the right side. It is read from bottom to top, from right to left. 1 square = 1 stitch.

When working back and forth, every other row is worked from the right side and every other row is worked from the wrong side. When working from the wrong side, the diagram will have to be worked reversed: from left to right, knit stitches are purled, purl stitches are knit etc.

When working in the round every round is worked from the right side and the diagram are worked from right to left on all rounds.

See DROPS lesson: How to read knitting diagrams

The diagram depicts all rows/rounds, and every stitch seen from the right side. It is worked from bottom to top, from right to left.

When working back and forth every other row is worked from the right side: from right to left and every other row is worked from the wrong side: from left to right.

When working in the round, every row in the diagram are worked from the right side, from right to left.

When working a circular diagram you start in the middle and work your way outwards, counter clockwise, row by row.

The rows usually start with a given number of chain stitches (equivalent to the height of the following stitch), this will either be depicted in the diagram or explained in the pattern.

See DROPS lesson: How to read crochet diagrams

Instructions for working several diagrams after each other on the same row/round, will often be written like so: “work A.1, A.2, A.3 a total of 0-0-2-3-4 times". This means you work A.1 once, then A.2 is worked once, and A.3 is repeated (in width) the number of times provided for your size – in this case like so: S = 0 times, M = 0 times, L=2 times, XL= 3 times and XXL = 4 times.

The diagrams are worked as usual: begin with the first row in A.1, then work the first row in A.2 etc.

See DROPS lesson: How to read knitting diagrams

See DROPS lesson: How to read crochet diagrams

The total width of the garment (from wrist-to-wrist) will be larger in the larger sizes, despite the actual sleeves being shorter. The larger sizes have longer sleeve caps and wider shoulders, so there will be a good fit in all sizes.

The measurement sketch/schematic drawing provides information regarding the full length of the garment. If it’s a jumper or a jacket the length is measured from the highest point on the shoulder (usually closest to the neckline), and straight down to the bottom of the garment. It is NOT measured from the tip of shoulder. Similarly, the length of yoke is measured from the highest point on the shoulder and down to where yoke is split into body and sleeves.

See DROPS lesson: How to read a schematic drawing

Diagrams are often repeated on the round or in height. 1 repeat is the diagram the way it appears in the pattern. If it says to work 5 repeats of A.1 in the round, then you work A.1 a total of 5 times after/next to each other in the round. If it says to work 2 repeats of A.1 vertically/in height you work the entire diagram once, then begin again at the start and work the entire diagram one more time.

Chain stitches are slightly narrower than other stitches and to avoid working the cast-on edge too tight, we simply chain more stitches to begin with. The stitch count will be adjusted on the following row to fit the pattern and measurement sketch.

The rib edge is more elastic and will contract slightly compared to, for example, stocking stitch. By increasing before the rib edge, you avoid a visible difference in width between the rib edge and the rest of the body.

It’s very easy to cast off too tightly, and by making yarn overs while casting off (and simultaneously casting these off) you avoid a too tight cast off edge.

See DROPS video: How to bind off with yarn overs (yo)

To achieve an even increase (or decrease) you can increase on, for example: every 3rd and 4th row alternately, like so: work 2 rows and increase on the 3rd row, work 3 rows and increase on the 4th. Repeat this until the increase is complete.

See DROPS lesson: Increase or decrease 1 st on every 3rd and 4th row alternately

Should you prefer to work in the round instead of back and forth, you may of course adjust the pattern. You’ll need to add steeks mid-front (usually 5 stitches), and follow the instructions. When you would normally turn and work from the wrong side, simply work across the steek and continue in the round. At the end you’ll cut the piece open, pick up stitches to work bands, and cover the cut edges.

See DROPS video: How to knit steeks and cut open

Should you prefer to work back and forth instead of in the round, you may of course adjust the pattern so you work the pieces separately and then assemble them at the end. Divide the stitches for the body in 2, add 1 edge stitch in each side (for sewing) and work the front and back pieces separately.

See DROPS lesson: Can I adapt a pattern for circular needles into straight needles?

Pattern repeats can vary slightly in the different sizes, in order to get the correct proportions. If you’re not working the exact same size as the garment in the photo, yours might deviate slightly. This has been carefully developed and adjusted so that the complete impression of the garment is the same in all sizes.

Make sure to follow instructions and diagrams for your size!

If you have found a pattern you like which is available in women’s size it’s not very difficult to convert it to men’s size. The biggest difference will be the length of sleeves and body. Start working on the women size that you think would fit across the chest. The additional length will be worked right before you cast off for the armhole/sleeve cap. If the pattern is worked top-down you can add the length right after the armhole or before the first decrease on sleeve.

Regarding additional yarn amount, this will depend on how much length you add, but it is better with a skein too many than too few.

All yarns will have excess fibres (from production) that might come off as lint or shedding. Brushed yarns (ie hairier yarns) have more of these loose, excess fibres, causing more shedding.

Shedding also depends on what is worn under or over the garment, and whether this pulls at the yarn fibres. It’s therefore not possible to guarantee that there will be no shedding

Below are some tips on how to get the best result when working with hairier yarns:

1. When the garment is finished (before you wash it) shake it vigorously so the looser hairs come off. NOTE: do NOT use a lint roller, brush or any method that pulls at the yarn.

2. Place the garment in a plastic bag and put it in your freezer - the temperature will cause the fibres to become less attached to each other, and excess fibres will come off easier.

3. Leave in the freezer for a few hours before taking it out and shaking it again.

4. Wash the garment according to the instructions on the yarn label.

Pilling is a natural process that happens to even the most exclusive of fibers. It's a natural sign of wear and tear that is hard to avoid, and that is most visible in high friction areas of your garment like a sweater's arms and cuffs.

You can make your garment look as new by removing the pilling, using a fabric comb or a pill/lint remover.

Still can't find the answer you need? Then scroll down and leave your question so one of our experts can try to help you. This will be done normally within 5 to 10 working days.
In the meantime, you can read the questions and answers that others have left to this pattern or join the DROPS Workshop on Facebook to get help from fellow knitters/crocheters!

You might also like...

Aberdeen

Lelia Scott, United States

Aberdeen

Kammya, India

712. Aberdeen

Olajda, Norway

Post a comment to pattern DROPS Extra 0-1159

We would love to hear what you have to say about this pattern!

If you want to leave a question, please make sure you select the correct category in the form below, to speed up the answering process. Required fields are marked *.

Comments / Questions (259)

country flag Johanna Elmer wrote:

Hello, Could you kindly explain this? I am now at 204 sts and the body is 70 cm in length per the chart. I do not understand what this means or where to measure from: On next round switch to circular needle size 6 mm / US 10 and dec 32-32-36-40-44-48 sts evenly = 144-156-168-184-200-220 sts. REMEMBER THE GAUGE! When piece measures 42-43-44-45-46-47 cm / Please advice! Joha na

05.02.2023 - 00:36

DROPS Design answered:

Dear Johanna, The instructions you have indicated are worked on the round just after the rib. So, you cast on 204sts, work the rib 6 cm and then work the round with decreases (the rest of the round is worked in stocking stitch). Continue working in stocking stitch, without decreasing, until the body measures 44cm, where you will start casting off for the armholes. Happy knitting!

05.02.2023 - 23:23

country flag Nancy Scholl wrote:

I checked the gauge for a size small. It measures 96 cm at the hip and the directions say to cast on 176 sts. My calculations of 15sts/10cm result in 145 sts needing to be casted on. Please help me out.

15.01.2023 - 01:06

DROPS Design answered:

Dear Nancy, since we are going to work the rib, we cast on more stitches, so that the cast on edge is not too tight. Take into account that the 15sts/10 cm gauge is for the pattern in stocking stitch and not the rib and that you will decrease to 144 sts (more or less the amount stated by the gauge) the moment you change from rib to stocking stitch. Happy knitting!

15.01.2023 - 09:59

country flag Janelle Davey wrote:

I am struggling with where to change to working back and forth. I have just finished the round where I cast off for the neck and am ment to change to working back and forth where should this start, do I start it right after I cast off the 18sts for neck or at the start of next round

07.01.2023 - 19:22

DROPS Design answered:

Dear Mrs Davey, after you have cast off the middle stitches for neck on front piece, finish the row/round as before,then cut the yarn and join again just after the 18 sts cast off so that rows will now start from after these 18 sts and end before these 18 sts cast off. Happy knitting!

09.01.2023 - 09:28

country flag Betsy wrote:

Hi I have just finished row 11 of yoke /sleeve/neck dec,22 rows total after joining sleeves to body. The bound off bottom neck edge is centered perfectly, sleeves and raglans are equal stitch counts and symmetrical, back also. Yet I have only 2 stitches left between neck edge and raglan on the right side, 10 are left on the left side. Help! Ps I'm trying to get this done for Xmas, thank you

13.12.2022 - 02:07

DROPS Design answered:

Dear Betsy, check that you decreased the same number of times/stitches on both front piece, you might have skip some on the left side. Do not hesitate to show you work to your store (even with a picture per mai), it will be easier for them to help you looking at your knitting piece. Happy knitting!

13.12.2022 - 08:20

country flag Aurore wrote:

Bonjour, lors de la réhausse pour le col du modèle DROPS Extra 0-1159, il est dit de "tricoter comme avant", cela signifie en jersey simple, ou en jersey avec les diminitions et A.1 ? A combien de mailles doit on être rendu avant de faire la réhausse du col dos ? Merci par avance

03.12.2022 - 18:54

DROPS Design answered:

Bonjour Aurore, tricotez les mailles comme vous le faisiez auparavant, en jersey, avec les mailles de A.1 comme avant. Le nombre de mailles qui vous reste va dépendre de votre tension en hauteur, ce qui compte ici, ce sont bien les bonnes mesures plus que le nombre de mailles. Bon tricot!

06.12.2022 - 08:54

country flag Lyn O'Neill wrote:

Can you let me know what the sizes the pullover comes in...38", 40" 44" etc? Want to knit this for a friend who has a chest size of 48". Thanks a million. Lyn

02.11.2022 - 16:56

DROPS Design answered:

Dear Mrs O'Neill, the best way to find the best relevant size is to measure a garment he has and likes, then compare these measurements to those in the chart (convert into cm/inches here) - read more about charts here. Happy knitting!

03.11.2022 - 09:39

country flag Lennart wrote:

Hallöchen, verstehe ich das richtig, dass bei den Abnahmen für den Halsausschnitt auch in jeder 2. Reihe (Hinreihe) abgenommen wird? Weil auf dem Musterchart soeht es eher danach aus, als würde man jede 3. oder sogar 4. Reihe abnehmen? Viele Grüße Lennart

24.10.2022 - 08:11

DROPS Design answered:

Liebe Frau Lennart, die Abnahmen für den V-Halsauschnitt werden in jeder 2. Reihe = in jeder Hinreihe gestrickt, wie unter ABNAHMETIPP beschrieben, dh nach der Randmaschen am Anfang der Hinreihe + vor der Randmaschen am Ende der Hinreihe. Viel Spaß beim stricken!

24.10.2022 - 09:15

country flag Gro Sunne wrote:

Jeg har satt alle delene inn på en pine og strikket første runde med glattstrikk og mønster A1. Nå skal jeg begynne med raglansfelling. Under raulan står det 2 varianter. Skal jeg felle annen hver gang med 1 avsnitt og så andre neste gang sånn at det er annen hver gang?

12.10.2022 - 20:36

DROPS Design answered:

Hei Gro. Først feller du etter 1.avsnitt under RAGLAN. Gjenta fellingen til raglan på hver 2.omg/hver p fra retten 15-16-16-17-18-18 ganger til (= 8 m pr felling). Når du har felt det antall ganger i den str du strikker, så skal det felles 2 m på hver side av hver raglan(= 16 m pr felling). Gjenta fellingen 1-1-2-2-2-3 ganger til. Og da felles det etter 2.avsnitt under RAGLAN. mvh DROPS Design

17.10.2022 - 13:21

country flag Rachel Vincent wrote:

Hi - I'm really struggling once I put the sleeves on the same needle.. Am I right that with the decreasing, I should knit 32 rows in total (one decrease each side of A1 = 8 stitches and then one knit) or 16 rows in total (decreasing in all rows) before I get to the double decreases? Or is it 16 decreases (so only 2 rows with 8 decreases in each). How many stitches should I have for the 2nd size when I cast off 16 for the front opening? I'm a good knitter but I can't crack the instructions.

13.09.2022 - 09:54

DROPS Design answered:

Dear Rachel, you work 8 decreases in each row, one decrease on each side of A.1. You work the decreases every 2nd row (one row with decreases, next one is knitted, and repeat). So you work 32 rows in total. After decreasing 8 stitches 16 times, you have cast off 128 stitches. Happy knitting!

17.09.2022 - 16:37

country flag Victoria wrote:

I’m struggling to understand the neck decreases, where do I situate the garter stitch ridge? The instructions say “ bind off the middle 14-16-16-16-18-20 sts on front piece for neck. Then work piece back and forth and work edge st towards the neck in GARTER ST - see explanation above” So I start the garter ridge right before and after the stitches I’ve bound off? I am doing the second largest size, so I have to bind off 18 stitches. Is there a video that shows this?

12.04.2022 - 18:47

DROPS Design answered:

Dear Victoria, the stitch worked in garter stitch is the edge stitch, which is the outermost stitch, in the edge of the neck. Happy knitting!

14.04.2022 - 19:13