DROPS Big Merino
DROPS Big Merino
100% Wool
from 3.50 £ /50g
Get the yarn to make this pattern from 38.50£.

The yarn cost is calculated from the pattern’s smallest size and the yarn’s cheapest product type. Looking for an even better price? You might find it on the DROPS Deals!

DROPS SS24

Bon Soir

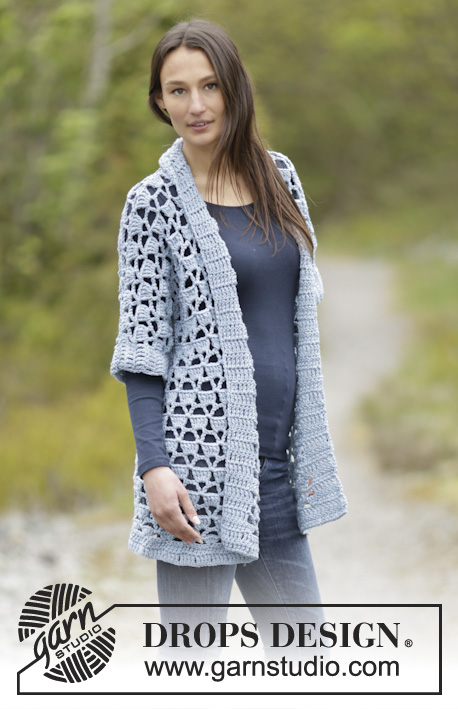
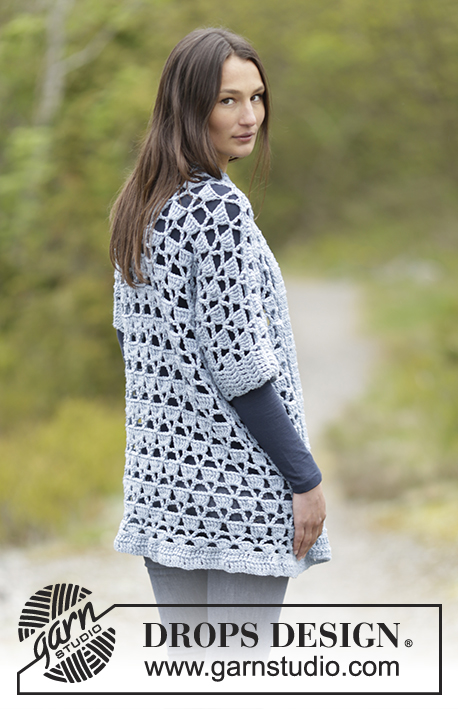
Crochet DROPS jacket with lace pattern and shawl collar in ”Big Merino”. Size: S - XXXL.

DROPS Extra 0-1153
DROPS design: Pattern no mb-022
Yarn group C or A + A
----------------------------------------------------------
Size: S - M - L - XL - XXL - XXXL
Materials:
DROPS BIG MERINO from Garnstudio
550-600-650-700-800-850 g colour no 06, forget-me-not

DROPS CROCHET HOOK SIZE 5.5 mm – or size needed to get 13 tr = width 10 cm, and to get A.2 (= 6 sts) = width 4.5 cm.

-------------------------------------------------------

Alternative Yarn – See how to change yarns here
Yarn Groups A to F – Use the same pattern and change the yarn here
Yarn usage using an alternative yarn – Use our yarn converter here

-------------------------------------------------------

DROPS Big Merino
DROPS Big Merino
100% Wool
from 3.50 £ /50g
Get the yarn to make this pattern from 38.50£.

The yarn cost is calculated from the pattern’s smallest size and the yarn’s cheapest product type. Looking for an even better price? You might find it on the DROPS Deals!

Pattern instructions

NOTE: This pattern is written in British English. All measurements in charts are in cm. For conversion from cm to inches - click here. There are different terms for crocheting in British and American English. If this pattern includes crochet, click for "crochet terms" here. For this pattern in American English, please click here.
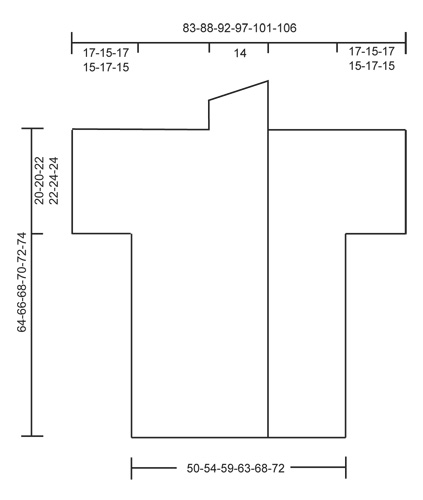
CROCHET INFO:
Replace first dtr at beg of every dtr row with 4 ch.

INCREASE TIP:
Work 2 dtr in same dtr

PATTERN:
See diagrams A.1 to A.3.
----------------------------------------------------------

BODY:
Worked back and forth. Work 164-177-193-207-223-235 ch (incl 4 ch to turn with) on hook size 5.5 mm with Big Merino. Turn and work 1 dtr in 5th ch from hook (= 2 dtr), 1 dtr in each of the next 4-2-3-2-3-5 ch, * skip 1 ch, 1 dtr in each of the next 4 dtr *, repeat from *-* the rest of row = 130-140-153-164-177-187 dtr.

Turn and work 1 dtr in every dtr - READ CROCHET INFO - while AT THE SAME TIME inc 10-12-11-12-11-13 dtr evenly - READ INCREASE TIP = 140-152-164-176-188-200 dtr. REMEMBER THE CROCHET TENSION!

Turn and work as follows from RS: Work 1 dtr in each of the first 7 dtr (= right band), A.2 (= 6 sts) 21-23-25-27-29-31 times in total, 1 dtr in each of the next 7 dtr (= left band). When A.2 has been worked 1 time vertically, repeat the rows in A.x and work band sts as before until finished measurements.

When piece measures approx. 44-46-46-48-48-50 cm - adjust according to 1st row in A.x, work next row from RS (= 2nd row in A.x) AT THE SAME TIME insert 1 marker in each side as follows:

SIZE S-L-XXL:
Work 7 band sts as before, A.2 5-6-7 times in total, insert 1 marker in last dtr in A.2 - see square in diagram (= right side), work A.2 11-13-15 times in total, insert 1 marker in last dtr in A.2 (= left side), work A.2 5-6-7 times in total, finish with 7 band sts as before.
Now work each front and back piece separately, cut the yarn.

SIZE M-XL-XXXL:
Work 7 band sts as before, A.2 6-7-8 times in total, insert 1 marker in last ch in A.2 - see star in diagram (= right side), work A.2 12-14-16 times in total, insert 1 marker in last ch in A.2 (= left side), work A.2 5-6-7 times in total, finish with 7 band sts as before.
Now work each front and back piece separately, cut the yarn.

BACK PIECE/SLEEVES:
Now work on body, beg from WS (= 3rd row in A.x) as follows: Work 23-21-23-21-23-21 LOOSE ch for left sleeve, A.3 0-1-0-1-0-1 time, A.2 11-11-13-13-15-15 times, A.3 0-1-0-1-0-1 time, finish with 22 LOOSE ch for right sleeve (different no of ch on left and right sleeve because of pattern).

Work next row from RS as follows: Remember CROCHET INFO! - (NOTE: Work first row in A.1- A.3 over ch) Work 1 dtr in each of the first 7 ch (= right sleeve edge), A.1 1-0-1-0-1-0 times in total, A.2 15-17-17-19-19-21 times in total, A.3 1-0-1-0-1-0-1 time in total, finish with 1 dtr in each of the last 7 ch (= left sleeve edge). Continue like this but continue to repeat A.x, and work 1 dtr in each of the 7 dtr in each side until finished measurements.

When piece measures 64-66-68-70-72-74 cm - adjust according to row from RS - the middle 3 repetitions of A.2 (= neck) are no longer worked. Work 1 row as before over sts for left shoulder. NOTE: Cut the yarn before working over the remaining sts for right shoulder.

RIGHT FRONT PIECE/SLEEVE:
Work 22 LOOSE ch for sleeve, then work to the end of body, beg from WS (= 3rd row in A.x) as follows: A.3 0-1-0-1-0-1 time, A.2 5-5-6-6-7-7 times, finish with 7 band sts as before.

Work next row from RS as follows: Remember CROCHET INFO! - (NOTE: Work first row in A.2/A.3 over ch) Work 1 dtr in each of the first 7 dtr (= band sts), A.2 7-8-8-9-9-10 times in total, A.3 1-0-1-0-1-0 times in total, finish with 1 dtr in each of the last 7 ch (= sleeve edge). Continue like this but continue to repeat A.x, and work 1 dtr in each of the 7 dtr in the side until finished measurements.

When piece measures 63-65-67-69-71-73 cm - adjust to finish with the same row as back piece (= from WS) the shoulder is done and work shawl collar over the first 13 sts.

SHAWL COLLAR:
Work shawl collar back and forth, beg from RS as follows: * Work 1 dtr in each of the first 7 dtr, 1 dtr in each of the next 6 dtr/ch, turn and work 1 dc in each of the first 2 dtr, 1 htr in each of the next 2 dtr, 1 tr in each of the next 2 dtr, 1 dtr in each of the next 7 dtr, turn *, repeat from *-* until piece measures approx. 8 cm on the most narrow part. Fasten off.

LEFT FRONT PIECE/SLEEVE:
Then work the body. Work as right piece but reversed. I.e. work A.1 instead of A.3 and reversed, work 23-21-23-21-23-21 ch for sleeve at the end of row from WS. Cut the yarn before working shawl collar over the first 13 tr/ch on row, beg from WS.

ASSEMBLY:
Place front piece on top of back piece and work the shoulders as follows: 1 dc through both layers, * 3 ch, 1 dc around next ch-space *, repeat from *-* along the entire shoulder. In sleeve edge skip 2 dtr before next dc. Work collar tog mid back as follows: 1 dc in every st. Work tog under sleeves as follows: * 1 dc in ch with dtr-group, 3 ch, 1 dc around next ch-space, 3 ch *, repeat from *-* under the entire sleeve - NOTE: In sleeve edge skip 2 dtr before next dc.

Diagram

symbols = ch
symbols = dtr in dtr/ch
symbols = dtr around ch/ch-space
symbols = 1 dtr/1 ch - row is explained in pattern
symbols = beg here
symbols = applies to division of body - explained in pattern
diagram
diagram
Do you have a question? See a list of frequently asked questions (FAQ)

Knitting tension is what determines the final measurements of your work, and is usually measured per 10 x 10 cm. It is provided like so: number of stitches in width x number of rows in height - eg: 19 stitches x 26 rows = 10 x 10 cm.

The knitting tension is very individual; some people knit/crochet loosely while others work tightly. You adjust the knitting tension with the needle size, which is why the suggested needle size is only meant as a guide! You need to adjust this (up or down) to ensure that YOUR knitting tension matches the knitting tension provided in the pattern. If you work with a different knitting tension than provided you will have a different yarn consumption, and your work will have different measurements than what the pattern suggests.

The knitting tension also determines which yarns can replace each other. As long as you achieve the same knitting tension you can replace one yarn with another.

See DROPS lesson: How to measure your tension/gauge

See DROPS video: How to make a gauge tension swatch

The required amount of yarn is provided in grams, eg: 450 g. To calculate how many balls you’ll need you first need to know how many grams are in 1 ball (25g, 50g or 100g). This information is available if you click on the individual yarn quality on our pages. Divide the amount required with the amount of each ball. For example, if each ball is 50g (the most common amount), the calculation will be as follows: 450 / 50 = 9 balls.

The important thing when changing from one yarn to another is that the knitting/crochet tension remains the same. This is so that the measurements of the finished piece will be the same as on the sketch provided. It is easier to achieve the same knitting tension using yarns from the same yarn group. It is also possible to work with multiple strands of a thinner yarn to achieve the knitting tension of a thicker one. Please try our yarn converter. We recommend you to always work a test swatch.

Please NOTE: when changing yarn the garment might have a different look and feel to the garment in the photo, due to individual properties and qualities of each yarn.

See DROPS lesson: Can I use a different yarn than the one mentioned in the pattern?

All our yarns are categorised into yarn groups (from A to F) according to thickness and knitting tension – group A contains the thinnest yarns and group F the thickest. This makes it easier for you to find alternative yarns to our patterns, should you wish to switch yarn. All yarns within the same group have a similar knitting tension and can easily replace each other. However, different yarn qualities have different structures and properties which will give the finished work a unique look and feel.

Click here for an overview of the yarns in each yarn group

At the top of all our patterns you’ll find a link to our yarn calculator, which is a helpful tool should you wish to use a different yarn than suggested. By filling in the yarn quality you wish to replace, the amount (in your size) and number of strands, the calculator will present good alternative yarns with the same knitting tension. Additionally it will tell you how much you’ll require in the new qualities and whether you’ll need to work with multiple strands. Most skeins are 50g (some are 25g or 100g).

If the pattern is worked with multiple colours, every colour will have to be calculated separately. Similarly, if the pattern is worked with several strands of different yarns (for example 1 strand Alpaca and 1 strand Kid-Silk) you will have to find alternatives for each, individually.

Click here to see our yarn calculator

Since different yarns have different qualities and textures we have chosen to keep the original yarn in our patterns. However, you can easily find options among our available qualities by using our yarn calculator, or simply pick a yarn from the same yarn group.

It is possible that some retailers still have discontinued yarns in stock, or that someone has a few skeins at home that they would like to find patterns for.

The yarn calculator will provide both alternative yarn as well as required amount in the new quality.

If you think it's hard to decide what size to make, it can be a good idea to measure a garment you own already and like the size of. Then you can pick the size by comparing those measures with the ones available in the pattern's size chart.

You'll find the size chart at the bottom of the pattern.

See DROPS lesson: How to read size chart

The needle size provided in the pattern serves only as a guide, the important thing is to follow the knitting tension. And since knitting tension is very individual, you will have to adjust the needle size to ensure that YOUR tension is the same as in the pattern – maybe you’ll have to adjust 1, or even 2 needle sizes, up or down to achieve the correct tension. For this, we recommend that you work test swatches.

Should you work with a different knitting tension than the one provided, the measurements of the finished garment might deviate from the measurement sketch.

See DROPS lesson: How to measure your tension/gauge

See DROPS video: How to make a tension/gauge swatch

Working a garment top-down provides more flexibility and room for personal adjustment. For example it is easier to try the garment on while working, as well as making adjustments to length of yoke and shoulder caps.

The instructions are carefully explaining every step, in the correct order. Diagrams are adjusted to the knitting direction and are worked as usual.

The diagram depicts all rows/rounds, and every stitch seen from the right side. It is read from bottom to top, from right to left. 1 square = 1 stitch.

When working back and forth, every other row is worked from the right side and every other row is worked from the wrong side. When working from the wrong side, the diagram will have to be worked reversed: from left to right, knit stitches are purled, purl stitches are knit etc.

When working in the round every round is worked from the right side and the diagram are worked from right to left on all rounds.

See DROPS lesson: How to read knitting diagrams

The diagram depicts all rows/rounds, and every stitch seen from the right side. It is worked from bottom to top, from right to left.

When working back and forth every other row is worked from the right side: from right to left and every other row is worked from the wrong side: from left to right.

When working in the round, every row in the diagram are worked from the right side, from right to left.

When working a circular diagram you start in the middle and work your way outwards, counter clockwise, row by row.

The rows usually start with a given number of chain stitches (equivalent to the height of the following stitch), this will either be depicted in the diagram or explained in the pattern.

See DROPS lesson: How to read crochet diagrams

Instructions for working several diagrams after each other on the same row/round, will often be written like so: “work A.1, A.2, A.3 a total of 0-0-2-3-4 times". This means you work A.1 once, then A.2 is worked once, and A.3 is repeated (in width) the number of times provided for your size – in this case like so: S = 0 times, M = 0 times, L=2 times, XL= 3 times and XXL = 4 times.

The diagrams are worked as usual: begin with the first row in A.1, then work the first row in A.2 etc.

See DROPS lesson: How to read knitting diagrams

See DROPS lesson: How to read crochet diagrams

The total width of the garment (from wrist-to-wrist) will be larger in the larger sizes, despite the actual sleeves being shorter. The larger sizes have longer sleeve caps and wider shoulders, so there will be a good fit in all sizes.

The measurement sketch/schematic drawing provides information regarding the full length of the garment. If it’s a jumper or a jacket the length is measured from the highest point on the shoulder closest to the neckline, and straight down to the bottom of the garment. It is NOT measured from the tip of shoulder. Similarly, the length of yoke is measured from the highest point on the shoulder and down to where yoke is split into body and sleeves.

On a jacket measures are never taken along bands, unless specifically stated. Always measure inside band stitches when measuring the length.

See DROPS lesson: How to read a schematic drawing

Diagrams are often repeated on the round or in height. 1 repeat is the diagram the way it appears in the pattern. If it says to work 5 repeats of A.1 in the round, then you work A.1 a total of 5 times after/next to each other in the round. If it says to work 2 repeats of A.1 vertically/in height you work the entire diagram once, then begin again at the start and work the entire diagram one more time.

Chain stitches are slightly narrower than other stitches and to avoid working the cast-on edge too tight, we simply chain more stitches to begin with. The stitch count will be adjusted on the following row to fit the pattern and measurement sketch.

The rib edge is more elastic and will contract slightly compared to, for example, stocking stitch. By increasing before the rib edge, you avoid a visible difference in width between the rib edge and the rest of the body.

It’s very easy to cast off too tightly, and by making yarn overs while casting off (and simultaneously casting these off) you avoid a too tight cast off edge.

See DROPS video: How to bind off with yarn overs (yo)

To achieve an even increase (or decrease) you can increase on, for example: every 3rd and 4th row alternately, like so: work 2 rows and increase on the 3rd row, work 3 rows and increase on the 4th. Repeat this until the increase is complete.

See DROPS lesson: Increase or decrease 1 st on every 3rd and 4th row alternately

Should you prefer to work in the round instead of back and forth, you may of course adjust the pattern. You’ll need to add steeks mid-front (usually 5 stitches), and follow the instructions. When you would normally turn and work from the wrong side, simply work across the steek and continue in the round. At the end you’ll cut the piece open, pick up stitches to work bands, and cover the cut edges.

See DROPS video: How to knit steeks and cut open

Should you prefer to work back and forth instead of in the round, you may of course adjust the pattern so you work the pieces separately and then assemble them at the end. Divide the stitches for the body in 2, add 1 edge stitch in each side (for sewing) and work the front and back pieces separately.

See DROPS lesson: Can I adapt a pattern for circular needles into straight needles?

Pattern repeats can vary slightly in the different sizes, in order to get the correct proportions. If you’re not working the exact same size as the garment in the photo, yours might deviate slightly. This has been carefully developed and adjusted so that the complete impression of the garment is the same in all sizes.

Make sure to follow instructions and diagrams for your size!

If you have found a pattern you like which is available in women’s size it’s not very difficult to convert it to men’s size. The biggest difference will be the length of sleeves and body. Start working on the women size that you think would fit across the chest. The additional length will be worked right before you cast off for the armhole/sleeve cap. If the pattern is worked top-down you can add the length right after the armhole or before the first decrease on sleeve.

Regarding additional yarn amount, this will depend on how much length you add, but it is better with a skein too many than too few.

All yarns will have excess fibres (from production) that might come off as lint or shedding. Brushed yarns (ie hairier yarns) have more of these loose, excess fibres, causing more shedding.

Shedding also depends on what is worn under or over the garment, and whether this pulls at the yarn fibres. It’s therefore not possible to guarantee that there will be no shedding

Below are some tips on how to get the best result when working with hairier yarns:

1. When the garment is finished (before you wash it) shake it vigorously so the looser hairs come off. NOTE: do NOT use a lint roller, brush or any method that pulls at the yarn.

2. Place the garment in a plastic bag and put it in your freezer - the temperature will cause the fibres to become less attached to each other, and excess fibres will come off easier.

3. Leave in the freezer for a few hours before taking it out and shaking it again.

4. Wash the garment according to the instructions on the yarn label.

Pilling is a natural process that happens to even the most exclusive of fibers. It's a natural sign of wear and tear that is hard to avoid, and that is most visible in high friction areas of your garment like a sweater's arms and cuffs.

You can make your garment look as new by removing the pilling, using a fabric comb or a pill/lint remover.

Still can't find the answer you need? Then scroll down and leave your question so one of our experts can try to help you. This will be done normally within 5 to 10 working days.
In the meantime, you can read the questions and answers that others have left to this pattern or join the DROPS Workshop on Facebook to get help from fellow knitters/crocheters!

You might also like...

Post a comment to pattern DROPS Extra 0-1153

We would love to hear what you have to say about this pattern!

If you want to leave a question, please make sure you select the correct category in the form below, to speed up the answering process. Required fields are marked *.

Comments / Questions (6)

country flag Boisson Elena wrote:

Bonjour. Les explications a partir de DOS/MANCHES ne sont pas claires. Comment et dans quel endroit integrer les ml? Avez vous des photos intermediaires de l'ouvrage sur les quels on peut voir la configuration de l'ouvrage avant l'assamblage? J'ai achetė la laine sur ce site et je n'ai pas de magasin au tour de chez moi pour me consulter comment continuer a crocheter. Merci.

20.10.2019 - 22:27

DROPS Design answered:

Bonjour Mme Boisson, vous crochetez maintenant les manches, vous avez coupé votre fil et montez maintenant 21-23 mailles en l'air (cf taille) pour la manche gauche, crochetez le rang suivant sur les mailles du dos comme avant (A.3, A.2, A.3) et terminez en montant 22 mailles en l'air, tournez et crochetez sur l'endroit dans les mailles en l'air de la manche droite, au-dessus du dos, et dans les mailles en l'air de la manche gauche. Le motif doit continuer, et on a 7 DB de chaque côté pour la bordure des manches. Bon crochet!

21.10.2019 - 11:41

country flag Kamila P wrote:

Dobrý den,\r\nJsem cca v půlce práce, ale neumím si teď schematicky představit, jak bude celá práce vypadat. \r\nChápu správně, že \"TRUP\" a \"ZADNI DIL/RUKAVY\" je jeden kus. A pote \"PRAVY PREDNI DIL/RUKAV\" a \"LEVY PREDNI DIL/RUKAV\" jsou dalsi dve casti? \r\nNemate prosim nakres kusu zvlast? \r\nDekuji.

20.09.2019 - 14:52

DROPS Design answered:

Dobrý den, Kamilo, nejprve háčkujeme všechny díly dohromady jako jeden kus, až dojdeme k průramkům. Tam oddělíme záda (zadní díl/trup) a oba přední díly. Přidáme oka pro rukávy a jednotlivé díly postupně doháčkujeme k rameni. Sešívat/sháčkovávat nakonec budeme náramenice, dolní hranu rukávů a podpaží. Hodně zdaru! Hana

06.12.2019 - 18:10

country flag Hilde wrote:

Hallo.. Ik heb de toer met de steek markeerders gehaakt. Nu moet is verder met het achterpand/mouwen. Je begint met de lossen. Waar haak ik deze vast. Aan het begin van de toer? Of begin ik bij de steekmarkeerder? Ga ik dan verder haken tot de juiste lengte? Dan de steken overslaan voor de hals en dan weer aanhechten aan de rechterkant die af haken en weer aanhechten aan de linker kant? Volgens mij ga ik ergens fout.. misschien kunnen jullie mij op weg helpen?Alvast bedank. groetjes hilde.

26.02.2018 - 19:53

DROPS Design answered:

Hallo Hilde, Je haakt inderdaad eerst lossen en hier doe je verder niks mee, dan begin je op het pand, dus bij de markeerdraad en aan het eind haak je ook weer lossen. Dan keer je en haakje over de lossen (dit wordt de mouw) dan over het pand en dan weer over de lossen (dit wordt de andere mouw)

04.03.2018 - 19:46

country flag Elke Giesen wrote:

Hallo, ich habe Schwierigkeiten mit den Ärmel im Vorderteil, wo und wie ich sie mit den Luftmaschen anhäkeln muss. Besteht da die Möglichkeit ein kurzes Video zu erstellen ? Wäre super. Ich stricke und häkel vieles von ihren Anleitungen, hatte bisher , wenn Fragen waren, immer Antwort gefunden, Nur leider zu dieser Anleitung nicht. Mit freundlichen Grüßen Elke Giesen

20.05.2017 - 07:18

DROPS Design answered:

Liebe Frau Giesen, hier finden Sie mit Fotos wie man die Ärmel häkeln wird, das Tutorial wurde für ein anderes Modell gemacht, aber die Technik ist dieselbe. Viel Spaß beim häkeln!

22.05.2017 - 08:45

country flag Linh Khuu wrote:

I really love this pattern, can you help me step by step ? My English is poor thank you very much?

03.02.2017 - 21:06

DROPS Design answered:

Dear Mrs Linh Khuu, for any personnal assistance please feel free to contact the store where you bought your yarn, find DROPS retailers in Canada here. Happy crocheting!

06.02.2017 - 13:39

Claudia wrote:

Hello, I'm working on this beautiful pattern but I find it somehow difficult to follow. When the pattern says "back piece/sleeves" I understand that what is tied is the central is just the repetition of pattern A.2,11 times + 2 times on the sleeves (instead of 15), correct? Plus, when I start working on the right sleeve, the pattern says to work on 23 ch sts: do they include the 4 ch sts to replace the first dtr? Thank you very much, Claudia

14.11.2016 - 11:22

DROPS Design answered:

Dear Claudia, when working back/sleeves, you start 1st row there with a new chain (= 23 ch in your size) for left sleeve, then work as explained over back piece, and finish with 22 ch for right sleeve, then work next row as stated, replace 1st st at beg of row as before (not included in the 22 ch). Happy crocheting!

14.11.2016 - 11:35