DROPS Cotton Merino
DROPS Cotton Merino
50% Wool, 50% Cotton
from 4.45 $ /50g
Get the yarn to make this pattern from 17.80$.

The yarn cost is calculated from the pattern’s smallest size and the yarn’s cheapest product type. Looking for an even better price? You might find it on the DROPS Deals!

DROPS SS24

Clever Clark Cardigan

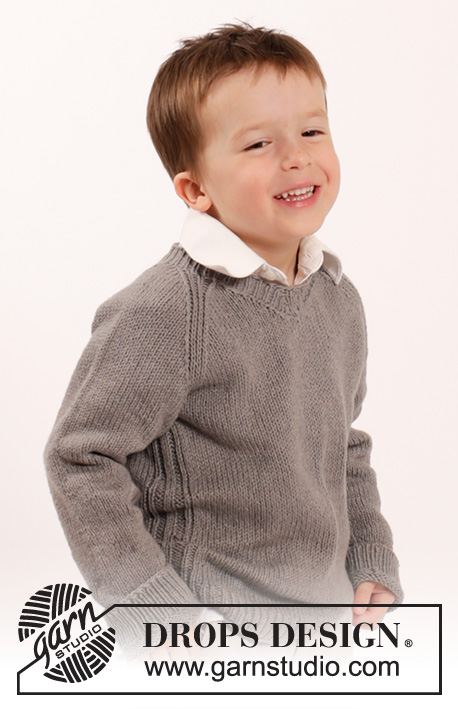
Knitted DROPS jacket with raglan and textured pattern in ”Cotton Merino”. Size 1-10 years

DROPS Extra 0-1143
DROPS design: Pattern no cm-004-bn
Yarn group B
----------------------------------------------------------
Size: (12/18) months 2 - 3/4 - 5/6 - 7/8 - 9/10 years

Materials:
DROPS COTTON MERINO from Garnstudio
(200) 250-250-250-300-350 g color no 15, mustard

DROPS DOUBLE POINTED NEEDLES AND CIRCULAR NEEDLE (60 or 80 cm / 24" or 32") SIZE 4 mm/US 6 - or size needed to get 21 sts x 28 rows in stockinette st = 4" x 4" (10 x 10 cm).
DROPS DOUBLE POINTED NEEDLES and CIRCULAR NEEDLE (60 or 80 cm / 24" or 32") SIZE 3 mm/US 2.5 - for edge in garter st.
DROPS BUTTON ARCHED (white), NO 521: 8 pieces in all sizes

-------------------------------------------------------

Alternative Yarn – See how to change yarns here
Yarn Groups A to F – Use the same pattern and change the yarn here
Yarn usage using an alternative yarn – Use our yarn converter here

-------------------------------------------------------

DROPS Cotton Merino
DROPS Cotton Merino
50% Wool, 50% Cotton
from 4.45 $ /50g
Get the yarn to make this pattern from 17.80$.

The yarn cost is calculated from the pattern’s smallest size and the yarn’s cheapest product type. Looking for an even better price? You might find it on the DROPS Deals!

Pattern instructions

NOTE: This pattern is written in American English. All measurements in charts are in cm. For conversion from inches to cm - click here. There are different terms for crocheting in American and British English. If this pattern includes crochet, click for "crochet terms" here. For this pattern in British English, please click here.
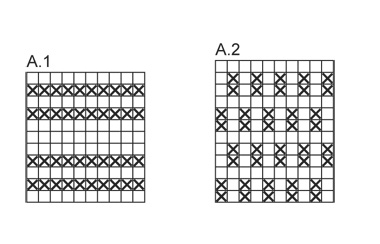
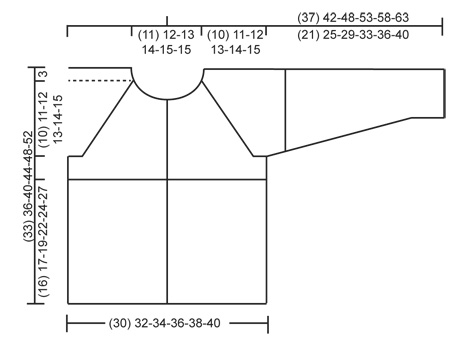
GARTER ST (back and forth):
K all rows. 1 ridge = K2 rows.

GARTER ST (worked in the round):
1 ridge = 2 rounds. * K 1 round and P 1 round *, repeat from *-*.

BUTTONHOLES:
Dec for buttonholes on left band. 1 buttonhole = make 1 YO when 4 sts remain on needle, K the next 2 sts tog and finish with 2 K. Dec for buttonholes when piece measures:
SIZE 12/18 MONTHS: 2, 6, 10, 14, 18, 22, 26 and 29 cm / ¾",2½",4",5½",7",8¾",10¼",11½".
SIZE 2 YEARS: 2, 6, 10, 14, 18, 22, 26 and 31 cm / ¾",2½",4",5½",7",8¾",10¼",12¼".
SIZE 3/4 YEARS: 2, 7, 12, 17, 22, 27, 31 and 35 cm /
3/4",2¾",4¾",6¾",8¾",10½",12¼",13¾".
SIZE 5/6 YEARS: 2, 7, 12, 17, 22, 27, 33 and 39 cm /
3/4",2¾",4¾",6¾",8¾",10½",13",15¼".
SIZE 7/8 YEARS: 2, 8, 14, 20, 26, 32, 37 and 42 cm /
3/4",3",5½",8",10¼",12½",14½",16½".
SIZE 9/10 YEARS: 2, 8, 14, 20, 26, 32, 39 and 46 cm / ¾",3",5½",8",10¼",12½",15¼",18.

PATTERN:
See diagrams A.1 and A.2. The diagrams show all rows in pattern seen from RS.

RAGLAN:
Dec for raglan in every transition between sleeves and body.
FROM RS:
Beg 2 sts before marker, K 2 tog, slip 1 st as if to K, K 1, psso (= 2 sts dec).
FROM WS:
Beg 2 sts before marker, P 2 twisted tog, P 2 tog (= 2 sts dec).
----------------------------------------------------------

BODY:
Worked back and forth on circular needle from mid front.
Cast on (135) 143-151-159-167-179 sts (includes 5 band sts in each side towards mid front) on circular needle size 3 mm / US 2.5 with Cotton Merino. Work 2 ridges in GARTER ST - see explanation above. Switch to circular needle size 4 mm / US 6 and work in stockinette st with 5 band sts in garter st in each side towards mid front. REMEMBER THE KNITTING GAUGE and REMEMBER BUTTONHOLES on left band - see explanation above. When piece measures (16) 17-19-22-24-27 cm / (6¼") 6¾"-7½"-8¾"-9½"-10½", work pattern according to diagram A.1 (continue bands as before). When A.1 has been worked, work pattern according to diagram A.2 (continue bands as before). When piece measures (20) 22-25-28-31-34 cm / (8") 8¾"-9¾"-11"-12¼"-13½", work next row from WS as follows: Work (33) 35-37-39-41-44 sts (= left front piece), bind off 6 sts for armhole, work (57) 61-65-69-73-79 sts (= back piece), bind off 6 sts for armhole and work the last (33) 35-37-39-41-44 sts (= right front piece). Put piece aside and knit the sleeves.

INCREASE TIP:
Work until there is 1 stitch left before the marker thread, 1 yarn over, knit 2 (marker thread sits between these 2 stitches), 1 yarn over. On the next round knit the yarn overs twisted to avoid holes. Then work the new stitches in stockinette stitch.

SLEEVE:
Worked in the round on double pointed needles.
Cast on (34) 36-38-38-40-40 sts on double pointed needles size 3 mm / US 2.5 with Cotton Merino. Work 2 ridges in GARTER ST - see explanation above. Add a marker thread at the beginning of the round (= mid under sleeve). Switch to double pointed needles size 4 mm / US 6 and work in stockinette st. When piece measures (6) 6-7-6-7-7 cm / (2½") 2½"-2¾"-2½"-2¾"-2¾" , inc 2 sts mid under sleeve - read INCREASE TIP. Repeat inc every (1½) 2-2-2-2-2 cm / (½") ¾"-¾"-¾"-¾"-¾" (9) 9-10-13-14-16 times in total = (52) 54-58-64-68-72 sts. AT THE SAME TIME when piece measures (17) 20-23-27-29-33 cm / (6¾") 8"-9"-10½"-11½"-13", work pattern in the round according to diagram A.1. When A.1 has been worked, work pattern in the round according to diagram A.2. AT THE SAME TIME when piece measures (21) 25-29-33-36-40 cm / (8¼") 9¾"-11½"-13"-14¼"-15¾" (adjust finish on same row in diagram as on body), bind off the middle 6 sts under sleeve = (46) 48-52-58-62-66 sts. Put piece aside and make another sleeve.

YOKE:
Slip sleeves on to same circular needle as body where armholes were bound off (without working them first) = (215) 227-243-263-279-299 sts. Insert 1 marker in all transitions between sleeves and body piece = 4 markers.
READ ALL OF THE FOLLOWING SECTION BEFORE CONTINUING!

RAGLAN: Continue pattern as before over all sts with 5 band sts in garter st in each side towards mid front. AT THE SAME TIME on 1st row from RS dec for RAGLAN – see explanation above (= 8 sts dec). Repeat dec every other row (i.e. every row from RS) (13) 14-16-15-17-17 times in total and then every row (i.e. both from RS and WS) (3) 3-3-7-7-9 times in total.

NECK: AT THE SAME TIME when piece measures (29) 31-35-39-42-46 cm / (11½") 12¼"-13¾"-15¼"-16½"-18", slip the outermost (13) 13-12-11-9-10 sts in each side towards mid front on 1 stitch holder for neck (work them before slipping them on 1 stitch holder). Continue to bind off for neckline at beg of every row in each side as follows: bind off 2 sts (1) 1-1-1-2-2 times and 1 st (0) 1-2-2-2-2 times.

After all dec for raglan and bind offs for neck, (57) 59-59-57-57-59 sts remain on needle and piece measures approx. (33) 36-40-44-48-52 cm / (13") 14¼"-15¾"-17¼"19"-20½" up to shoulder.

NECK EDGE: Pick up from RS approx. 86 to 96 sts around the neck (includes sts on stitch holders at the front) on circular needle size 3 mm / US 2.5 with Cotton Merino. K 1 row from WS while dec evenly to (70) 76-82-86-90-90 sts - do not dec over bands. K 1 row from RS and K 1 row from WS before binding off with K from RS.

ASSEMBLY:
Sew the openings under the sleeves. Sew on buttons.

Diagram

All measurements in charts are in cm.

symbols = K from RS, P from WS
symbols = P from RS, K from WS
diagram
diagram

Each of our patterns has specific tutorial videos to help you.

Do you have a question? See a list of frequently asked questions (FAQ)

Knitting tension is what determines the final measurements of your work, and is usually measured per 10 x 10 cm. It is provided like so: number of stitches in width x number of rows in height - eg: 19 stitches x 26 rows = 10 x 10 cm.

The knitting tension is very individual; some people knit/crochet loosely while others work tightly. You adjust the knitting tension with the needle size, which is why the suggested needle size only serve as a guide! You need to adjust this (up or down) to ensure that YOUR knitting tension matches the knitting tension provided in the pattern. If you work with a different knitting tension than provided you will have a different yarn consumption, and your work will have different measurements than what the pattern suggests.

The knitting tension also determines which yarns can replace each other. As long as you achieve the same knitting tension you can replace one yarn with another.

See DROPS lesson: How to measure your tension/gauge

See DROPS video: How to make a gauge tension swatch

The required amount of yarn is provided in grams, eg: 450 g. To calculate how many balls you’ll need you first need to know how many grams are in 1 ball (25g, 50g or 100g). This information is available if you click on the individual yarn quality on our pages. Divide the amount required with the amount of each ball. For example, if each ball is 50g (the most common amount), the calculation will be as follows: 450 / 50 = 9 balls.

The important thing when changing from one yarn to another is that the knitting/crochet tension remains the same. This is so that the measurements of the finished piece will be the same as on the sketch provided. It is easier to achieve the same knitting tension using yarns from the same yarn group. It is also possible to work with multiple strands of a thinner yarn to achieve the knitting tension of a thicker one. Please try our yarn converter. We recommend you to always work a test swatch.

Please NOTE: when changing yarn the garment might have a different look and feel to the garment in the photo, due to individual properties and qualities of each yarn.

See DROPS lesson: Can I use a different yarn than the one mentioned in the pattern?

All our yarns are categorised into yarn groups (from A to F) according to thickness and knitting tension – group A contains the thinnest yarns and group F the thickest. This makes it easier for you to find alternative yarns to our patterns, should you wish to switch yarn. All yarns within the same group have a similar knitting tension and can easily replace each other. However, different yarn qualities have different structures and properties which will give the finished work a unique look and feel.

Click here for an overview of the yarns in each yarn group

At the top of all our patterns you’ll find a link to our yarn converter, which is a helpful tool should you wish to use a different yarn than suggested. By filling in the yarn quality you wish to replace, the amount (in your size) and number of strands, the converter will present good alternative yarns with the same knitting tension. Additionally it will tell you how much you’ll require in the new qualities and whether you’ll need to work with multiple strands. Most skeins are 50g (some are 25g or 100g).

If the pattern is worked with multiple colours, every colour will have to be converted separately. Similarly, if the pattern is worked with several strands of different yarns (for example 1 strand Alpaca and 1 strand Kid-Silk) you will have to find alternatives for each, individually.

Click here to see our yarn converter

Since different yarns have different qualities and textures we have chosen to keep the original yarn in our patterns. However, you can easily find options among our available qualities by using our yarn converter, or simply pick a yarn from the same yarn group.

It is possible that some retailers still have discontinued yarns in stock, or that someone has a few skeins at home that they would like to find patterns for.

The yarn converter will provide both alternative yarn as well as required amount in the new quality.

If you think it's hard to decide what size to make, it can be a good idea to measure a garment you own already and like the size of. Then you can pick the size by comparing those measures with the ones available in the pattern's size chart.

You'll find the size chart at the bottom of the pattern.

See DROPS lesson: How to read size chart

The needle size provided in the pattern serves only as a guide, the important thing is to follow the knitting tension. And since knitting tension is very individual, you will have to adjust the needle size to ensure that YOUR tension is the same as in the pattern – maybe you’ll have to adjust 1, or even 2 needle sizes, up or down to achieve the correct tension. For this, we recommend that you work test swatches.

Should you work with a different knitting tension than the one provided, the measurements of the finished garment might deviate from the measurement sketch.

See DROPS lesson: How to measure your tension/gauge

See DROPS video: How to make a gauge tension swatch

Working a garment top-down provides more flexibility and room for personal adjustment. For example it is easier to try the garment on while working, as well as making adjustments to length of yoke and shoulder caps.

The instructions are carefully explaining every step, in the correct order. Diagrams are adjusted to the knitting direction and are worked as usual.

The diagram depicts all rows/rounds, and every stitch seen from the right side. It is read from bottom to top, from right to left. 1 square = 1 stitch.

When working back and forth, every other row is worked from the right side and every other row is worked from the wrong side. When working from the wrong side, the diagram will have to be worked reversed: from left to right, knit stitches are purled, purl stitches are knit etc.

When working in the round every round is worked from the right side and the diagram are worked from right to left on all rounds.

See DROPS lesson: How to read knitting diagrams

The diagram depicts all rows/rounds, and every stitch seen from the right side. It is worked from bottom to top, from right to left.

When working back and forth every other row is worked from the right side: from right to left and every other row is worked from the wrong side: from left to right.

When working in the round, every row in the diagram are worked from the right side, from right to left.

When working a circular diagram you start in the middle and work your way outwards, counter clockwise, row by row.

The rows usually start with a given number of chain stitches (equivalent to the height of the following stitch), this will either be depicted in the diagram or explained in the pattern.

See DROPS lesson: How to read crochet diagrams

Instructions for working several diagrams after each other on the same row/round, will often be written like so: “work A.1, A.2, A.3 a total of 0-0-2-3-4 times". This means you work A.1 once, then A.2 is worked once, and A.3 is repeated (in width) the number of times provided for your size – in this case like so: S = 0 times, M = 0 times, L=2 times, XL= 3 times and XXL = 4 times.

The diagrams are worked as usual: begin with the first row in A.1, then work the first row in A.2 etc.

See DROPS lesson: How to read knitting diagrams

See DROPS lesson: How to read crochet diagrams

The total width of the garment (from wrist-to-wrist) will be larger in the larger sizes, despite the actual sleeves being shorter. The larger sizes have longer sleeve caps and wider shoulders, so there will be a good fit in all sizes.

The measurement sketch/schematic drawing provides information regarding the full length of the garment. If it’s a jumper or a jacket the length is measured from the highest point on the shoulder (usually closest to the neckline), and straight down to the bottom of the garment. It is NOT measured from the tip of shoulder. Similarly, the length of yoke is measured from the highest point on the shoulder and down to where yoke is split into body and sleeves.

See DROPS lesson: How to read a schematic drawing

Diagrams are often repeated on the round or in height. 1 repeat is the diagram the way it appears in the pattern. If it says to work 5 repeats of A.1 in the round, then you work A.1 a total of 5 times after/next to each other in the round. If it says to work 2 repeats of A.1 vertically/in height you work the entire diagram once, then begin again at the start and work the entire diagram one more time.

Chain stitches are slightly narrower than other stitches and to avoid working the cast-on edge too tight, we simply chain more stitches to begin with. The stitch count will be adjusted on the following row to fit the pattern and measurement sketch.

The rib edge is more elastic and will contract slightly compared to, for example, stocking stitch. By increasing before the rib edge, you avoid a visible difference in width between the rib edge and the rest of the body.

It’s very easy to cast off too tightly, and by making yarn overs while casting off (and simultaneously casting these off) you avoid a too tight cast off edge.

See DROPS video: How to bind off with yarn overs (yo)

To achieve an even increase (or decrease) you can increase on, for example: every 3rd and 4th row alternately, like so: work 2 rows and increase on the 3rd row, work 3 rows and increase on the 4th. Repeat this until the increase is complete.

See DROPS lesson: Increase or decrease 1 st on every 3rd and 4th row alternately

Should you prefer to work in the round instead of back and forth, you may of course adjust the pattern. You’ll need to add steeks mid-front (usually 5 stitches), and follow the instructions. When you would normally turn and work from the wrong side, simply work across the steek and continue in the round. At the end you’ll cut the piece open, pick up stitches to work bands, and cover the cut edges.

See DROPS video: How to knit steeks and cut open

Should you prefer to work back and forth instead of in the round, you may of course adjust the pattern so you work the pieces separately and then assemble them at the end. Divide the stitches for the body in 2, add 1 edge stitch in each side (for sewing) and work the front and back pieces separately.

See DROPS lesson: Can I adapt a pattern for circular needles into straight needles?

Pattern repeats can vary slightly in the different sizes, in order to get the correct proportions. If you’re not working the exact same size as the garment in the photo, yours might deviate slightly. This has been carefully developed and adjusted so that the complete impression of the garment is the same in all sizes.

Make sure to follow instructions and diagrams for your size!

If you have found a pattern you like which is available in women’s size it’s not very difficult to convert it to men’s size. The biggest difference will be the length of sleeves and body. Start working on the women size that you think would fit across the chest. The additional length will be worked right before you cast off for the armhole/sleeve cap. If the pattern is worked top-down you can add the length right after the armhole or before the first decrease on sleeve.

Regarding additional yarn amount, this will depend on how much length you add, but it is better with a skein too many than too few.

All yarns will have excess fibres (from production) that might come off as lint or shedding. Brushed yarns (ie hairier yarns) have more of these loose, excess fibres, causing more shedding.

Shedding also depends on what is worn under or over the garment, and whether this pulls at the yarn fibres. It’s therefore not possible to guarantee that there will be no shedding

Below are some tips on how to get the best result when working with hairier yarns:

1. When the garment is finished (before you wash it) shake it vigorously so the looser hairs come off. NOTE: do NOT use a lint roller, brush or any method that pulls at the yarn.

2. Place the garment in a plastic bag and put it in your freezer - the temperature will cause the fibres to become less attached to each other, and excess fibres will come off easier.

3. Leave in the freezer for a few hours before taking it out and shaking it again.

4. Wash the garment according to the instructions on the yarn label.

Pilling is a natural process that happens to even the most exclusive of fibers. It's a natural sign of wear and tear that is hard to avoid, and that is most visible in high friction areas of your garment like a sweater's arms and cuffs.

You can make your garment look as new by removing the pilling, using a fabric comb or a pill/lint remover.

Still can't find the answer you need? Then scroll down and leave your question so one of our experts can try to help you. This will be done normally within 5 to 10 working days.
In the meantime, you can read the questions and answers that others have left to this pattern or join the DROPS Workshop on Facebook to get help from fellow knitters/crocheters!

You might also like...

Post a comment to pattern DROPS Extra 0-1143

We would love to hear what you have to say about this pattern!

If you want to leave a question, please make sure you select the correct category in the form below, to speed up the answering process. Required fields are marked *.

Comments / Questions (31)

country flag Louise wrote:

I am really struggling with this pattern. The numbers don’t match up and I’m left with an enormous baggy neckline. I followed the pattern at every point. Very disappointed

29.03.2020 - 16:31

country flag Leonie wrote:

Patroon A1 bestaat uit 11 naalden dus de 1e naald van A2 begin ik aan de averechte kant klopt dit. De 3e naald in A2 wordt de ene keer aan de goede kant gebreid en de andere keer aan de averechte kant gebreid in het voor-achter en linkervoorpand. Bij de mouwen wordt in de rondte gebreid dus hier spreekt het vanzelf. Hoe moet ik dat zien voor het lijf.

27.09.2019 - 18:03

DROPS Design answered:

Dag Leonie,

Het klopt inderdaad precies zoals je zegt; omdat het patroon zich een oneven aantal naalden in de hoogte herhaalt, brei je de ene keer de 3e naald (in A.2) recht, en de andere keer de 3e naald averecht op het lijf. Vandaar dat ook staat aangegeven hoe je steken op de verkeerde kant en de goed kant van het werk moet breien.

29.09.2019 - 18:10

country flag Inga Sandorff wrote:

Forstår ikke rigtig raglan indtagning i Clever Clark designJeg kan kun få det til 4 m indtagning og i opskriften står der 8mHvad gør jeg forkert? mvh Inga

20.09.2019 - 15:12

DROPS Design answered:

Hei Inga. Du har 4 overganger mellom erme og bol og det skal felles til raglan på hver siden av hver overgang. Altså 2 fellinger på hver overgang = 8 fellinger. God Fornøyelse!

23.09.2019 - 14:02

country flag Eva-Marie Wulff wrote:

Hej!\r\nJag har stickat minsta stl o har 135 m när jag ska dela för ärmhål blir antalet maskor 123=33+57+33, vad är fel?

08.06.2019 - 14:40

DROPS Design answered:

Hej. Du maskar av 6 maskor för varje ärmhål som du missat att räkna med. 33+6 (avmaskas)+57+6 (avmaskas)+33 = 135 maskor. Lycka till!

10.06.2019 - 14:24

country flag MLuz Martin Lorenzo wrote:

Me pueden explicar con más detalle como hacer los aumentos de la manga? Se hace un aumento en dos puntos seguidos o se deja alguno entre aumento y aumento? Muchas gracias

23.03.2019 - 22:24

DROPS Design answered:

Hola MLuz. Como no se especifica en el modelo, los aumentos los puedes trabajar, por ejemplo, según este vídeo:

24.03.2019 - 20:19

country flag Maria wrote:

Ciao ho iniziato questo modello sono arrivata allo scollo, ma non ho capito come andare avanti, o meglio non capisco oltre alle diminuzioni dello scollo vanno continuate le diminuzioni per il raglan? Perché io quelle le avrei già diminuite tutte, ma non mi trovo col numero di maglie. Avrò sbagliato qualcosa?Grazie in anticipo

06.12.2018 - 12:50

DROPS Design answered:

Buongiorno Maria, se ha già finito le diminuzioni per il raglan, non deve continuarle, ma solo diminuire per lo scollo. Ad esempio per la taglia 12/18 mesi parte con 215 maglie, con le diminuzioni del raglan diminuisce 8 maglie per 16 volte in tutto, quindi 215-128=87, poi mette in sospeso 13 maglie per lato, quindi 87-26=61 e poi intreccia 2 maglie per lato per una volta per lo scollo, quindi 61-4=57. Può ripeterd questo calcolo usando le altre taglie. Ci riscriva se ha ancora problemi. Buon lavoro!

06.12.2018 - 14:04

country flag Christina Persson wrote:

Den angivna mängden garn stämmer inte för storlek 7/8. Jag har använt ett annat garn cotton light men tagit hänsyn till antalet meter/nystan. Enl. beskrivningen går det åt 6 nystan cotton merino (som ligger på 110 cm) vilket ger 660 cm. I ett nystan cotton light finns 105 cm. Alltså köpte jag 7 nystan som ger 735 cm. Det borde alltså räckt med råge - men icke. Nystanet jag tvingats köpa till har ett annat färgbad. Totalt misslyckat.

24.01.2018 - 18:41

country flag Piamargareta wrote:

Hej! Funderar över samma sak som Sarah, stl 5/6. Det skulle underlätta om ni uppger hur många maskor som ska vara kvar på stickan när raglanavmaskningen avslutas och även vid de olika avmaskningarna vid halsen. Får inte riktigt ihop det. Mycket tacksam för era snabba svar.

16.11.2016 - 12:02

DROPS Design answered:

Hej Pia. Du kan udregne det som fölger. Du starter med 263 m og har 4 merketraade. Du tager 2 m ind paa hver side af hvert merke = 8 m. Du gentager i alt 15+7 gange = 22x8 m = 176 m mindre. Derudover tager du ind til halsen: 11 m i hver side og lukker af i hver side 4 + 4 m = 30 m mindre. Dvs, 263-176-30 = 57 m tilbage.

17.11.2016 - 13:37

country flag Mamynette wrote:

Bonjour, Sur ce modèle, j'aimerai savoir comment raccorder les manches au dos et aux devants. Si je comprends bien, il faut repartir sur l'endroit du tricot, tricoter les 37 premières mailles, glisser les manches sans les tricoter, tricoter les 65 mailles du dos, glisser les mailles des manches et tricoter les 37 mailles du devant. On fait un rang envers sur toutes les mailles et on commence le raglan sur le rang suivant. Est-ce bien cela ? D'avance merci.

24.10.2016 - 23:31

DROPS Design answered:

Bonjour Mamynette, le dernier rang du dos/des devants était sur l'envers, on continue sur l'endroit après avoir repris toutes les mailles (devant droit, manche, dos, manche, devant gauche, vu sur l'endroit), et on commence les diminutions du raglan au 1er rang sur l'endroit. Bon tricot!

25.10.2016 - 09:22

country flag Sarah wrote:

Hallo, ich habe nach dem Halsausschnitt noch insgesamt 154 Maschen insgesamt übrig. Ist das nicht zuviel? Jetzt würde normalerweise die Halsblende kommen und hier darf ich nur noch 86 - 96 Maschen haben. Ich stricke in Größe 5/6 Jahre. Vielen Dank im Voraus für die Antwort. Viele Grüße, Sarah Katny

16.09.2016 - 11:24

DROPS Design answered:

Liebe Sarah, in dieser Grösse haben Sie 263 M für die Passe, dann nehmen Sie 8 M. x 22 (15 x jede 2. R + 7 x jede R) für Raglan ab, dann nehmen Sie 30 M (= 1x11 M + 1x2M + 2x1M beidseitig) für den Halsausschnitt = 57 M übrig (263 - (8x22= 176) - 30).

16.09.2016 - 11:48