DROPS Lima
DROPS Lima
65% Wool, 35% Alpaca
from 2.40 £ /50g
Get the yarn to make this pattern from 38.40£.

The yarn cost is calculated from the pattern’s smallest size and the yarn’s cheapest product type. Looking for an even better price? You might find it on the DROPS Deals!

DROPS SS24

Finnley

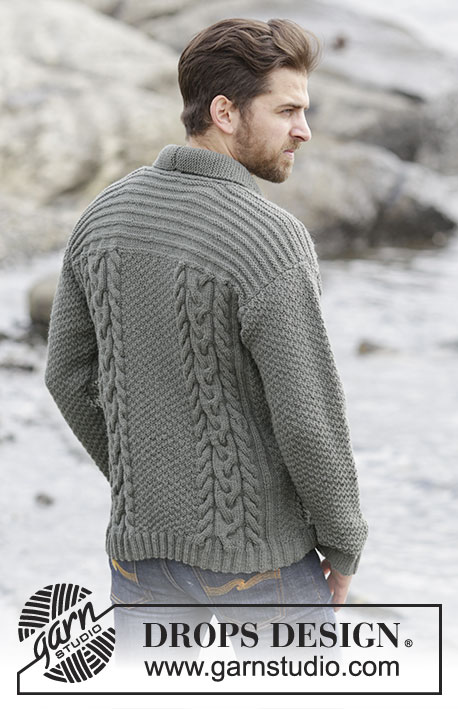
Men's knitted jacket in DROPS Lima, with cables and shawl collar. Size: S - XXXL.

DROPS Extra 0-1132
DROPS design: Pattern no li-059
Yarn group B
----------------------------------------------------------
Size: S - M - L - XL - XXL - XXXL
Materials:
DROPS LIMA from Garnstudio
800-950-1050-1150-1250-1400 g colour no 7810, moss green

DROPS CIRCULAR NEEDLE (60 cm) SIZE 4 mm - or size needed to get 21 sts x 28 rows in stocking st = 10 x 10 cm.
DROPS CIRCULAR NEEDLE (60 cm) SIZE 3.5 mm – for rib.
DROPS BUFFELHORN BUTTON NO 535: 6 pieces in all sizes

-------------------------------------------------------

Alternative Yarn – See how to change yarns here
Yarn Groups A to F – Use the same pattern and change the yarn here
Yarn usage using an alternative yarn – Use our yarn converter here

-------------------------------------------------------

DROPS Lima
DROPS Lima
65% Wool, 35% Alpaca
from 2.40 £ /50g
Get the yarn to make this pattern from 38.40£.

The yarn cost is calculated from the pattern’s smallest size and the yarn’s cheapest product type. Looking for an even better price? You might find it on the DROPS Deals!

Pattern instructions

NOTE: This pattern is written in British English. All measurements in charts are in cm. For conversion from cm to inches - click here. There are different terms for crocheting in British and American English. If this pattern includes crochet, click for "crochet terms" here. For this pattern in American English, please click here.
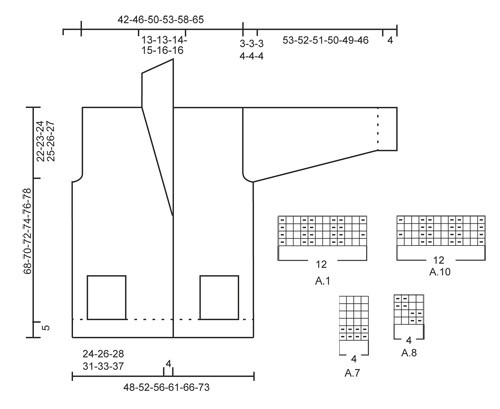
GARTER ST (back and forth):
K all rows. 1 ridge = 2 rows K.

PATTERN:
See diagrams A.1-A.10. The diagrams show all rows in pattern seen from RS.

INCREASE TIP:
Inc 1 st by making 1 YO, on next row work YO twisted (i.e. work in the back loop of st instead front) to avoid holes.

DECREASE TIP:
All dec are done from RS!
Dec as follows after A.1: P 2 tog
Dec as follows before A.1: Work until 2 sts remain before A.1, P 2 tog.

BUTTONHOLES:
Dec for buttonholes on left band. 1 buttonhole = K tog sixth and seventh st from edge and make 1 YO.
Dec for buttonholes when piece measures:
SIZE S: 2, 9, 17, 25, 33 and 41 cm.
SIZE M: 2, 10, 18, 26, 34 and 42 cm.
SIZE L: 3, 11, 19, 27, 35 and 43 cm.
SIZE XL: 3, 12, 20, 28, 36 and 44 cm.
SIZE XXL: 4, 13, 21, 29, 37 and 45 cm.
SIZE XXXL: 5, 14, 22, 30, 38 and 46 cm.

SHORT ROWS (applies to shawl collar):
Work short rows over sts in garter st from mid front as follows:
For every 14th row work as follows (beg from RS): Work over all sts in garter st, turn piece, tighten yarn and K back, turn piece and work as before over all sts. That way the ridges in collar will not contract as much. On left front piece work reversed, i.e. beg short rows from WS.
----------------------------------------------------------

JACKET:
Worked back and forth and sewn tog when finished.

BACK PIECE:
Cast on 145-150-158-178-186-206 sts on circular needle size 3.5 mm with Lima. Work rib as follows: 1 edge st in GARTER ST - see explanation above, A.6 (find diagram for correct size), A.4, A.3, P 2, K 2, * P 3, K 2 *, repeat from *-* 4-5-5-9-9-11 more times, P 2, A.3, A.4, A.5 (find diagram for correct size), 1 edge st in garter st. Continue like this and repeat the first 2 rows in A.3-A.6 until 12 rows have been worked. Now continue pattern from 3rd row in diagram and work as follows: Work the first 59-59-63-63-67-72 sts as before, work the next 27-32-32-52-52-62 sts AT THE SAME TIME dec 11-8-8-12-12-14 sts evenly in sections with P, continue as before over the remaining 59-59-63-63-67-72 sts = 122-130-138-154-162-178 sts. Work 1 row. Now switch to circular needle size 4 mm and continue with pattern but work A.8 over the middle 16-24-24-40-40-48 sts. NOTE: Now repeat A.3- A.6 from arrow in diagram. REMEMBER THE KNITTING TENSION When piece measures 46-47-48-49-50-51 cm, cast off 3-3-3-4-4-4 sts at beg of the next 4 rows for armholes = 110-118-126-138-146-162 sts on needle. When piece measures 53-54-55-56-57-58 cm, work A.7 over all sts inside 1 edge st in garter st in each side AT THE SAME TIME on first row dec 20-20-18-24-22-24 sts evenly in all sizes = 90-98-108-114-124-138 sts. Repeat A.7 until finished measurements.
When piece measures 66-68-70-72-74-76 cm, work as follows: Work the first 32-36-40-42-46-53 sts, cast off the next 26-26-28-30-32-32 sts and work the remaining 32-36-40-42-46-53 sts. Then finish each shoulder separately as follows: On next row from the neck, dec 1 st = 31-35-39-41-45-52 sts remain on each shoulder. When piece measures 68-70-72-74-76-78 cm, work 1 ridge over all sts. Cast off. Work the other shoulder the same way.

RIGHT FRONT PIECE:
Cast on 81-85-89-98-102-111 sts on circular needle size 3.5 mm with Lima. Work rib as follows: A.1 (= 12 sts), A.2 (find diagram for correct size), P 2, A.3, A.4, A.5 (find diagram for correct size), 1 edge st in garter st. Continue like this and repeat the first 2 rows in A.2-A.5 until 12 rows have been worked. Switch to circular needle size 4 mm and continue with pattern = 73-77-81-89-93-101 sts. NOTE: Now repeat diagram from arrow. When piece measures 40-41-42-43-44-46 cm, beg shawl collar while AT THE SAME TIME working shoulder as explained below:
READ ALL OF THE FOLLOWING SECTION BEFORE CONTINUING!

SHAWL COLLAR:
Work first st in A.1, 1 YO, work the remaining 11 sts in A.1, dec 1 st - READ DECREASE TIP, continue over the remaining sts on needle as before. Repeat displacement over A.1 every 1½ cm 0-2-3-3-3-4 times in total and every cm 26-24-23-24-25-24 times = 26-26-26-27-28-28 sts (incl the first st in A.1). Work the inc sts towards mid front in garter st, AT THE SAME TIME work SHORT ROWS - see explanation above.
SHOULDER:
When piece measures 46-47-48-49-50-51 cm, cast off 3-3-3-4-4-4 sts at beg of the next 2 rows from WS = 67-71-75-81-85-93 sts on needle. When piece measures 53-54-55-56-57-58 cm, work collar sts in garter st and A.1 as before, then work A.7 over the remaining sts on needle, AT THE SAME TIME dec 10-10-10-13-12-13 sts evenly = 57-61-65-68-73-80 sts. Continue pattern until finished measurements.

Then work as follows from RS:
When piece measures 68-70-72-74-76-78 cm - adjust after back piece - work the first 26-26-26-27-28-28 sts before slipping them on a stitch holder, then work a ridge over the remaining 31-35-39-41-45-52 sts. Cast off.
Slip sts back on needle. Then work short rows in garter st as follows, beg from WS: Work over all 26-26-26-27-28-28 sts, * 2 rows back and forth over the first 13-13-14-14-15-15 sts, 2 rows over all sts *, repeat from *-* until piece measures 7-7-7-8-8-8 cm on the shortest. Cast off.

LEFT FRONT PIECE:
Work as right front piece but reversed. I.e. work A.10 instead of A.1, A.9 instead of A.2 and A.6 instead of A.5. Remember BUTTONHOLES on left band - see explanation above.

SLEEVE:
The sleeve is worked back and forth on circular needle.
Cast on 59-64-64-69-69-74 sts (incl 1 edge st in garter st in each side) on circular needle size 3.5 mm with Lima. Work rib as follows: 1 edge st in garter st, * K 2, P 3 *, repeat from *-* until 3 sts remain, K 2, 1 edge st in garter st. Continue like this until rib measures 4 cm. Switch to circular needle size 4 mm and work 1 row in stocking st while AT THE SAME TIME dec 9-10-10-11-11-12 sts evenly = 50-54-54-58-58-62 sts. Continue with A.8 inside 1 edge st in garter st in each side. When piece measures 14-13-8-8-13-11 cm, inc 1 st inside edge st in garter st in each side - read INCREASE TIP. Repeat inc approx. every 2-2-1½-1½-1½-1½ cm 20-20-22-22-25-25 more times = 92-96-100-104-110-114 sts. When piece measures 57-56-55-54-53-50 cm, cast off at beg of every row in each side: 3 sts 1-1-1-2-2-2 times, 2 sts 1 time and 3 st 2-2-2-3-3-3 times. Cast off. Sleeve measures approx. 60-59-58-58-57-54 cm. Knit another sleeve.

POCKETS:
Worked back and forth on circular needle.
Cast on 42 sts on circular needle size 4 mm with Lima. Work 1 ridge in garter st AT THE SAME TIME inc 6 sts evenly on row from RS = 48 sts. On next row from RS work pattern as follows: NOTE: Beg and repeat pattern in A.3 and A.4 from 5th row in A.3 and A.4. 1 edge sts in garter st, A.3, A.4, A.8, 1 edge st in garter st. Continue like this back and forth until A.3 and A.4 have been worked 2 times vertically. Then continue with the first 6 rows from arrows in diagram 1 more time. Then work and dec as follows: 1 edge st in garter st, K the next 4 sts tog 2 by 2 (= 2 sts dec), continue as before over the next 7 sts, K the next 4 sts tog 2 by 2, continue with pattern as before over the next 15 sts, K the next 4 sts tog 2 by 2, Work remaining sts as before and finish with 1 edge st in garter st. Then switch to needle 3.5 mm and work 2 ridges over all sts, beg from WS. Cast off from WS. Work another pocket the same way but reversed.

ASSEMBLY:
Sew the shoulder seams tog. Sew sleeves in body. Sew underarm and side seams in one inside 1 edge st in garter st. Sew the buttons on to the right band. Sew cast-off edge on collars tog mid back, sew collar to the back of neck.
Fasten pockets on front pieces so that pattern on pocket is placed over pattern on front piece. Sew pocket neatly through both layers in edge st in garter st in each side and at the bottom of pocket. Cut the yarn and fasten.

This pattern has been corrected.

Updated online: 04.11.2015
2nd chart text:
= K from WS, P from RS
Updated online: 25.08.2016
POCKETS:
.....Then continue with the first 6 rows from arrows in diagram 1 more time. Then work and dec as follows: 1 edge st in garter st, K the next 4 sts tog 2 by 2 (= 2 sts dec), continue as before over the next 7 sts, K the next 4 sts tog 2 by 2, continue with pattern as before over the next 15 sts, K the next 4 sts tog 2 by 2, Work remaining sts as before and finish with 1 edge st in garter st. Then switch to needle 3.5 mm and work 2 ridges over all sts, beg from WS. Cast off from WS. Work another pocket the same way but reversed.
Updated online: 29.10.2018
Correction: BACK PIECE: NOTE: Now repeat A.3- A.6 from arrow in diagram.

Diagram

symbols = K from RS, P from WS
symbols = K from WS, P from RS
symbols = slip 4 sts on cable needle in front of piece, K 4, K 4 from cable needle
symbols = slip 4 sts on cable needle behind piece, K 4, K 4 from cable needle
symbols = repeat pattern from here (= 5th row in diagram)
symbols = P 2 tog
diagram
diagram
diagram

Each of our patterns has specific tutorial videos to help you.

Do you have a question? See a list of frequently asked questions (FAQ)

Knitting tension is what determines the final measurements of your work, and is usually measured per 10 x 10 cm. It is provided like so: number of stitches in width x number of rows in height - eg: 19 stitches x 26 rows = 10 x 10 cm.

The knitting tension is very individual; some people knit/crochet loosely while others work tightly. You adjust the knitting tension with the needle size, which is why the suggested needle size is only meant as a guide! You need to adjust this (up or down) to ensure that YOUR knitting tension matches the knitting tension provided in the pattern. If you work with a different knitting tension than provided you will have a different yarn consumption, and your work will have different measurements than what the pattern suggests.

The knitting tension also determines which yarns can replace each other. As long as you achieve the same knitting tension you can replace one yarn with another.

See DROPS lesson: How to measure your tension/gauge

See DROPS video: How to make a gauge tension swatch

The required amount of yarn is provided in grams, eg: 450 g. To calculate how many balls you’ll need you first need to know how many grams are in 1 ball (25g, 50g or 100g). This information is available if you click on the individual yarn quality on our pages. Divide the amount required with the amount of each ball. For example, if each ball is 50g (the most common amount), the calculation will be as follows: 450 / 50 = 9 balls.

The important thing when changing from one yarn to another is that the knitting/crochet tension remains the same. This is so that the measurements of the finished piece will be the same as on the sketch provided. It is easier to achieve the same knitting tension using yarns from the same yarn group. It is also possible to work with multiple strands of a thinner yarn to achieve the knitting tension of a thicker one. Please try our yarn converter. We recommend you to always work a test swatch.

Please NOTE: when changing yarn the garment might have a different look and feel to the garment in the photo, due to individual properties and qualities of each yarn.

See DROPS lesson: Can I use a different yarn than the one mentioned in the pattern?

All our yarns are categorised into yarn groups (from A to F) according to thickness and knitting tension – group A contains the thinnest yarns and group F the thickest. This makes it easier for you to find alternative yarns to our patterns, should you wish to switch yarn. All yarns within the same group have a similar knitting tension and can easily replace each other. However, different yarn qualities have different structures and properties which will give the finished work a unique look and feel.

Click here for an overview of the yarns in each yarn group

At the top of all our patterns you’ll find a link to our yarn calculator, which is a helpful tool should you wish to use a different yarn than suggested. By filling in the yarn quality you wish to replace, the amount (in your size) and number of strands, the calculator will present good alternative yarns with the same knitting tension. Additionally it will tell you how much you’ll require in the new qualities and whether you’ll need to work with multiple strands. Most skeins are 50g (some are 25g or 100g).

If the pattern is worked with multiple colours, every colour will have to be calculated separately. Similarly, if the pattern is worked with several strands of different yarns (for example 1 strand Alpaca and 1 strand Kid-Silk) you will have to find alternatives for each, individually.

Click here to see our yarn calculator

Since different yarns have different qualities and textures we have chosen to keep the original yarn in our patterns. However, you can easily find options among our available qualities by using our yarn calculator, or simply pick a yarn from the same yarn group.

It is possible that some retailers still have discontinued yarns in stock, or that someone has a few skeins at home that they would like to find patterns for.

The yarn calculator will provide both alternative yarn as well as required amount in the new quality.

If you think it's hard to decide what size to make, it can be a good idea to measure a garment you own already and like the size of. Then you can pick the size by comparing those measures with the ones available in the pattern's size chart.

You'll find the size chart at the bottom of the pattern.

See DROPS lesson: How to read size chart

The needle size provided in the pattern serves only as a guide, the important thing is to follow the knitting tension. And since knitting tension is very individual, you will have to adjust the needle size to ensure that YOUR tension is the same as in the pattern – maybe you’ll have to adjust 1, or even 2 needle sizes, up or down to achieve the correct tension. For this, we recommend that you work test swatches.

Should you work with a different knitting tension than the one provided, the measurements of the finished garment might deviate from the measurement sketch.

See DROPS lesson: How to measure your tension/gauge

See DROPS video: How to make a tension/gauge swatch

Working a garment top-down provides more flexibility and room for personal adjustment. For example it is easier to try the garment on while working, as well as making adjustments to length of yoke and shoulder caps.

The instructions are carefully explaining every step, in the correct order. Diagrams are adjusted to the knitting direction and are worked as usual.

The diagram depicts all rows/rounds, and every stitch seen from the right side. It is read from bottom to top, from right to left. 1 square = 1 stitch.

When working back and forth, every other row is worked from the right side and every other row is worked from the wrong side. When working from the wrong side, the diagram will have to be worked reversed: from left to right, knit stitches are purled, purl stitches are knit etc.

When working in the round every round is worked from the right side and the diagram are worked from right to left on all rounds.

See DROPS lesson: How to read knitting diagrams

The diagram depicts all rows/rounds, and every stitch seen from the right side. It is worked from bottom to top, from right to left.

When working back and forth every other row is worked from the right side: from right to left and every other row is worked from the wrong side: from left to right.

When working in the round, every row in the diagram are worked from the right side, from right to left.

When working a circular diagram you start in the middle and work your way outwards, counter clockwise, row by row.

The rows usually start with a given number of chain stitches (equivalent to the height of the following stitch), this will either be depicted in the diagram or explained in the pattern.

See DROPS lesson: How to read crochet diagrams

Instructions for working several diagrams after each other on the same row/round, will often be written like so: “work A.1, A.2, A.3 a total of 0-0-2-3-4 times". This means you work A.1 once, then A.2 is worked once, and A.3 is repeated (in width) the number of times provided for your size – in this case like so: S = 0 times, M = 0 times, L=2 times, XL= 3 times and XXL = 4 times.

The diagrams are worked as usual: begin with the first row in A.1, then work the first row in A.2 etc.

See DROPS lesson: How to read knitting diagrams

See DROPS lesson: How to read crochet diagrams

The total width of the garment (from wrist-to-wrist) will be larger in the larger sizes, despite the actual sleeves being shorter. The larger sizes have longer sleeve caps and wider shoulders, so there will be a good fit in all sizes.

The measurement sketch/schematic drawing provides information regarding the full length of the garment. If it’s a jumper or a jacket the length is measured from the highest point on the shoulder closest to the neckline, and straight down to the bottom of the garment. It is NOT measured from the tip of shoulder. Similarly, the length of yoke is measured from the highest point on the shoulder and down to where yoke is split into body and sleeves.

On a jacket measures are never taken along bands, unless specifically stated. Always measure inside band stitches when measuring the length.

See DROPS lesson: How to read a schematic drawing

Diagrams are often repeated on the round or in height. 1 repeat is the diagram the way it appears in the pattern. If it says to work 5 repeats of A.1 in the round, then you work A.1 a total of 5 times after/next to each other in the round. If it says to work 2 repeats of A.1 vertically/in height you work the entire diagram once, then begin again at the start and work the entire diagram one more time.

Chain stitches are slightly narrower than other stitches and to avoid working the cast-on edge too tight, we simply chain more stitches to begin with. The stitch count will be adjusted on the following row to fit the pattern and measurement sketch.

The rib edge is more elastic and will contract slightly compared to, for example, stocking stitch. By increasing before the rib edge, you avoid a visible difference in width between the rib edge and the rest of the body.

It’s very easy to cast off too tightly, and by making yarn overs while casting off (and simultaneously casting these off) you avoid a too tight cast off edge.

See DROPS video: How to bind off with yarn overs (yo)

To achieve an even increase (or decrease) you can increase on, for example: every 3rd and 4th row alternately, like so: work 2 rows and increase on the 3rd row, work 3 rows and increase on the 4th. Repeat this until the increase is complete.

See DROPS lesson: Increase or decrease 1 st on every 3rd and 4th row alternately

Should you prefer to work in the round instead of back and forth, you may of course adjust the pattern. You’ll need to add steeks mid-front (usually 5 stitches), and follow the instructions. When you would normally turn and work from the wrong side, simply work across the steek and continue in the round. At the end you’ll cut the piece open, pick up stitches to work bands, and cover the cut edges.

See DROPS video: How to knit steeks and cut open

Should you prefer to work back and forth instead of in the round, you may of course adjust the pattern so you work the pieces separately and then assemble them at the end. Divide the stitches for the body in 2, add 1 edge stitch in each side (for sewing) and work the front and back pieces separately.

See DROPS lesson: Can I adapt a pattern for circular needles into straight needles?

Pattern repeats can vary slightly in the different sizes, in order to get the correct proportions. If you’re not working the exact same size as the garment in the photo, yours might deviate slightly. This has been carefully developed and adjusted so that the complete impression of the garment is the same in all sizes.

Make sure to follow instructions and diagrams for your size!

If you have found a pattern you like which is available in women’s size it’s not very difficult to convert it to men’s size. The biggest difference will be the length of sleeves and body. Start working on the women size that you think would fit across the chest. The additional length will be worked right before you cast off for the armhole/sleeve cap. If the pattern is worked top-down you can add the length right after the armhole or before the first decrease on sleeve.

Regarding additional yarn amount, this will depend on how much length you add, but it is better with a skein too many than too few.

All yarns will have excess fibres (from production) that might come off as lint or shedding. Brushed yarns (ie hairier yarns) have more of these loose, excess fibres, causing more shedding.

Shedding also depends on what is worn under or over the garment, and whether this pulls at the yarn fibres. It’s therefore not possible to guarantee that there will be no shedding

Below are some tips on how to get the best result when working with hairier yarns:

1. When the garment is finished (before you wash it) shake it vigorously so the looser hairs come off. NOTE: do NOT use a lint roller, brush or any method that pulls at the yarn.

2. Place the garment in a plastic bag and put it in your freezer - the temperature will cause the fibres to become less attached to each other, and excess fibres will come off easier.

3. Leave in the freezer for a few hours before taking it out and shaking it again.

4. Wash the garment according to the instructions on the yarn label.

Pilling is a natural process that happens to even the most exclusive of fibers. It's a natural sign of wear and tear that is hard to avoid, and that is most visible in high friction areas of your garment like a sweater's arms and cuffs.

You can make your garment look as new by removing the pilling, using a fabric comb or a pill/lint remover.

Still can't find the answer you need? Then scroll down and leave your question so one of our experts can try to help you. This will be done normally within 5 to 10 working days.
In the meantime, you can read the questions and answers that others have left to this pattern or join the DROPS Workshop on Facebook to get help from fellow knitters/crocheters!

You might also like...

Finnley

Brian, United States

Finnley

Saša, Serbia

Post a comment to pattern DROPS Extra 0-1132

We would love to hear what you have to say about this pattern!

If you want to leave a question, please make sure you select the correct category in the form below, to speed up the answering process. Required fields are marked *.

Comments / Questions (266)

country flag Heidi Nørgaard wrote:

Hej Drops, Jeg strikker Finnley i str. S. Jeg er kommet til ribkanten hvor de 27 masker skal tages ind med 11, så der er 16 masker tilbage. Der står det skal gøres i vrang maskerne, men det er der jo ikke nok vrang masker til? Det kan passe hvis man strikke alle de 2 ret sammen og strikker alle hvor der er 3 vrang sammen således at man strikker 2 vang sammen og 1 normal vrang. Så kommer rib til at være 1 r, 2 vrang over de 16 masker på de 2 sidste pinde i rib?

02.04.2024 - 09:16

DROPS Design answered:

Hei Heidi. Ja, i str. S er det ikke nok vrangpartier, så du kan gjøre som du skriver, evnt ta en titt på hva som kommer på pinnen etter (A.8) og se om det kan tilpasses noe bedre. mvh DROPS Design

08.04.2024 - 11:32

country flag Sunniva wrote:

Hei igjen. Nå er det 10 dager siden jeg spurte om hjelp med denne genseren. Er det noen som kan hjelpe meg?

09.02.2024 - 15:56

country flag Sunniva wrote:

Jeg strikker str L. Jeg har strikket vrangborden frem til pinne 12 slik oppskriften sier. Det står strikk 63 masker som før, fell gjevnt fordelt over de vrange partiene på de neste 32m (fell 8 masker), fortsett som før de resterende 63m. På midtpartiet mitt har jeg 36m (2vr,2r *3vr,2r* x6, 2vr).. det står at jeg skal felle 8m over de neste 32 maskene i vrangpartiene.. men jeg har bare 6 vrangpartier. Skjønner ikke hva jeg skal gjøre. Håper dere kan hjelpe meg. På forhånd takk!

29.01.2024 - 15:17

country flag Maria Kassalia wrote:

145-150-158-178-186-206 M (einschl. beidseitig je 1 Rand-M) auf Rundnadel Nr. 3,5 mit Lima anschlagen. Wie folgt im Rippenmuster str: 1 Rand-M KRAUS RECHTS (siehe oben), Muster A.6 (das Diagramm für die gewünschte Größe wählen), A.4, A.3, 2 M li, 2 M re, * 3 M li, 2 M re *, von *-* noch weitere 4-5-5-9-9-11 x wdh, 2 M li, A.3, A.4, A.5 (das Diagramm für die gewünschte Größe wählen), Ich stricke größe L und ist das ,das bündchen ? damit komme ich nicht klar für den anfang

10.01.2024 - 10:55

DROPS Design answered:

Liebe Frua Kassalia, in L stricken Sie so die 158 Maschen für das untere Bündchen: 1 Rand-M kraus rechts, A.6 (= 14 Maschen in L), A.4 (= 10 M) , A.3 (= 36 M), 2 M li, 2 M re, * 3 M li, 2 M re *, von *-* noch weitere 5 x wdh (= 30 Maschen Bündchen), 2 M li, A.3 (= 36 M), A.4 (= 10 M), A.5 (14 Maschen), 1 Rand-M kraus re = 1+14+10+36+2+2+30+2+36+10+14+1=158 Maschen. Die 2 ersten Reihen von den Diagrammen A.3-A.6 wiederholen Sie bis 12 Reihen gestrickt wurden, dann stricken Sie die 3. Reihe von den Diagrammen (mit Abnahmen) sowie Abnahmen wie in der schriftlichen Anleitung erklärt wird = 138 Maschen, die dann mit Muster gestrickt werden. Viel Spaß beim stricken!

10.01.2024 - 15:58

country flag Maria Kassalia wrote:

Hallo liebes team ich komme nicht klar mit dem Rückenteil ist einbischen durcheinender können sie vieleicht etwas besser erklären vielen dank

09.01.2024 - 14:35

DROPS Design answered:

Liebe Frau Kassalia, können Sie uns bitte sagen, welches Teil Sie nicht verstehen, welche Größe Sie stricken, usw? So können wir Ihnen besser helfen. Danke im voraus für Ihr Verständnis.

10.01.2024 - 08:51

country flag Arlene wrote:

For the left front piece that is to be worked reversed: Does this mean instead of A1 through A5 it should be A10 through A6 ( A10, A9, A8, A7, A6)? Thank you in advance - Arlens

06.01.2024 - 22:54

DROPS Design answered:

Dear Arlene, as indicated: Work as right front piece but reversed. I.e. work A.10 instead of A.1, A.9 instead of A.2 and A.6 instead of A.5. A.3 and A.4 are worked as before and not replaced by A.7 and A.8. You also need to change the order of the charts: start with A.6 and finish with A.10 (since you are working from the opposite side). Happy knitting!

07.01.2024 - 18:38

country flag Angel Adriana wrote:

Buena noche; Cómo ensamblo el cuello de chal en el escote de la espalda? Agradezco estos bellos diseños que han compartido. DROPS Extra 0-1132 Diseño DROPS: Patrón No. li-059

17.12.2023 - 03:36

DROPS Design answered:

Hola Angel, el cuello chal se trabaja en el delantero y es lo suficientemente largo como para cubrir la espalda. A la hora de ensamblar, unes las dos mitades del cuello chal por sus borde de remate. Una vez unido, unes la parte del cuello chal que no está en el delantero al borde del cuello en la espalda. En los siguientes videos puedes ver algunas formas de cómo trabajar y coser el cuello: https://www.garnstudio.com/video.php?id=434&lang=es y https://www.garnstudio.com/video.php?id=1687&lang=es

18.12.2023 - 00:00

country flag Linda B wrote:

Betreft Finnley vest L: wilt u alstublieft mijn vraag van 22 oktober jl. beantwoorden zodat ik het vest verder kan breien. Alvast hartelijke dank en groet.

26.10.2023 - 13:57

country flag Linda B wrote:

Goededag, ik brei het Finnley vest L voor de tweede keer, de sjaalkraag heb ik de eerste keer los gebreid en daarna aangenaaid. Ik brei het nu volgens patroon met de 26 meerderingen en minderingen. Klopt het dat er tot aan de schouders waar A7 begint er maar 13 ribbelsteken voor de kraag zijn gebreid (met evenveel minderingen na A1). Ga ik tijdens het breien van A7 door met de meerderingen en minderingen totdat ik 26 kraagstenen heb? Ik hoor het graag van U. Alvast dank.

22.10.2023 - 06:40

DROPS Design answered:

Dag Linda,

Vanaf een hoogte van 40-41-42-43-44-46 cm begin je met de sjaalkraag (zoals beschreven onder het kopje 'SJAALKRAAG'), dus komen er steeds meer steken bij voor de kraag en minder voor het pand, door het meerderen en minderen naast A.1. Een stukje later, namelijk bij een hoogte van 53-54-55-56-57-58 cm, begin je met A.7 (dit staat onder het kopje 'SCHOUDER'). Je gaat dan gewoon door met het meerderen en minderen voor de sjaalkraag. Ik weet niet precies hoeveel steken je hebt, maar 13 zou wel kunnen kloppen.

26.10.2023 - 19:52

country flag Linda B wrote:

Goededag, ik brei het Finnley vest maat L maar wil de voorpanden breder maken vanwege een buikomvang van ca 113 /114 cm. Ik ben bang dat de voorpanden van maat L te krap zijn zodat het vest niet dicht kan. De voorpanden voor maat XL zullen weer te wijd zijn. Hoeveel extra cm's kan ik toevoegen aan de voorpanden om ze goed sluitend te maken. Hartelijke dank voor uw reactie.

03.10.2023 - 15:48

DROPS Design answered:

Dag Linda,

De omvang van maat L in dit patroon is 112 cm en het materiaal rekt natuurlijk ook een beetje mee. Ik denk dat je zelf het beste in kunt schatten hoeveel cm erbij moet...

05.10.2023 - 06:43