
Popular categories
Looking for a yarn?


|
|||||||||||||||||||||||||||||||||||||||||||||||||
Autumn Delight |
|||||||||||||||||||||||||||||||||||||||||||||||||
 |
 |
||||||||||||||||||||||||||||||||||||||||||||||||
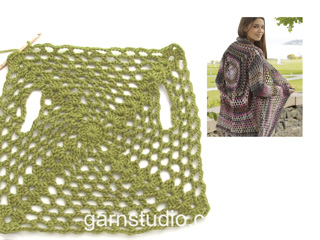
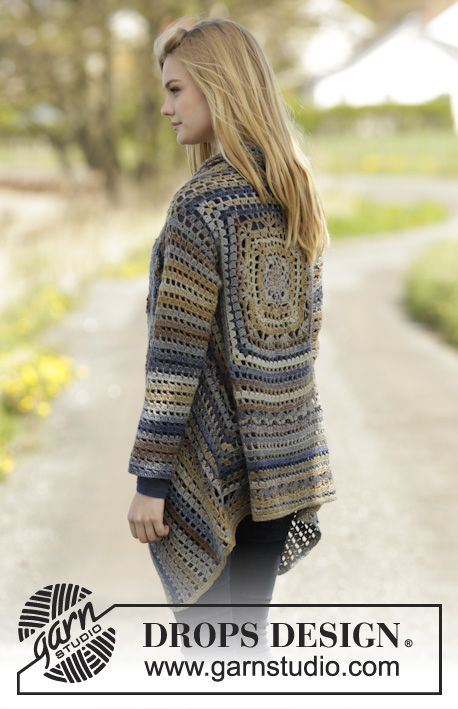
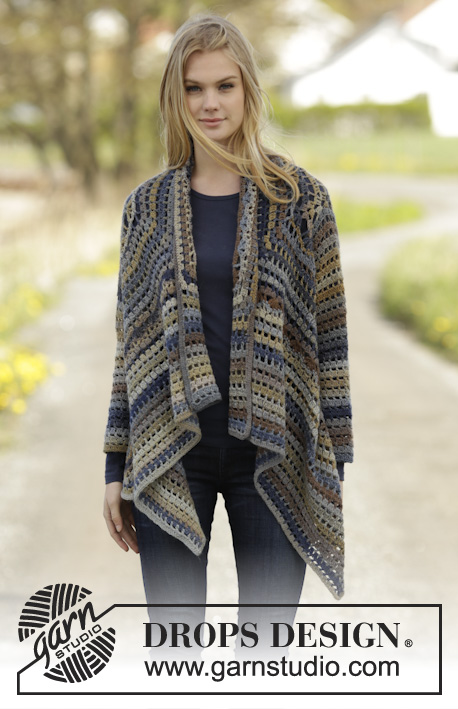
Crochet DROPS jacket worked in a square in "Delight". Size: S - XXXL.
DROPS 166-22 |
|||||||||||||||||||||||||||||||||||||||||||||||||
|
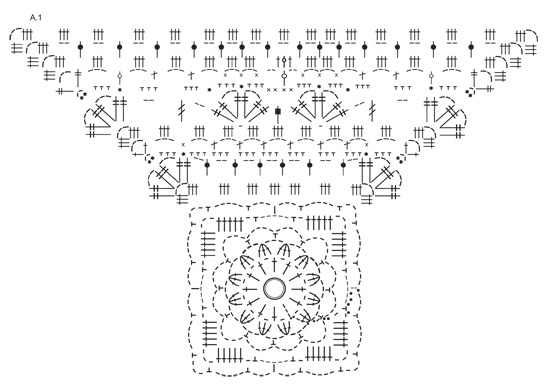
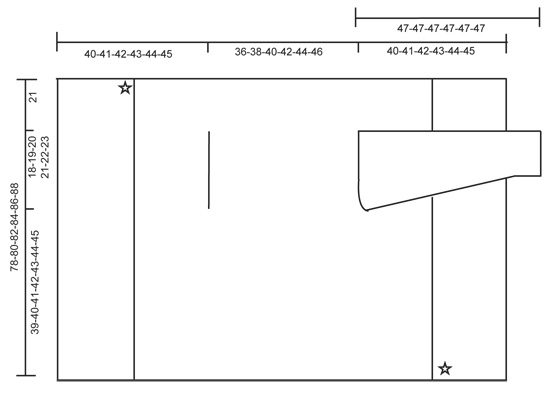
PATTERN: See diagrams A.1 to A.4. 3 TR TOG AT BEG OF ROUND: 3 ch, work next tr around same ch but wait with last YO and pull through, work 1 tr around same ch but pull last YO through all 3 sts on hook. 3 TR TOG: Work 1 tr around ch but wait with last pull through, work 1 tr around same ch, but wait the last pull through, work last tr around same ch but now pull last YO through all 4 sts on hook DECREASE TIP: Work 1 tr but wait with last YO and pull through, work next tr but pull last YO through all 3 sts on hook = 2 tr worked tog. ---------------------------------------------------------- JACKET: Work 4 ch on hook size 3,5 mm with Delight and form a ring with 1 sl st in first ch. Then work according to diagram A.1, i.e. work as follows: ROUND 1: Work 4 ch (= 1 tr + 1 ch), * 1 tr in ch-ring, 1 ch *, repeat from *-* a total of 11 times, finish with 1 sl st in 3rd ch from beg of round = 12 tr with 1 ch between every tr. REMEMBER THE CROCHET TENSION! ROUND 2: 1 sl st around first ch, work 3 TR TOG AT BEG OF ROUND – see explanation above, * 3 ch, 3 TR TOG around next ch – see explanation above *, repeat from *-* 11 times in total and finish with 3 ch and 1 sl st at the top of first tr-group = 12 tr-groups with 3 ch between every tr-group. ROUND 3: 1 sl st around first ch-space, 1 ch, 1 dc around same ch-space, * 5 ch, 1 dc around next ch-space, 5 ch, 1 dc around next ch-space, 6 ch, 1 dc around next ch-space *, repeat from *-* 4 times in total, but finish with 1 sl st in first dc at beg of round (instead of 1 dc around next ch-space). ROUND 4: Work 1 sl st around first ch-space, 1 ch, 1 dc around same ch-space, * 5 ch, 1 dc around next ch-space, 1 ch, around next ch-space (ch-space with 6 ch) work 5 tr + 3 ch + 5 tr (= corner), 1 ch, 1 dc around next ch-space *, repeat from *-* 4 times in total, but finish with 1 sl st in first dc at beg of round (instead of 1 dc around next ch-space). ROUND 5: Work sl sts until middle of first ch-space (ch-space with 5 ch), work 5 ch (= 1 htr + 3 ch), * 1 dc around ch before tr-group, 5 ch, 1 dc around ch-space in corner, 3 ch, 1 dc around same ch-space, 5 ch, 1 dc around ch-space after next tr-group, 3 ch, 1 htr around next ch-space, 3 ch *, repeat from *-* 4 times in total, but finish with 1 sl st in 2nd ch from beg of round (instead of 1 htr in next ch-space, 3 ch). Cut the yarn. The round now starts around the ch-space in first corner. ROUND 6: 1 sl st around ch-space in the corner, 3 ch (= 1 tr), 2 tr + 3 ch + 3 tr around same ch-space, * work 3 tr around each of the first 2 ch-spaces, 3 tr in htr, 3 tr around each of the next 2 ch-spaces, work 3 tr + 3 ch + 3 tr around ch-space in the corner *, repeat from *-* 3 times in total, work 3 tr around every ch-space and 3 tr in every htr until the corner and finish with 1 sl st in 3rd ch at beg of round. ROUND 7: Work sl sts until ch-space in corner, 4 ch (= 1 dtr), work 1 dtr + 3 ch + 2 dtr + 3 ch + 2 dtr around same ch-space (= corner), * (2 ch, skip 1 tr-group, 1 tr before next tr-group = between 2 tr-groups), repeat from (-) 6 times in total, 2 ch, 2 dtr + 3 ch + 2 dtr + 3 ch + 2 dtr around ch-space in corner *, repeat from *-* 3 times in total, repeat from (-) 6 times in total and finish with 2 ch and 1 sl st in 4th ch from beg of round. ROUND 8: Work sl sts until the middle of the 2 dtr in corner, 3 ch (= 1 dc + 2 ch), 1 dc between the same middle dtr in corner, * 3 dc around space, 1 dc between the next 2 dtr, then work 3 dc around every ch-space until dtr in corner, 1 dc between the first 2 dtr, 3 dc around next ch-space, 1 dc + 2 ch + 1 dc between the middle 2 dtr in corner *, repeat from *-* 3 times in total, 3 dc around ch-space, 1 dc between the next 2 dtr, then work 3 dc around every ch-space until dtr in corner, 1 dc between the first 2 dtr, 3 dc around ch-space and finish with 1 sl st in first ch from beg of round. ROUND 9: Work 1 sl st around ch-space in corner, 6 ch (= 1 tr + 3 ch), 1 tr around same ch-space, * 3 ch, skip 3 dc, 1 dc in next dc, (3 ch, skip 2 dc, 1 htr in next dc), repeat from (-) 6 times in total, 3 ch, skip 3 dc, 1 dc in next dc, 3 ch, 1 tr + 3 ch + 1 tr around ch-space in corner *, repeat from *-* the entire round, but finish with 1 sl st in 3rd ch from beg of round (instead of 1 tr + 3 ch + 1 tr in corner). ROUND 10: 1 sl st in ch-space in corner, 3 ch (= 1 tr), 2 tr + 3 ch + 3 tr around same ch-space, * work 3 tr around each of the first 3 ch-space, 1 ch, 3 tr around each of the next 3 ch-spaces, 1 ch, 3 tr around each of the next 3 ch-spaces, in corner work 3 tr + 3 ch + 3 tr around ch-space *, repeat from *-* the entire round, but finish with 1 sl st in 3rd ch from beg of round (instead 3 tr + 3 ch + 3 tr in corner). ROUND 11: Work sl st until ch-space in corner, 4 ch (= 1 dtr), work 1 dtr + 3 ch + 2 dtr + 3 ch + 2 dtr around same ch-space (= corner), * 2 ch, skip 2 tr-groups, 1 dtr before next tr-group, 2 ch, skip 2 tr-groups, around ch before next tr-group work 2 dtr + 3 ch + 2 dtr + 3 ch + 2 dtr, skip 1 tr-group, 1 dtr in the middle tr in next tr-group, skip 1 tr-group, around ch before next tr-groups work 2 dtr + 3 ch + 2 dtr + 3 ch + 2 dtr, 2 ch, skip 2 tr-groups, 1 dtr before next tr-group, 2 ch, around ch-space in corner work 2 dtr + 3 ch + 2 dtr + 3 ch + 2 dtr *, repeat from *-* the entire round, but finish with 1 sl st in 4th ch from beg of round (instead of dtr-groups in corner). ROUND 12: Work sl sts until middle of the middle 2 dtr in corner, 3 ch (= 1 dc + 2 ch), 1 dc between the middle dtr in corner, * 3 dc around ch-space, 1 dc between the next 2 dtr, 3 dc around each of the next 2 ch-spaces, 1 dc between the next 2 dtr, 3 dc around next ch-space, 1 dc between the next 2 dtr, 3 dc around next ch-space, 1 dc in each of the next 2 dtr, skip 1 dtr, 1 dc in each of the next 2 dtr, 3 dc around next ch-space, 1 dc between 2 dtr, 3 dc around next ch-space, 1 dc between 2 dtr, 3 dc around each of the next 2 ch-spaces, 1 dc between 2 dtr, 3 dc around next ch-space, 1 dc + 2 ch + 1 dc between the 2 middle dtr in corner *, repeat from *-* the entire round but finish with 1 sl st in first ch on round (instead of 1 dc + 2 ch + 1 dc in corner). ROUND 13: Work 1 sl st around ch-space in corner, 7 ch (= 1 dtr + 3 ch), 1 dtr around same ch-space, * 3 ch, skip 3 dc, 1 tr in next dc, 3 ch, skip 2 dc, 1 htr in next dc, 3 ch, skip 1 dc, 1 htr in next dc, 3 ch, skip 3 dc, 1 dc in next dc, 3 ch, skip 1 dc, 1 dc in next dc, 3 ch, skip 1 dc, 1 dc in next dc, 2 ch, skip 2 dc, 1 tr in next dc, 2 ch, skip 3 dc, 1 dc in next dc, 3 ch, skip 1 dc, 1 dc in next dc, 3 ch, skip 1 dc, 1 dc in next dc, 3 ch, skip 3 dc, 1 htr in next dc, 3 ch, skip 1 dc, 1 htr in next dc, 3 ch, skip 2 dc, 1 tr in next dc, 3 ch, skip 3 dc and work 1 dtr + 3 ch + 1 dtr around ch-space in corner *, repeat from *-* the entire round but finish with 1 sl st in 4th ch from beg of round (instead of 1 dtr + 3 ch + 1 dtr around ch-space in corner). ROUND 14: 1 sl st around ch-space in corner, 3 ch (= 1 tr), 2 tr + 3 ch + 3 tr around same ch-space, * work 3 tr around each of the first 6 ch-spaces, 1 tr around 2-ch-space, 1 tr in tr, 1 tr around 2-ch-space, work 3 tr around each of the next 6 ch-spaces, in corner work 3 tr + 3 ch + 3 tr around ch-space *, repeat from *-* the entire round but finish with 1 sl st in 3rd ch from beg of round (instead of 3 tr + 3 ch + 3 tr in corner). ROUND 15: 1 sl st around ch-space in corner, 3 ch (= 1 tr), 2 tr + 3 ch + 3 tr around same ch-space, * (2 ch, 1 tr before next tr-group), repeat from (-) until corner, 2 ch, around ch-space in corner work 3 tr + 3 ch + 3 tr *, repeat from *-* the entire round, but finish with 1 sl st in 3rd ch from beg of round (instead of tr-group in corner). ROUND 16: 1 sl st around ch-space in corner, 3 ch (= 1 tr), 2 tr + 3 ch + 3 tr around same ch-space, * work 3 tr in every ch-space until corner, work 3 tr + 3 ch + 3 tr around ch-space in corner *, repeat from *-* 3 times in total, work 3 tr around every ch-space until corner and finish with 1 sl st in 3rd ch from beg of round. Continue repeating 15th and 16th round until square measures 36-38-40-42-44-46 cm x 36-38-40-42-44-46 cm. Now work armholes as follows: Work as before until first corner, work 3 tr + 3 ch + 3 tr in ch-space in the corner. Now work ch until the middle of next side (i.e. in the middle between 1st and 2nd corner) as follows: Work 1 ch for every ch/tr skipped. Then work pattern as before until the middle between 3rd and 4th corner. Now work ch until beg of round as follows: Work 1 ch for every ch/tr skipped. On next round work pattern and inc as before over all sts, also in ch for armholes. Continue repeating15th and 16th round until no of ch-spaces between each corner is divisible with 3. Continue to work as follows: ROUND 1: 1 sl st around ch-space in corner, 3 ch (= 1 tr), 2 tr + 3 ch + 3 tr around same ch-space, * (work 3 tr around each of the first 3 ch-spaces, 1 ch), repeat from (-) until 3 ch-spaces remain before corner, work 3 tr around each of the next ch-spaces, in corner work 3 tr + 3 ch + 3 tr around ch-space *, repeat from *-* the entire round but finish with 1 sl st in 3rd ch at beg of round (instead of 3 tr + 3 ch + 3 tr in corner). ROUNDS 2-4: Work as 11th-13th round (work 1 tr-group around every ch from previous round). ROUNDS 5-18: Work as 15th and 16th round. Repeat these 2 rounds 7 times in total. Repeat 18th round until square measures 78-80-82-84-86-88 cm x 78-80-82-84-86-88 cm (i.e. 21 cm in all sizes from armhole). Cut the yarn. FRONT PIECES: Now work back and forth between first and second corner. NOTE: Work front piece without inc. ROW 1: Work according to A.2 as follows: Work sl sts until the middle of first corner: 5 ch,* skip 3 tr, 1 tr between 2 tr-groups, 2 ch *, repeat from *-*, skip 3 tr and finish with 1 tr around ch-space in second corner. ROW 2: Turn and work as follows: 3 ch, 2 tr around first ch-space, then work 3 tr around every ch-space, last time finish with 1 tr in 3rd ch at beg of previous row. Repeat 1st and 2nd row for 19-20-21-22-23-24 cm, cut the yarn. Repeat on the other side, now work back and forth from third to fourth corner. Finally work a round around the entire square, work pattern as before but in ch-space in each corner work 6 tr. Fasten off. SLEEVES: Work around the armhole and down, work every round tog with 1 sl st in 3rd ch from beg of round. Insert 1 marker in piece, mid under sleeve. NOW MEASURE PIECE FROM HERE! Beg by working 81-84-87-93-96-99 tr evenly around the opening for sleeve, beg of row should be under sleeve. Continue with A.2 - when piece measures 4 cm dec under sleeve as follows: Dec as shown in A.3/A.4 – READ DECREASE TIP alternately on right and left side of marker. Dec like this every 4th round 10-11-11-6-6-7 times, then every other round 0-0-0-7-7-7 times = 51-51-54-54-57-57 tr. Work A.2 until sleeve measures approx. 47 cm in all sizes. Fasten off. Work the other sleeve the same way. |
|||||||||||||||||||||||||||||||||||||||||||||||||
Diagram explanations |
|||||||||||||||||||||||||||||||||||||||||||||||||
|
|||||||||||||||||||||||||||||||||||||||||||||||||
|
|||||||||||||||||||||||||||||||||||||||||||||||||

|
|||||||||||||||||||||||||||||||||||||||||||||||||
|
|||||||||||||||||||||||||||||||||||||||||||||||||
|
Have you made this or any other of our designs? Tag your pictures in social media with #dropsdesign so we can see them! Do you need help with this pattern?You'll find tutorial videos, a Comments/Questions area and more by visiting the pattern on garnstudio.com. © 1982-2024 DROPS Design A/S. We reserve all rights. This document, including all its sub-sections, has copyrights. Read more about what you can do with our patterns at the bottom of each pattern on our site. |
|||||||||||||||||||||||||||||||||||||||||||||||||


With over 40 years in knitting and crochet design, DROPS Design offers one of the most extensive collections of free patterns on the internet - translated to 17 languages. As of today we count 304 catalogues and 11422 patterns - 11422 of which are translated into English (UK/cm).
We work hard to bring you the best knitting and crochet have to offer, inspiration and advice as well as great quality yarns at incredible prices! Would you like to use our patterns for other than personal use? You can read what you are allowed to do in the Copyright text at the bottom of all our patterns. Happy crafting!
Comments / Questions (73)
Hello, I am about to start on this gorgeous pattern but I don't know what size a small is, is it a small in juniors or womens it would mean so much to me if you could answer my question asap so I can get to work! thank you
27.11.2016 - 22:15DROPS Design answered:
Dear Mrs Ruth, you will find a measurement chart at the bottom of the pattern with all measurements taken flat from side to side. Compare these to a similar garment you have and like the shape to find out the matching size. Read more here. Happy knitting!
28.11.2016 - 09:43Nie rozumiem o co chodzi jak zrobic pokrojem pod rękawy Gdzie sa opuszczane oczka gdzie dobierać Czy ktoś moze mi to wytłumaczyć? Co znaczy symbol oś?
14.08.2016 - 16:15DROPS Design answered:
Bogusiu, już odpowiadałam na to pytanie. Jeśli dalej jest z tym kłopot proszę o bezpośredni kontakt na poland@dropsproject.com Pozdrawiamy
14.08.2016 - 22:10Nie rozumiem o co chodzi jak zrobic pokrojem pod rękawy Gdzie sa opuszczane oczka gdzie dobierać Czy ktoś moze mi to wytłumaczyć? Co znaczy symbol oś?
25.07.2016 - 23:12DROPS Design answered:
Bogusiu, już odpowiadałam na to pytanie. Jeśli dalej jest z tym kłopot proszę o bezpośredni kontakt na poland@dropsproject.com Pozdrawiamy
26.07.2016 - 16:44Bonjour, je suis bloqué sur la ligne 18, il est mentionné de répéter cette ligne jusqu'à une dimension alors que juste avant on nous parle des lignes 15 et 16, de quel ligne s'agit il ? De plus, sur la photo, on voit qu'ensuite il y a la ligne 11 à 13 qui n'est pas mentionné dans l'explication. Pouvez-vous m'aider à comprendre ?
25.07.2016 - 10:05DROPS Design answered:
Bonjour Lolo7745, le tour 18 correspond au tour 16 des explications/du diagramme - après avoir répété 7 fois au total les tours 15 & 16, répétez le tour 16 jusqu'à la dimension indiquée pour votre taille (le nbe de fois va dépendre de votre tension, n'hésitez pas à ajuster comme vous le souhaitez). Bon crochet!
25.07.2016 - 10:21Nie rozumiem o co chodzi jak zrobic pokrojem pod rękawy Gdzie sa opuszczane oczka gdzie dobierać Czy ktoś moze mi to wytłumaczyć? Co znaczy symbol oś?
17.07.2016 - 01:03DROPS Design answered:
Bogusiu proszę spójrz do komentarzy do wzoru, tam znajdują się odpowiedzi na twoje pytania. Podobną techniką wykonywany jest sweter, który znajduje się na naszym facebooku, w grupie DROPS Workshop: https://www.facebook.com/groups/DROPSWorkshop/permalink/1736851459907529/. Tam są dokładnie pokazane podkroje rękawów. POWODZENIA
18.07.2016 - 13:37Nie rozumiem o co chodzi jak zrobic pokrojem pod rękawy Gdzie sa opuszczane oczka gdzie dobierać Czy ktoś moze mi to wytłumaczyć? Co znaczy symbol oś?
14.07.2016 - 18:13DROPS Design answered:
Bogusiu, odpowiedziałam już wcześniej na Twoje pytanie. Proszę spójrz we wzorze w zakładce KOMENTARZE - w 2 miejscach. W razie pytań służę pomocą. Pozdrawiam
15.07.2016 - 15:05Nie rozumiem o co chodzi jak zrobic pokrojem pod rękawy Gdzie sa opuszczane oczka gdzie dobierać Czy ktoś moze mi to wytłumaczyć? Co znaczy symbol oś?
06.07.2016 - 01:23DROPS Design answered:
Dalej przer. ściegiem fantazyjnym jak wcześniej do środka boku między 3-cim i 4-tym rogiem. Przer. teraz oł do pocz. okrążenia następująco: przer. 1 oł na każde ominięte oł/sł. W nast. okrążeniu przer. ściegiem fantazyjnym i dodawać o. jak wcześniej ponad wszystkimi oczkami i łańcuszkami nabranymi na podkroje rękawów”. Skrót 'oś' - oznacza oczko ścisłe
06.07.2016 - 17:34Nie rozumiem o co chodzi jak zrobic pokrojem pod rękawy Gdzie sa opuszczane oczka gdzie dobierać Czy ktoś moze mi to wytłumaczyć? Co znaczy symbol oś?
06.07.2016 - 00:18DROPS Design answered:
Proszę spojrzeć na schemat na dole wzoru: 2 krótkie poprzeczne kreski to pęknięcia, w które następnie wykonuje się rękawy (podkroje rękawów). Powstają one następująco: „Przer. teraz podkroje rękawów następująco: przer. jak wcześniej (kwadrat) do 1-szego rogu, dalej przer. 3 sł + 3 oł + 3 sł w łuk w rogu. Przer. teraz łańcuszek do środka nast. boku (tj. na środku między 1-szym i 2-gim rogiem) następująco: przer. 1 oł na każde ominięte oł/sł.
06.07.2016 - 17:33Müssen bei den Ärmel in jeder 4. Reihe eine Abnahme (A 3 oder A4) oder zwei Abnahmen (A3 und A4) erfolgen?
15.06.2016 - 19:29DROPS Design answered:
Hallo Alexa, Sie nehmen auf beiden Seiten der Ärmelmitte Maschen ab, am Rundenanfang nach A.3 und am Rundenende nach A.4.
16.06.2016 - 07:52Kiki wrote:
Hello, I am in the 8th round and it says Work sl sts until the middle of the 2 dtr in corner, but in the pattern A1 it shows dc sts??? what are the correct sts i must use?
08.06.2016 - 20:46DROPS Design answered:
Dear Kiki, start round 8 with sl st to the 2 dtr in corner then work 1 sc between these 2 dtr - diagram just doesn't show these sl sts. Happy crocheting!
09.06.2016 - 08:46