
Popular categories
Looking for a yarn?


|
||||||||||||||||||||||||||||||||||||||||||||||||||||
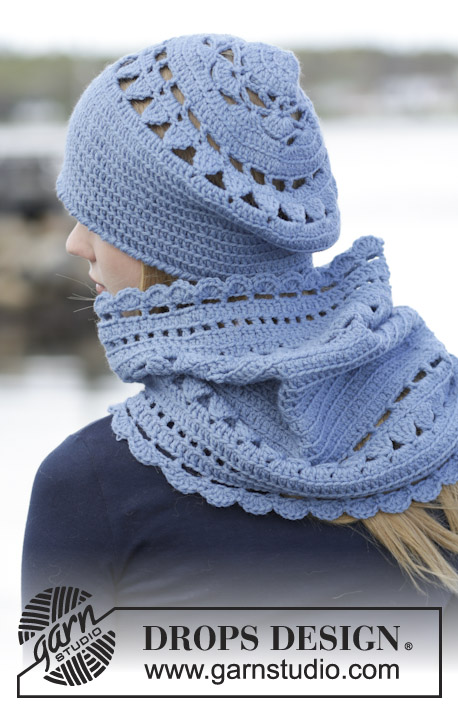
Winter Flower |
||||||||||||||||||||||||||||||||||||||||||||||||||||
 |
 |
|||||||||||||||||||||||||||||||||||||||||||||||||||
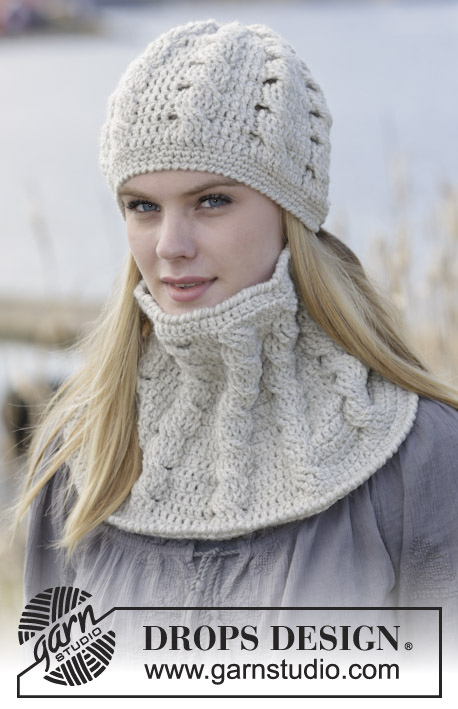
Set consists of: Crochet DROPS beret and neck warmer with lace pattern in ”Lima”.
DROPS 166-21 |
||||||||||||||||||||||||||||||||||||||||||||||||||||
|
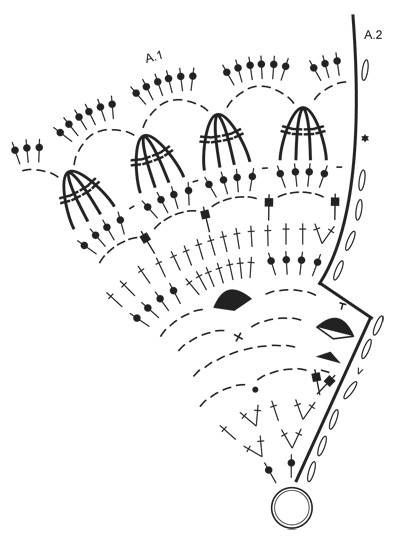
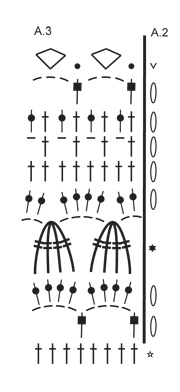
PATTERN: See diagrams A.1 to A.3. Diagram A.2 shows how round beg and ends. DTR-GROUP: 1 dtr in back loop of first/next tr but wait with last pull through, work 1 dtr in each of the next 3 tr the same way, pull yarn through all 5 sts on hook REVERSE CROCHET: Work as dc but backwards. I.e. crochet around from left to right CROCHET INFO: Beg every round with tr with 3 ch (do not replace first tr) and finish with 1 sl st in 3rd ch at beg of round. Beg every dc round with 1 ch (this does not replace first dc) and finish with 1 sl st in first ch from beg of round. DECREASE TIP: Dec 1 tr by working the next 2 tr tog as follows: Work 1 tr but wait with last pull through (= 2 sts on hook), then work next tr but on last pull through, pull yarn through all 3 sts on hook. INCREASE TIP: Inc 1 tr by working 2 tr in same tr. ---------------------------------------------------------- BERET: The piece is worked top down. Work 4 ch on hook size 4 mm with Lima and form a ring with 1 sl st in first ch. Then work A.1 as follows (repeat A.1 5 times in total on round): ROUND 1: A.2 shows how round beg and ends - READ CROCHET INFO. Work 10 tr in ch-ring. ROUND 2: Work 2 tr in back loop of every tr = 20 tr. ROUND 3: Work * 2 tr in back loop of first tr, 1 tr in back loop of next tr *, repeat from *-* 10 times in total = 30 tr. ROUND 4: Work * 1 tr in both loops in first tr, 1 ch, 1 tr in both loops in same tr, 4 ch, skip 2 tr, 1 dc in next tr, 4 ch, skip 2 tr *, repeat from *-* 5 times in total. ROUND 5: Work * 1 dc around ch (= ch between tr from previous round), 3 ch, 1 dc around same ch, 8 ch, skip: 4 ch + 1 dc + 4 ch *, repeat from *-* 5 times in total. ROUND 6: Work * 7 tr around first/next ch-space (= space with 3 ch), 4 ch, 1 dc around next ch-space (= space with 8 ch), 4 ch *, repeat from *-* 5 times in total. ROUND 7: Work * 1 dc in middle tr in tr-group (= 4th tr), 4 ch, 7 tr in next dc, 4 ch *, repeat from *-* 5 times in total. REMEMBER THE CROCHET TENSION! ROUND 8: Work * 4 tr around ch-space, 1 tr in back loop of each of the 7 tr from tr-group, 4 tr around next ch-space *, repeat from *-* 5 times in total = 75 tr. ROUND 9: On this round work all tr in back loop of tr from previous round: Work * 2 tr in first tr, 1 tr in each of the next 14 tr *, repeat from *-* 5 times in total = 80 tr. ROUND 10: Work * 1 tr in both loops of first/next tr, 4 ch, skip 3 tr *, repeat from *-* 20 times in total. ROUND 11: Work * 1 ch, 4 tr around first/next ch-space *, repeat from *-* 20 times in total = 80 tr and 20 ch. ROUND 12: Work * 3 ch, 1 DTR-GROUP – see explanation above – over the next 4 tr, 6 ch, 1 dtr-group over the next 4 tr, 6 ch, 1 dtr-group over the next 4 tr, 6 ch, 1 dtr-group over the next 4 tr, 3 ch *, repeat from *-* 5 times in total = 20 dtr-groups with 6 ch between each. ROUND 13: Work 3 tr around first ch-space, 6 tr around each of the next 19 ch-space, 3 tr around last ch-space = 120 tr. Then work piece with tr in back loop as follows: ROUND 1: Work 1 tr in every tr. ROUND 2: Work 1 tr in every tr AT THE SAME TIME dec 3 tr evenly READ DECREASE TIP = 117 tr. ROUND 3: Work 1 tr in every tr but work every 12th and 13th tr tog = 108 tr. ROUND 4: Work 1 tr in every tr but work every 11th and 12th tr tog = 99 tr. ROUND 5: Work 1 tr in every tr AT THE SAME TIME dec 11-5 tr evenly = 88-94 tr. ROUND 6-9: Work 1 tr in every tr. ROUND 10: Work with a double thread. Work REVERSE CROCHET – see explanation above – the entire round. Fasten off. ---------------------------------------------------------- NECK WARMER: Worked in the round from the middle of neck warmer and down with tr and A.3, then worked from ch-row and up with A.3. Work 96-104 LOOSE ch on hook size 5 mm with Lima and form a ring with 1 sl st in first ch. Work 3 ch – READ CROCHET INFO, 1 tr in every ch, finish with 1 sl st in 3rd ch on round = 96-104 tr. Work 1 tr in back loop of every tr. When piece measures 7 cm, inc 8 tr evenly - READ INCREASE TIP = 104-112 tr. Repeat inc when piece measures 10-12 cm = 112-120 tr. REMEMBER THE CROCHET TENSION! Continue with 1 tr in back loop of every tr until piece measures 14-16 cm. Then work A.3 as follows: ROUND 1: A.2 shows how round beg and ends. Work * 1 tr in both loops in first/next tr, 4 ch, skip 3 ch *, repeat from *-* the entire round (= 28-30 times in total). ROUND 2: Work 4 tr in every ch-space = 112-120 tr. ROUND 3: Work * 2 ch, 1 DTR-GROUP – see explanation above – over the next 4 tr, 4 ch, 1 dtr-group over the next 4 tr, 2 ch *, repeat from *-* the entire round (= 14-15 times in total) = 28-30 dtr-groups. ROUND 4: Work 2 tr around first ch-space, 4 tr around every ch-space until 1 ch-space remains, 2 tr around last ch-space = 112-120 tr. ROUND 5: Work 1 tr in back loop of every tr = 112-120 tr. ROUND 6: Work * 1 tr in back loop of first/next tr, 1 ch, skip 1 tr *, repeat from *-* the entire round = 56-60 tr and 56-60 ch. ROUND 7: Work 1 tr in back loop of every tr and 1 tr around every ch = 112-120 tr. ROUND 8: Work * 1 tr in both loops of first/next tr, 3 ch, skip 3 tr *, repeat from *-* the entire round (= 28-30 times in total). ROUND 9: Work * 1 dc in first/next tr, 5 tr in middle ch in ch-space *, repeat from *-* the entire round (= 28-30 times in total). Fasten off. Then work A.3 in ch-ring (= 96-104 ch) in opposite direction as follows: ROUND 1: Work * 1 tr in both loops of first/next, 4 ch, skip 3 tr *, repeat from *-* the entire round (= 24-26 times in total). ROUND 2: Work 4 tr in every ch-space = 96-104 tr. ROUND 3: Work * 2 ch, 1 dtr-group over the next 4 tr, 4 ch, 1 dtr-group over the next 4 tr, 2 ch *, repeat from *-* the entire round (= 12-13 times in total) = 24-26 dtr-groups. ROUND 4: Work 2 tr around first ch, 4 tr around every ch-space until 1 ch-space remains, 2 tr around last ch-space = 96-104 tr. ROUND 5: Work 1 tr in back loop of every tr = 96-104 tr. ROUND 6: Work * 1 tr in back loop of first/next tr, 1 ch, skip 1 tr *, repeat from *-* the entire round = 48-52 tr and 48-52 ch. ROUND 7: Work 1 tr in back loop of every tr and 1 tr around every ch = 96-104 tr. ROUND 8: Work * 1 tr in both loops of first/next tr, 3 ch, skip 3 tr *, repeat from *-* the entire round (= 24-26 times in total). ROUND 9: Work * 1 dc in first/next tr, 5 tr in middle ch in ch-space *, repeat from *-* the entire round (= 24-26 times in total). Fasten off. |
||||||||||||||||||||||||||||||||||||||||||||||||||||
Diagram explanations |
||||||||||||||||||||||||||||||||||||||||||||||||||||
|
||||||||||||||||||||||||||||||||||||||||||||||||||||
|
||||||||||||||||||||||||||||||||||||||||||||||||||||
|
||||||||||||||||||||||||||||||||||||||||||||||||||||
|
Have you made this or any other of our designs? Tag your pictures in social media with #dropsdesign so we can see them! Do you need help with this pattern?You'll find tutorial videos, a Comments/Questions area and more by visiting the pattern on garnstudio.com. © 1982-2024 DROPS Design A/S. We reserve all rights. This document, including all its sub-sections, has copyrights. Read more about what you can do with our patterns at the bottom of each pattern on our site. |
||||||||||||||||||||||||||||||||||||||||||||||||||||


With over 40 years in knitting and crochet design, DROPS Design offers one of the most extensive collections of free patterns on the internet - translated to 17 languages. As of today we count 304 catalogues and 11422 patterns - 11422 of which are translated into English (UK/cm).
We work hard to bring you the best knitting and crochet have to offer, inspiration and advice as well as great quality yarns at incredible prices! Would you like to use our patterns for other than personal use? You can read what you are allowed to do in the Copyright text at the bottom of all our patterns. Happy crafting!
Comments / Questions (8)
On end of row 7 on the beret what do I do to finish off the row and then start the next row as it just doesn’t seem to be right the way I have tried.
30.12.2023 - 22:49DROPS Design answered:
Dear Mrs Pitt, finish 7th round with 1 slip stitch in first stitch of the round, then work A.2 (you can crochet 1 slip stitch around first chain-space if you like to) and just continue with the 8th round crocheting treble crochets (UK-English) around the first chain space. Happy crocheting!
02.01.2024 - 10:54Dans l'explication du 1er tour du tour de cou,il faut sauter 3 brides et non 3 mailles en l'air.
14.11.2021 - 14:33DROPS Design answered:
Bonjour Mme Campora, effectivement, merci pour votre retour, une correction va être faite. Bonne continuation!
15.11.2021 - 08:09Bonjour, très joli modèle! Je l'ai travaillé dans la laine indiquée, mais il est effectivement très large! Pour le tour du cou, je laisse tel quel, ce n'est pas gênant .. Pour le béret j'ai terminé avec 80 mailles en diminuant beaucoup plus depuis le tour 2 du deuxième groupe d'explications. Cordialement.
21.01.2021 - 22:07Hello Drops! Thank you for your truly beautiful designs. My question is about row 12 for the beret. Is it possible that we should end up with = 25 tr-groups since we start with 100 stitches and TR-groups have 4 stitches? I have the right amount of stitches in previous rows. Should the round be something like: Work ch 3, *1 tr-group over the next 4 dc, ch 6* repeat from * to * for a total of 25 tr-groups with 6 ch between each? Best regards from Vancouver Island, Canada!
12.11.2016 - 22:04DROPS Design answered:
Dear Denise, at the end of round 10 you should have 20 ch-spaces with each 4 ch. On round 11 you will crochet 4 dc in each of this ch-spaces, you will have then (4 dc, 1 ch) a total of 20 times. On round 12 you will crochet 1 dtr-group over each of these (each dtr-group is worked over the 4 dc from previous row), you will have then 20 dtr-groups. See also diagram A.1 (= worked a total of 5 times in the round). Happy crocheting!
14.11.2016 - 10:09I'm new to crotcheting and I'm not sure how to work with a double thread? Do I have to cut the yarn and double it up?
21.12.2015 - 10:53DROPS Design answered:
Dear Redhead, you have to work this round with 2 strands of yarn held tog as just one. You can use the other end of ball to work at the same time with both yarn from inside and from outside the ball (or with another ball). Happy crocheting!
21.12.2015 - 11:57Je l ai fais, combien dois t il mesurer en diametre avant de faire les brides Je le trouvevun peu large j ai du finir avec des ms Cordialement isa
26.08.2015 - 00:05DROPS Design answered:
Bonjour Mme Jannel, le béret est adapté pour un tour de tête de 54/56 et de 56/58 cm, pour un tour de tête plus petit, vous pouvez diminuer davantage pour ajuster à la taille souhaitée. Bon crochet!
26.08.2015 - 10:28Ce modèle est très élégant et féminin. J'aime bien les ajourés.
27.05.2015 - 22:50Romantique à souhait !
27.05.2015 - 19:03