DROPS Fabel
DROPS Fabel
75% Wool, 25% Polyamide
from 2.50 € /50g
DROPS Alpaca
DROPS Alpaca
100% Alpaca
from 3.65 € /50g
Get the yarn to make this pattern from 28.25€.

The yarn cost is calculated from the pattern’s smallest size and the yarn’s cheapest product type. Looking for an even better price? You might find it on the DROPS Deals!

DROPS SS24

Checkmate

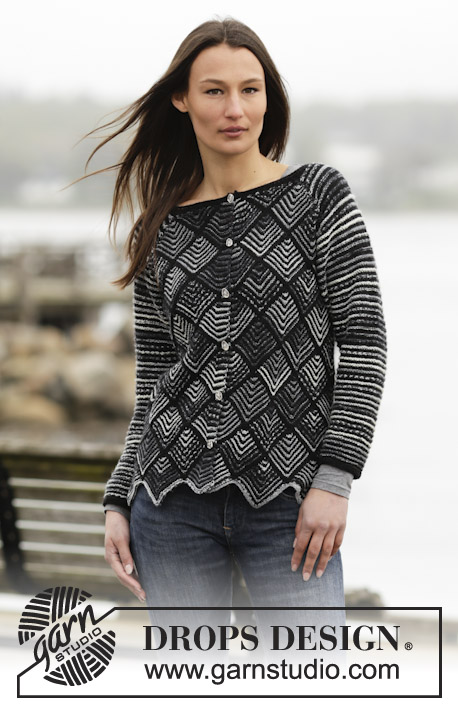
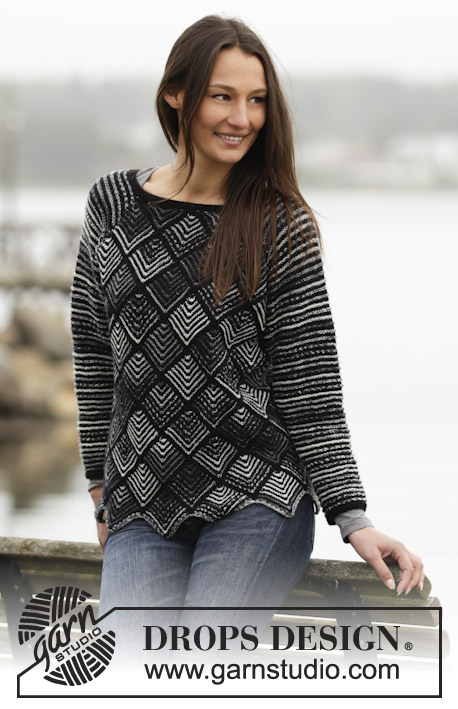
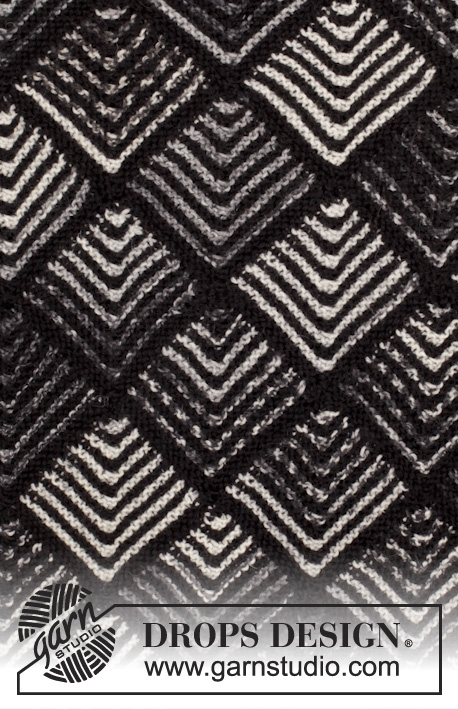
Knitted DROPS jumper with domino squares and raglan in ”Fabel” and “Alpaca”. Size: S - XXXL.

DROPS 165-12
DROPS design: Pattern no fa-310
Yarn group A
----------------------------------------------------------
Size: S - M - L - XL - XXL - XXXL
Materials:
DROPS FABEL from Garnstudio
200-200-200-250-250-300 g, colour no 905, salt and pepper
DROPS ALPACA from Garnstudio
250-250-250-300-300-350 g colour no 8903, black

DROPS DOUBLE POINTED NEEDLES and CIRCULAR NEEDLE (40 and 80 cm) SIZE 3 mm - or size needed to get 24 sts x 48 rows in garter st or 24 sts x 40 rows in garter/stocking st (sleeve) = 10 x 10 cm.

-------------------------------------------------------

Alternative Yarn – See how to change yarns here
Yarn Groups A to F – Use the same pattern and change the yarn here
Yarn usage using an alternative yarn – Use our yarn converter here

-------------------------------------------------------

DROPS Fabel
DROPS Fabel
75% Wool, 25% Polyamide
from 2.50 € /50g
DROPS Alpaca
DROPS Alpaca
100% Alpaca
from 3.65 € /50g
Get the yarn to make this pattern from 28.25€.

The yarn cost is calculated from the pattern’s smallest size and the yarn’s cheapest product type. Looking for an even better price? You might find it on the DROPS Deals!

Pattern instructions

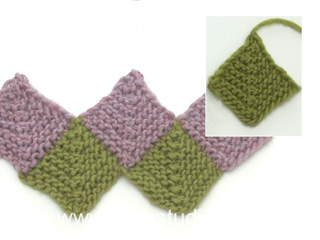
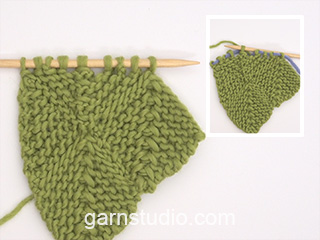
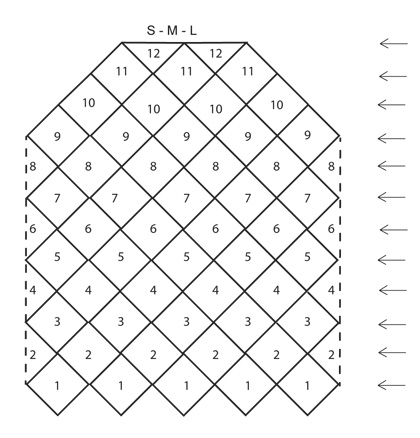
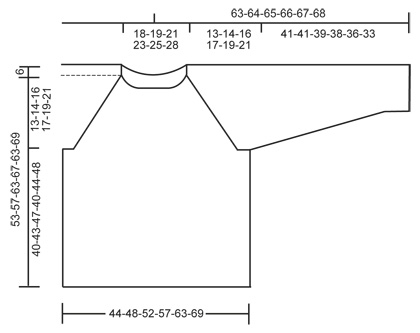
MEASURING TIP:
Because of the ridges the sleeves will be approx. 5 cm longer when garment is done.

GARTER ST (worked in the round):
* K 1 round and P 1 round *, repeat from *-*. 1 ridge = 2 rounds.

KNITTING TIP 1: To avoid all yarn fastenings, every square on first row can be worked with 2 separate balls (1 of each yarn). Instead of cutting the yarn, the balls can follow the squares upwards in the rows.

KNITTING TIP 2: Always pick up sts from RS.

STRIPES BODY: Work body in stripes as follows:
Always pick up sts with Alpaca, K 1 row from WS with Alpaca, K 2 rows more with Alpaca. Thereafter * K 2 rows with Fabel, K 2 rows with Alpaca *, repeat from *-*.

STRIPES SLEEVE: Work as follows:
Row 1: K from RS with Alpaca.
Row 2: P from WS with Alpaca.
Row 3: K from RS with Fabel.
Row 4: K from WS with Fabel.
Repeat these 4 rows upwards.

WHOLE DOMINO SQUARE:
Insert 1 marker in the middle st.
Row 1 (= WS): K all sts.
Row 2 (= RS): K until 1 st before marker, slip 1 st as if to K, K 2 sts tog, psso, K rest of row.
Repeat 1st and 2nd row, i.e. dec 2 sts in the middle of the square on every other row until 1 st remains, cut the yarn and pull it through remaining st.

HALF DOMINO SQUARE (horizontal):
Work as whole domino square but in addition to dec in the middle of square, slip last st at the end of every row on 1 stitch holder. Continue like this until 5-5-3-3-3-3 sts remain on needle.
SIZE S-M: 5 sts remain on row (= 6-7 sts on stitch holder in each side). K 1 row from WS and slip last st at end of row on stitch holder. On next row (from RS) work as follows: Slip 1 st as if to K, K 2 tog, psso. Slip last st at end of row on stitch holder (= 7-8 sts on stitch holder). Cut the yarn and pull it through last st on row.
SIZE L-XL-XXL-XXXL: 3 sts remain on row (= 8-9-10-11 sts on stitch holder in each side). K 1 row from WS over the 3 sts. On next row (= from RS) work as follows: Slip 1 st as if to K, K 2 tog, psso. Cut the yarn and pull it through the last st.
----------------------------------------------------------

JUMPER: Beg by casting on sts the entire width of garment, then work one and one square back and forth in GARTER ST and STRIPES BODY - see explanation above.

ROW 1:
Cast on 310-350-370-410-450-490 sts on circular needle size 3 mm with Fabel. P 1 round. Work next round as follows: K 14-16-17-19-21-23, * slip 1 st as if to K, K 2 tog, psso, K 28-32-34-38-42-46 *, repeat from *-* 9 times in total and finish by slipping 1 st as if to K, K 2 tog, psso and K 14-16-17-19-21-23 = 290-330-350-390-430-470 sts.
Now work WHOLE DOMINO SQUARE - see explanation above! Beg with the first 29-33-35-39-43-47 sts on round. When Domino square has been worked, work the next 29-33-35-39-43-47 sts the same way. Repeat the same way until there are 10 whole domino squares on 1st row.

ROW 2:
Pick up 14-16-17-19-21-23 sts along the edge of the first square on 1st row. Then pick up 1 st in the middle of the first and second square, then pick up 14-16-17-19-21-23 sts along the edge on the second square on 1st row = 29-33-35-39-43-47 sts on needle. Then work whole domino square. Work the same way between all squares from 1st row = 10 domino squares on 2nd row.

Repeat 2nd row until 9-9-9-7-7-7 rows with domino squares have been worked.

ROW 10-10-10-8-8-8: * Pick up 14-16-17-19-21-23 sts along the edge of the first square from previous row. Then pick up 1 st between the first square and next square from previous row. Pick up 14-16-17-19-21-23 sts along the side of next square = 29-33-35-39-43-47 sts on needle. Work whole domino square *, repeat from *-* 4 times. Skip the other side of next square and the first side on next square.
* Pick up 14-16-17-19-21-23 sts along the edges on each of the next 2 squares from previous row and 1 st between squares = 29-33-35-39-43-47 sts on needle. Work whole domino square *, repeat from *-* 4 times. Finish each part separately. There are 4 squares on back piece and 4 squares on front piece.

BACK PIECE:
ROW 11-11-11-9-9-9: Pick up 14-16-17-19-21-23 sts along the edges on each of the next 2 squares from previous row and 1 st between squares = 29-33-35-39-43-47 sts on needle. Work whole domino square. When Domino square has been worked, pick up 29-33-35-39-43-47 sts between 2 and 2 squares. Continue like this until 3 domino squares have been worked.

ROW 12-12-12-10-10-10: Pick up 14-16-17-19-21-23 sts along the edges on each of the next 2 squares from previous row and 1 st between squares = 29-33-35-39-43-47 sts on needle. Work HALF DOMINO SQUARE (horizontal). When Domino square has been worked, pick up 29-33-35-39-43-47 sts between the next 2 squares. Work half domino square (horizontal).

FRONT PIECE:
Work as on back piece.

SLEEVE:
Worked back and forth on circular needle. Cast on 50-52-54-58-60-62 sts (incl 1 edge st in each side) on circular needle size 3 mm with Alpaca. Work 2 ridges with Alpaca, then work STRIPES SLEEVE - see explanation above. READ MEASURING TIP! When piece measures 8 cm, inc 1 st in each side, repeat inc every 2-2-1½-1½-1½-1 cm 14-15-16-16-17-18 more times = 80-84-88-92-96-100 sts. When piece measures 41-41-39-38-36-33 cm, beg dec for raglan, dec 1 st in each side as follows: Dec on every 4th row 0-0-3-3-5-7 times, then on every other row 26-28-27-29-29-29 times = 28 sts remain in all sizes. Slip sts on a stitch holder. Knit another sleeve.

Sew sleeve seam and sew sleeve in raglan on body. Slip all sts (from sleeve and front/back piece) back on needle = 112-120-120-128-136-144 sts. Insert 1 marker in all transitions between sleeves and body. Work 4 ridges with Alpaca, at the same time on every round worked K, dec 1 st on each side of marker by K 2 tog (8 sts dec in total per round, 32 sts dec in total) = 80-88-88-96-104-112 sts. Cast off.

This pattern has been corrected.

Updated online: 21.09.2015
STRIPES BODY: Work body in stripes as follows:
Always pick up sts with Alpaca, K 1 row from WS with Alpaca, K 2 rows more with Alpaca. Thereafter * K 2 rows with Fabel, K 2 rows with Alpaca *, repeat from *-*.

Diagram

symbols = knitting direction
diagram
diagram
diagram

Each of our patterns has specific tutorial videos to help you.

Do you have a question? See a list of frequently asked questions (FAQ)

Knitting tension is what determines the final measurements of your work, and is usually measured per 10 x 10 cm. It is provided like so: number of stitches in width x number of rows in height - eg: 19 stitches x 26 rows = 10 x 10 cm.

The knitting tension is very individual; some people knit/crochet loosely while others work tightly. You adjust the knitting tension with the needle size, which is why the suggested needle size is only meant as a guide! You need to adjust this (up or down) to ensure that YOUR knitting tension matches the knitting tension provided in the pattern. If you work with a different knitting tension than provided you will have a different yarn consumption, and your work will have different measurements than what the pattern suggests.

The knitting tension also determines which yarns can replace each other. As long as you achieve the same knitting tension you can replace one yarn with another.

See DROPS lesson: How to measure your tension/gauge

See DROPS video: How to make a gauge tension swatch

The required amount of yarn is provided in grams, eg: 450 g. To calculate how many balls you’ll need you first need to know how many grams are in 1 ball (25g, 50g or 100g). This information is available if you click on the individual yarn quality on our pages. Divide the amount required with the amount of each ball. For example, if each ball is 50g (the most common amount), the calculation will be as follows: 450 / 50 = 9 balls.

The important thing when changing from one yarn to another is that the knitting/crochet tension remains the same. This is so that the measurements of the finished piece will be the same as on the sketch provided. It is easier to achieve the same knitting tension using yarns from the same yarn group. It is also possible to work with multiple strands of a thinner yarn to achieve the knitting tension of a thicker one. Please try our yarn converter. We recommend you to always work a test swatch.

Please NOTE: when changing yarn the garment might have a different look and feel to the garment in the photo, due to individual properties and qualities of each yarn.

See DROPS lesson: Can I use a different yarn than the one mentioned in the pattern?

All our yarns are categorised into yarn groups (from A to F) according to thickness and knitting tension – group A contains the thinnest yarns and group F the thickest. This makes it easier for you to find alternative yarns to our patterns, should you wish to switch yarn. All yarns within the same group have a similar knitting tension and can easily replace each other. However, different yarn qualities have different structures and properties which will give the finished work a unique look and feel.

Click here for an overview of the yarns in each yarn group

At the top of all our patterns you’ll find a link to our yarn calculator, which is a helpful tool should you wish to use a different yarn than suggested. By filling in the yarn quality you wish to replace, the amount (in your size) and number of strands, the calculator will present good alternative yarns with the same knitting tension. Additionally it will tell you how much you’ll require in the new qualities and whether you’ll need to work with multiple strands. Most skeins are 50g (some are 25g or 100g).

If the pattern is worked with multiple colours, every colour will have to be calculated separately. Similarly, if the pattern is worked with several strands of different yarns (for example 1 strand Alpaca and 1 strand Kid-Silk) you will have to find alternatives for each, individually.

Click here to see our yarn calculator

Since different yarns have different qualities and textures we have chosen to keep the original yarn in our patterns. However, you can easily find options among our available qualities by using our yarn calculator, or simply pick a yarn from the same yarn group.

It is possible that some retailers still have discontinued yarns in stock, or that someone has a few skeins at home that they would like to find patterns for.

The yarn calculator will provide both alternative yarn as well as required amount in the new quality.

If you think it's hard to decide what size to make, it can be a good idea to measure a garment you own already and like the size of. Then you can pick the size by comparing those measures with the ones available in the pattern's size chart.

You'll find the size chart at the bottom of the pattern.

See DROPS lesson: How to read size chart

The needle size provided in the pattern serves only as a guide, the important thing is to follow the knitting tension. And since knitting tension is very individual, you will have to adjust the needle size to ensure that YOUR tension is the same as in the pattern – maybe you’ll have to adjust 1, or even 2 needle sizes, up or down to achieve the correct tension. For this, we recommend that you work test swatches.

Should you work with a different knitting tension than the one provided, the measurements of the finished garment might deviate from the measurement sketch.

See DROPS lesson: How to measure your tension/gauge

See DROPS video: How to make a tension/gauge swatch

Working a garment top-down provides more flexibility and room for personal adjustment. For example it is easier to try the garment on while working, as well as making adjustments to length of yoke and shoulder caps.

The instructions are carefully explaining every step, in the correct order. Diagrams are adjusted to the knitting direction and are worked as usual.

The diagram depicts all rows/rounds, and every stitch seen from the right side. It is read from bottom to top, from right to left. 1 square = 1 stitch.

When working back and forth, every other row is worked from the right side and every other row is worked from the wrong side. When working from the wrong side, the diagram will have to be worked reversed: from left to right, knit stitches are purled, purl stitches are knit etc.

When working in the round every round is worked from the right side and the diagram are worked from right to left on all rounds.

See DROPS lesson: How to read knitting diagrams

The diagram depicts all rows/rounds, and every stitch seen from the right side. It is worked from bottom to top, from right to left.

When working back and forth every other row is worked from the right side: from right to left and every other row is worked from the wrong side: from left to right.

When working in the round, every row in the diagram are worked from the right side, from right to left.

When working a circular diagram you start in the middle and work your way outwards, counter clockwise, row by row.

The rows usually start with a given number of chain stitches (equivalent to the height of the following stitch), this will either be depicted in the diagram or explained in the pattern.

See DROPS lesson: How to read crochet diagrams

Instructions for working several diagrams after each other on the same row/round, will often be written like so: “work A.1, A.2, A.3 a total of 0-0-2-3-4 times". This means you work A.1 once, then A.2 is worked once, and A.3 is repeated (in width) the number of times provided for your size – in this case like so: S = 0 times, M = 0 times, L=2 times, XL= 3 times and XXL = 4 times.

The diagrams are worked as usual: begin with the first row in A.1, then work the first row in A.2 etc.

See DROPS lesson: How to read knitting diagrams

See DROPS lesson: How to read crochet diagrams

The total width of the garment (from wrist-to-wrist) will be larger in the larger sizes, despite the actual sleeves being shorter. The larger sizes have longer sleeve caps and wider shoulders, so there will be a good fit in all sizes.

The measurement sketch/schematic drawing provides information regarding the full length of the garment. If it’s a jumper or a jacket the length is measured from the highest point on the shoulder closest to the neckline, and straight down to the bottom of the garment. It is NOT measured from the tip of shoulder. Similarly, the length of yoke is measured from the highest point on the shoulder and down to where yoke is split into body and sleeves.

On a jacket measures are never taken along bands, unless specifically stated. Always measure inside band stitches when measuring the length.

See DROPS lesson: How to read a schematic drawing

Diagrams are often repeated on the round or in height. 1 repeat is the diagram the way it appears in the pattern. If it says to work 5 repeats of A.1 in the round, then you work A.1 a total of 5 times after/next to each other in the round. If it says to work 2 repeats of A.1 vertically/in height you work the entire diagram once, then begin again at the start and work the entire diagram one more time.

Chain stitches are slightly narrower than other stitches and to avoid working the cast-on edge too tight, we simply chain more stitches to begin with. The stitch count will be adjusted on the following row to fit the pattern and measurement sketch.

The rib edge is more elastic and will contract slightly compared to, for example, stocking stitch. By increasing before the rib edge, you avoid a visible difference in width between the rib edge and the rest of the body.

It’s very easy to cast off too tightly, and by making yarn overs while casting off (and simultaneously casting these off) you avoid a too tight cast off edge.

See DROPS video: How to bind off with yarn overs (yo)

To achieve an even increase (or decrease) you can increase on, for example: every 3rd and 4th row alternately, like so: work 2 rows and increase on the 3rd row, work 3 rows and increase on the 4th. Repeat this until the increase is complete.

See DROPS lesson: Increase or decrease 1 st on every 3rd and 4th row alternately

Should you prefer to work in the round instead of back and forth, you may of course adjust the pattern. You’ll need to add steeks mid-front (usually 5 stitches), and follow the instructions. When you would normally turn and work from the wrong side, simply work across the steek and continue in the round. At the end you’ll cut the piece open, pick up stitches to work bands, and cover the cut edges.

See DROPS video: How to knit steeks and cut open

Should you prefer to work back and forth instead of in the round, you may of course adjust the pattern so you work the pieces separately and then assemble them at the end. Divide the stitches for the body in 2, add 1 edge stitch in each side (for sewing) and work the front and back pieces separately.

See DROPS lesson: Can I adapt a pattern for circular needles into straight needles?

Pattern repeats can vary slightly in the different sizes, in order to get the correct proportions. If you’re not working the exact same size as the garment in the photo, yours might deviate slightly. This has been carefully developed and adjusted so that the complete impression of the garment is the same in all sizes.

Make sure to follow instructions and diagrams for your size!

If you have found a pattern you like which is available in women’s size it’s not very difficult to convert it to men’s size. The biggest difference will be the length of sleeves and body. Start working on the women size that you think would fit across the chest. The additional length will be worked right before you cast off for the armhole/sleeve cap. If the pattern is worked top-down you can add the length right after the armhole or before the first decrease on sleeve.

Regarding additional yarn amount, this will depend on how much length you add, but it is better with a skein too many than too few.

All yarns will have excess fibres (from production) that might come off as lint or shedding. Brushed yarns (ie hairier yarns) have more of these loose, excess fibres, causing more shedding.

Shedding also depends on what is worn under or over the garment, and whether this pulls at the yarn fibres. It’s therefore not possible to guarantee that there will be no shedding

Below are some tips on how to get the best result when working with hairier yarns:

1. When the garment is finished (before you wash it) shake it vigorously so the looser hairs come off. NOTE: do NOT use a lint roller, brush or any method that pulls at the yarn.

2. Place the garment in a plastic bag and put it in your freezer - the temperature will cause the fibres to become less attached to each other, and excess fibres will come off easier.

3. Leave in the freezer for a few hours before taking it out and shaking it again.

4. Wash the garment according to the instructions on the yarn label.

Pilling is a natural process that happens to even the most exclusive of fibers. It's a natural sign of wear and tear that is hard to avoid, and that is most visible in high friction areas of your garment like a sweater's arms and cuffs.

You can make your garment look as new by removing the pilling, using a fabric comb or a pill/lint remover.

Still can't find the answer you need? Then scroll down and leave your question so one of our experts can try to help you. This will be done normally within 5 to 10 working days.
In the meantime, you can read the questions and answers that others have left to this pattern or join the DROPS Workshop on Facebook to get help from fellow knitters/crocheters!

You might also like...

Post a comment to pattern DROPS 165-12

We would love to hear what you have to say about this pattern!

If you want to leave a question, please make sure you select the correct category in the form below, to speed up the answering process. Required fields are marked *.

Comments / Questions (34)

country flag Piló Holm wrote:

Hej, jeg har strkket blusen i L, men har problemer med ærmerne, som bliver for stramme i selve ærmegabet. Ærmegabet på blusen passer fint, men når jeg syr ærmet på, bliver det alt for stramt. Overvejer at strikke ærme i en større størrelse... Er der andet jeg kan gøre? På forhånd tak for hjælpen

23.04.2023 - 08:41

DROPS Design answered:

Hej, du skal sørge for at have den strikkefasthed som står i opskriften både i bredden og i højden og så skal du lukke løst af til både raglan og ærmekuppel :)

24.04.2023 - 14:42

country flag Henny wrote:

Wordt deze trui nu in het rond gebreid? De mouwen wel maar voor- en achterpand is me niet helemaal duidelijk

21.09.2022 - 11:31

DROPS Design answered:

Dag Henny,

Het lijf wordt in de rondte gebreid van onder naar boven. Je zet steken op en de brei je de volgende naald 1 naald averecht in de rondte en daarna nog een naald waarin je minderingen maakt, zoals aangegeven. Daarna begin je met de vierkantjes die je als het ware op de basis 'bouwt'

21.09.2022 - 19:41

country flag Anna wrote:

Chciałabym zrobić gładkie czarne rękawy. Robię rozmiar L. Jak policzyć ile włóczki potrzebuje na same rękawy? Czy ktoś może mi pomóc? pozdrawiam serdecznie

21.02.2022 - 11:25

DROPS Design answered:

Witaj Aniu, myślę, że będziesz potrzebować ok. 150 g włóczki Fabel i 300-350 g włóczki Alpaca. Pozdrawiamy!

21.02.2022 - 14:56

country flag Ans Tulner wrote:

Moet je in het vierkant niet iedere 2 naalden een kleurwisseling doen?

12.04.2021 - 18:31

DROPS Design answered:

Dag Ans,

Ja, dat klopt. Zo staat dat ook beschreven bij 'STREPEN LIJF' en 'STREPEN MOUW'.

15.04.2021 - 11:23

country flag Adriana Angellieri wrote:

La mia domanda é sempre la stessa perchè non dare la spiegazione e mcon ferri linearj

11.01.2021 - 11:17

DROPS Design answered:

Buongiorno Adriana, al di fuori dell'Italia si lavora principalmente con i ferri circolari per qualsiasi tipo di indumento. In particolare, questo modello è lavorato in tante parti separate che poi vengono unite insieme, quindi può usare i ferri dritti. Buon lavoro!

11.01.2021 - 15:33

country flag Adriana Angellieri wrote:

La mia domanda é sempre la stessa perchè non dare la spiegazione e mcon ferri linearj

11.01.2021 - 11:14

country flag Florence wrote:

Well I e finished it! It’s a beautiful pattern. With hindsight, it would have been worth spending extra time at the beginning to make smaller balls so that I could have carried the yarn up the pattern! The darning-in of all the ends took hours!

08.04.2020 - 00:05

country flag Alison Heath wrote:

Can you please explain the finishing neck and instructions. WORK 4 RIDGES.......what does that mean?

22.09.2019 - 21:07

DROPS Design answered:

Dear Alison, you have to work 8 rounds garter sts. See the pragraph GARTER ST at the beginning of the instructions. Happy knitting!

22.09.2019 - 22:35

country flag Florence wrote:

I don’t understand how I can knit each of the first round of dominoes with separate balls when the pattern only requires 4 or 5 and there are 10 squares per line. Surely it is impossible?

30.07.2019 - 20:34

DROPS Design answered:

Dear Florence, this is a suggestion: every square can be knitted - if you choose to do this, you will have to make smaller balls or to cut the yarn. Happy knitting!

07.08.2019 - 08:21

country flag Alison Heath wrote:

Hi, there is one measurement missing from the diagram. What is the width at the bottom of the sleeve?

16.05.2019 - 10:43

DROPS Design answered:

Dear Mrs Heath, if your tension is right (= 24 sts = 10 cm), the 50-52-54-58-60-62 sts cast on at the bottom of sleeve will measure approx. 21-22-23-24-25 cm. Happy knitting!

16.05.2019 - 11:37