
Popular categories
Looking for a yarn?


|
|
DROPS 69-11 |
|
|
|
|
DROPS Cardigan with matching top in Cotton Viscose
DROPS 69-11 |
|
|
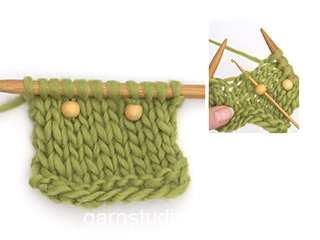
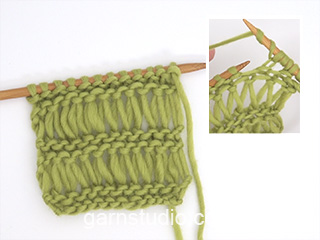
Gauge: 22 sts x 42 rows in garter st = 10 x 10 cm. Garter st, when knitting flat: Knit all sts, all rows. Pattern: The numbers below before ( ) refer to the back and the numbers inside ( ) refer to the front. Rows 1 (right side), 2 and 3: knit. Row 4 (wrong side): K 5-5-5-5 (3-3-3-3), K the next st with 1 bead - pull yarn tight, * K 7, K 1 with bead *, repeat from * - * 9-10-11-12 (5-5-6-6) times, K 5-5-5-5 (5-9-4-9) (center front). Rows 5, 6 and 7: Knit. Row 8 (wrong side): * K 1, 2 yo on needle*, repeat from * - * until 1 st remains on needle, K 1. Row 9: Knit, letting yo loops drop from previous rows (= long sts). Rows 10, 11, 12 and 13: Knit. Cut yarn and thread 11-12-13-14 (5-6-6-7) new beads on yarn. Row 14: K 1-1-1-1 (7-7-7-7), K 1 with bead, * K 7, K 1 with bead *, repeat from * - * 10-11-12-13 (4-5-5-6) times, K 1-1-1-1 (9-5-8-5). Rows 15 and 16: Knit. Row 17: Knit the same as row 8. Row 18: Knit the same as row 9. Decreasing tips: All decs are made on right side rows. Dec for the neck inside 4 edge sts knit as follows from edge: K 3, P 1. Before 4 edge sts: K 2 tog. After 4 edge sts: sl 1, K 1, psso. Buttonhole: 1 buttonhole = K the 3rd and 4th sts from edge tog, yo; on the next row, twist and knit yo (so that the buttonhole will not get too large). Back: Thread 10-11-12-13 beads on yarn. Cast on 83-91-99-107 sts and knit Pattern - see instructions above. After Pattern rows, knit garter st to finished dimensions. When the piece measures 9 cm inc 1 st at each side 7-7-8-8 times, every 2.5 cm = 97-105-115-123 sts. When the piece measures 26-27-29-30 cm bind off for armhole at each side every other row: 3 sts 1 time, 2 sts 0-1-2-3 times and 1 st 6-7-9-10 times = 79-81-83-85 sts. When the piece measures 43-45-47-49 cm bind off the center 27-27-29-29 sts for the neck. Continue in garter st, but P the 4th st from neck edge on right side rows. Dec 1 st at each neck edge every other row 2 times - see knitting tips = 24-25-25-26 sts remain on each shoulder. Bind off the remaining sts when the piece measures 45-47-49-51 cm. Left front: Thread 6-6-7-7 beads on yarn. Cast on 49-53-56-61 sts and knit pattern - see instructions above. After the pattern knit garter st but P the 8th st from center front edge on right side rows. When the piece measures 9 cm inc at the side as on back = 56-60-64-69 sts. When the piece measures 26-27-29-30 cm bind off for armhole at the side as on back = 47-48-48-50 sts. When the piece measures 35-37-38-39 cm bind off 10 sts at center front edge for neck. P the 4th st from center front edge on right side rows - at the same time dec 1 st for the neck inside the P st (see decreasing tips) 9-9-9-10 times every other row and then 4-4-4-4 times every 4 rows = 24-25-25-26 sts remain on shoulder. Bind off when the piece measures 45-47-49-51 cm. Right front: Cast on and knit the same as the left, reversing all shaping. Begin making buttonholes when the piece measures 20-20-19-20 cm - see instructions above. Repeat buttonholes when the piece measures Size S: 27 and 34 cm. Size M: 28 and 36 cm. Size L: 25, 31 and 37 cm. Size XL: 26, 32 and 38 cm. Sleeve: Cast on 48-50-52-54 sts and knit 8 rows garter st. On the next row inc 4 sts evenly distributed (right side row) = 52-54-56-58 sts. Continue with garter st. When the piece measures 4 c inc 1 st at each side 12-14-13-14 times every 2.5-2-2-2 cm = 76-82-82-86 sts. When sleeve measures 38-37-36-35 cm bind off for sleeve cap at each side every other row: 3 sts 1 time, 2 sts 1 time, then 1 st at each side until the piece measures 45-45-46-46 cm, then 2 sts 1 time and 3 sts 1 time. Bind off, sleeve measures approx. 46-46-47-47 cm. Assembly: Sew shoulder seams. Sew in sleeves. Sew sleeve and side seams using edge sts as a seam allowance. Sew 3-3-4-4 beads for buttons along left button band. TOP IN COTTON VISCOSE: Sizes: S - M - L - XL Finished measurements: 88-94-102-110 cm Materials: Garnstudio COTTON-VISCOSE, 54% Egyptian cotton, 46% viscose, 50 g./110 m. 300-350-350-400 g. col. no. 17, light beige. Alternate yarns: * Garnstudio SAFRAN, 100% cotton, 50 g/160 m. DROPS Wood beads: 48-52-56-60 beads DROPS 4 mm needles, or size needed to obtain correct gauge. Gauge: 22 sts x 42 rows in garter st = 10 x 10 cm. Garter st, when knitting flat: Knit all sts, all rows. Pattern: Rows 1 (right side), 2 and 3: Knit. Row 4 (wrong side): K 4, the next st knit with 1 bead - pull yarn tight, * K 7, K 1 with bead *, repeat from * - * 11-12-13-14 times, K 5. Rows 5, 6 and 7: Knit. Row 8 (wrong side): * K 1, 2 yo on needle *, repeat from * - * to last st on needle, K 1. Row 9: Knit, letting yo loops drop from previous row (= long st). Rows 10, 11, 12 and 13: Knit. Cut yarn and thread 12-13-14-15 new beads on yarn. Row 14: K 8, K 1 with bead, * K 7, K 1 with bead *, repeat from * - * 11-12-13-14 times, K 1. Rows 15 and 16: Knit. Row 17: Knit the same as row 8. Row 18: Knit the same as row 9. Knitting tips (for neck and armhole): All decs are made on right side rows. Dec 1 st for neck and armhole inside 4 sts knit as follows from edge (seen from right side): K 3, P 1 Before 4 edge sts: K 2 tog. After 4 edge sts: sl 1, K 1, psso. Front: Thread 12-13-14-15 beads on yarn. Cast on 98-106-114-122 sts and knit Pattern - see instructions above. Then knit garter st to finished dimensions. Read the entire next section before knitting. When the piece measures 33-34-36-37 cm bind off 5-6-7-8 sts at each side for armhole = 88-94-100-106 sts. Bind off 2 sts at each side every other row 1-1-2-2 times. Then keep the 4th st from armhole edge as a P on right side row and dec 1 st at each side - see knitting tips - 7-9-9-10 times. When the piece measures 34-36-37-39 cm divide piece for center front opening and knit each piece separately. Continue in garter st, but P the 4th st from neck edge on all right side rows. When the piece measures 42-44-45-47 cm bind off 8 sts at each neck edge. Keep the 4th st from center front edge as a P on right side rows and dec 1 st at each neck edge - see knitting tips - 3-3-3-4 times every other row and then 3-4-4-4 times every 4th row. After all armhole and neck shaping is complete 21-21-22-23 sts remain on each shoulder. Continue to P the 4th st from armhole and neck edges on all right side rows. When the piece measures 50-52-54-56 cm bind off from armhole edge 5-5-5-5 sts 3 times every other row = 6-6-7-8 sts remain. On the next row bind off - the piece measures approx. 52-54-56-58 cm. Back: Cast on and knit the same as the front. Shape armhole as on front (P 4th st from edge) and continue until the piece measures 50-52-54-56 cm. Bind off for shoulder as on front and at the same time bind off the center 24-26-26-28 sts for the neck. P the 4th st from the neck edge and dec 1 st at each neck edge every other row 2 times - see knitting tips. After all sts are bound off measures piece approx. 52-54-56-58 cm. Assembly: Sew shoulder seams. Sew side seams using edge sts as seam allowance. |
|

|
|

|
|
|
Have you made this or any other of our designs? Tag your pictures in social media with #dropsdesign so we can see them! Do you need help with this pattern?You'll find tutorial videos, a Comments/Questions area and more by visiting the pattern on garnstudio.com. © 1982-2024 DROPS Design A/S. We reserve all rights. This document, including all its sub-sections, has copyrights. Read more about what you can do with our patterns at the bottom of each pattern on our site. |


With over 40 years in knitting and crochet design, DROPS Design offers one of the most extensive collections of free patterns on the internet - translated to 17 languages. As of today we count 304 catalogues and 11422 patterns - 11422 of which are translated into English (UK/cm).
We work hard to bring you the best knitting and crochet have to offer, inspiration and advice as well as great quality yarns at incredible prices! Would you like to use our patterns for other than personal use? You can read what you are allowed to do in the Copyright text at the bottom of all our patterns. Happy crafting!
Comments / Questions (12)
I can't find what size or where to purchase the DROPS Wood beads? What would be the substitute size?
25.07.2020 - 17:11DROPS Design answered:
Hi Laurel, this is an old pattern and the wood beads are not in sale any more. You should look for something similar at haberdashery. The size of beads depends on you. Just make sure the hole inside is large enough to push needle and thread through it. Happy knitting!
27.07.2020 - 09:23Cuántos mm deberían tener las cuentas de madera?
28.01.2020 - 14:35DROPS Design answered:
Hola Carmina. Se trata de un patrón antiguo y estas cuentas ya no están en venta. Puedes elegir aquellas que te parezcan más adecuadas.
28.01.2020 - 22:56Grazie. Non avevo capito che si trattava dei due lati del collo
08.06.2018 - 18:56Si certo. Però la spiegazione dice Diminuire per il collo all’interno delle 4 m. di vivagno lavorate come segue dal bordo: 3 m. dir., 1 m. rov. Prima delle 4 m. dir vivagno: 2 m. insieme a dir. Dopo le 4 m. di vivagno: passare 1 m. a dir. senza lavorarla, 1 m. dir., accavallare la m. passata sopra quella appena lavorata. Se faccio 2 m. Insieme prima delle 4 e poi ne a cavallo 1 diminuisco 2 m.x volta cioè 4m. X ogni lato d non 2 totale maglie 22 e non 24. Scusate ma non capisco
08.06.2018 - 17:01DROPS Design answered:
Buonasera Carmen. P.es sul dietro: intreccia le maglie centrali per lo scollo. Rimangono le m per le spalle. Per la spalla destra (intesa quando il capo è indossato) diminuisce, sul diritto del lavoro, 1 m prima delle 4 m più vicine allo scollo. Per la spalla sinistra, diminuisce 1 m dopo le 4 m più vicino allo scollo. Analogamente sul davanti. Buon lavoro!
08.06.2018 - 17:40Non capisco le diminuzione per il collo. Se faccio 2 maglie insieme prima delle 4 di vivagno e poi dopo le 4 di vivano a cavallo una maglia sulla maglia al diritto faccio 2 diminuzioni mon una. Cosa sbaglio? Grazie
08.06.2018 - 16:07DROPS Design answered:
Buongiorno Carmen. Quando modella lo scollo, diminuisce una maglia da ciascun lato dello scollo stesso. Quindi 1 maglia sul lato destro dello scollo e 1 sul lato sinistro. Buon lavoro!
08.06.2018 - 16:41Bakst.: Lägg upp 83-107 maskor.
27.07.2016 - 16:33Läser Varv 1 (rätan), varv 2 och 3: Räta. sedan Varv 4 (avigsidan): 5-5-5-5 (3-3-3-3) rm, nästa m stickas räta med 1 pärla - strama tråden, * 7 rm, 1 rm med pärla *, upprepa från *-* totalt 9-10-11-12 (5-5-6-6) ggr, 5-5-5-5 (5-9-4-9 = mot mitt fram) rm. Det står inget, vad jag kan hitta, om hur många masker som ska läggas upp för att starta arbetet.
27.07.2016 - 12:17DROPS Design answered:
Hej. Du hittar det lite längre ner i mönstret "Bakst: Trä 10-11-12-13 pärlor ett stycke in på tråden. Lägg upp 83-91-99-107 m (inkl 1 kantm i varje sida)..." Lycka till!
12.08.2016 - 14:06Bonjour,suite à votre réponse,je tiens à vous préciser que ma question concernait les diminutions MANCHES ! Merci encore .
03.06.2014 - 10:30DROPS Design answered:
Bonjour Mme Lion, effectivement la réponse est alors différente ... On rabat pour les manches de chaque côté tous les 2 rangs: 1 x 3 m, 1x 2 m puis 1 x 1 m (de chaque côté tous les 2 rangs toujours) jusqu'à ce que la manche mesure 45-46 cm de hauteur totale (cf taille), puis on rabat alors 2x 2 m et 1 x 3 m de chaque côté, tous les 2 rangs. Bon tricot!
03.06.2014 - 10:40Je vous prie de m'excuser mais le message écrit précédemment était une question ! En vous remerciant encore .
02.06.2014 - 15:09Bonjour,j'en suis aux diminutions des manches et je ne comprends pas : 1fois 3 mailles,1fois 2 mailles PUIS 1 MAILLE:??: une seule fois ou bien de chaque côté jusqu'à 46 cm de haut ? En vous remerciant par avance .
02.06.2014 - 15:07DROPS Design answered:
Bonjour Mme Lion, pour le dos, on rabat de chaque côté tous les 2 rangs (= tous les rangs au début de chaque rang de chaque côté) : 1 fois 3 m, 1 fois 2 m puis 6-10 fois 1 m (cf taille). Bon tricot!
03.06.2014 - 10:02