DROPS Nepal
DROPS Nepal
65% Wool, 35% Alpaca
from 2.40 £ /50g
Get the yarn to make this pattern from 40.80£.

The yarn cost is calculated from the pattern’s smallest size and the yarn’s cheapest product type. Looking for an even better price? You might find it on the DROPS Deals!

DROPS SS24

Southwest

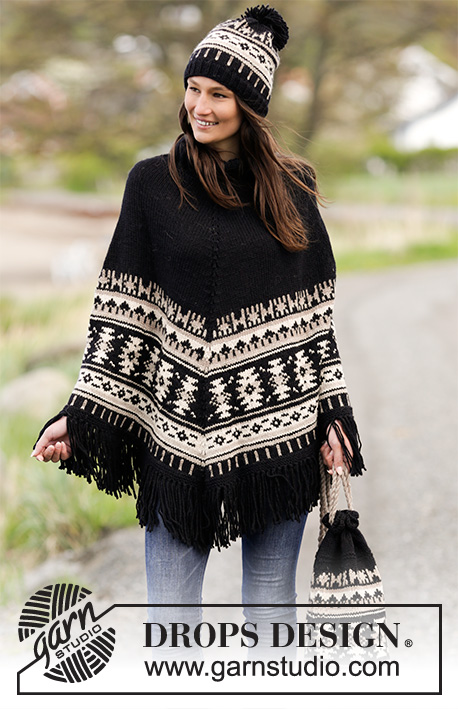
Knitted DROPS poncho with graphic pattern, fringes, high collar in rib, worked top down in ”Nepal”. Size: S - XXXL.

DROPS 165-20
DROPS design: Pattern no ne-177
Yarn group C or A + A
----------------------------------------------------------
PONCHO:
Size: S/M - L/XL - XXL/ XXXL
Materials:
DROPS NEPAL from Garnstudio
600-650-700 g colour no 8903, black
100 g for all sizes in colour no 0206, light beige
100 g for all sizes in colour no 0300, beige
50 g for all sizes in colour no 0618, camel

DROPS CIRCULAR NEEDLE (60 and 80 cm) SIZE 5 mm - or size needed to get 17 sts x 22 rows in stocking st = 10 x 10 cm.
DROPS CIRCULAR NEEDLE (40 and 80 cm) SIZE 4.5 mm - for rib and garter st.

-------------------------------------------------------

Alternative Yarn – See how to change yarns here
Yarn Groups A to F – Use the same pattern and change the yarn here
Yarn usage using an alternative yarn – Use our yarn converter here

-------------------------------------------------------

DROPS Nepal
DROPS Nepal
65% Wool, 35% Alpaca
from 2.40 £ /50g
Get the yarn to make this pattern from 40.80£.

The yarn cost is calculated from the pattern’s smallest size and the yarn’s cheapest product type. Looking for an even better price? You might find it on the DROPS Deals!

Pattern instructions

NOTE: This pattern is written in British English. All measurements in charts are in cm. For conversion from cm to inches - click here. There are different terms for crocheting in British and American English. If this pattern includes crochet, click for "crochet terms" here. For this pattern in American English, please click here.
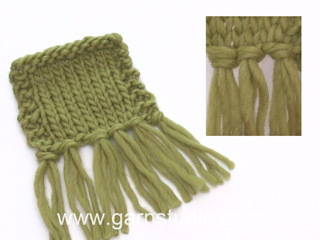
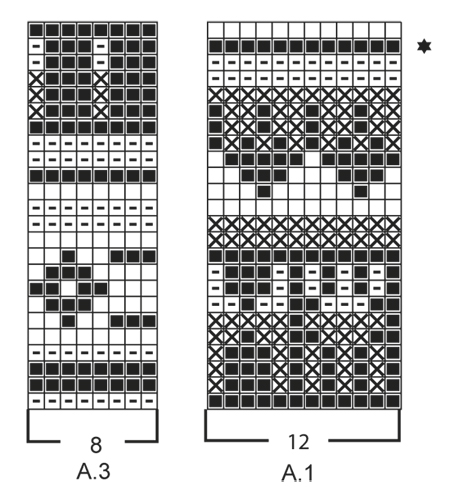
GARTER ST (worked in the round):
* K 1 round and P 1 round *, repeat from *-*. 1 ridge = 2 rounds.

PATTERN:
See diagrams A.1 to A.3. All sts in pattern are worked in stocking st.

KNITTING TIP:
To avoid the knitting tension to tighten when working pattern, it is important not to tighten the strands on back side of piece. Switch to a higher needle no when working pattern if the pattern is somewhat tight.

INCREASE TIP:
Inc 1 st on each side of every marker by making a YO.
On next round K YOs mid front and mid back to make holes.
K YOs on each side of marker on shoulders twisted (i.e. work in back loop of st instead of front) to avoid holes.

DECREASE TIP:
Dec 1 st by K 2 sts tog.
----------------------------------------------------------

PONCHO:
Worked in the round on circular needle, top down in stocking st. Work neck in rib. Rounds start mid back.

Cast on 120-132-144 sts on circular needle size 4.5 mm with black. Work rib = K 3/P 3 for 12 cm. Switch to circular needle size 5 mm. Work 2 rounds in stocking st while on 1st round dec 32-36-40 sts evenly - READ DECREASE TIP = 88-96-104 sts. Insert a marker here. NOW MEASURE THE PIECE FROM HERE. Now insert 4 markers in the piece as follows: Insert a marker in first st (= mid back), work 21-23-25 sts, insert a marker in next st (= right shoulder), work 21-23-25 sts, insert a marker in next st, (= mid front), work 21-23-25 sts, insert a marker in next st (= left shoulder), work the remaining 21-23-25 sts. REMEMBER THE KNITTING TENSION On next round beg inc (total 8 inc per round). NOTE: Inc is different towards mid front/mid back and on each shoulder - READ INCREASE TIP.

INCREASE MID FRONT AND MID BACK:
Repeat inc on each side of st with marker every 4th round 16-18-19 more times.(Total 17-19-20 times)
INCREASE ON EACH SHOULDER:
Repeat inc on each side of st with marker every other round 18-25-34 more times.(Total 19-26-35 times)

When inc are done, there are 232-276-324 sts on round and piece measures approx. 31-35-37 cm from marker on neck (measured along inc mid back) as follows: Work 1 round in stocking st while inc 0-4-4 sts (i.e. 0-2-2 sts on each side between marker mid front and mid back) = 232-280-328 sts.
Then continue inc mid front and mid back every 4th round as before until finished measurements, AT THE SAME TIME work pattern - READ KNITTING TIP. NOTE: Work YOs and st with marker mid front and mid back in base colour in pattern on every round until finished measurements.
K 1 (= mid back), work A.1 (= 12 sts) 9-11-13 times in width, work the first 7 sts in A.1, K next st (= mid front), work A.1 9-11-13 times in width, work the first 7 sts in A.1. Continue like this in the round. Work the new inc sts in pattern, i.e. work st before st with marker in pattern from 8th st in A.1. Work st after st with marker so that the pattern is reversed on each side of st with marker. On next to last round in A.1 inc 4 sts evenly in all sizes (i.e. 2 sts in every section between st with marker front and back). When entire A.1 has been worked vertically, there are 260-308-356 sts on round. Now work as follows: K 1 (= mid back), work A.2 (= 24 sts) 5-6-7 times in width, work the first 9 sts in A.2, K 1 (= mid front), work A.2 5-6-7 times in width, work the first 9 sts in A.2. Continue like this in the round. Work the new inc sts in pattern, i.e. work st before st with marker in pattern from 10th st in A.2. Work st after st with marker so that pattern is reversed on each side of st with marker. On last round in A.2 inc 16 sts evenly in all sizes (i.e. 8 sts in every section between st with marker front and back). When entire A.2 has been worked vertically, there are 296-344-392 sts on round.
Now continue with pattern as follows: K 1 (= mid back), work A.3 (= 8 sts) 18-21-24 times in width, work the first 3 sts in A.3, K next st (= mid front), work A.3 18-21-24 times in width, work the first 3 sts in A.3. Continue like this in the round. Work the new inc sts in pattern, i.e. work st before st with marker in pattern from 4th st in A.3. Work st after st with marker so that pattern is reversed on each side of st with marker. When entire A.3 has been worked vertically, there are 320-368-416 sts on round. Switch to circular needle size 4.5 mm (or use 2 circular needles) and work 3 ridges in GARTER ST - see explanation above, with black, AT THE SAME TIME on first ridge inc 18-21-23 sts evenly = 338-389-439 sts. Cast off. Fasten off.

FRINGES:
Fasten fringes along the entire edge at the bottom as follows: 1 fringe = cut 2 lengths of 35 cm black. Place them double and thread loop through st in cast-off edge, pull the yarn ends through the loop. Repeat approx. every 4th st around the entire round - adjust to get a fringe in mid st front and back. Cut fringes to a length of approx. 13 cm.
----------------------------------------------------------
Hat and bag:
See DROPS 165-21 or "Related patterns" in pattern on website.
----------------------------------------------------------

Diagram

symbols = light beige
symbols = black
symbols = beige
symbols = camel
symbols = increase round - see explanation in pattern
diagram
diagram
diagram

Each of our patterns has specific tutorial videos to help you.

Do you have a question? See a list of frequently asked questions (FAQ)

Knitting tension is what determines the final measurements of your work, and is usually measured per 10 x 10 cm. It is provided like so: number of stitches in width x number of rows in height - eg: 19 stitches x 26 rows = 10 x 10 cm.

The knitting tension is very individual; some people knit/crochet loosely while others work tightly. You adjust the knitting tension with the needle size, which is why the suggested needle size is only meant as a guide! You need to adjust this (up or down) to ensure that YOUR knitting tension matches the knitting tension provided in the pattern. If you work with a different knitting tension than provided you will have a different yarn consumption, and your work will have different measurements than what the pattern suggests.

The knitting tension also determines which yarns can replace each other. As long as you achieve the same knitting tension you can replace one yarn with another.

See DROPS lesson: How to measure your tension/gauge

See DROPS video: How to make a gauge tension swatch

The required amount of yarn is provided in grams, eg: 450 g. To calculate how many balls you’ll need you first need to know how many grams are in 1 ball (25g, 50g or 100g). This information is available if you click on the individual yarn quality on our pages. Divide the amount required with the amount of each ball. For example, if each ball is 50g (the most common amount), the calculation will be as follows: 450 / 50 = 9 balls.

The important thing when changing from one yarn to another is that the knitting/crochet tension remains the same. This is so that the measurements of the finished piece will be the same as on the sketch provided. It is easier to achieve the same knitting tension using yarns from the same yarn group. It is also possible to work with multiple strands of a thinner yarn to achieve the knitting tension of a thicker one. Please try our yarn converter. We recommend you to always work a test swatch.

Please NOTE: when changing yarn the garment might have a different look and feel to the garment in the photo, due to individual properties and qualities of each yarn.

See DROPS lesson: Can I use a different yarn than the one mentioned in the pattern?

All our yarns are categorised into yarn groups (from A to F) according to thickness and knitting tension – group A contains the thinnest yarns and group F the thickest. This makes it easier for you to find alternative yarns to our patterns, should you wish to switch yarn. All yarns within the same group have a similar knitting tension and can easily replace each other. However, different yarn qualities have different structures and properties which will give the finished work a unique look and feel.

Click here for an overview of the yarns in each yarn group

At the top of all our patterns you’ll find a link to our yarn calculator, which is a helpful tool should you wish to use a different yarn than suggested. By filling in the yarn quality you wish to replace, the amount (in your size) and number of strands, the calculator will present good alternative yarns with the same knitting tension. Additionally it will tell you how much you’ll require in the new qualities and whether you’ll need to work with multiple strands. Most skeins are 50g (some are 25g or 100g).

If the pattern is worked with multiple colours, every colour will have to be calculated separately. Similarly, if the pattern is worked with several strands of different yarns (for example 1 strand Alpaca and 1 strand Kid-Silk) you will have to find alternatives for each, individually.

Click here to see our yarn calculator

Since different yarns have different qualities and textures we have chosen to keep the original yarn in our patterns. However, you can easily find options among our available qualities by using our yarn calculator, or simply pick a yarn from the same yarn group.

It is possible that some retailers still have discontinued yarns in stock, or that someone has a few skeins at home that they would like to find patterns for.

The yarn calculator will provide both alternative yarn as well as required amount in the new quality.

If you think it's hard to decide what size to make, it can be a good idea to measure a garment you own already and like the size of. Then you can pick the size by comparing those measures with the ones available in the pattern's size chart.

You'll find the size chart at the bottom of the pattern.

See DROPS lesson: How to read size chart

The needle size provided in the pattern serves only as a guide, the important thing is to follow the knitting tension. And since knitting tension is very individual, you will have to adjust the needle size to ensure that YOUR tension is the same as in the pattern – maybe you’ll have to adjust 1, or even 2 needle sizes, up or down to achieve the correct tension. For this, we recommend that you work test swatches.

Should you work with a different knitting tension than the one provided, the measurements of the finished garment might deviate from the measurement sketch.

See DROPS lesson: How to measure your tension/gauge

See DROPS video: How to make a tension/gauge swatch

Working a garment top-down provides more flexibility and room for personal adjustment. For example it is easier to try the garment on while working, as well as making adjustments to length of yoke and shoulder caps.

The instructions are carefully explaining every step, in the correct order. Diagrams are adjusted to the knitting direction and are worked as usual.

The diagram depicts all rows/rounds, and every stitch seen from the right side. It is read from bottom to top, from right to left. 1 square = 1 stitch.

When working back and forth, every other row is worked from the right side and every other row is worked from the wrong side. When working from the wrong side, the diagram will have to be worked reversed: from left to right, knit stitches are purled, purl stitches are knit etc.

When working in the round every round is worked from the right side and the diagram are worked from right to left on all rounds.

See DROPS lesson: How to read knitting diagrams

The diagram depicts all rows/rounds, and every stitch seen from the right side. It is worked from bottom to top, from right to left.

When working back and forth every other row is worked from the right side: from right to left and every other row is worked from the wrong side: from left to right.

When working in the round, every row in the diagram are worked from the right side, from right to left.

When working a circular diagram you start in the middle and work your way outwards, counter clockwise, row by row.

The rows usually start with a given number of chain stitches (equivalent to the height of the following stitch), this will either be depicted in the diagram or explained in the pattern.

See DROPS lesson: How to read crochet diagrams

Instructions for working several diagrams after each other on the same row/round, will often be written like so: “work A.1, A.2, A.3 a total of 0-0-2-3-4 times". This means you work A.1 once, then A.2 is worked once, and A.3 is repeated (in width) the number of times provided for your size – in this case like so: S = 0 times, M = 0 times, L=2 times, XL= 3 times and XXL = 4 times.

The diagrams are worked as usual: begin with the first row in A.1, then work the first row in A.2 etc.

See DROPS lesson: How to read knitting diagrams

See DROPS lesson: How to read crochet diagrams

The total width of the garment (from wrist-to-wrist) will be larger in the larger sizes, despite the actual sleeves being shorter. The larger sizes have longer sleeve caps and wider shoulders, so there will be a good fit in all sizes.

The measurement sketch/schematic drawing provides information regarding the full length of the garment. If it’s a jumper or a jacket the length is measured from the highest point on the shoulder closest to the neckline, and straight down to the bottom of the garment. It is NOT measured from the tip of shoulder. Similarly, the length of yoke is measured from the highest point on the shoulder and down to where yoke is split into body and sleeves.

On a jacket measures are never taken along bands, unless specifically stated. Always measure inside band stitches when measuring the length.

See DROPS lesson: How to read a schematic drawing

Diagrams are often repeated on the round or in height. 1 repeat is the diagram the way it appears in the pattern. If it says to work 5 repeats of A.1 in the round, then you work A.1 a total of 5 times after/next to each other in the round. If it says to work 2 repeats of A.1 vertically/in height you work the entire diagram once, then begin again at the start and work the entire diagram one more time.

Chain stitches are slightly narrower than other stitches and to avoid working the cast-on edge too tight, we simply chain more stitches to begin with. The stitch count will be adjusted on the following row to fit the pattern and measurement sketch.

The rib edge is more elastic and will contract slightly compared to, for example, stocking stitch. By increasing before the rib edge, you avoid a visible difference in width between the rib edge and the rest of the body.

It’s very easy to cast off too tightly, and by making yarn overs while casting off (and simultaneously casting these off) you avoid a too tight cast off edge.

See DROPS video: How to bind off with yarn overs (yo)

To achieve an even increase (or decrease) you can increase on, for example: every 3rd and 4th row alternately, like so: work 2 rows and increase on the 3rd row, work 3 rows and increase on the 4th. Repeat this until the increase is complete.

See DROPS lesson: Increase or decrease 1 st on every 3rd and 4th row alternately

Should you prefer to work in the round instead of back and forth, you may of course adjust the pattern. You’ll need to add steeks mid-front (usually 5 stitches), and follow the instructions. When you would normally turn and work from the wrong side, simply work across the steek and continue in the round. At the end you’ll cut the piece open, pick up stitches to work bands, and cover the cut edges.

See DROPS video: How to knit steeks and cut open

Should you prefer to work back and forth instead of in the round, you may of course adjust the pattern so you work the pieces separately and then assemble them at the end. Divide the stitches for the body in 2, add 1 edge stitch in each side (for sewing) and work the front and back pieces separately.

See DROPS lesson: Can I adapt a pattern for circular needles into straight needles?

Pattern repeats can vary slightly in the different sizes, in order to get the correct proportions. If you’re not working the exact same size as the garment in the photo, yours might deviate slightly. This has been carefully developed and adjusted so that the complete impression of the garment is the same in all sizes.

Make sure to follow instructions and diagrams for your size!

If you have found a pattern you like which is available in women’s size it’s not very difficult to convert it to men’s size. The biggest difference will be the length of sleeves and body. Start working on the women size that you think would fit across the chest. The additional length will be worked right before you cast off for the armhole/sleeve cap. If the pattern is worked top-down you can add the length right after the armhole or before the first decrease on sleeve.

Regarding additional yarn amount, this will depend on how much length you add, but it is better with a skein too many than too few.

All yarns will have excess fibres (from production) that might come off as lint or shedding. Brushed yarns (ie hairier yarns) have more of these loose, excess fibres, causing more shedding.

Shedding also depends on what is worn under or over the garment, and whether this pulls at the yarn fibres. It’s therefore not possible to guarantee that there will be no shedding

Below are some tips on how to get the best result when working with hairier yarns:

1. When the garment is finished (before you wash it) shake it vigorously so the looser hairs come off. NOTE: do NOT use a lint roller, brush or any method that pulls at the yarn.

2. Place the garment in a plastic bag and put it in your freezer - the temperature will cause the fibres to become less attached to each other, and excess fibres will come off easier.

3. Leave in the freezer for a few hours before taking it out and shaking it again.

4. Wash the garment according to the instructions on the yarn label.

Pilling is a natural process that happens to even the most exclusive of fibers. It's a natural sign of wear and tear that is hard to avoid, and that is most visible in high friction areas of your garment like a sweater's arms and cuffs.

You can make your garment look as new by removing the pilling, using a fabric comb or a pill/lint remover.

Still can't find the answer you need? Then scroll down and leave your question so one of our experts can try to help you. This will be done normally within 5 to 10 working days.
In the meantime, you can read the questions and answers that others have left to this pattern or join the DROPS Workshop on Facebook to get help from fellow knitters/crocheters!

You might also like...

Southwest

skandura_handmade, Austria

Norwegian Winter Poncho

Reimy, Netherlands

Post a comment to pattern DROPS 165-20

We would love to hear what you have to say about this pattern!

If you want to leave a question, please make sure you select the correct category in the form below, to speed up the answering process. Required fields are marked *.

Comments / Questions (38)

country flag Judith wrote:

Vielen Dank für die Antwort. Mache ich so.

07.11.2015 - 16:57

country flag Judith wrote:

Hallo, ich stricke den Poncho gerade in Größe S. Ich habe jetzt alle Zunahmen gemach und 232 M. Aber erst 29cm. Soll ich nun bis 31cm (ab da beginnt ja erst das Muster) weiterhin Vorne Mitte und Hinten Maschen zunehmen? Auf dem Foto sieht das für mich so aus. Aber dann hätte ich ja deutlich mehr Maschen. Passt das das Muster noch?

05.11.2015 - 15:45

DROPS Design answered:

Wenn Sie noch weiter zunehmen, bevor Sie mit dem Muster beginnen, geht das Muster nicht mehr auf. Sttricken Sie es also mit der richtigen Maschenzahl, auch wenn es etwas eher beginnt als in der Anleitung beschrieben, das ist nicht so schlimm, er hängt sich ja auch noch etwas aus. Sie können besser am Ende, wenn der Poncho tatsächlich etwas zu kurz sein sollte, noch ein Stück in Schwarz anstricken, aber probieren Sie ihn dann vorher einfach einmal an. Auch mit den Fransen können Sie ihn noch etwas verlängern, wenn Sie möchten.

07.11.2015 - 12:24

country flag Rita wrote:

Molto bello ma dovreste essere più precisi nelle spiegazioni

03.11.2015 - 16:12

country flag Marianne Frederiksen wrote:

Fejl i opskriften... Send venligst en rettet udgave. Det passer slet ikke med udtagninger... Og, længde. Måler langt fra 31 cm, når jeg har taget ud. Kun omkring de 22-23 cm.

10.10.2015 - 13:14

DROPS Design answered:

Hej Marianne, Strikker du i DROPS Nepal? Og har du 22p glatstrik i højden på 10 cm?

12.10.2015 - 12:09

country flag Berit wrote:

Hej .Jeg er også stødt på problemer med denne opskrift,med hensyn til udtagninger,og kan ikke komme videre.venligst send den rigtige opskrift til min mail.mvh berit

22.09.2015 - 09:55

country flag Annita wrote:

Dette er den anden model jeg forsøger mig på og har lige læst en kommentar at der "også" er fejl i denne opskrift. Synes det sker for ofte og som i sikkert er klar over er det særlig morsomt at sidde og trævle op og starte om og om igen. Jeg strikker str. s/m så venligst send en revideret og rigtig opskrift til min email. På forhånd tak for ellers dejlige opskrifter:-) mvh Annita

20.09.2015 - 09:47

country flag Christina Bjørn Nilsson wrote:

Hej jeg er ved at strikke denne poncho, men der er fejl i maskeantallet, udtagningerne i forhold til opskriften, kan I hjælpe med det? VH Christina

29.08.2015 - 17:20

country flag Nina H. wrote:

Wunderschön!! Habe direkt den Wunsch, das Teil in 3 Farbvarianten zu stricken....

24.06.2015 - 06:56

country flag Regina wrote:

Würde ich unheimlich gerne stricken!!

18.06.2015 - 06:44

country flag Maria wrote:

Muy lindo. Ojalá no hubiese que utilizar agujas circulares.

14.06.2015 - 21:25